2022 CHRYSLER PACIFICA belt
[x] Cancel search: beltPage 50 of 384

48GETTING TO KNOW YOUR VEHICLE
Tilting The Seat Up Or Down
The angle of the seat cushion can be adjusted in
two directions. Pull upward or push downward on
the front of the seat switch, the front of the seat
cushion will move in the direction of the switch.
Release the switch when the desired position has
been reached.
Reclining The Seatback
The angle of the seatback can be adjusted forward
or rearward. Push the seatback switch forward or
rearward, the seat will move in the direction of the
switch. Release the switch when the desired
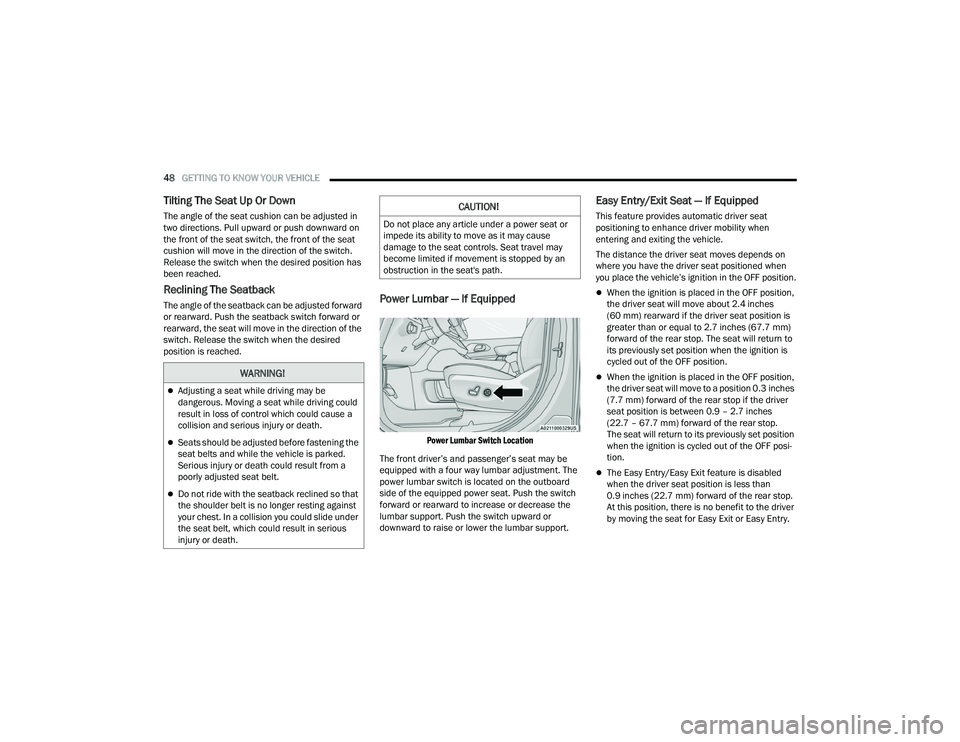
position is reached.Power Lumbar — If Equipped
Power Lumbar Switch Location
The front driver’s and passenger’s seat may be
equipped with a four way lumbar adjustment. The
power lumbar switch is located on the outboard
side of the equipped power seat. Push the switch
forward or rearward to increase or decrease the
lumbar support. Push the switch upward or
downward to raise or lower the lumbar support.
Easy Entry/Exit Seat — If Equipped
This feature provides automatic driver seat
positioning to enhance driver mobility when
entering and exiting the vehicle.
The distance the driver seat moves depends on
where you have the driver seat positioned when
you place the vehicle’s ignition in the OFF position.
When the ignition is placed in the OFF position,
the driver seat will move about 2.4 inches
(60 mm) rearward if the driver seat position is
greater than or equal to 2.7 inches (67.7 mm)
forward of the rear stop. The seat will return to
its previously set position when the ignition is
cycled out of the OFF position.
When the ignition is placed in the OFF position,
the driver seat will move to a position 0.3 inches
(7.7 mm) forward of the rear stop if the driver
seat position is between 0.9 – 2.7 inches
(22.7 – 67.7 mm) forward of the rear stop.
The seat will return to its previously set position
when the ignition is cycled out of the OFF posi -
tion.
The Easy Entry/Easy Exit feature is disabled
when the driver seat position is less than
0.9 inches (22.7 mm) forward of the rear stop.
At this position, there is no benefit to the driver
by moving the seat for Easy Exit or Easy Entry.
WARNING!
Adjusting a seat while driving may be
dangerous. Moving a seat while driving could
result in loss of control which could cause a
collision and serious injury or death.
Seats should be adjusted before fastening the
seat belts and while the vehicle is parked.
Serious injury or death could result from a
poorly adjusted seat belt.
Do not ride with the seatback reclined so that
the shoulder belt is no longer resting against
your chest. In a collision you could slide under
the seat belt, which could result in serious
injury or death.
CAUTION!
Do not place any article under a power seat or
impede its ability to move as it may cause
damage to the seat controls. Seat travel may
become limited if movement is stopped by an
obstruction in the seat's path.
22_RUP_OM_EN_USC_t.book Page 48
Page 51 of 384

GETTING TO KNOW YOUR VEHICLE49
(Continued)
When enabled within Uconnect Settings, Easy
Entry and Easy Exit positions are stored in each
memory setting profile (if equipped) Ú
page 32.
NOTE:The Easy Entry/Exit feature is enabled or disabled
within the Uconnect system Úpage 188.
POWER ADJUSTMENT (REAR SEATS) —
I
F EQUIPPED
Third Row Power Recline — If Equipped
The power recline feature, located on the trim
panel next to the seat, adjusts the seatback angle
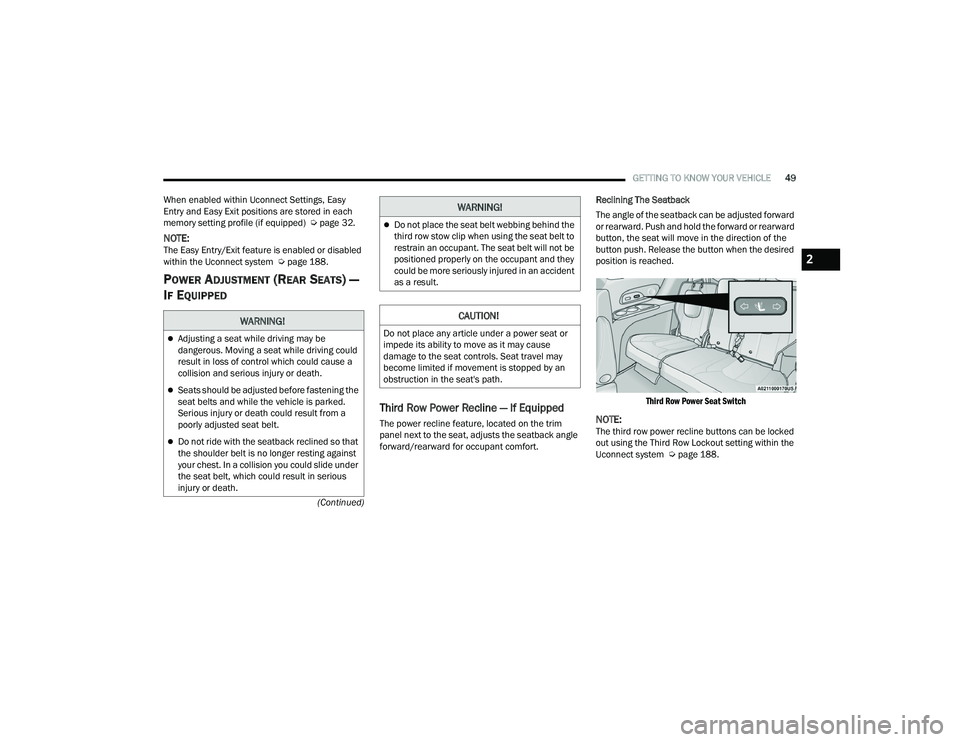
forward/rearward for occupant comfort. Reclining The Seatback
The angle of the seatback can be adjusted forward
or rearward. Push and hold the forward or rearward
button, the seat will move in the direction of the
button push. Release the button when the desired
position is reached.
Third Row Power Seat Switch
NOTE:The third row power recline buttons can be locked
out using the Third Row Lockout setting within the
Uconnect system Ú page 188.
WARNING!
Adjusting a seat while driving may be
dangerous. Moving a seat while driving could
result in loss of control which could cause a
collision and serious injury or death.
Seats should be adjusted before fastening the
seat belts and while the vehicle is parked.
Serious injury or death could result from a
poorly adjusted seat belt.
Do not ride with the seatback reclined so that
the shoulder belt is no longer resting against
your chest. In a collision you could slide under
the seat belt, which could result in serious
injury or death.
Do not place the seat belt webbing behind the
third row stow clip when using the seat belt to
restrain an occupant. The seat belt will not be
positioned properly on the occupant and they
could be more seriously injured in an accident
as a result.
CAUTION!
Do not place any article under a power seat or
impede its ability to move as it may cause
damage to the seat controls. Seat travel may
become limited if movement is stopped by an
obstruction in the seat's path.
WARNING!
2
22_RUP_OM_EN_USC_t.book Page 49
Page 52 of 384

50GETTING TO KNOW YOUR VEHICLE
Third Row Power Stow ‘n Go Seat —
If Equipped
A one-touch power folding seat switch is located in
the right rear trim panel as part of a switch bank.
NOTE:The third row outboard seat belts may interfere
with the power folding of the seat. Place the seat
belt webbing behind the stow clip before stowing or
opening the seat. When the seat is in the desired
position, remove the webbing from the stow clip so
that it is ready for use. Never leave the seat belt in
the stow clip when it is used to restrain an
occupant.
NOTE:
The outer head restraints will lower automati -
cally as necessary when the power seat begins
to move.
The center head restraint raises and lowers
manually but will not lower automatically.
The head restraint can also be lowered manu -
ally using the pull strap located at the back of
the seat Ú page 55.
The switch is only functional when the liftgate is
open and the vehicle is in PARK.
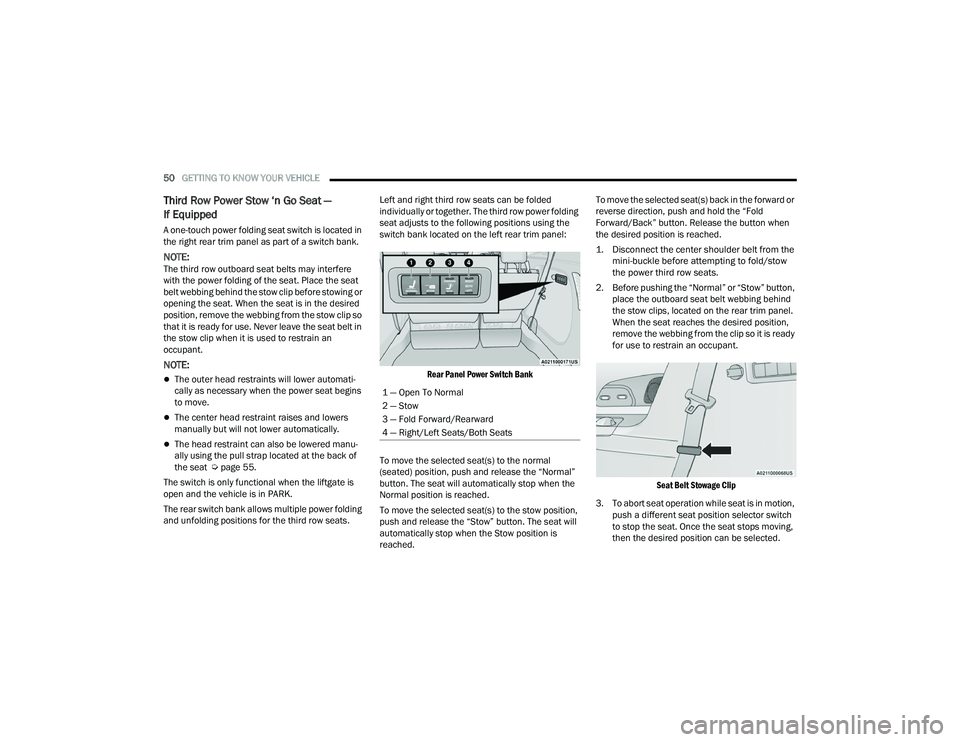
The rear switch bank allows multiple power folding
and unfolding positions for the third row seats. Left and right third row seats can be folded
individually or together. The third row power folding
seat adjusts to the following positions using the
switch bank located on the left rear trim panel:
Rear Panel Power Switch Bank
To move the selected seat(s) to the normal
(seated) position, push and release the “Normal”
button. The seat will automatically stop when the
Normal position is reached.
To move the selected seat(s) to the stow position,
push and release the “Stow” button. The seat will
automatically stop when the Stow position is
reached. To move the selected seat(s) back in the forward or
reverse direction, push and hold the “Fold
Forward/Back” button. Release the button when
the desired position is reached.
1. Disconnect the center shoulder belt from the
mini-buckle before attempting to fold/stow
the power third row seats.
2. Before pushing the “Normal” or “Stow” button, place the outboard seat belt webbing behind
the stow clips, located on the rear trim panel.
When the seat reaches the desired position,
remove the webbing from the clip so it is ready
for use to restrain an occupant.
Seat Belt Stowage Clip
3. To abort seat operation while seat is in motion, push a different seat position selector switch
to stop the seat. Once the seat stops moving,
then the desired position can be selected.
1 — Open To Normal
2 — Stow
3 — Fold Forward/Rearward
4 — Right/Left Seats/Both Seats
22_RUP_OM_EN_USC_t.book Page 50
Page 96 of 384

94GETTING TO KNOW YOUR VEHICLE
(Continued)
WIND BUFFETING
Wind buffeting can be described as the perception
of pressure on the ears or a helicopter-type sound
in the ears. Your vehicle may exhibit wind buffeting
with the windows down, or the sunroof (if
equipped) in certain open or partially open
positions. This is a normal occurrence and can be
minimized. If the buffeting occurs with the rear
windows open, open the front and rear windows
together to minimize the buffeting. If the buffeting
occurs with the sunroof open, adjust the sunroof
opening to minimize the buffeting or open any
window.
PANORAMIC SUNROOF — IF EQUIPPED
The Panoramic Sunroof switch is located to the left
between the sun visors on the overhead console.
The Power Shade switch is located to the right
between the sun visors on the overhead console.
Panoramic Sunroof And Power Shade Switches
OPENING AND CLOSING THE SUNROOF
Express Open/Close
Push the open switch and release it within one
second. The sunroof will open automatically from
any position and stop at the full open position.
This is called Express Open.
Push the close switch and release it within one
second and the sunroof will close automatically
from any position. The sunroof will close fully and
stop automatically. This is called Express Close.
1 — Sunroof Switch
2 — Power Shade Switch
3 — Vent Button
WARNING!
Never leave children unattended in a vehicle,
or with access to an unlocked vehicle. Never
leave the key fob in or near the vehicle, or in a
location accessible to children. Do not leave
the Keyless Enter ‘n Go™ Ignition in the ACC or
ON/RUN position. Occupants, particularly
unattended children, can become entrapped
by the power sunroof while operating the
power sunroof switch. Such entrapment may
result in serious injury or death.
In a collision, there is a greater risk of being
thrown from a vehicle with an open sunroof.
You could also be seriously injured or killed.
Always fasten your seat belt properly and
make sure all passengers are also properly
secured.
Do not allow small children to operate the
sunroof. Never allow your fingers, other body
parts, or any object, to project through the
sunroof opening. Injury may result.
WARNING!
22_RUP_OM_EN_USC_t.book Page 94
Page 126 of 384

124GETTING TO KNOW YOUR INSTRUMENT PANEL
Seat Belt Reminder Warning Light
This warning light indicates when the
driver or passenger seat belt is
unbuckled. When the ignition is first
placed in the ON/RUN or ACC/ON/RUN
position and if the driver’s seat belt is unbuckled,
a chime will sound and the light will turn on. When
driving, if the driver or front passenger seat belt
remains unbuckled, the Seat Belt Reminder Light
will flash or remain on continuously and a chime
will sound Ú page 239.
Transmission Temperature Warning
Light — If Equipped
This warning light will illuminate to warn
of a high transmission fluid temperature.
This may occur with strenuous usage
such as trailer towing. If this light turns
on, stop the vehicle and run the engine at idle or
slightly faster, with the transmission in PARK (P) or
NEUTRAL (N), until the light turns off. Once the light
turns off, you may continue to drive normally.
Vehicle Security Warning Light —
If Equipped
This warning light will flash at a fast rate
for approximately 15 seconds when the
vehicle security system is arming, and
then will flash slowly until the vehicle is
disarmed.
YELLOW WARNING LIGHTS
Adaptive Cruise Control (ACC) Fault
Warning Light — If Equipped
This warning light will illuminate to
indicate a fault in the ACC system.
Contact a local authorized dealer for
service Ú page 147.
Electronic Park Brake Warning Light
This warning light will illuminate to
indicate the Electronic Park Brake is not
functioning properly and service is
required. Contact an authorized dealer.
Anti-Lock Brake System (ABS) Warning
Light
This warning light monitors the ABS.
The light will turn on when the ignition is
placed in the ON/RUN or ACC/ON/RUN
position and may stay on for as long as
four seconds.
If the ABS light remains on or turns on while
driving, then the Anti-Lock portion of the brake
system is not functioning and service is required as
soon as possible. However, the conventional brake
system will continue to operate normally,
assuming the Brake Warning Light is not also on.
WARNING!
If you continue operating the vehicle when the
Transmission Temperature Warning Light is
illuminated you could cause the fluid to boil over,
come in contact with hot engine or exhaust
components and cause a fire.
CAUTION!
Continuous driving with the Transmission
Temperature Warning Light illuminated will
eventually cause severe transmission damage
or transmission failure.
22_RUP_OM_EN_USC_t.book Page 124
Page 133 of 384

131
(Continued)
STARTING AND OPERATING
STARTING THE ENGINE
Before starting your vehicle, adjust your seat,
adjust both inside and outside mirrors, and fasten
your seat belts.Start the engine with the gear selector in the
NEUTRAL (N) or PARK (P) position. Apply the brake
before shifting to any driving range.
NORMAL STARTING
To Turn On The Engine Using ENGINE START/STOP
Button
1. The transmission must be in PARK or NEUTRAL.
2. Press and hold the brake pedal while pushing the ENGINE START/STOP button once.
3. The system starts the vehicle. If the vehicle fails to start, the starter will disengage
automatically after 10 seconds.
4. If you wish to stop the cranking of the engine prior to the engine starting, push the button
again. ENGINE START/STOP Button Functions — With
Driver’s Foot Off The Brake Pedal (In PARK Or
NEUTRAL Position)
The ENGINE START/STOP button operates similar
to an ignition switch. It has three positions; OFF,
ACC, and ON/RUN. To change the ignition positions
without starting the vehicle and to use the
accessories, follow these steps:
Start with the ignition in the OFF position.
Push the ENGINE START/STOP button once to
place the ignition to the ACC position (instru
-
ment cluster will display “ACC”).
Push the ENGINE START/STOP button a second
time to place the ignition to the ON/RUN posi -
tion (instrument cluster will display “ON/RUN”).
Push the ENGINE START/STOP button a third
time to return the ignition to the OFF position
(instrument cluster will display “OFF”).
NOTE:Only press one pedal at a time while driving the
vehicle. Torque performance of the vehicle could
be reduced if both pedals are pressed at the same
time. If pressure is detected on both pedals simul -
taneously, a warning message will display in the
instrument cluster Ú page 113.
WARNING!
When exiting the vehicle, always remove the
key fob from the vehicle and lock your vehicle.
Never leave children alone in a vehicle, or with
access to an unlocked vehicle.
Allowing children to be in a vehicle unattended
is dangerous for a number of reasons. A child
or others could be seriously or fatally injured.
Children should be warned not to touch the
parking brake, brake pedal or the transmis -
sion gear selector.
Do not leave the key fob in or near the vehicle,
or in a location accessible to children, and do
not leave the ignition of a vehicle equipped
with Keyless Enter ‘n Go™ in the ACC or ON/
RUN position. A child could operate power
windows, other controls, or move the vehicle.
Do not leave children or animals inside parked
vehicles in hot weather. Interior heat buildup
may cause serious injury or death.
WARNING!
4
22_RUP_OM_EN_USC_t.book Page 131
Page 134 of 384

132STARTING AND OPERATING
AUTOPARK
AutoPark is a supplemental feature to assist with
placing the vehicle in PARK under certain
situations. It is a back-up system and should not be
relied upon as the primary method by which the
driver shifts the vehicle into PARK.
The conditions under which AutoPark will engage
are outlined on the following pages. ALWAYS DO A VISUAL CHECK
that your vehicle is in
PARK by looking for the “P” in the instrument
cluster display and on the gear selector. As an
added precaution, always apply the parking brake.
If the vehicle is not in PARK and the driver
attempts to turn off the engine, if certain
conditions are met, the vehicle will AutoPark,
automatically shifting the vehicle’s transmission to
the PARK position. The gear selector will
automatically reset itself to the PARK position. The
vehicle’s ignition will then move to the OFF position
(engine off). When AutoPark is activated the
instrument cluster will display the message
“AutoPark Engaged”.
AutoPark will engage when all of these conditions
are met:
Vehicle is equipped with a gear selector
Vehicle is not in PARK
Vehicle speed is 1.2 mph (1.9 km/h) or less
Driver has pushed the ENGINE START/STOP
button If the vehicle is not in PARK and the driver exits the
vehicle with the engine running, if certain
conditions are met, the vehicle will AutoPark,
automatically shifting the vehicle’s transmission to
the PARK position. The Electric Park Brake SAFE
HOLD feature will also activate in some conditions
Ú
page 138.
AutoPark will engage when all of these conditions
are met:
Vehicle is equipped with a gear selector
Vehicle is not in PARK
Vehicle speed is 1.2 mph (1.9 km/h) or less
Driver’s door is ajar
Driver’s seat belt is unbuckled
Brake pedal is not pressed
The message “ AutoPark Engaged ” will display in
the instrument cluster.
WARNING!
Driver inattention could lead to failure to place
the vehicle in PARK. ALWAYS DO A VISUAL
CHECK that your vehicle is in PARK by verifying
that a solid (not blinking) “P” is indicated in
the instrument cluster display and near the
gear selector. If the “P” indicator is blinking,
your vehicle is not in PARK. As an added
precaution, always apply the parking brake
when exiting the vehicle.
AutoPark is a supplemental feature. It is not
designed to replace the need to shift your
vehicle into PARK. It is a back up system and
should not be relied upon as the primary
method by which the driver shifts the vehicle
into PARK.
CAUTION!
Engine will remain running.
22_RUP_OM_EN_USC_t.book Page 132
Page 135 of 384

STARTING AND OPERATING133
(Continued)
(Continued)
AutoPark In Stop/Start Autostop Mode
AutoPark will engage when all of these condi
-
tions are met:
Vehicle is equipped with a gear selector
Vehicle is not in PARK
Vehicle speed is 1.2 mph (1.9 km/h) or less
Driver’s door is ajar
Driver’s seat belt is unbuckled or brake pedal is
not pressed
The message “ AutoPark Engaged ” will display in
the instrument cluster.
WARNING!
Never use the PARK position as a substitute
for the parking brake. Always apply the
parking brake fully when exiting the vehicle to
guard against vehicle movement and possible
injury or damage.
Your vehicle could move and injure you and
others if it is not in PARK. Check by trying to
move the transmission gear selector out of
PARK with the brake pedal released. Make
sure the transmission is in PARK before
exiting the vehicle.
The transmission may not engage PARK if the
vehicle is moving. Always bring the vehicle to a
complete stop before shifting to PARK, and
verify that the transmission gear position indi -
cator solidly indicates PARK (P) without
blinking. Ensure that the vehicle is completely
stopped, and the PARK position is properly
indicated, before exiting the vehicle.
It is dangerous to shift out of PARK or
NEUTRAL if the engine speed is higher than
idle speed. If your foot is not firmly pressing
the brake pedal, the vehicle could accelerate
quickly forward or in reverse. You could lose
control of the vehicle and hit someone or
something. Only shift into gear when the
engine is idling normally and your foot is firmly
pressing the brake pedal.
WARNING!
Unintended movement of a vehicle could
injure those in or near the vehicle. As with all
vehicles, you should never exit a vehicle while
the engine is running. Before exiting a vehicle,
always come to a complete stop, then apply
the parking brake, shift the transmission into
PARK, and turn the ignition OFF. When the
ignition is in the OFF position, the transmis -
sion is locked in PARK, securing the vehicle
against unwanted movement.
When exiting the vehicle, always make sure
the ignition is in the OFF position, remove the
key fob from the vehicle, and lock the vehicle.
Never leave children alone in a vehicle, or
with access to an unlocked vehicle. Allowing
children to be in a vehicle unattended is
dangerous for a number of reasons. A child or
others could be seriously or fatally injured.
Children should be warned not to touch the
parking brake, brake pedal or the transmis -
sion gear selector.
Do not leave the key fob in or near the vehicle
(or in a location accessible to children), and do
not leave the ignition in the ACC or ON/RUN
position. A child could operate power
windows, other controls, or move the vehicle.
WARNING!
4
22_RUP_OM_EN_USC_t.book Page 133