2022 CHRYSLER PACIFICA Liftgate
[x] Cancel search: LiftgatePage 27 of 384
GETTING TO KNOW YOUR VEHICLE25
If set by the customer in the Uconnect Settings,
unlocking with Passive Entry will initiate illumi -
nated approach (low beams, license plate light,
parking lights) for the time 0, 30, 60 or
90 seconds. Passive Entry also initiates
two flashes of the turn signals.
If wearing gloves, or if it has been raining/
snowing on the Passive Entry door handle, the
unlock sensitivity can be affected, resulting in a
slower response time.
If the vehicle is unlocked by Passive Entry and
no door is opened within 60 seconds, the
vehicle will relock and will arm the Vehicle
Security system (if equipped).
The sliding side doors can be unlocked from the
outside using the hands-free or Passive Entry
system.
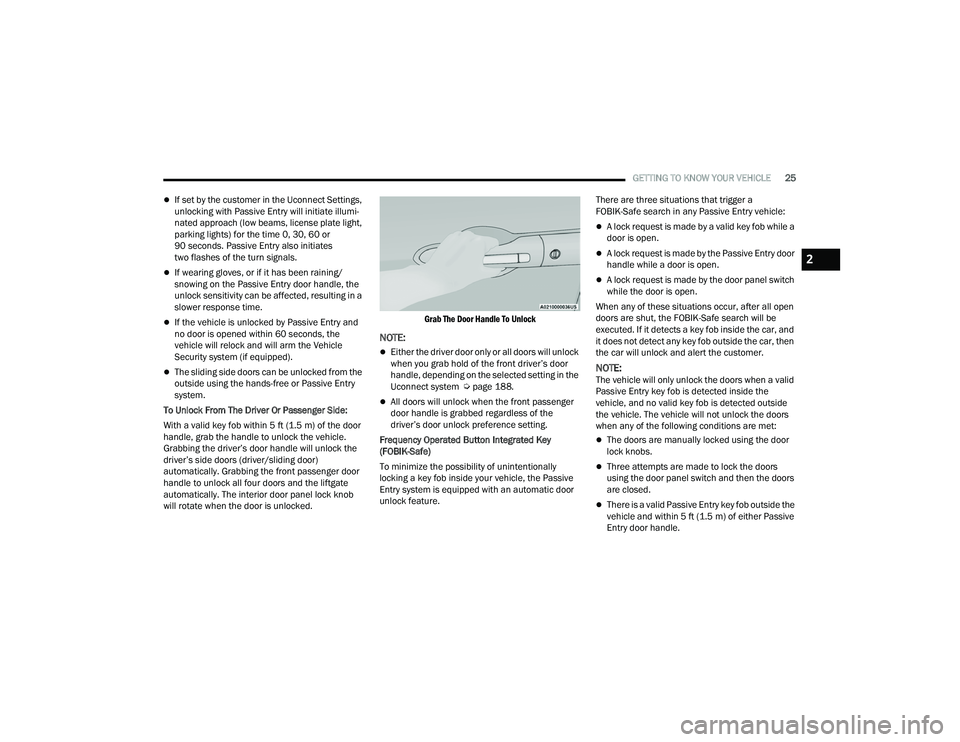
To Unlock From The Driver Or Passenger Side:
With a valid key fob within 5 ft (1.5 m) of the door
handle, grab the handle to unlock the vehicle.
Grabbing the driver’s door handle will unlock the
driver’s side doors (driver/sliding door)
automatically. Grabbing the front passenger door
handle to unlock all four doors and the liftgate
automatically. The interior door panel lock knob
will rotate when the door is unlocked.
Grab The Door Handle To Unlock
NOTE:
Either the driver door only or all doors will unlock
when you grab hold of the front driver’s door
handle, depending on the selected setting in the
Uconnect system Ú
page 188.
All doors will unlock when the front passenger
door handle is grabbed regardless of the
driver’s door unlock preference setting.
Frequency Operated Button Integrated Key
(FOBIK-Safe)
To minimize the possibility of unintentionally
locking a key fob inside your vehicle, the Passive
Entry system is equipped with an automatic door
unlock feature. There are three situations that trigger a
FOBIK-Safe search in any Passive Entry vehicle:
A lock request is made by a valid key fob while a
door is open.
A lock request is made by the Passive Entry door
handle while a door is open.
A lock request is made by the door panel switch
while the door is open.
When any of these situations occur, after all open
doors are shut, the FOBIK-Safe search will be
executed. If it detects a key fob inside the car, and
it does not detect any key fob outside the car, then
the car will unlock and alert the customer.
NOTE:The vehicle will only unlock the doors when a valid
Passive Entry key fob is detected inside the
vehicle, and no valid key fob is detected outside
the vehicle. The vehicle will not unlock the doors
when any of the following conditions are met:
The doors are manually locked using the door
lock knobs.
Three attempts are made to lock the doors
using the door panel switch and then the doors
are closed.
There is a valid Passive Entry key fob outside the
vehicle and within 5 ft (1.5 m) of either Passive
Entry door handle.
2
22_RUP_OM_EN_USC_t.book Page 25
Page 28 of 384
26GETTING TO KNOW YOUR VEHICLE
NOTE:On the third attempt ALL doors will lock and the key
fob can be locked in the vehicle.
To Lock The Vehicle’s Doors And Liftgate
With one of the vehicle’s key fobs within 5 ft
(1.5 m) of the driver or passenger front door
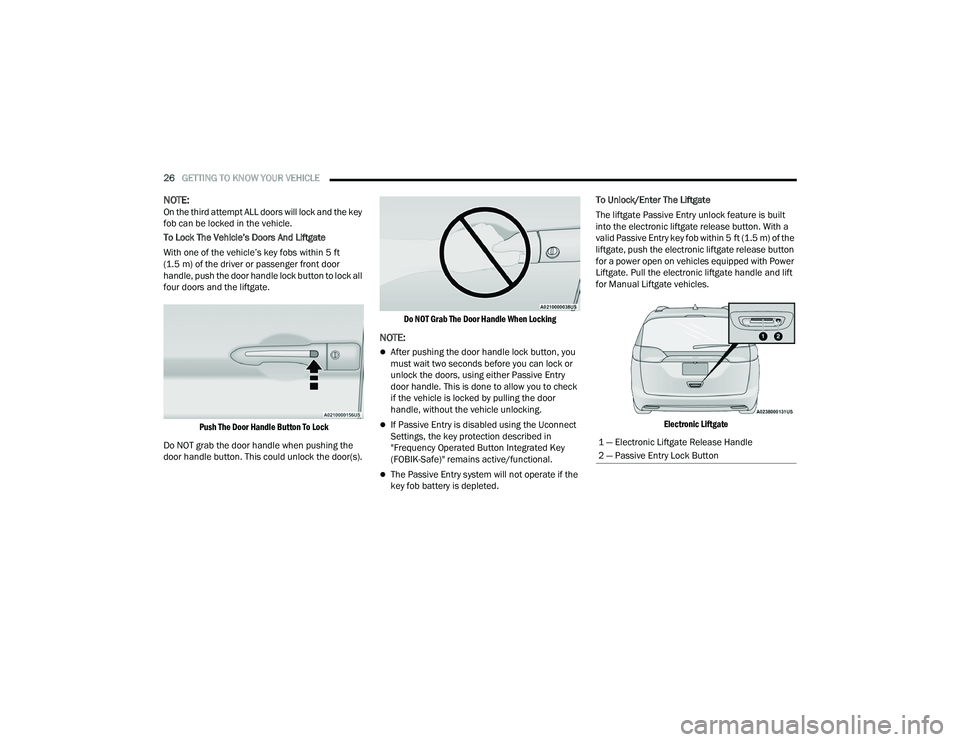
handle, push the door handle lock button to lock all
four doors and the liftgate.
Push The Door Handle Button To Lock
Do NOT grab the door handle when pushing the
door handle button. This could unlock the door(s).
Do NOT Grab The Door Handle When Locking
NOTE:
After pushing the door handle lock button, you
must wait two seconds before you can lock or
unlock the doors, using either Passive Entry
door handle. This is done to allow you to check
if the vehicle is locked by pulling the door
handle, without the vehicle unlocking.
If Passive Entry is disabled using the Uconnect
Settings, the key protection described in
"Frequency Operated Button Integrated Key
(FOBIK-Safe)" remains active/functional.
The Passive Entry system will not operate if the
key fob battery is depleted.To Unlock/Enter The Liftgate
The liftgate Passive Entry unlock feature is built
into the electronic liftgate release button. With a
valid Passive Entry key fob within 5 ft (1.5 m) of the
liftgate, push the electronic liftgate release button
for a power open on vehicles equipped with Power
Liftgate. Pull the electronic liftgate handle and lift
for Manual Liftgate vehicles.
Electronic Liftgate
1 — Electronic Liftgate Release Handle
2 — Passive Entry Lock Button
22_RUP_OM_EN_USC_t.book Page 26
Page 29 of 384
GETTING TO KNOW YOUR VEHICLE27
To Lock The Liftgate
With a valid Passive Entry key fob within 5 ft
(1.5 m) of the liftgate, push the Passive Entry lock
button located to the right of the liftgate release
handle.
The vehicle doors can also be locked by using the
key fob lock button, or the lock button located on
the vehicle’s interior door panel Ú page 370.
AUTOMATIC UNLOCK DOORS ON EXIT —
I
F EQUIPPED
The Unlock Doors Automatically On Exit feature
unlocks all of the vehicle doors when any door is
opened. This will occur only after the gear selector
has been placed into the PARK position, after the
vehicle has been driven (the gear selector has
been placed out of PARK and all doors closed).
The Unlock Doors Automatically On Exit feature will
not operate if there is any manual operation of the
door locks (lock or unlock).
This feature can be turned on or off in the
Uconnect system Ú page 188.
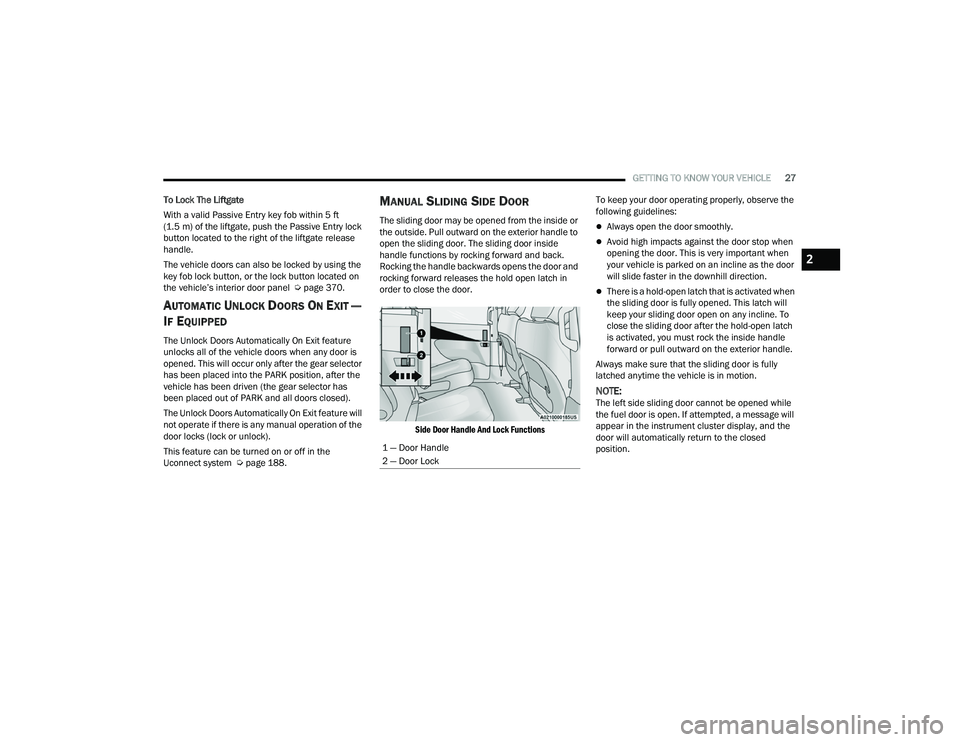
MANUAL SLIDING SIDE DOOR
The sliding door may be opened from the inside or
the outside. Pull outward on the exterior handle to
open the sliding door. The sliding door inside
handle functions by rocking forward and back.
Rocking the handle backwards opens the door and
rocking forward releases the hold open latch in
order to close the door.
Side Door Handle And Lock Functions
To keep your door operating properly, observe the
following guidelines:Always open the door smoothly.
Avoid high impacts against the door stop when
opening the door. This is very important when
your vehicle is parked on an incline as the door
will slide faster in the downhill direction.
There is a hold-open latch that is activated when
the sliding door is fully opened. This latch will
keep your sliding door open on any incline. To
close the sliding door after the hold-open latch
is activated, you must rock the inside handle
forward or pull outward on the exterior handle.
Always make sure that the sliding door is fully
latched anytime the vehicle is in motion.
NOTE:The left side sliding door cannot be opened while
the fuel door is open. If attempted, a message will
appear in the instrument cluster display, and the
door will automatically return to the closed
position.
1 — Door Handle
2 — Door Lock
2
22_RUP_OM_EN_USC_t.book Page 27
Page 30 of 384

28GETTING TO KNOW YOUR VEHICLE
POWER SLIDING SIDE DOOR —
I
F EQUIPPED
The power sliding door may be power opened or
closed in several ways:
Key fob
Inside or outside handles
Buttons located:
In the overhead console
Just inside the sliding door
On the outside handle
Push the button on the key fob twice
within five seconds to open, close, or
reverse a power sliding door.
The key fob and the overhead console button will
operate the door when the door is locked. All other
ways require the sliding door to be unlocked. If the
vehicle is equipped with Passive Entry, pushing the
button on the outside handle or Hands-Free
feature (if equipped) will unlock and open the
sliding door, with a valid Passive Entry key fob
within 5 ft (1.5 m) of the door handle.
Overhead Console Power Switches
There is a power sliding side door switch located on
the B-pillar trim panel on the driver’s and
passenger’s side, just in front of the power sliding
door for the rear seat passengers.
To operate the sliding door manually with the
handles or to avoid unintentional operation of the
power sliding doors from the rear seats, push the
power sliding door power off button, located in the
overhead console, to remove power to the handles
and buttons just inside the sliding doors. The power off LED, in the overhead console, will be
lit when the handles are manual. When the LED is
lit, pushing the power sliding door power off button
will return the handles to power operation.
NOTE:
If anything obstructs the power sliding side door
while it is closing or opening, the door will auto
-
matically reverse to the closed or open position
and an audible tone will sound, provided it
meets sufficient resistance. The turn signals will
flash with sliding door movements.
If the power sliding door stops in the middle due
to obstacles, it will power open on the next
command.
Power Sliding Side Door Switch (Left Side Shown)
1 — Liftgate
2 — Left Sliding Door
3 — Sliding Door Power Off
4 — Right Sliding Door
22_RUP_OM_EN_USC_t.book Page 28
Page 38 of 384

36GETTING TO KNOW YOUR VEHICLE
To recline the seatback, lean forward slightly, lift
the recline lever located on the outboard side of
the seat cushion, and push back to the desired
position and release the lever. Lean forward and
lift the lever to return the seatback to its normal
position. Using body pressure, lean forward and
rearward on the seat to be sure the seatback has
latched.
Recline Lever
The bench seat does not stow in the floor, but is
removable for added cargo space. Removing The Bench Seat
1. Adjust the driver and passenger seats
forward to allow room for the bench seat
removal.
2. Raise the armrest completely, then lift the recline lever located on the outboard side of
the seat to fold the seatback flat against the
seat cushion.
Folded Position
3. Pull the release strap located behind the seat, in the center near the floor to release the
latches.
Release Strap Location
4. Once the latches are released, tilt the entire seat toward the front of the vehicle. The seat
can now be removed through either sliding
side door, or through the liftgate.
Tilt Bench Seat Forward
22_RUP_OM_EN_USC_t.book Page 36
Page 52 of 384
50GETTING TO KNOW YOUR VEHICLE
Third Row Power Stow ‘n Go Seat —
If Equipped
A one-touch power folding seat switch is located in
the right rear trim panel as part of a switch bank.
NOTE:The third row outboard seat belts may interfere
with the power folding of the seat. Place the seat
belt webbing behind the stow clip before stowing or
opening the seat. When the seat is in the desired
position, remove the webbing from the stow clip so
that it is ready for use. Never leave the seat belt in
the stow clip when it is used to restrain an
occupant.
NOTE:
The outer head restraints will lower automati -
cally as necessary when the power seat begins
to move.
The center head restraint raises and lowers
manually but will not lower automatically.
The head restraint can also be lowered manu -
ally using the pull strap located at the back of
the seat Ú page 55.
The switch is only functional when the liftgate is
open and the vehicle is in PARK.
The rear switch bank allows multiple power folding
and unfolding positions for the third row seats. Left and right third row seats can be folded
individually or together. The third row power folding
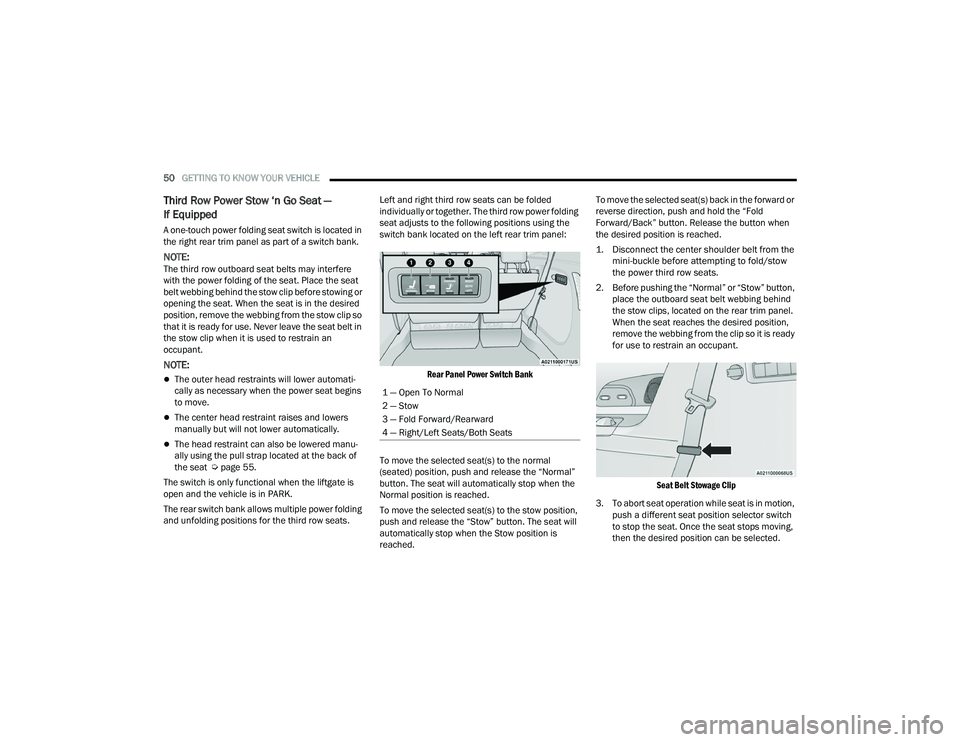
seat adjusts to the following positions using the
switch bank located on the left rear trim panel:
Rear Panel Power Switch Bank
To move the selected seat(s) to the normal
(seated) position, push and release the “Normal”
button. The seat will automatically stop when the
Normal position is reached.
To move the selected seat(s) to the stow position,
push and release the “Stow” button. The seat will
automatically stop when the Stow position is
reached. To move the selected seat(s) back in the forward or
reverse direction, push and hold the “Fold
Forward/Back” button. Release the button when
the desired position is reached.
1. Disconnect the center shoulder belt from the
mini-buckle before attempting to fold/stow
the power third row seats.
2. Before pushing the “Normal” or “Stow” button, place the outboard seat belt webbing behind
the stow clips, located on the rear trim panel.
When the seat reaches the desired position,
remove the webbing from the clip so it is ready
for use to restrain an occupant.
Seat Belt Stowage Clip
3. To abort seat operation while seat is in motion, push a different seat position selector switch
to stop the seat. Once the seat stops moving,
then the desired position can be selected.
1 — Open To Normal
2 — Stow
3 — Fold Forward/Rearward
4 — Right/Left Seats/Both Seats
22_RUP_OM_EN_USC_t.book Page 50
Page 71 of 384

GETTING TO KNOW YOUR VEHICLE69
INTERIOR LIGHTS
INTERIOR COURTESY LIGHTS
The courtesy light switches are used to turn the
courtesy lights on/off.
Courtesy Light Switches
To operate the courtesy lights, push either the
driver or passenger light switch.
NOTE:
Before exiting the vehicle, make sure that the
interior lights are turned off. This will prevent the
battery from discharging once the doors are
closed.
If a light is left on, it will automatically be turned
off approximately 10 minutes after the ignition
is placed in the OFF position.
Rear Courtesy/Reading Lights —
If Equipped
Located above the rear passengers are courtesy/
reading lights. The lights turn on when a front door,
a sliding door or the liftgate is opened. If your
vehicle is equipped with Remote Keyless Entry
(RKE) the lights will also turn on when the unlock
button on the key fob is pushed.
The courtesy lights also function as reading lights.
Push the lens to turn these lights on while inside
the vehicle. Push the lens a second time to turn
each light off.
Dimmer Controls
The dimmer controls are part of the headlight
switch, and are located on the driver’s side of the
instrument panel.
With the parking lights or headlights on, rotating
the right dimmer control upward will increase the
brightness of the instrument cluster lights.
Rotating the left dimmer control will adjust the
interior light levels of the ambient lighting on the
instrument panel and doors.
Dimmer Controls
Dimmer Controls (Vehicles Sold In Canada Only)
1 — Ambient Light Dimmer Control
2 — Instrument Panel Dimmer Control
1 — Ambient Light Dimmer Control
2 — Instrument Panel Dimmer Control
2
22_RUP_OM_EN_USC_t.book Page 69
Page 99 of 384
GETTING TO KNOW YOUR VEHICLE97
LIFTGATE
TO UNLOCK/OPEN THE LIFTGATE
The liftgate may be released in several ways:
Key fob
Liftgate Release Handle
Button on overhead console
Push the liftgate button on the key fob twice within
five seconds to release the liftgate.
The key fob and the overhead console button will
release the liftgate when the liftgate is locked. The
outside handle requires the liftgate to be unlocked.
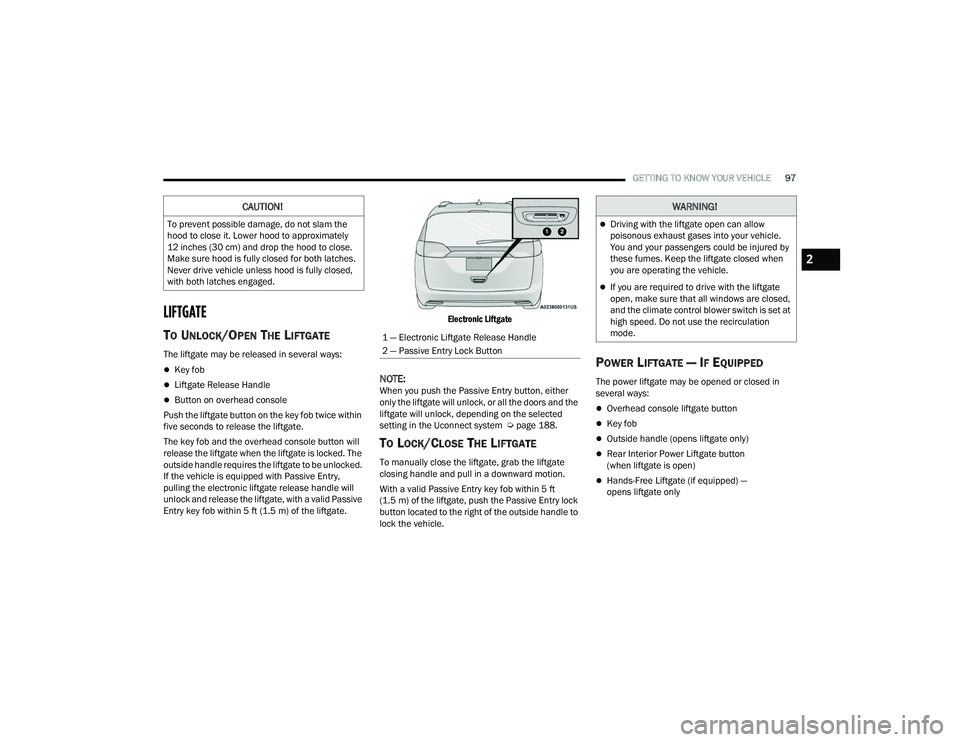
If the vehicle is equipped with Passive Entry,
pulling the electronic liftgate release handle will
unlock and release the liftgate, with a valid Passive
Entry key fob within 5 ft (1.5 m) of the liftgate.
Electronic Liftgate
NOTE:When you push the Passive Entry button, either
only the liftgate will unlock, or all the doors and the
liftgate will unlock, depending on the selected
setting in the Uconnect system Ú
page 188.
TO LOCK/CLOSE THE LIFTGATE
To manually close the liftgate, grab the liftgate
closing handle and pull in a downward motion.
With a valid Passive Entry key fob within 5 ft
(1.5 m) of the liftgate, push the Passive Entry lock
button located to the right of the outside handle to
lock the vehicle.
POWER LIFTGATE — IF EQUIPPED
The power liftgate may be opened or closed in
several ways:
Overhead console liftgate button
Key fob
Outside handle (opens liftgate only)
Rear Interior Power Liftgate button
(when liftgate is open)
Hands-Free Liftgate (if equipped) —
opens liftgate only
CAUTION!
To prevent possible damage, do not slam the
hood to close it. Lower hood to approximately
12 inches (30 cm) and drop the hood to close.
Make sure hood is fully closed for both latches.
Never drive vehicle unless hood is fully closed,
with both latches engaged.
1 — Electronic Liftgate Release Handle
2 — Passive Entry Lock Button
WARNING!
Driving with the liftgate open can allow
poisonous exhaust gases into your vehicle.
You and your passengers could be injured by
these fumes. Keep the liftgate closed when
you are operating the vehicle.
If you are required to drive with the liftgate
open, make sure that all windows are closed,
and the climate control blower switch is set at
high speed. Do not use the recirculation
mode.
2
22_RUP_OM_EN_USC_t.book Page 97