2022 CHRYSLER PACIFICA Eco
[x] Cancel search: EcoPage 194 of 384
192MULTIMEDIA
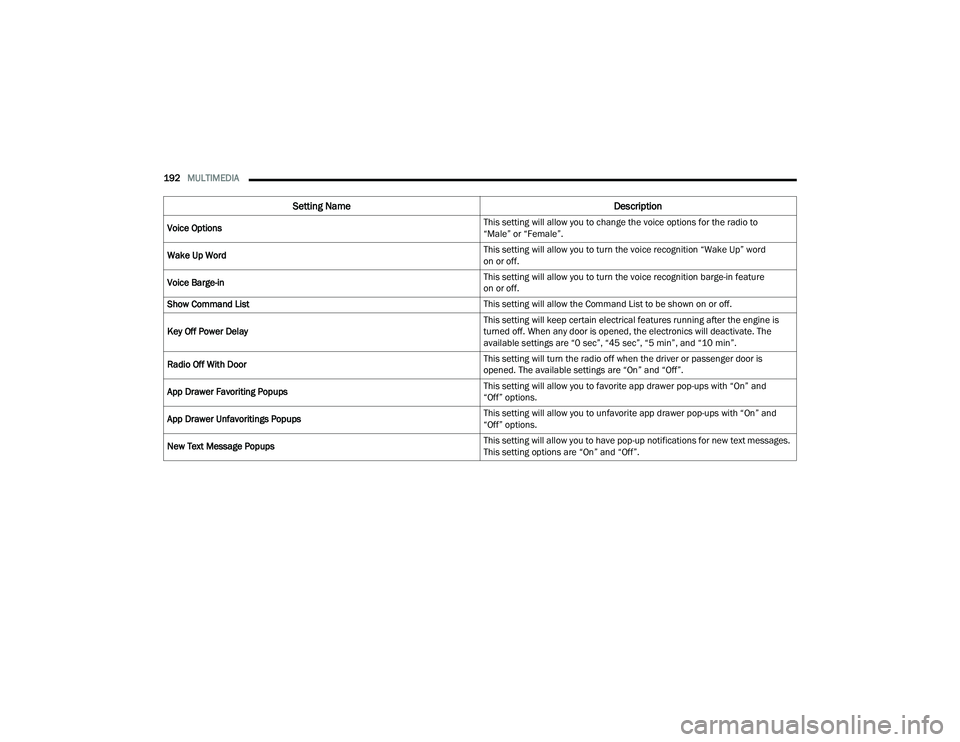
Voice Options This setting will allow you to change the voice options for the radio to
“Male” or “Female”.
Wake Up Word This setting will allow you to turn the voice recognition “Wake Up” word
on or off.
Voice Barge-in This setting will allow you to turn the voice recognition barge-in feature
on or off.
Show Command List This setting will allow the Command List to be shown on or off.
Key Off Power Delay This setting will keep certain electrical features running after the engine is
turned off. When any door is opened, the electronics will deactivate. The
available settings are “0 sec”, “45 sec”, “5 min”, and “10 min”.
Radio Off With Door This setting will turn the radio off when the driver or passenger door is
opened. The available settings are “On” and “Off”.
App Drawer Favoriting Popups This setting will allow you to favorite app drawer pop-ups with “On” and
“Off” options.
App Drawer Unfavoritings Popups This setting will allow you to unfavorite app drawer pop-ups with “On” and
“Off” options.
New Text Message Popups This setting will allow you to have pop-up notifications for new text messages.
This setting options are “On” and “Off”.
Setting Name
Description
22_RUP_OM_EN_USC_t.book Page 192
Page 197 of 384
MULTIMEDIA195
Safety & Driving Assistance
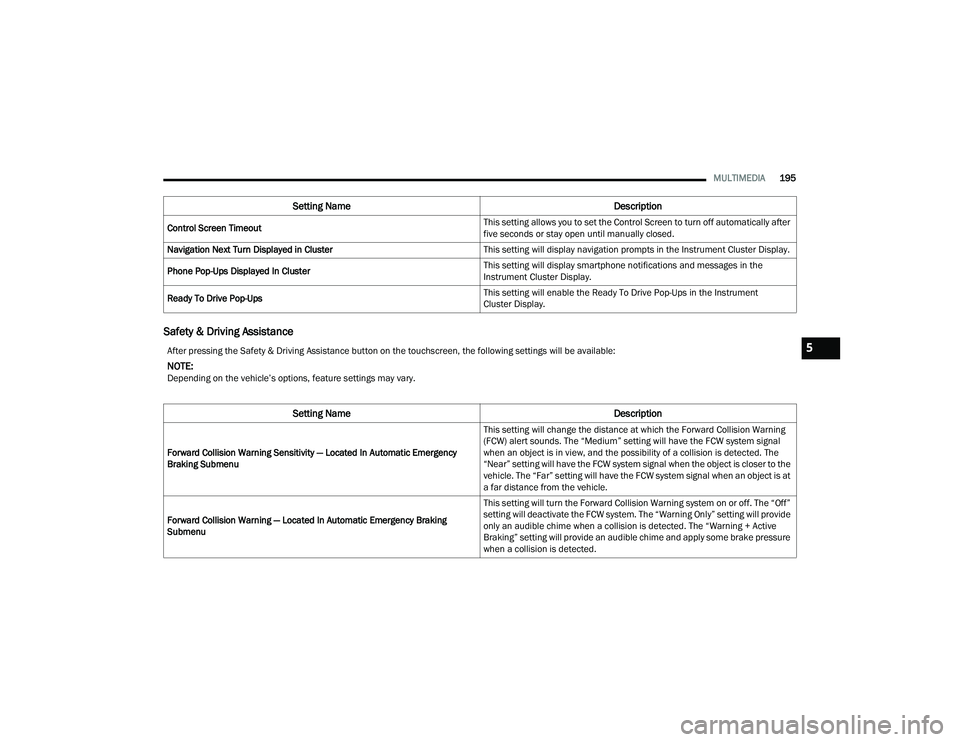
Control Screen Timeout This setting allows you to set the Control Screen to turn off automatically after
five seconds or stay open until manually closed.
Navigation Next Turn Displayed in Cluster This setting will display navigation prompts in the Instrument Cluster Display.
Phone Pop-Ups Displayed In Cluster This setting will display smartphone notifications and messages in the
Instrument Cluster Display.
Ready To Drive Pop-Ups This setting will enable the Ready To Drive Pop-Ups in the Instrument
Cluster Display.
Setting Name
Description
After pressing the Safety & Driving Assistance button on the touchscreen, the following settings will be available:
NOTE:Depending on the vehicle’s options, feature settings may vary.
Setting NameDescription
Forward Collision Warning Sensitivity — Located In Automatic Emergency
Braking Submenu This setting will change the distance at which the Forward Collision Warning
(FCW) alert sounds. The “Medium” setting will have the FCW system signal
when an object is in view, and the possibility of a collision is detected. The
“Near” setting will have the FCW system signal when the object is closer to the
vehicle. The “Far” setting will have the FCW system signal when an object is at
a far distance from the vehicle.
Forward Collision Warning — Located In Automatic Emergency Braking
Submenu This setting will turn the Forward Collision Warning system on or off. The “Off”
setting will deactivate the FCW system. The “Warning Only” setting will provide
only an audible chime when a collision is detected. The “Warning + Active
Braking” setting will provide an audible chime and apply some brake pressure
when a collision is detected.
5
22_RUP_OM_EN_USC_t.book Page 195
Page 201 of 384
MULTIMEDIA199
Voice — If Equipped
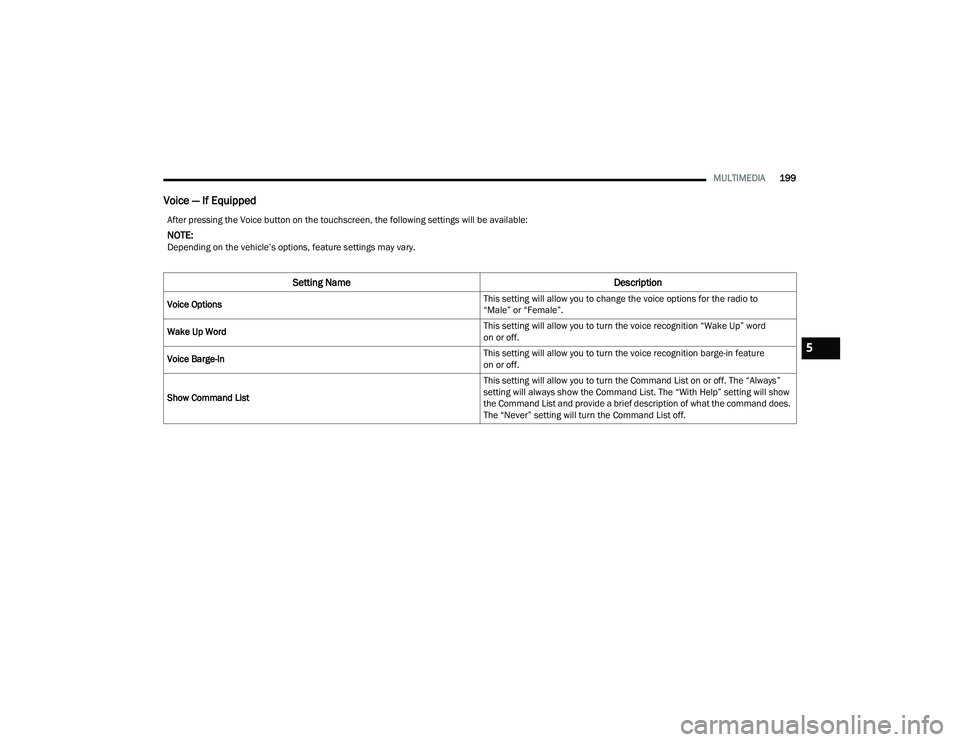
After pressing the Voice button on the touchscreen, the following settings will be available:
NOTE:Depending on the vehicle’s options, feature settings may vary.
Setting Name Description
Voice Options This setting will allow you to change the voice options for the radio to
“Male” or “Female”.
Wake Up Word This setting will allow you to turn the voice recognition “Wake Up” word
on or off.
Voice Barge-In This setting will allow you to turn the voice recognition barge-in feature
on or off.
Show Command List This setting will allow you to turn the Command List on or off. The “Always”
setting will always show the Command List. The “With Help” setting will show
the Command List and provide a brief description of what the command does.
The “Never” setting will turn the Command List off.
5
22_RUP_OM_EN_USC_t.book Page 199
Page 209 of 384

MULTIMEDIA207
Audio
When the Audio button is pressed on the touchscreen, the system displays options related to the vehicle’s sound system. These settings can change the audio
location within the vehicle, adjust the bass or treble levels, and auto-play settings from an audio device or smartphone.
NOTE:Depending on the vehicle’s options, feature settings may vary.
Setting Name Description
Balance/Fade This setting will adjust audio levels from specific speakers in the front/back
and left/right of the vehicle. The Speaker icon can be moved to set
audio location.
Equalizer This setting will adjust the “Bass”, “Mid”, and “Treble” ranges of the audio.
Speed Adjusted Volume This setting will adjust audio volume as speeds increase. At a higher setting,
the volume will increase more as the vehicle speeds up. The available settings
are “Off”, “1”, “2”, and “3”.
Surround Sound This setting will turn the Surround Sound system on or off.
AUX Volume Offset This setting will tune the audio levels from a device connected through the
AUX port. The available settings are “+” and “-”.
Auto Play This setting will automatically begin playing audio from a connected device.
Auto On Radio This setting will automatically turn on when the vehicle is in ON/RUN or will
recall whether it was on or off at last ignition OFF. The selectable options are
“On”, “Off”, and “Recall Last”.
Volume Adjustment This setting allows you to adjust the volume levels for features such as Media,
Phone, Navigation, and Voice Recognition.
5
22_RUP_OM_EN_USC_t.book Page 207
Page 216 of 384

214MULTIMEDIA
ACCESSING REAR SEAT
E
NTERTAINMENT WITH FIRE TV BUILT-IN
FROM THE REAR SCREENS
You can access your Rear Seat Entertainment with
Fire TV built-in system from the rear screens by just
flipping the screens open. Flipping open the rear
screens will automatically turn the system on.
Pushing the Power button on the Rear Seat
Entertainment Voice Remote with Alexa.
NOTE:While accessing on the rear screens, the system
will launch with the integrated Fire TV.
FIRST TIME STARTING UP
(U
SING THE REAR SCREENS)
Boot-Up Screen
When turning on the system for the first time from
the rear screens, a boot-up screen will appear on
the system displaying the Fire TV logo.
During this boot up sequence, language options
will be available for the system.
Voice Remote with Alexa Pairing
After the boot-up sequence is complete, the
system will then give the option to pair a Voice
Remote with Alexa (two are included with the
system). Follow the on-screen instructions to pair the Voice
Remote with Alexa to the system.
NOTE:If the Voice Remote with Alexa pairing fails,
on-screen instructions will appear for trying to pair
again.
Connecting to a Network
During the start-up process, the system will need to
be connected to a network. Multiple network
sources can be options for the system, and one will
need to be selected for the system to function.
Some options for a network connection are:
Wi-Fi Hotspot using a capable smartphone
(if activated, it will show as a possible network
for the system on the screen).
Outside connection like a home Wi-Fi network.
In-vehicle Wi-Fi.
NOTE:When a network is connected to the system for the
first time, an over-the-air software update will take
place using the Wi-Fi connection. After this
first-time update, updates will only accrue when
one is available. It is recommended that you
connect your RSE/Amazon Fire OS to a Wi-Fi
Hotspot with unlimited data and a good signal
(such as a home Wi-Fi network) in order to check
for future Fire OS updates.
Account Sign-in
The next step will be the option to sign in to your
Amazon account.
There are two options to sign into the system:
I already have an Amazon account:
Sign in with
an already existing Amazon account
I am new to Amazon: Create a new Amazon
Account
If “I am new to Amazon” is selected, follow the
on-screen steps to set up an Amazon account with
the system.
Parental Controls
Another feature that will appear during this first
time set up is parental controls.
When the parental controls page appears, it will
give the options to “Enable Parental Controls” and
“No Parental Controls”. If “Enable Parental
Controls” is selected, follow the on-screen steps to
set up parental controls for the system.
REAR SEAT ENTERTAINMENT WITH FIRE
TV B
UILT-IN ALEXA
A feature with Rear Seat Entertainment with Fire
TV built-in that enhances your experience is Alexa.
It is simple to get started using this feature. Push
the Voice button at the top of the Voice Remote
with Alexa to activate Alexa and get started.
22_RUP_OM_EN_USC_t.book Page 214
Page 217 of 384

MULTIMEDIA215
LISTEN VIA VEHICLE SPEAKERS
A feature within Rear Seat Entertainment with Fire
TV built-in is the front radio Listen feature. On the
front radio Home screen for Fire TV, select the
Listen button in the top right corner on either card
for Screen 1 or 2. This will allow you to have either
rear screen play audio through all the speakers in
the vehicle.
QUICK MENU
Accessing the Quick Menu will give you more
options for Fire TV.
To access the Quick Menu, tap the screen, and it
will appear. The Quick Menu is also accessible by
pushing the Gear/Settings button on the Voice
Remote with Alexa.
Some options of the Quick Menu are:
Power — This will power the screen off.
On-Screen Remote — This will bring up the
on-screen remote to use with the system.
Back — This will let you go back a page.
Home — This will take you to the Home screen.
Gear/Settings — This will let you access
certain settings in the system. For more setting
options, select “Settings” within the on-screen
Gear/Settings menu.
Vehicle — This will bring up the Vehicle menu.
From here you can adjust rear climate controls
and the Are We There Yet? app.
PARENTAL CONTROLS (USING THE REAR
S
CREENS)
If parental controls were not set during the first
time start up of the system, they can be set by
following these steps:
1. Push the Gear/Settings button on the Voice
Remote with Alexa or tap the screen to access
“Settings” in the Quick Menu.
2. Select the Gear/Settings icon on the screen.
3. Select “Settings” on the screen.
4. While in Settings, select “Preferences”.
5. Select “Parental Controls”. From here you can turn Parental Controls on or off and set up a
PIN for the controls using the Voice Remote
with Alexa.
PAIRING THE VOICE REMOTE WITH
A
LEXA (USING THE REAR SCREENS)
If the Voice Remote with Alexa needs to be paired
again or a new remote is being paired, follow these
procedures:
1. Install batteries into the remote.
2. Tap the screen and select the Gear/Settings
icon on the screen.
3. Select “Settings” on the screen.
4. In Settings, select “Controllers & Bluetooth® Devices”.
5. From this menu, select “Add New Remote”.
6. Follow the on-screen steps for Voice Remote with Alexa pairing.
A long press on the Home button can also re-pair a
Voice Remote with Alexa that has become
disconnected.
NOTE:Your vehicle is included with two Voice Remotes
with Alexa. Each Voice Remote with Alexa can be
paired with each rear screen. Pairing one with
either rear screen will pair that Voice Remote with
Alexa with that screen.
5
22_RUP_OM_EN_USC_t.book Page 215
Page 224 of 384
222MULTIMEDIA
LEGAL & COMPLIANCE
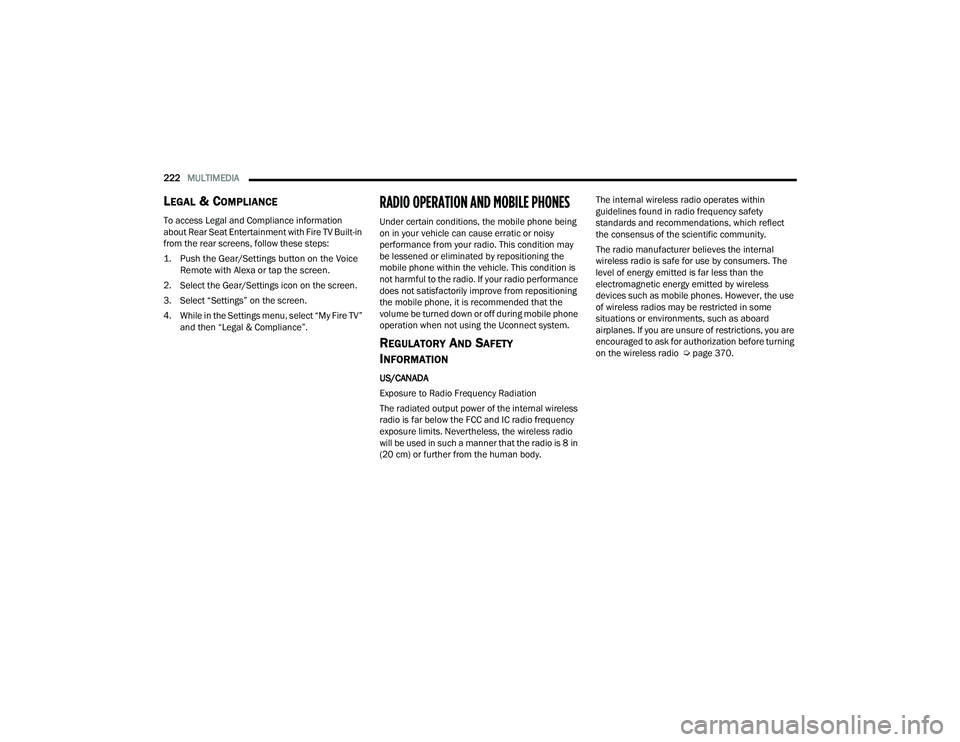
To access Legal and Compliance information
about Rear Seat Entertainment with Fire TV Built-in
from the rear screens, follow these steps:
1. Push the Gear/Settings button on the Voice
Remote with Alexa or tap the screen.
2. Select the Gear/Settings icon on the screen.
3. Select “Settings” on the screen.
4. While in the Settings menu, select “My Fire TV” and then “Legal & Compliance”.
RADIO OPERATION AND MOBILE PHONES
Under certain conditions, the mobile phone being
on in your vehicle can cause erratic or noisy
performance from your radio. This condition may
be lessened or eliminated by repositioning the
mobile phone within the vehicle. This condition is
not harmful to the radio. If your radio performance
does not satisfactorily improve from repositioning
the mobile phone, it is recommended that the
volume be turned down or off during mobile phone
operation when not using the Uconnect system.
REGULATORY AND SAFETY
I
NFORMATION
US/CANADA
Exposure to Radio Frequency Radiation
The radiated output power of the internal wireless
radio is far below the FCC and IC radio frequency
exposure limits. Nevertheless, the wireless radio
will be used in such a manner that the radio is 8 in
(20 cm) or further from the human body. The internal wireless radio operates within
guidelines found in radio frequency safety
standards and recommendations, which reflect
the consensus of the scientific community.
The radio manufacturer believes the internal
wireless radio is safe for use by consumers. The
level of energy emitted is far less than the
electromagnetic energy emitted by wireless
devices such as mobile phones. However, the use
of wireless radios may be restricted in some
situations or environments, such as aboard
airplanes. If you are unsure of restrictions, you are
encouraged to ask for authorization before turning
on the wireless radio Ú
page 370.
22_RUP_OM_EN_USC_t.book Page 222
Page 226 of 384
224SAFETY
Anti-Lock Brake System (ABS)
Warning Light
The yellow ABS Warning Light will turn on when the
ignition is placed in the ON/RUN mode and may
stay on for as long as four seconds.
If the ABS Warning Light remains on or comes on
while driving, it indicates that the anti-lock portion
of the brake system is not functioning and that
service is required. However, the conventional
brake system will continue to operate normally if
the ABS Warning Light is on.
If the ABS Warning Light is on, the brake system
should be serviced as soon as possible to restore
the benefits of anti-lock brakes. If the ABS Warning
Light does not come on when the ignition is placed
in the ON/RUN mode, have the light repaired as
soon as possible.
ELECTRONIC BRAKE CONTROL (EBC)
S
YSTEM
Your vehicle is equipped with an advanced
Electronic Brake Control (EBC) system. This system
includes Anti-Lock Brake System (ABS), Brake
Assist System (BAS), Electronic Brake Force
Distribution (EBD), Electronic Roll Mitigation
(ERM), Electronic Stability Control (ESC), Hill Start Assist (HSA), and Traction Control System
(TCS).These systems work together to enhance
both vehicle stability and control in various driving
conditions.
Your vehicle may also be equipped with Dynamic
Steering Torque (DST), Ready Alert Braking (RAB),
Rain Brake Support (RBS) and Trailer Sway Control
(TSC).
Brake Assist System (BAS)
The BAS is designed to optimize the vehicle’s
braking capability during emergency braking
maneuvers. The system detects an emergency
braking situation by sensing the rate and amount
of brake application and then applies optimum
pressure to the brakes. This can help reduce
braking distances. The BAS complements the
Anti-Lock Brake System (ABS). Applying the brakes
very quickly results in the best BAS assistance. To
receive the benefit of the system, you must apply
continuous braking pressure during the stopping
sequence (do not “pump” the brakes). Do not
reduce brake pedal pressure unless braking is no
longer desired. Once the brake pedal is released,
the BAS is deactivated.
Brake System Warning Light
The red Brake System Warning Light will turn on
when the ignition is placed in the ON/RUN mode
and may stay on for as long as four seconds.
If the Brake System Warning Light remains on or
comes on while driving, it indicates that the brake
system is not functioning properly and that
immediate service is required. If the Brake System
Warning Light does not come on when the ignition
is placed in the ON/RUN mode, have the light
repaired as soon as possible.
WARNING!
The Brake Assist System (BAS) cannot prevent
the natural laws of physics from acting on the
vehicle, nor can it increase the traction afforded
by prevailing road conditions. BAS cannot
prevent collisions, including those resulting from
excessive speed in turns, driving on very slippery
surfaces, or hydroplaning. The capabilities of a
BAS-equipped vehicle must never be exploited in
a reckless or dangerous manner, which could
jeopardize the user's safety or the safety of
others.
22_RUP_OM_EN_USC_t.book Page 224