2022 CHRYSLER PACIFICA HYBRID radio
[x] Cancel search: radioPage 238 of 384
236SAFETY
Changing the PEB status to “Off” deactivates the
system, so no warning or active braking will be
available in case of a possible frontal collision with
the pedestrian.
NOTE:The PEB system will NOT retain the last setting
selected by the driver after ignition shut down. The
system will reset to the default setting when the
vehicle is restarted.
TIRE PRESSURE MONITORING SYSTEM
(TPMS)
The Tire Pressure Monitoring System (TPMS) will
warn the driver of a low tire pressure based on the
vehicle recommended cold placard pressure.
NOTE:The TPMS Warning Light will illuminate in the
instrument cluster and a chime will sound when
tire pressure is low in one or more of the four active
road tires. In addition, the instrument cluster will
display a graphic showing the pressure values of
each tire with the low tire pressure values in a
different color, or the Uconnect radio will display a
TPMS message. When this occurs you must
increase the tire pressure to the recommended
cold placard pressure in order for the TPMS
Warning Light to turn off. The tire pressure will vary with temperature by
approximately 1 psi (7 kPa) for every 12°F (6.5°C).
This means that when the outside temperature
decreases, the tire pressure will decrease. Tire
pressure should always be set based on cold
inflation tire pressure. This is defined as the tire
pressure after the vehicle has not been driven for
at least three hours, or driven less than 1 mile
(1.6 km) after a three hour period. The cold tire
inflation pressure must not exceed the maximum
inflation pressure molded into the tire sidewall.
The tire pressure will also increase as the vehicle
is driven. This is normal and there should be no
adjustment for this increased pressure.
See Ú
page 346 for information on how to
properly inflate the vehicle’s tires.
The TPMS will warn the driver of a low tire pressure
if the tire pressure falls below the low-pressure
warning limit for any reason, including low
temperature effects and natural pressure loss
through the tire.
The TPMS will continue to warn the driver of low
tire pressure as long as the condition exists, and
will not turn off until the tire pressure is at or above
the recommended cold placard pressure. Once the
low tire pressure warning (TPMS Warning Light)
illuminates, you must increase the tire pressure to
the recommended cold placard pressure in order
for the TPMS Warning Light to turn off. The system will automatically update and the
TPMS Warning Light will turn off once the system
receives the updated tire pressures. The vehicle
may need to be driven for up to 20 minutes above
15 mph (24 km/h) in order for the TPMS to receive
this information.
For example, your vehicle may have a
recommended cold (parked for more than three
hours) placard pressure of 33 psi (227 kPa). If the
ambient temperature is 68°F (20°C) and the
measured tire pressure is 28 psi (193 kPa), a
temperature drop to 20°F (-7°C) will decrease the
tire pressure to approximately 24 psi (165 kPa).
This tire pressure is low enough to turn on the
TPMS Warning Light. Driving the vehicle may cause
the tire pressure to rise to approximately 28 psi
(193 kPa), but the TPMS Warning Light will still be
on. In this situation, the TPMS Warning Light will
turn off only after the tires are inflated to the
vehicle’s recommended cold placard pressure
value Ú
page 370.
NOTE:When filling warm tires, the tire pressure may need
to be increased up to an additional 4 psi (28 kPa)
above the recommended cold placard pressure in
order to turn the TPMS Warning Light off.
22_RUP_OM_EN_USC_t.book Page 236
Page 240 of 384

238SAFETY
If the ignition is cycled, this sequence will repeat,
providing the system fault still exists. If the system
fault no longer exists, the TPMS Warning Light will
no longer flash, and the “SERVICE TPM SYSTEM”
message will no longer display, and a pressure
value will display in place of the dashes. A system
fault can occur due to any of the following:
Jamming due to electronic devices or driving
next to facilities emitting the same radio
frequencies as the TPMS sensors
Installing some form of aftermarket window
tinting that affects radio wave signals
Lots of snow or ice around the wheels or wheel
housings
Using tire chains on the vehicle
Using wheels/tires not equipped with TPMS
sensors
Vehicles With Compact Spare — If Equipped
1. The compact spare tire does not have a Tire Pressure Monitoring System sensor.
Therefore, the TPMS will not monitor the
pressure in the compact spare tire.
2. If you install the compact spare tire in place of a road tire that has a pressure below the
low-pressure warning limit, upon the next
ignition cycle, the TPMS Warning Light will
remain on and a chime will sound. In addition,
the graphic in the instrument cluster will still
display a different color pressure value. 3. After driving the vehicle for up to 20 minutes
above 15 mph (24 km/h), the TPMS Warning
Light will flash on and off for 75 seconds and
then remain on solid. In addition, the
instrument cluster will display a “SERVICE TPM
SYSTEM” message for five seconds and then
display dashes (--) in place of the pressure
value.
4. For each subsequent ignition cycle, a chime will sound, the TPMS Warning Light will flash
on and off for 75 seconds and then remain on
solid, and the instrument cluster will display a
“SERVICE TPM SYSTEM” message for five
seconds and then display dashes (- -) in place
of the pressure value.
5. Once you repair or replace the original road tire and reinstall it on the vehicle in place of the
compact spare, the TPMS will update automat -
ically. In addition, the TPMS Warning Light will
turn off and the graphic in the instrument
cluster will display a new pressure value
instead of dashes (--), as long as no tire
pressure is below the low-pressure warning
limit in any of the four active road tires. The
vehicle may need to be driven for up to
20 minutes above 15 mph (24 km/h) in order
for the TPMS to receive this information.
TIRE PRESSURE MONITORING SYSTEM LOW
PRESSURE WARNINGS
The TPMS Warning Light will illuminate in
the instrument cluster and a chime will
sound when tire pressure is low in one or
more of the four active road tires. In
addition, the instrument cluster will display an
"Inflate to XX" message and a graphic showing the
pressure values of each tire with the low tire
pressure values in a different color.
Tire Pressure Monitoring System
Should this occur, you should stop as soon as
possible and inflate the tires with low pressure
(those in a different color in the instrument cluster
graphic) to the vehicle’s recommended cold
placard pressure value as shown in the
"Inflate to XX" message.
22_RUP_OM_EN_USC_t.book Page 238
Page 258 of 384

256SAFETY
The Air Bag Warning Light in the instrument
panel will turn on whenever the OCS is unable to
classify the front passenger seat status. A
malfunction in the OCS may affect the operation of
the air bag system.
If the Air Bag Warning Light does not come on,
or stays on after you start the vehicle, or it comes
on as you drive, take the vehicle to an authorized
dealer for service immediately. The passenger seat assembly contains critical OCS
components that may affect the Passenger
Advanced Front Air Bag inflation. In order for the
OCS to properly classify the seated weight of a
front seat passenger, the OCS components must
function as designed. Do not make any
modifications to the front passenger seat
components, assembly, or to the seat cover. If the
seat, trim cover, or cushion needs service for any
reason, take the vehicle to an authorized dealer.
Only FCA US LLC approved seat accessories may
be used.
The following requirements must be strictly
followed:
Do not modify the front passenger seat
assembly or components in any way.
Do not use prior or future model year seat
covers or cushions not designated by FCA US
LLC for the specific model being repaired.
Always use the correct seat cover and cushion
specified for the vehicle.
Do not replace the seat cover or cushion with an
aftermarket seat cover or cushion.
Do not add a secondary seat cover or mat.
At no time should any Supplemental Restraint
System (SRS) component or SRS related
component or fastener be modified or replaced
with any part except those which are approved
by FCA US LLC.
Knee Impact Bolsters
The Knee Impact Bolsters help protect the knees
of the driver and front passenger, and position the
front occupants for improved interaction with the
front air bags.
Do not carry or hold any objects (e.g., back
-
packs, boxes, etc.) while seated in the front
passenger seat. Holding an object may
provide an output signal to the OCS that is
different than the occupant’s properly seated
weight input, which may result in serious injury
or death in a collision.
Placing an object on the floor under the front
passenger seat may prevent the OCS from
working properly, which may result in serious
injury or death in a collision. Do not place any
objects on the floor under the front passenger
seat.
WARNING!WARNING!
Unapproved modifications or service proce-
dures to the passenger seat assembly, its
related components, seat cover or cushion
may inadvertently change the air bag deploy -
ment in case of a frontal collision. This could
result in death or serious injury to the front
passenger if the vehicle is involved in a colli -
sion. A modified vehicle may not comply with
required Federal Motor Vehicle Safety Stan -
dards (FMVSS) and/or Canadian Motor
Vehicle Safety Standards (CMVSS).
If it is necessary to modify the air bag system
for persons with disabilities, contact an autho -
rized dealer.
WARNING!
Do not drill, cut, or tamper with the knee
impact bolsters in any way.
Do not mount any accessories to the knee
impact bolsters such as alarm lights, stereos,
citizen band radios, etc.
22_RUP_OM_EN_USC_t.book Page 256
Page 285 of 384
IN CASE OF EMERGENCY283
If equipped, the rearview mirror contains an SOS
and ASSIST button.
NOTE:
Your vehicle may be transmitting data as
authorized by the subscriber Ú page 370.
The SOS and ASSIST buttons will only function
if you are connected to an operable LTE
(voice/data) or 4G (data) network, which comes
as a built in function. Other Uconnect services
will only be operable if your SiriusXM Guardian™
service is active and you are connected to an
operable LTE (voice/data) or 4G (data) network. ASSIST Call
The ASSIST Button is used to automatically
connect you to any one of the following support
centers:
Roadside Assistance – If you get a flat tire, or
need a tow, just push the ASSIST button and you
will be connected to a representative for assis-
tance. Roadside Assistance will know what
vehicle is being driven and its location. Addi-
tional fees may apply for roadside assistance.
SiriusXM Guardian™ Customer Care – In-vehicle
support for SiriusXM Guardian™.
Vehicle Customer Care – Total support for all
other vehicle issues.
Uconnect Customer Care - Total support for
Radio, Phone and NAV issues.
SOS Call
1. Push the SOS Call button on the Rearview Mirror.
NOTE:In case the SOS Call button is pushed in error,
there will be a 10 second delay before the SOS Call
system initiates a call to a SOS operator. To cancel
the SOS Call connection, push the SOS call button
on the Rearview Mirror or press the cancellation
button on the Device Screen. Termination of the
SOS Call will turn off the green LED light on the
Rearview Mirror. 2. The LED light located between the SOS and
ASSIST buttons on the Rearview Mirror will
turn green once a connection to a SOS
operator has been made.
3. Once a connection between the vehicle and a SOS operator is made, the SOS Call system
may transmit the following important vehicle
information to a SOS operator:
Indication that the occupant placed a SOS
Call
The vehicle brand
The last known GPS coordinates of the
vehicle
4. You should be able to speak with the SOS operator through the vehicle audio system to
determine if additional assistance is needed.
WARNING!
ALWAYS obey traffic laws and pay attention to
the road. ALWAYS drive safely with your hands on
the steering wheel. You have full responsibility
and assume all risks related to the use of the
features and applications in this vehicle. Only
use the features and applications when it is safe
to do so. Failure to do so may result in an
accident involving serious injury or death.
7
22_RUP_OM_EN_USC_t.book Page 283
Page 286 of 384
284IN CASE OF EMERGENCY
(Continued)
NOTE:
Your vehicle may be transmitting data as
authorized by the subscriber.
Once a connection is made between the
vehicle’s SOS Call system and the SOS oper-
ator, the SOS operator may be able to open
a voice connection with the vehicle to deter -
mine if additional assistance is needed.
Once the SOS operator opens a voice
connection with the vehicle’s SOS Call
system, the operator should be able to
speak with you or other vehicle occupants
and hear sounds occurring in the vehicle.
The vehicle’s SOS Call system will attempt
to remain connected with the SOS operator
until the SOS operator terminates the
connection.
5. The SOS operator may attempt to contact appropriate emergency responders and
provide them with important vehicle
information and GPS coordinates.
WARNING!
If anyone in the vehicle could be in danger
(e.g., fire or smoke is visible, dangerous road
conditions or location), do not wait for voice
contact from an Emergency Services Agent. All
occupants should exit the vehicle immediately
and move to a safe location.
Never place anything on or near the vehicle’s
operable network and GPS antennas. You
could prevent operable network and GPS
signal reception, which can prevent your
vehicle from placing an emergency call. An
operable network and GPS signal reception is
required for the SOS Call system to function
properly.
The SOS Call system is embedded into the
vehicle’s electrical system. Do not add after -
market electrical equipment to the vehicle’s
electrical system. This may prevent your
vehicle from sending a signal to initiate an
emergency call. To avoid interference that can
cause the SOS Call system to fail, never add
aftermarket equipment (e.g., two-way mobile
radio, CB radio, data recorder, etc.) to your
vehicle’s electrical system or modify the
antennas on your vehicle. IF YOUR VEHICLE
LOSES BATTERY POWER FOR ANY REASON
(INCLUDING DURING OR AFTER AN ACCI -
DENT), THE UCONNECT FEATURES, APPS AND
SERVICES, AMONG OTHERS, WILL NOT
OPERATE.
Modifications to any part of the SOS Call
system could cause the air bag system to fail
when you need it. You could be injured if the
air bag system is not there to help protect you.
WARNING!
22_RUP_OM_EN_USC_t.book Page 284
Page 288 of 384
286IN CASE OF EMERGENCY
(Continued)
NOTE:
Your vehicle may be transmitting data as autho-
rized by the subscriber.
Never place anything on or near the vehicle’s
LTE (voice/data) or 4G (data) and GPS
antennas. You could prevent LTE (voice/data) or
4G (data) and GPS signal reception, which can
prevent your vehicle from placing an emergency
call. An operable LTE (voice/data) or 4G (data)
network connection and a GPS signal is
required for the SOS Call system to function
properly.
NOTE:Changes or modifications not expressly approved
by the party responsible for compliance could void
the user's authority to operate the equipment.
Automatic SOS — If Equipped
Automatic SOS is a hands-free safety service that
can immediately connect you with help in the event
that your vehicle’s airbags deploy. Please refer to
your provided radio supplement for complete
information.
JACKING AND TIRE CHANGING —
IF EQUIPPED PREPARATIONS FOR JACKING
1. Park the vehicle on a firm, level surface. Avoid ice or slippery areas.
2. Turn on the Hazard Warning Flashers.
3. Apply the parking brake.
4. Place the gear selector into PARK (P).
5. Place the ignition in OFF mode.
CAUTION!
To avoid damage to the mirror during cleaning,
never spray any cleaning solution directly onto
the mirror. Apply the solution onto a clean cloth
and wipe the mirror clean.
WARNING!
Do not attempt to change a tire on the side of
the vehicle close to moving traffic. Pull far
enough off the road to avoid the danger of
being hit when operating the jack or changing
the wheel.
Being under a jacked-up vehicle is dangerous.
The vehicle could slip off the jack and fall on
you. You could be crushed. Never put any part
of your body under a vehicle that is on a jack.
If you need to get under a raised vehicle, take
it to a service center where it can be raised on
a lift.
The jack is designed to be used as a tool for
changing tires only. The jack should not be
used to lift the vehicle for service purposes.
The vehicle should be jacked on a firm level
surface only. Avoid ice or slippery areas.
WARNING!
Do not attempt to change a tire on the side of
the vehicle close to moving traffic. Pull far
enough off the road to avoid being hit when
operating the jack or changing the wheel.
WARNING!
22_RUP_OM_EN_USC_t.book Page 286
Page 303 of 384
IN CASE OF EMERGENCY301
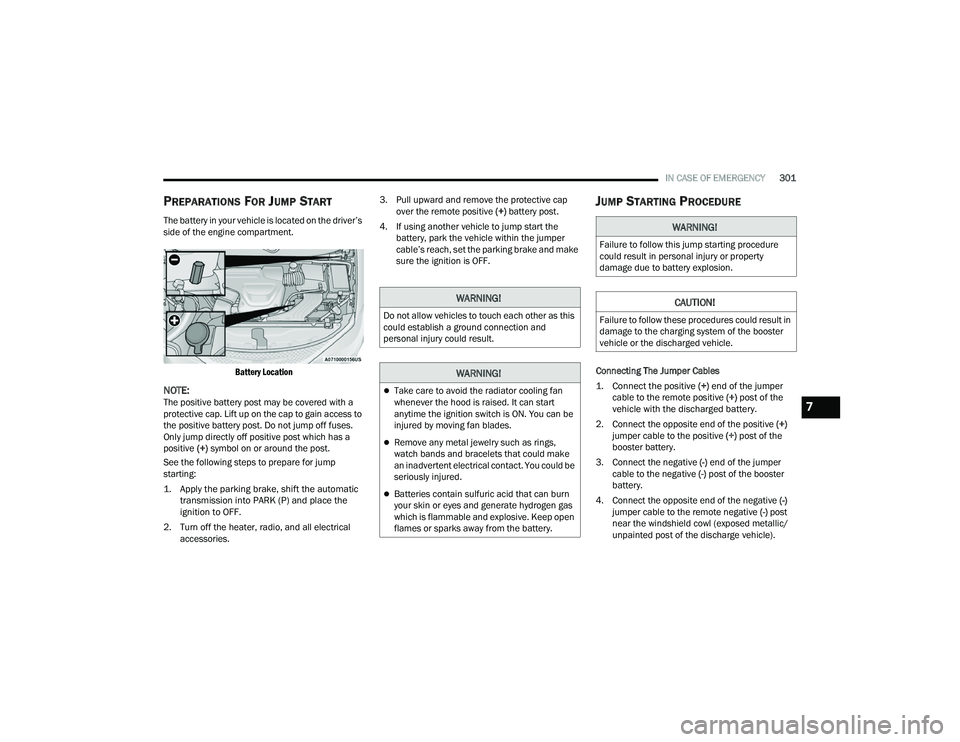
PREPARATIONS FOR JUMP START
The battery in your vehicle is located on the driver’s
side of the engine compartment.
Battery Location
NOTE:The positive battery post may be covered with a
protective cap. Lift up on the cap to gain access to
the positive battery post. Do not jump off fuses.
Only jump directly off positive post which has a
positive (+) symbol on or around the post.
See the following steps to prepare for jump
starting:
1. Apply the parking brake, shift the automatic transmission into PARK (P) and place the
ignition to OFF.
2. Turn off the heater, radio, and all electrical accessories. 3. Pull upward and remove the protective cap
over the remote positive (+) battery post.
4. If using another vehicle to jump start the battery, park the vehicle within the jumper
cable’s reach, set the parking brake and make
sure the ignition is OFF.
JUMP STARTING PROCEDURE
Connecting The Jumper Cables
1. Connect the positive
(+) end of the jumper
cable to the remote positive (+)
post of the
vehicle with the discharged battery.
2. Connect the opposite end of the positive (+)
jumper cable to the positive (+) post of the
booster battery.
3. Connect the negative (-) end of the jumper
cable to the negative (-) post of the booster
battery.
4. Connect the opposite end of the negative (-)
jumper cable to the remote negative (-) post
near the windshield cowl (exposed metallic/
unpainted post of the discharge vehicle).
WARNING!
Do not allow vehicles to touch each other as this
could establish a ground connection and
personal injury could result.
WARNING!
Take care to avoid the radiator cooling fan
whenever the hood is raised. It can start
anytime the ignition switch is ON. You can be
injured by moving fan blades.
Remove any metal jewelry such as rings,
watch bands and bracelets that could make
an inadvertent electrical contact. You could be
seriously injured.
Batteries contain sulfuric acid that can burn
your skin or eyes and generate hydrogen gas
which is flammable and explosive. Keep open
flames or sparks away from the battery.
WARNING!
Failure to follow this jump starting procedure
could result in personal injury or property
damage due to battery explosion.
CAUTION!
Failure to follow these procedures could result in
damage to the charging system of the booster
vehicle or the discharged vehicle.
7
22_RUP_OM_EN_USC_t.book Page 301
Page 335 of 384

SERVICING AND MAINTENANCE333
F53 ––Not Populated
F54 40 Amp Green –ESP-ECU And Valves
F55 –15 Amp BlueRadio Frequency HUB/ Keyless
Ignition System (KIN) / ESL / DVD
F56 –10 Amp RedFront and Rear HVAC Control
Module / Occupant Classification
Module (OCM) / Electronic Steering Lock (ESL) / ESP / ESC
F57 ––Not Populated
F58 –10 Amp RedDrive Train Control Mod / Power
Transfer Unit *
F59 30 Amp Pink –Trailer Tow Receptacle *
F60 –20 Amp Yellow Rear Cargo Pwr Outlet
F61 –20 Amp YellowTrailer Tow Right Stop/Turn *
F62 –20 Amp Yellow Power Transfer Unit *
F63 –20 Amp Yellow Trailer Tow Left Stop/Turn *
F64 –15 Amp Blue RT HID Headlamp *
F65 ––Not Populated
F66 –15 Amp Blue Cluster
F67 –10 Amp RedHaptic Lane Feedback Module
(HALF) / Parktronics System (PTS)/
Drivers Assist System Module (DASM)
Cavity Cartridge Fuse Blade FuseDescription
*If Equipped
8
22_RUP_OM_EN_USC_t.book Page 333