2022 CHRYSLER PACIFICA HYBRID steering
[x] Cancel search: steeringPage 169 of 384

STARTING AND OPERATING167
Left Lane Departure — Only Left Lane Detected
When the LaneSense system is on, the Lane -
Sense Telltale is solid white only when the
left lane marking has been detected and the
system is ready to provide visual warnings in the
instrument cluster display if an unintentional
lane departure occurs on the left side.
When the LaneSense system senses the lane
has been approached and is in a lane departure
situation, the visual warning in the instrument
cluster display will show the left inside lane line
flashing yellow (on/off), while the outside lane
line on the left of the display will remain solid
yellow. The LaneSense telltale changes from
solid white to flashing yellow.
Lane Approached With Flashing Yellow Line/ Flashing Yellow Telltale
NOTE:The LaneSense system operates with similar
behavior for a right lane departure when only the
right lane marking has been detected.
Left Lane Departure — Both Lane Lines Detected
When the LaneSense system is on, the lane
lines turn from gray to white. The LaneSense
telltale is solid green when both lane mark -
ings have been detected and the system is
“armed” to provide visual warnings in the instru -
ment cluster display and a torque warning in the
steering wheel if an unintentional lane depar -
ture occurs.
Lanes Sensed (White Lines) With Green Telltale
When the LaneSense system senses a lane drift
situation, the left inside and outside lane lines
turn solid yellow. The LaneSense telltale
changes from solid green to solid yellow. At this
time torque is applied to the steering wheel in
the opposite direction of the lane boundary.
For example: If approaching the left side of the
lane the steering wheel will turn to the right.
Lane Drift With Solid Yellow Line/Solid Yellow Telltale
4
22_RUP_OM_EN_USC_t.book Page 167
Page 170 of 384

168STARTING AND OPERATING
When the LaneSense system senses the lane
has been approached and is in a lane departure
situation, the left inside lane line flashes yellow
(on/off) while the left outside line remains solid
yellow. The LaneSense telltale changes from
solid yellow to flashing yellow. At this time
torque is applied to the steering wheel in the
opposite direction of the lane boundary.
For example: If approaching the left side of the
lane the steering wheel will turn to the right.
Lane Approached With Flashing Yellow Line/ Flashing Yellow Telltale
NOTE:The LaneSense system operates with similar
behavior for a right lane departure.
CHANGING LANESENSE STATUS
The LaneSense system has settings to adjust the
intensity of the torque warning and the warning
zone sensitivity (Early/Medium/Late) that you can
configure through the Uconnect system
Úpage 188.
NOTE:
When enabled the system operates above
37 mph (60 km/h) and below 112 mph
(180 km/h).
The warnings are disabled with use of the
turn signal.
The system will not apply torque to the steering
wheel whenever a safety system engages
(Anti-Lock Brakes, Traction Control System,
Electronic Stability Control, Forward Collision
Warning, etc.).
PARKVIEW REAR BACK UP CAMERA
The ParkView Rear Back Up Camera allows you to
see an on-screen image of the rear surroundings of
your vehicle whenever the gear selector is put into
REVERSE. The image will be displayed on the
touchscreen display along with a caution note
“Check Entire Surroundings” across the top of the
screen. After five seconds, this note will disappear. The ParkView Rear Back Up Camera is located on
the rear of the vehicle above the rear license plate.
NOTE:The ParkView Rear Back Up Camera has program
-
mable modes of operation that may be selected
through the Uconnect system Ú page 188.
When the vehicle is shifted out of REVERSE with
camera delay turned off, the rear camera mode is
exited and the previous screen appears.
When the vehicle is shifted out of REVERSE with
camera delay turned on, the camera image will
continue to be displayed for up to 10 seconds
unless the vehicle speed exceeds 8 mph (13 km/h),
the vehicle is shifted into PARK, or the ignition is
placed in the OFF position.
A touchscreen button to disable display of the
camera image is made available when the vehicle
is not in REVERSE gear. Display of the camera
image after shifting out of REVERSE can be
disabled via a touchscreen button personalization
entry in the camera settings menu.
When enabled, active guidelines are overlaid on
the image to illustrate the width of the vehicle and
its projected back up path based on the steering
wheel position.
Different colored zones indicate the distance to
the rear of the vehicle.
22_RUP_OM_EN_USC_t.book Page 168
Page 172 of 384

170STARTING AND OPERATING
NOTE:
If the vehicle speed remains below 8 mph
(13 km/h), the Rear View Camera image will be
displayed continuously until deactivated via the
touchscreen button X, the transmission is
shifted into PARK, or the ignition is placed in the
OFF position.
The touchscreen button X to disable display of
the camera image is made available ONLY when
the vehicle is not in REVERSE.
When enabled, active guidelines are overlaid on
the image to illustrate the width of the vehicle,
including the side view mirrors and its projected
back up path based on the steering wheel position.
Different colored zones indicate the distance to
the rear of the vehicle.
The following table shows the approximate
distances for each zone: Modes Of Operation
Manual activation of the Surround View system is
selected by pressing the Surround View Camera
soft key located in the Controls screen within the
Uconnect system.
Top View
The Top View will show in the Uconnect system with
Rear View and Front View in a split screen display.
There is integrated ParkSense arcs in the image at
the front and rear of the vehicle. The arcs will
change color from yellow to red corresponding the
distance zones to the oncoming object.
Surround View Camera View
NOTE:
Front tires will be in image when the tires are
turned.
Due to wide angle cameras in the mirrors, the
image will appear distorted.
Top View will show which sliding doors are open.
Open front doors will remove outside image.
Rear View Plus Top View This is the default view of the system in
REVERSE and is always paired with the
Top View of the vehicle with optional
active guidelines for the projected path
when enabled.
Rear Cross Path View
Pressing the Rear Cross Path soft key will
give the driver a wider angle view of the
Rear View. The Top View will be disabled
when this is selected.
Front View Plus Top View The Front View will show you what is
immediately in front of the vehicle and is
always paired with the Top View of the
vehicle.
Front Cross Path View Pressing the Front Cross Path soft key
will give the driver a wider angle view of
the Front View. The Top View will be
disabled when this is selected.
Back Up Camera View Pressing the Back Up Camera soft key
will provide a full screen rear view with
Zoom View.
Zone
Distance To The Rear
Of The Vehicle
Red 0 - 1 ft (0 - 30 cm)
Yellow 1 ft - 6.5 ft (30 cm - 2 m)
Green 6.5 ft or greater
(2 m or greater)
22_RUP_OM_EN_USC_t.book Page 170
Page 177 of 384

STARTING AND OPERATING175
Gross Axle Weight Rating (GAWR)
The GAWR is the maximum capacity of the front
and rear axles. Distribute the load over the front
and rear axles evenly. Make sure that you do not
exceed either front or rear GAWR Ú page 173.
Tongue Weight (TW)
The TW is the downward force exerted on the hitch
ball by the trailer. You must consider this as part of
the load on your vehicle.
Trailer Frontal Area
The Frontal Area is the maximum height multiplied
by the maximum width of the front of a trailer.
Trailer Sway Control (TSC)
The TSC can be a mechanical telescoping link that
can be installed between the hitch receiver and the
trailer tongue that typically provides adjustable
friction associated with the telescoping motion to
dampen any unwanted trailer swaying motions
while traveling.
The electronic TSC (if equipped), recognizes a
swaying trailer and automatically applies individual
wheel brakes and/or reduces engine power to
attempt to eliminate the trailer sway.
Weight-Carrying Hitch
A Weight-Carrying Hitch supports the trailer tongue
weight, just as if it were luggage located at a hitch
ball or some other connecting point of the vehicle.
These kinds of hitches are commonly used to tow
small and medium sized trailers.
Weight-Distributing Hitch
A weight-distributing hitch works by applying
leverage through spring (load) bars. They are
typically used for heavier loads to distribute trailer
tongue weight to the tow vehicle's front axle and
the trailer axle(s). When used in accordance with
the manufacturer’s directions, it provides for a
more level ride, offering more consistent steering
and brake control thereby enhancing towing safety. The addition of a friction/hydraulic sway
control also dampens sway caused by traffic and
crosswinds and contributes positively to tow
vehicle and trailer stability. TSC and a
weight-distributing (load equalizing) hitch are
recommended for heavier TW and may be required
depending on vehicle and trailer configuration/
loading to comply with GAWR requirements.
WARNING!
It is important that you do not exceed the
maximum front or rear GAWR. A dangerous
driving condition can result if either rating is
exceeded. You could lose control of the vehicle
and have a collision.
WARNING!
An improperly adjusted weight-distributing
hitch system may reduce handling, stability,
braking performance, and could result in a
collision.
Weight-distributing systems may not be
compatible with surge brake couplers. Consult
with your hitch and trailer manufacturer or a
reputable Recreational Vehicle dealer for
additional information.
4
22_RUP_OM_EN_USC_t.book Page 175
Page 183 of 384

STARTING AND OPERATING181
(Continued)
Towing Requirements — Tires
Do not attempt to tow a trailer while using a
compact spare tire.
Do not drive more than 50 mph (80 km/h) when
towing while using a full size spare tire.
Proper tire inflation pressures are essential to
the safe and satisfactory operation of your
vehicle.
Check the trailer tires for proper tire inflation
pressures before trailer usage.
Check for signs of tire wear or visible tire
damage before towing a trailer.
Replacing tires with a higher load carrying
capacity will not increase the vehicle's GVWR
and GAWR limits.
For further information Ú page 346.
WARNING!
Make certain that the load is secured in the
trailer and will not shift during travel. When
trailering cargo that is not fully secured,
dynamic load shifts can occur that may be
difficult for the driver to control. You could lose
control of your vehicle and have a collision.
When hauling cargo or towing a trailer, do not
overload your vehicle or trailer. Overloading
can cause a loss of control, poor performance
or damage to brakes, axle, engine, transmis -
sion, steering, suspension, chassis structure
or tires.
Safety chains must always be used between
your vehicle and trailer. Always connect the
chains to the hook retainers of the vehicle
hitch. Cross the chains under the trailer
tongue and allow enough slack for turning
corners.
Vehicles with trailers should not be parked on
a grade. When parking, apply the parking
brake on the tow vehicle. Put the tow vehicle
transmission in PARK. For four-wheel drive
vehicles, make sure the transfer case is not in
NEUTRAL. Always, block or "chock" the trailer
wheels.
GCWR must not be exceeded.
Total weight must be distributed between the
tow vehicle and the trailer such that the
following four ratings are not exceeded :
GVWR
GTW
GAWR
Tongue weight rating for the trailer hitch
utilized.
WARNING!
4
22_RUP_OM_EN_USC_t.book Page 181
Page 195 of 384

MULTIMEDIA193
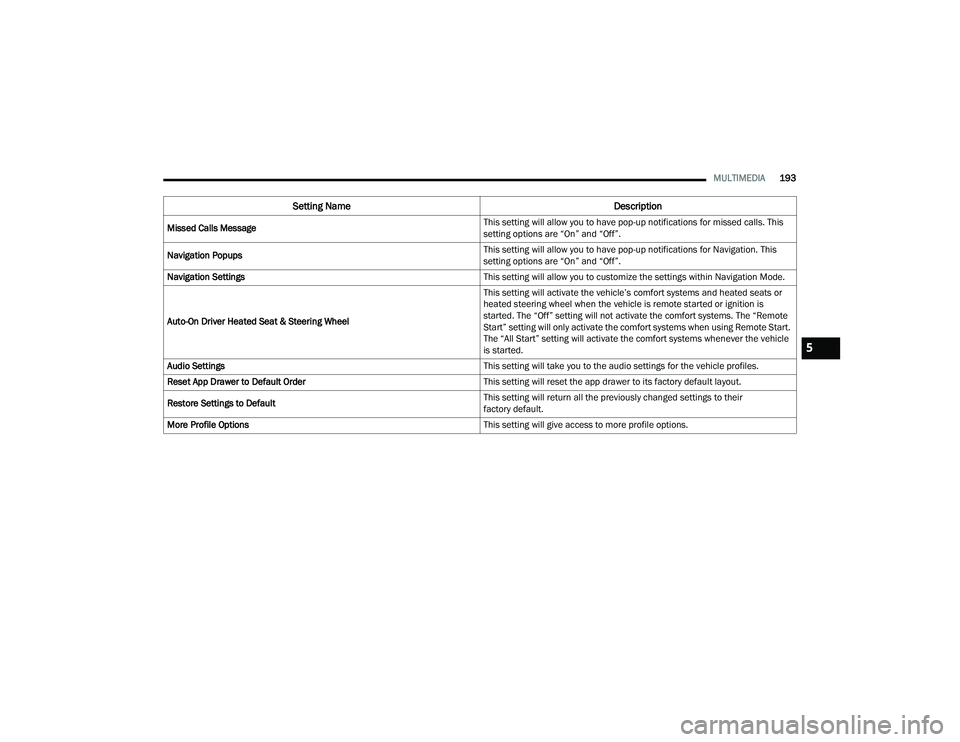
Missed Calls Message This setting will allow you to have pop-up notifications for missed calls. This
setting options are “On” and “Off”.
Navigation Popups This setting will allow you to have pop-up notifications for Navigation. This
setting options are “On” and “Off”.
Navigation Settings This setting will allow you to customize the settings within Navigation Mode.
Auto-On Driver Heated Seat & Steering Wheel This setting will activate the vehicle’s comfort systems and heated seats or
heated steering wheel when the vehicle is remote started or ignition is
started. The “Off” setting will not activate the comfort systems. The “Remote
Start” setting will only activate the comfort systems when using Remote Start.
The “All Start” setting will activate the comfort systems whenever the vehicle
is started.
Audio Settings This setting will take you to the audio settings for the vehicle profiles.
Reset App Drawer to Default Order This setting will reset the app drawer to its factory default layout.
Restore Settings to Default This setting will return all the previously changed settings to their
factory default.
More Profile Options This setting will give access to more profile options.
Setting NameDescription
5
22_RUP_OM_EN_USC_t.book Page 193
Page 198 of 384

196MULTIMEDIA
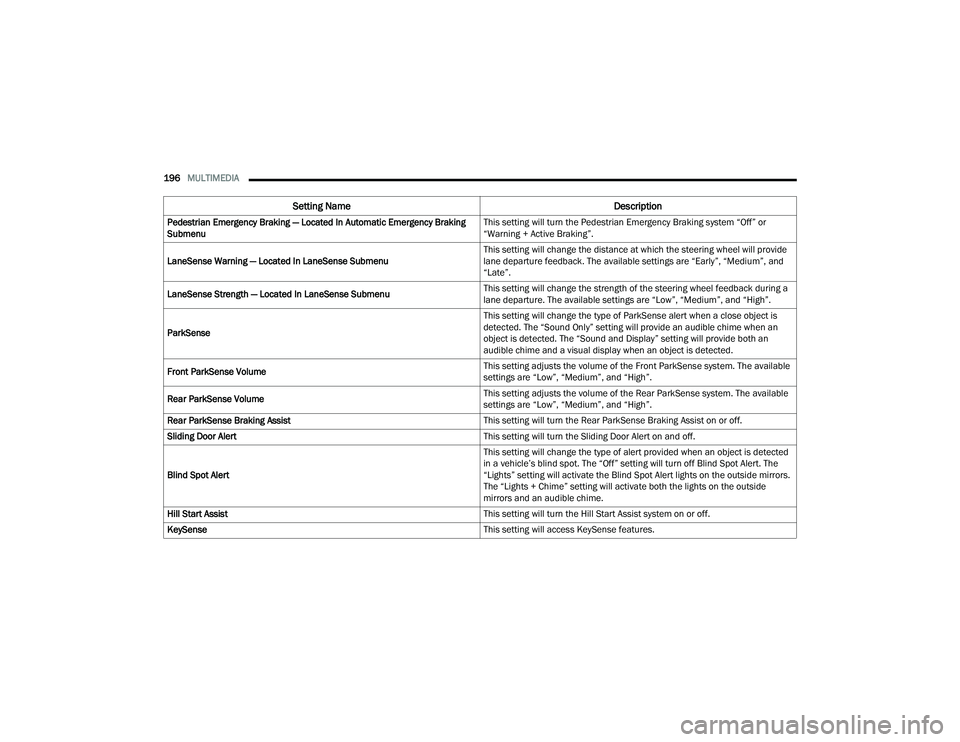
Pedestrian Emergency Braking — Located In Automatic Emergency Braking
Submenu This setting will turn the Pedestrian Emergency Braking system “Off” or
“Warning + Active Braking”.
LaneSense Warning — Located In LaneSense Submenu This setting will change the distance at which the steering wheel will provide
lane departure feedback. The available settings are “Early”, “Medium”, and
“Late”.
LaneSense Strength — Located In LaneSense Submenu This setting will change the strength of the steering wheel feedback during a
lane departure. The available settings are “Low”, “Medium”, and “High”.
ParkSense This setting will change the type of ParkSense alert when a close object is
detected. The “Sound Only” setting will provide an audible chime when an
object is detected. The “Sound and Display” setting will provide both an
audible chime and a visual display when an object is detected.
Front ParkSense Volume This setting adjusts the volume of the Front ParkSense system. The available
settings are “Low”, “Medium”, and “High”.
Rear ParkSense Volume This setting adjusts the volume of the Rear ParkSense system. The available
settings are “Low”, “Medium”, and “High”.
Rear ParkSense Braking Assist This setting will turn the Rear ParkSense Braking Assist on or off.
Sliding Door Alert This setting will turn the Sliding Door Alert on and off.
Blind Spot Alert This setting will change the type of alert provided when an object is detected
in a vehicle’s blind spot. The “Off” setting will turn off Blind Spot Alert. The
“Lights” setting will activate the Blind Spot Alert lights on the outside mirrors.
The “Lights + Chime” setting will activate both the lights on the outside
mirrors and an audible chime.
Hill Start Assist This setting will turn the Hill Start Assist system on or off.
KeySense This setting will access KeySense features.
Setting NameDescription
22_RUP_OM_EN_USC_t.book Page 196
Page 207 of 384

MULTIMEDIA205
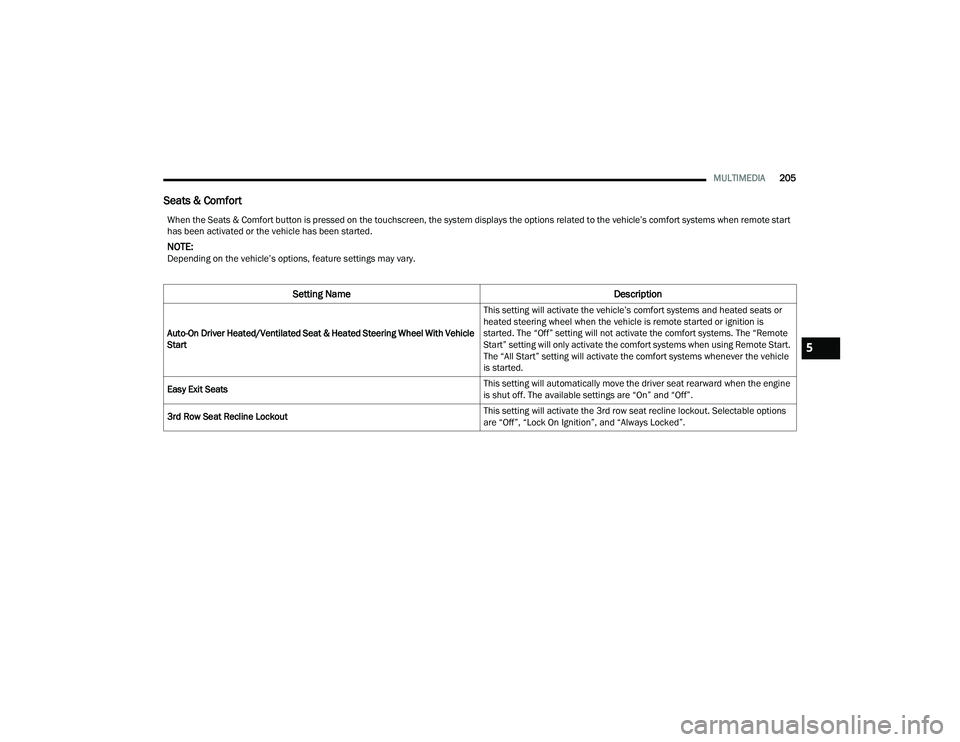
Seats & Comfort
When the Seats & Comfort button is pressed on the touchscreen, the system displays the options related to the vehicle’s comfort systems when remote start
has been activated or the vehicle has been started.
NOTE:Depending on the vehicle’s options, feature settings may vary.
Setting Name Description
Auto-On Driver Heated/Ventilated Seat & Heated Steering Wheel With Vehicle
Start This setting will activate the vehicle’s comfort systems and heated seats or
heated steering wheel when the vehicle is remote started or ignition is
started. The “Off” setting will not activate the comfort systems. The “Remote
Start” setting will only activate the comfort systems when using Remote Start.
The “All Start” setting will activate the comfort systems whenever the vehicle
is started.
Easy Exit Seats This setting will automatically move the driver seat rearward when the engine
is shut off. The available settings are “On” and “Off”.
3rd Row Seat Recline Lockout This setting will activate the 3rd row seat recline lockout. Selectable options
are “Off”, “Lock On Ignition”, and “Always Locked”.
5
22_RUP_OM_EN_USC_t.book Page 205