2022 CHRYSLER PACIFICA HYBRID spare wheel
[x] Cancel search: spare wheelPage 9 of 384

7
JUMP STARTING................................................... 300 Preparations For Jump Start......................... 301Jump Starting Procedure .............................. 301
REFUELING IN EMERGENCY –
IF EQUIPPED ......................................................... 302
IF YOUR ENGINE OVERHEATS ............................ 303
MANUAL PARK RELEASE .................................. 304
FREEING A STUCK VEHICLE .............................. 305
TOWING A DISABLED VEHICLE .......................... 306
All Wheel Drive (AWD) Models ...................... 308
ENHANCED ACCIDENT RESPONSE SYSTEM
(EARS) .................................................................. 308
EVENT DATA RECORDER (EDR) ......................... 308
SERVICING AND MAINTENANCE
SCHEDULED SERVICING ..................................... 309
Maintenance Plan ......................................... 310
ENGINE COMPARTMENT .................................... 313
3.6L Engine.................................................... 313
Checking Oil Level ......................................... 314
Adding Washer Fluid .................................... 314
Maintenance-Free Battery ........................... 314
Pressure Washing ......................................... 315 VEHICLE MAINTENANCE..................................... 315
Engine Oil ...................................................... 315
Engine Oil Filter ............................................. 316Engine Air Cleaner Filter ............................... 316
Accessory Drive Belt Inspection ................... 317Air Conditioner Maintenance........................ 317
Body Lubrication ........................................... 320Windshield Wiper Blades.............................. 320Exhaust System ............................................ 323
Cooling System .............................................. 324
Brake System ............................................... 327
Automatic Transmission .............................. 328Fuses.............................................................. 329
Bulb Replacement......................................... 337
TIRES ................................................................... 339
Tire Safety Information ................................. 339
Tires — General Information ......................... 346
Tire Types....................................................... 350
Spare Tires — If Equipped ............................ 350
Wheel And Wheel Trim Care ........................ 352
Snow Traction Devices ................................. 353
Tire Rotation Recommendations ................. 355 DEPARTMENT OF TRANSPORTATION
UNIFORM TIRE QUALITY GRADES .................... 355
Treadwear...................................................... 356
Traction Grades ............................................. 356Temperature Grades..................................... 356
STORING THE VEHICLE ....................................... 357
BODYWORK .......................................................... 357
Protection From Atmospheric Agents ......... 357
Body And Underbody Maintenance ............. 357
Preserving The Bodywork ............................. 357
INTERIORS ........................................................... 358
Seats And Fabric Parts ................................. 358
Plastic And Coated Parts .............................. 359
Leather Surfaces........................................... 359
Glass Surfaces ............................................. 359TECHNICAL SPECIFICATIONS
VEHICLE IDENTIFICATION NUMBER
(VIN) ....................................................................... 360
BRAKE SYSTEM ................................................... 360
WHEEL AND TIRE TORQUE
SPECIFICATIONS .................................................. 360Torque Specifications ................................... 360
22_RUP_OM_EN_USC_t.book Page 7
Page 128 of 384

126GETTING TO KNOW YOUR INSTRUMENT PANEL
Service AWD Warning Light — If Equipped
This telltale will turn on to indicate that
the All Wheel Drive (AWD) system is not
functioning properly and that service is
required. Contact an authorized dealer.
Service Forward Collision Warning (FCW)
or Pedestrian Emergency Braking (PEB)
Warning Light — If Equipped
This warning light will illuminate to
indicate a fault in the FCW or PEB
Warning System. Contact an authorized
dealer for service Úpage 233.
Service Stop/Start System Warning Light —
If Equipped
This warning light will illuminate when the
Stop/Start system is not functioning
properly and service is required. Contact
an authorized dealer for service
Ú page 143.
Tire Pressure Monitoring System (TPMS)
Warning Light
The warning light switches on and a
message is displayed to indicate that the
tire pressure is lower than the
recommended value and/or that slow
pressure loss is occurring. In these cases, optimal
tire duration and fuel consumption may not be
guaranteed.
Should one or more tires be in the condition
mentioned above, the display will show the
indications corresponding to each tire.
Each tire, including the spare (if provided), should
be checked monthly when cold and inflated to the
inflation pressure recommended by the vehicle
manufacturer on the vehicle placard or tire inflation
pressure label. If your vehicle has tires of a different
size than the size indicated on the vehicle placard
or tire inflation pressure label, you should
determine the proper tire inflation pressure for
those tires.
As an added safety feature, your vehicle has been
equipped with a TPMS that illuminates a low tire
pressure telltale when one or more of your tires is
significantly underinflated. Accordingly, when the
low tire pressure telltale illuminates, you should
stop and check your tires as soon as possible, and
inflate them to the proper pressure. Driving on a
significantly underinflated tire causes the tire to
overheat and can lead to tire failure. Underinflation
also reduces fuel efficiency and tire tread life, and
may affect the vehicle’s handling and stopping
ability.
WARNING!
A malfunctioning catalytic converter, as
referenced above, can reach higher
temperatures than in normal operating
conditions. This can cause a fire if you drive
slowly or park over flammable substances such
as dry plants, wood, cardboard, etc. This could
result in death or serious injury to the driver,
occupants or others.
CAUTION!
Prolonged driving with the Malfunction Indicator
Light (MIL) on could cause damage to the
vehicle control system. It also could affect fuel
economy and driveability. If the MIL is flashing,
severe catalytic converter damage and power
loss will soon occur. Immediate service is
required.
CAUTION!
Do not continue driving with one or more flat
tires as handling may be compromised. Stop the
vehicle, avoiding sharp braking and steering. If a
tire puncture occurs, repair immediately using
the dedicated tire repair kit and contact an
authorized dealer as soon as possible.
22_RUP_OM_EN_USC_t.book Page 126
Page 183 of 384

STARTING AND OPERATING181
(Continued)
Towing Requirements — Tires
Do not attempt to tow a trailer while using a
compact spare tire.
Do not drive more than 50 mph (80 km/h) when
towing while using a full size spare tire.
Proper tire inflation pressures are essential to
the safe and satisfactory operation of your
vehicle.
Check the trailer tires for proper tire inflation
pressures before trailer usage.
Check for signs of tire wear or visible tire
damage before towing a trailer.
Replacing tires with a higher load carrying
capacity will not increase the vehicle's GVWR
and GAWR limits.
For further information Ú page 346.
WARNING!
Make certain that the load is secured in the
trailer and will not shift during travel. When
trailering cargo that is not fully secured,
dynamic load shifts can occur that may be
difficult for the driver to control. You could lose
control of your vehicle and have a collision.
When hauling cargo or towing a trailer, do not
overload your vehicle or trailer. Overloading
can cause a loss of control, poor performance
or damage to brakes, axle, engine, transmis -
sion, steering, suspension, chassis structure
or tires.
Safety chains must always be used between
your vehicle and trailer. Always connect the
chains to the hook retainers of the vehicle
hitch. Cross the chains under the trailer
tongue and allow enough slack for turning
corners.
Vehicles with trailers should not be parked on
a grade. When parking, apply the parking
brake on the tow vehicle. Put the tow vehicle
transmission in PARK. For four-wheel drive
vehicles, make sure the transfer case is not in
NEUTRAL. Always, block or "chock" the trailer
wheels.
GCWR must not be exceeded.
Total weight must be distributed between the
tow vehicle and the trailer such that the
following four ratings are not exceeded :
GVWR
GTW
GAWR
Tongue weight rating for the trailer hitch
utilized.
WARNING!
4
22_RUP_OM_EN_USC_t.book Page 181
Page 240 of 384

238SAFETY
If the ignition is cycled, this sequence will repeat,
providing the system fault still exists. If the system
fault no longer exists, the TPMS Warning Light will
no longer flash, and the “SERVICE TPM SYSTEM”
message will no longer display, and a pressure
value will display in place of the dashes. A system
fault can occur due to any of the following:
Jamming due to electronic devices or driving
next to facilities emitting the same radio
frequencies as the TPMS sensors
Installing some form of aftermarket window
tinting that affects radio wave signals
Lots of snow or ice around the wheels or wheel
housings
Using tire chains on the vehicle
Using wheels/tires not equipped with TPMS
sensors
Vehicles With Compact Spare — If Equipped
1. The compact spare tire does not have a Tire Pressure Monitoring System sensor.
Therefore, the TPMS will not monitor the
pressure in the compact spare tire.
2. If you install the compact spare tire in place of a road tire that has a pressure below the
low-pressure warning limit, upon the next
ignition cycle, the TPMS Warning Light will
remain on and a chime will sound. In addition,
the graphic in the instrument cluster will still
display a different color pressure value. 3. After driving the vehicle for up to 20 minutes
above 15 mph (24 km/h), the TPMS Warning
Light will flash on and off for 75 seconds and
then remain on solid. In addition, the
instrument cluster will display a “SERVICE TPM
SYSTEM” message for five seconds and then
display dashes (--) in place of the pressure
value.
4. For each subsequent ignition cycle, a chime will sound, the TPMS Warning Light will flash
on and off for 75 seconds and then remain on
solid, and the instrument cluster will display a
“SERVICE TPM SYSTEM” message for five
seconds and then display dashes (- -) in place
of the pressure value.
5. Once you repair or replace the original road tire and reinstall it on the vehicle in place of the
compact spare, the TPMS will update automat -
ically. In addition, the TPMS Warning Light will
turn off and the graphic in the instrument
cluster will display a new pressure value
instead of dashes (--), as long as no tire
pressure is below the low-pressure warning
limit in any of the four active road tires. The
vehicle may need to be driven for up to
20 minutes above 15 mph (24 km/h) in order
for the TPMS to receive this information.
TIRE PRESSURE MONITORING SYSTEM LOW
PRESSURE WARNINGS
The TPMS Warning Light will illuminate in
the instrument cluster and a chime will
sound when tire pressure is low in one or
more of the four active road tires. In
addition, the instrument cluster will display an
"Inflate to XX" message and a graphic showing the
pressure values of each tire with the low tire
pressure values in a different color.
Tire Pressure Monitoring System
Should this occur, you should stop as soon as
possible and inflate the tires with low pressure
(those in a different color in the instrument cluster
graphic) to the vehicle’s recommended cold
placard pressure value as shown in the
"Inflate to XX" message.
22_RUP_OM_EN_USC_t.book Page 238
Page 289 of 384

IN CASE OF EMERGENCY287
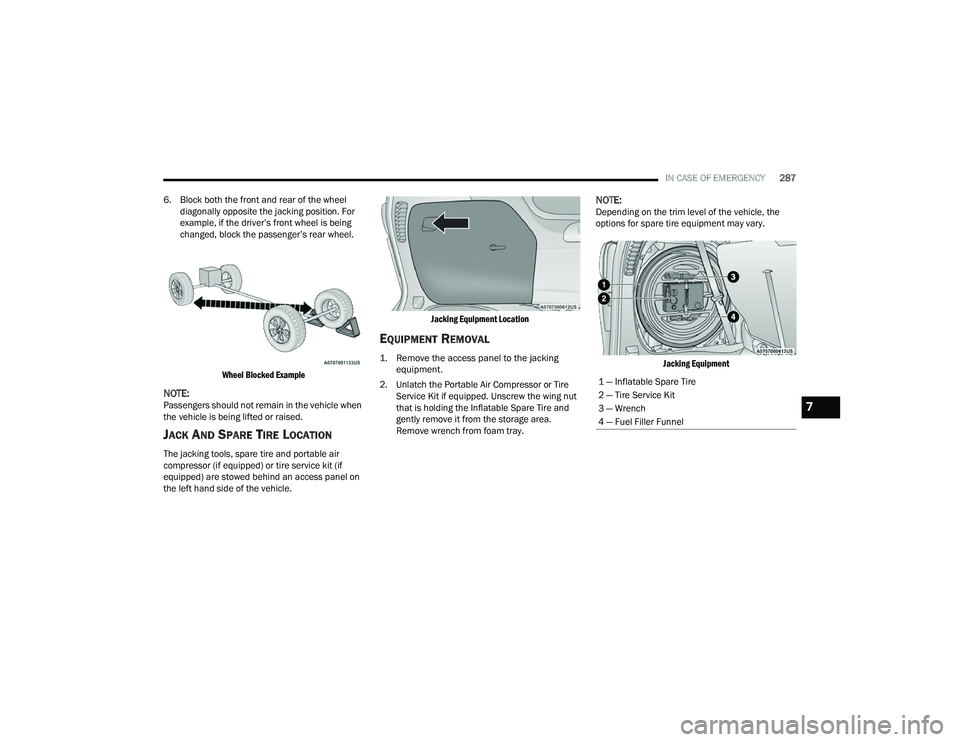
6. Block both the front and rear of the wheel diagonally opposite the jacking position. For
example, if the driver’s front wheel is being
changed, block the passenger’s rear wheel.
Wheel Blocked Example
NOTE:Passengers should not remain in the vehicle when
the vehicle is being lifted or raised.
JACK AND SPARE TIRE LOCATION
The jacking tools, spare tire and portable air
compressor (if equipped) or tire service kit (if
equipped) are stowed behind an access panel on
the left hand side of the vehicle.
Jacking Equipment Location
EQUIPMENT REMOVAL
1. Remove the access panel to the jacking
equipment.
2. Unlatch the Portable Air Compressor or Tire Service Kit if equipped. Unscrew the wing nut
that is holding the Inflatable Spare Tire and
gently remove it from the storage area.
Remove wrench from foam tray.
NOTE:Depending on the trim level of the vehicle, the
options for spare tire equipment may vary.
Jacking Equipment
1 — Inflatable Spare Tire
2 — Tire Service Kit
3 — Wrench
4 — Fuel Filler Funnel
7
22_RUP_OM_EN_USC_t.book Page 287
Page 290 of 384

288IN CASE OF EMERGENCY
(Continued)
Jacking Equipment
3. Turn the jack screw counterclockwise to remove the jack from the storage area behind
the tire.
Jack Location
JACKING INSTRUCTIONS
Jack Warning Label
1 — Inflatable Spare Tire
2 — Portable Air Compressor
1 — Jack Screw
2 — Jack
WARNING!
Carefully follow these tire changing warnings to
help prevent personal injury or damage to your
vehicle:
Always park on a firm, level surface as far from
the edge of the roadway as possible before
raising the vehicle.
Turn on the Hazard Warning Flashers.
Apply the parking brake firmly and set the
transmission in PARK.
Block the wheel diagonally opposite the wheel
to be raised.
Do not let any passenger sit in the vehicle
when it is on a jack.
Do not get under the vehicle when it is on a
jack. If you need to get under a raised vehicle,
take it to a service center where it can be
raised on a lift.
Only use the jack in the positions indicated
and for lifting this vehicle during a tire change.
If working on or near a roadway, be extremely
careful of motor traffic.
WARNING!
22_RUP_OM_EN_USC_t.book Page 288
Page 291 of 384

IN CASE OF EMERGENCY289
Detailed information about the inflatable spare
tire, its use, and operation Ú page 351.
Extending The Wrench
1. Loosen (but do not remove) the wheel lug nuts by turning them to the left, one turn while
the wheel is still on the ground.
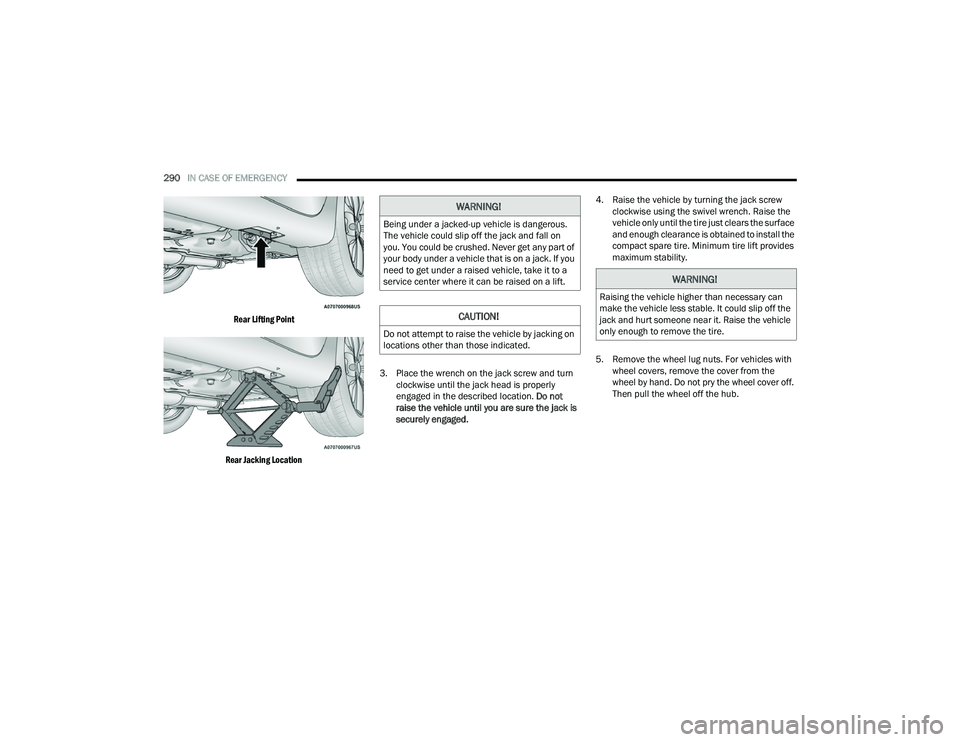
2. There are two jack engagement locations on
each side of the vehicle body. These locations
are on the sill flange of the vehicle body.
NOTE:Placement for the front and rear jacking locations
are critical. See the following images for proper
jacking locations.
Jacking Locations Front Lifting Point
Front Jack Location
CAUTION!
Do not attempt to raise the vehicle by jacking on
locations other than those indicated in the
Jacking Instructions for this vehicle.
7
22_RUP_OM_EN_USC_t.book Page 289
Page 292 of 384

290IN CASE OF EMERGENCY
Rear Lifting Point
Rear Jacking Location
3. Place the wrench on the jack screw and turn
clockwise until the jack head is properly
engaged in the described location. Do not
raise the vehicle until you are sure the jack is
securely engaged. 4. Raise the vehicle by turning the jack screw
clockwise using the swivel wrench. Raise the
vehicle only until the tire just clears the surface
and enough clearance is obtained to install the
compact spare tire. Minimum tire lift provides
maximum stability.
5. Remove the wheel lug nuts. For vehicles with wheel covers, remove the cover from the
wheel by hand. Do not pry the wheel cover off.
Then pull the wheel off the hub.
WARNING!
Being under a jacked-up vehicle is dangerous.
The vehicle could slip off the jack and fall on
you. You could be crushed. Never get any part of
your body under a vehicle that is on a jack. If you
need to get under a raised vehicle, take it to a
service center where it can be raised on a lift.
CAUTION!
Do not attempt to raise the vehicle by jacking on
locations other than those indicated.
WARNING!
Raising the vehicle higher than necessary can
make the vehicle less stable. It could slip off the
jack and hurt someone near it. Raise the vehicle
only enough to remove the tire.
22_RUP_OM_EN_USC_t.book Page 290