2022 CHEVROLET SUBURBAN headlamp
[x] Cancel search: headlampPage 144 of 438

Chevrolet Tahoe/Suburban Owner Manual (GMNA-Localizing-U.S./Canada/
Mexico-15555985) - 2022 - CRC - 12/3/21
Lighting 143
Headlamp High/Low-Beam
Changer
Push the turn signal lever away from you
and release to turn the high beams on.
To return to low beams, push the lever
again or pull it toward you and release.
When the high-beam headlamps are on, this
indicator light on the instrument cluster will
also be on.
Flash-to-Pass
This feature lets you use the high-beam
headlamps to signal a driver in front of you
that you want to pass. It works even if the
headlamps are in the automatic position.
To use it, pull the turn signal lever toward
you, then release it.
If the headlamps are in the automatic
position or on low beam, the high-beam
headlamps will turn on. Depending on the
type of headlamp, they will either turn offafter a short duration or stay on as long as
you hold the lever toward you. The
high-beam indicator on the instrument
cluster will come on. Release the lever to
return to normal operation.
Daytime Running Lamps (DRL)
DRL can make it easier for others to see the
front of the vehicle during the day. Fully
functional DRL are required on all vehicles
first sold in Canada.
The DRL system comes on when the
following conditions are met:
.The ignition is on.
.The exterior lamp control is in AUTO.
.The light sensor determines it is daytime.
When the DRL system is on, only the DRL
are on. The taillamps, sidemarker lamps,
instrument panel lights, and other lamps
will not be on.
When it begins to get dark, the automatic
headlamp system switches from DRL to the
headlamps.
To turn off the DRL, turn the exterior lamp
control to
Oand then release. For vehicles
first sold in Canada, off will only work when
the vehicle is parked.
Automatic Headlamp System
When the exterior lamp control is set to
AUTO and it is dark enough outside, the
headlamps come on automatically.
There is a light sensor on top of the
instrument panel. Do not cover the sensor,
otherwise the headlamps will come on when
they are not needed.
The system may also turn on the headlamps
when driving through a parking garage or
tunnel.
If the vehicle is started in a dark garage, the
automatic headlamp system comes on
immediately. If it is light outside when the
vehicle leaves the garage, there is a slight
Page 145 of 438

Chevrolet Tahoe/Suburban Owner Manual (GMNA-Localizing-U.S./Canada/
Mexico-15555985) - 2022 - CRC - 12/3/21
144 Lighting
delay before the automatic headlamp
system changes to the DRL. During that
delay, the instrument cluster may not be as
bright as usual. Make sure the instrument
panel brightness control is in the full bright
position. SeeInstrument Panel Illumination
Control 0145.
When it is bright enough outside, the
headlamps will turn off or may change to
Daytime Running Lamps (DRL).
The automatic headlamp system turns off
when the exterior lamp control is turned to
Oor the ignition is off.
Lights On with Wipers
If the windshield wipers are activated in
daylight with the engine on, and the
exterior lamp control is in AUTO, the
headlamps, parking lamps, and other
exterior lamps come on. The transition time
for the lamps coming on varies based on
wiper speed. When the wipers are not
operating, these lamps turn off. Move the
exterior lamp control to
Oor;to disable
this feature.
Hazard Warning Flashers
|: Press this button to make the front
and rear turn signal lamps flash on and off.
Press again to turn the flashers off.
When the hazard warning flashers are on,
the vehicle's turn signals will not work.
Turn and Lane-Change Signals
An arrow on the instrument cluster flashes
in the direction of the turn or lane change.
Move the turn signal lever all the way up or
down to signal a turn.
Raise or lower the lever for less than
one second until the arrow starts to flash to
signal a lane change. This causes the turn
signals to automatically flash three times.
It will flash six times if Tow/Haul Mode is
active. Holding the turn signal lever for
more than one second will cause the turn
signals to flash until the lever is released.
The lever returns to its starting position
whenever it is released.
If after signaling a turn or a lane change the
arrows flash rapidly or do not come on, a
signal bulb could be burned out.
Page 146 of 438
Chevrolet Tahoe/Suburban Owner Manual (GMNA-Localizing-U.S./Canada/
Mexico-15555985) - 2022 - CRC - 12/3/21
Lighting 145
Replace any burned out bulbs. If a bulb is
not burned out, check the fuse. SeeFuses
and Circuit Breakers 0334.
Turn Signal On Chime
If the turn signal is left on for more than
1.2 km (0.75 mi), a chime sounds at each
flash of the turn signal. The message TURN
SIGNAL ON will also appear in the Driver
Information Center (DIC). To turn the chime
and message off, move the turn signal lever
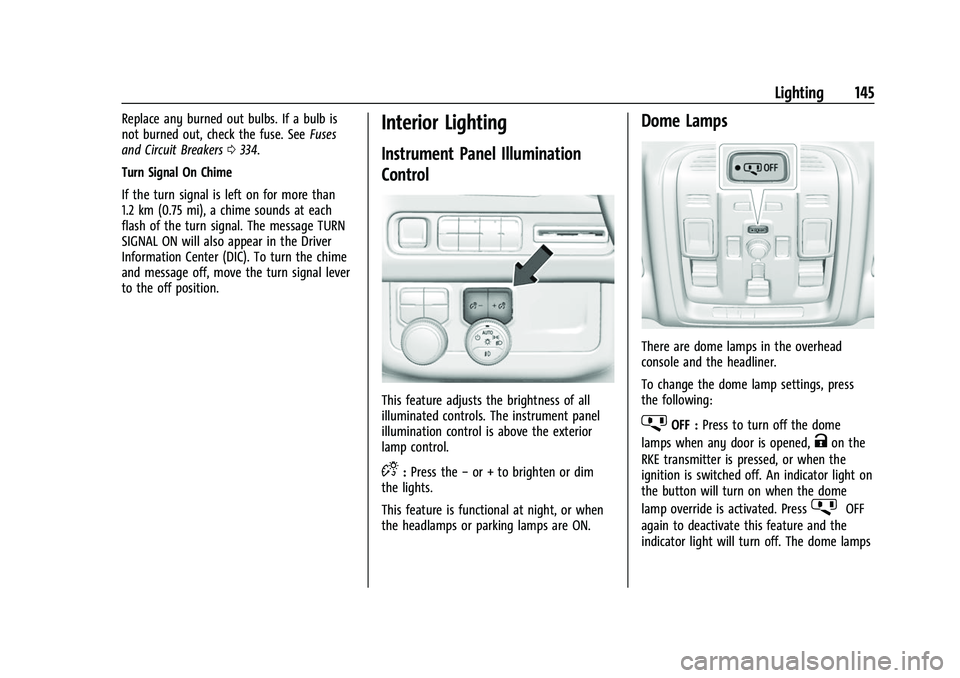
to the off position.Interior Lighting
Instrument Panel Illumination
Control
This feature adjusts the brightness of all
illuminated controls. The instrument panel
illumination control is above the exterior
lamp control.
D: Press the −or + to brighten or dim
the lights.
This feature is functional at night, or when
the headlamps or parking lamps are ON.
Dome Lamps
There are dome lamps in the overhead
console and the headliner.
To change the dome lamp settings, press
the following:
jOFF : Press to turn off the dome
lamps when any door is opened,
Kon the
RKE transmitter is pressed, or when the
ignition is switched off. An indicator light on
the button will turn on when the dome
lamp override is activated. Press
jOFF
again to deactivate this feature and the
indicator light will turn off. The dome lamps
Page 148 of 438

Chevrolet Tahoe/Suburban Owner Manual (GMNA-Localizing-U.S./Canada/
Mexico-15555985) - 2022 - CRC - 12/3/21
Lighting 147
The interior lights turn on when the ignition
is turned off.
The exterior and interior lamps remain on
for a set amount of time, then automatically
turn off.
The exterior lamps turn off immediately by
turning the exterior lamp control off.
This feature can be changed. SeeVehicle
Personalization 0133.
Battery Load Management
The vehicle has Electric Power Management
(EPM), which estimates the battery's
temperature and state of charge. It then
adjusts the voltage for best performance
and extended life of the battery.
When the battery's state of charge is low,
the voltage is raised slightly to quickly bring
the charge back up. When the state of
charge is high, the voltage is lowered
slightly to prevent overcharging. The
voltmeter gauge or the voltage display
on the Driver Information Center (DIC),
if equipped, may show the voltage moving
up or down. This is normal. If there is a
problem, an alert will be displayed. The battery can be discharged at idle if the
electrical loads are very high. This is true for
all vehicles. This is because the generator
(alternator) may not be spinning fast
enough at idle to produce all the power that
is needed for very high electrical loads.
A high electrical load occurs when several of
the following are on, such as: headlamps,
high beams, rear window defogger, climate
control fan at high speed, heated seats,
engine cooling fans, trailer loads, and loads
plugged into accessory power outlets.
EPM works to prevent excessive discharge of
the battery. It does this by balancing the
generator's output and the vehicle's
electrical needs. It can increase engine idle
speed to generate more power, whenever
needed. It can temporarily reduce the power
demands of some accessories.
Normally, these actions occur in steps or
levels, without being noticeable. In rare
cases at the highest levels of corrective
action, this action may be noticeable to the
driver. If so, a DIC message might be
displayed and it is recommended that the
driver reduce the electrical loads as much as
possible.
Battery Power Protection
This feature helps prevent the battery from
being drained, if the interior courtesy lamps
or reading lamps are accidentally left on.
If any of these lamps are left on, they
automatically turn off after 10 minutes,
if the ignition is off. The lamps will not
come back on again until one of the
following occurs:
.The ignition is turned on.
.The doors are closed and then re-opened.
Exterior Lighting Battery Saver
The exterior lamps turn off about 10 minutes
after the ignition is turned off, if the parking
lamps or headlamps have been manually
left on. This protects against draining the
battery. To restart the 10-minute timer, turn
the exterior lamp control to the
Oposition
and then back to the
;or2position.
To keep the lamps on for more than
10 minutes, the ignition must be on or in
ACC/ACCESSORY.
Page 209 of 438

Chevrolet Tahoe/Suburban Owner Manual (GMNA-Localizing-U.S./Canada/
Mexico-15555985) - 2022 - CRC - 12/3/21
208 Driving and Operating
Loading the Vehicle for Off-Road Driving
{Warning
.Unsecured cargo on the load floor can
be tossed about when driving over
rough terrain. You or your passengers
can be struck by flying objects. Secure
the cargo properly.
.Keep cargo in the cargo area as far
forward and as low as possible. The
heaviest things should be on the floor,
forward of the rear axle.
.Heavy loads on the roof raise the
vehicle's center of gravity, making it
more likely to roll over. You can be
seriously or fatally injured if the
vehicle rolls over. Put heavy loads
inside the cargo area, not on the roof.
For more information about loading the
vehicle, see Vehicle Load Limits 0214 and
Tires 0343.
Environmental Concerns
.Always use established trails, roads, and
areas that have been set aside for public
off-road recreational driving and obey all
posted regulations.
.Do not damage shrubs, flowers, trees,
or grasses or disturb wildlife.
.Do not park over things that burn. See
Parking over Things That Burn 0222.
Driving on Hills
Driving safely on hills requires good
judgment and an understanding of what the
vehicle can and cannot do.
{Warning
Many hills are simply too steep for any
vehicle. Driving up hills can cause the
vehicle to stall. Driving down hills can
cause loss of control. Driving across hills
can cause a rollover. You could be injured
or killed. Do not drive on steep hills.
Before driving on a hill, assess the
steepness, traction, and obstructions. If the
terrain ahead cannot be seen, get out of the
vehicle and walk the hill before driving
further.
When driving on hills:
.Use a low gear and keep a firm grip on
the steering wheel.
.Maintain a slow speed.
.When possible, drive straight up or down
the hill.
.Slow down when approaching the top of
the hill.
.Use headlamps even during the day to
make the vehicle more visible.
{Warning
Driving to the top of a hill at high speed
can cause a crash. There could be a
drop-off, embankment, cliff, or even
another vehicle. You could be seriously
injured or killed. As you near the top of a
hill, slow down and stay alert.
.Never go downhill forward or backward
with either the transmission or transfer
case in N (Neutral). The brakes could
overheat and you could lose control.
{Warning
If the vehicle has the two-speed
automatic or electronic transfer case,
shifting the transfer case to N (Neutral)
can cause your vehicle to roll even if the
transmission is in P (Park). This is because
the N (Neutral) position on the transfer (Continued)
Page 214 of 438

Chevrolet Tahoe/Suburban Owner Manual (GMNA-Localizing-U.S./Canada/
Mexico-15555985) - 2022 - CRC - 12/3/21
Driving and Operating 213
To save fuel, run the engine for short
periods to warm the vehicle and then shut
the engine off and partially close the
window. Moving about to keep warm also
helps.
If it takes time for help to arrive, when
running the engine, push the accelerator
pedal slightly so the engine runs faster than
the idle speed. This keeps the battery
charged to restart the vehicle and to signal
for help with the headlamps. Do this as
little as possible, to save fuel.
If the Vehicle Is Stuck
Slowly and cautiously spin the wheels to
free the vehicle when stuck in sand, mud,
ice, or snow. See“Rocking the Vehicle to Get
It Out” later in this section.
The Traction Control System (TCS) can often
help to free a stuck vehicle. See Traction
Control/Electronic Stability Control 0234.
If TCS cannot free the vehicle, see “Rocking
the Vehicle to Get it Out” following.
{Warning
If the vehicle's tires spin at high speed,
they can explode, and you or others
could be injured. The vehicle can
overheat, causing an engine compartment
fire or other damage. Spin the wheels as
little as possible and avoid going above
56 km/h (35 mph).
For information about using tire chains on
the vehicle, see Tire Chains0361.
Rocking the Vehicle to Get It Out
Turn the steering wheel left and right to
clear the area around the front wheels. For
four-wheel-drive vehicles, shift into
Four-Wheel Drive High. Turn the TCS off.
Shift back and forth between R (Reverse) and
a forward gear, spinning the wheels as little
as possible. To prevent transmission wear,
wait until the wheels stop spinning before
shifting gears. Slowly spinning the wheels in
the forward and reverse directions causes a
rocking motion that could free the vehicle.
If that does not get the vehicle out after a
few tries, it might need to be towed out.
See Towing the Vehicle 0376. Recovery
hooks can be used, if equipped.
Recovery Hooks
{Warning
Never pull on recovery hooks from the
side. The hooks could break and you and
others could be injured. When using
recovery hooks, always pull the vehicle
from the front.
Caution
Never use recovery hooks to tow the
vehicle. The vehicle could be damaged,
and the repairs would not be covered by
the vehicle warranty.
Page 255 of 438

Chevrolet Tahoe/Suburban Owner Manual (GMNA-Localizing-U.S./Canada/
Mexico-15555985) - 2022 - CRC - 12/3/21
254 Driving and Operating
Towing with ACC
Towing a trailer with ACC is not
recommended with an aftermarket brake
controller. Aftermarket brake controllers may
not integrate properly with the ACC system.
When towing a trailer, certain characteristics
such as following gap, acceleration rates and
braking rates may be modified to provide a
better towing experience.
If equipped when towing a trailer, ACC
driving characteristics such as following gap,
acceleration rates and braking rates may be
modified to provide a better towing
experience.
ACC should not be used while towing a
trailer with an aftermarket trailer brake
controller. Aftermarket trailer brake
controllers may not function properly with
the ACC system.
ACC may be used when towing a trailer
when trailer attached is within GM-approved
allowable size and weight limits. SeeTrailer
Towing 0283.
When towing a trailer with ACC, it is
important to properly set the Trailer Gain.
See “Integrated Trailer Brake Control
System” inTowing Equipment 0287 for
Trailer Gain Adjustment Procedure. Use Tow/Haul mode when driving down
steep hills or mountain grades, or when
hauling heavy loads. See
Driver Mode
Control 0236.
Disengaging ACC
There are three ways to disengage ACC:
.Step lightly on the brake pedal.
.Press*.
.PressJ.
Erasing Speed Memory
The ACC set speed is erased from memory if
Jis pressed or if the ignition is turned off.
Weather Conditions Affecting ACC
System operation may be limited under
snow, heavy rain, or road spray conditions.
Accessory Installations and Vehicle
Modifications
Do not install or place any object around
the front camera windshield area that would
obstruct the front camera view.
Do not install objects on top of the vehicle
that overhang and obstruct the front
camera, such as a canoe, kayak, or other
items that can be transported on a roof rack
system. See Roof Rack System 092. Do not modify the hood, headlamps, or fog
lamps, as this may limit the camera’s ability
to detect an object.
Cleaning the Sensing System
The camera sensor on the windshield behind
the rearview mirror, and the sensors on the
front of the vehicle can become blocked by
snow, ice, dirt, mud, or debris. This area
needs to be cleaned for ACC to operate
properly.
If ACC will not operate, regular cruise control
may be available. See
“Switching Between
ACC and Regular Cruise Control” previously
in this section. Always consider driving
conditions before using either cruise control
system.
For cleaning instructions, see “Washing the
Vehicle” underExterior Care 0381.
Driver Assistance Systems
This vehicle may have features that work
together to help avoid crashes or reduce
crash damage while driving, backing, and
parking. Read this entire section before
using these systems.
Page 257 of 438

Chevrolet Tahoe/Suburban Owner Manual (GMNA-Localizing-U.S./Canada/
Mexico-15555985) - 2022 - CRC - 12/3/21
256 Driving and Operating
.Front and rear bumpers and the area
below the bumpers
.Front grille and headlamps
.Front camera lens in the front grille or
near the front emblem
.Front side and rear side panels
.Outside of the windshield in front of the
rearview mirror
.Side camera lens on the bottom of the
outside mirrors
.Rear side corner bumpers
.Rear Vision Camera above the license
plate
Radio Frequency
This vehicle may be equipped with driver
assistance systems that operate using radio
frequency. See Radio Frequency Statement
0 414.
Assistance Systems for Parking or
Backing
If equipped, the Rear Vision Camera (RVC),
Rear Park Assist (RPA), Front Park Assist
(FPA), Surround Vision, and Rear Cross Traffic
Alert (RCTA) may help the driver park or
avoid objects. Always check around the
vehicle when parking or backing.
Rear Vision Camera (RVC)
When the vehicle is shifted into R (Reverse),
the RVC displays an image of the area
behind the vehicle in the infotainment
display. The previous screen displays when
the vehicle is shifted out of R (Reverse) after
a short delay. To return to the previous
screen sooner, press Home or Back on the
infotainment system, shift into P (Park),
or reach a vehicle speed of approximately
12 km/h (8 mph) while in D (Drive). The rear
vision camera is above the license plate.
1. View Displayed by the Camera
1. View Displayed by the Camera
2. Corners of the Rear Bumper
Displayed images may be farther or closer
than they appear. The area displayed is
limited and objects that are close to either
corner of the bumper or under the bumper
do not display.
A warning triangle may display to show
that RPA or RCTA has detected an object.
This triangle changes from amber to red and
increases in size the closer the object.
{Warning
The camera(s) do not display children,
pedestrians, bicyclists, crossing traffic,
animals, or any other object outside of
the cameras’ field of view, below the
bumper, or under the vehicle. Shown (Continued)