2022 CHEVROLET SILVERADO 2500 inflation pressure
[x] Cancel search: inflation pressurePage 354 of 441

Chevrolet Silverado 2500 HD/3500 HD Owner Manual (GMNA-Localizing-U.
S./Canada/Mexico-15546003) - 2022 - CRC - 5/5/21
Vehicle Care 353
Warning (Continued)
pressure listed on the tire sidewall. See
Tire Sidewall Labeling0345 and
Vehicle Load Limits 0220.
If the tire is overinflated by more than
35 kPa (5 psi), the horn will sound multiple
times and the turn signal lamp will continue
to flash for several seconds after filling
stops. To release and correct the pressure,
while the turn signal lamp is still flashing,
briefly press the center of the valve stem.
When the recommended pressure is reached,
the horn sounds once.
If the turn signal lamp does not flash within
15 seconds after starting to inflate the tire,
the tire fill alert has not been activated or is
not working.
If the hazard warning flashers are on, the
tire fill alert visual feedback will not work
properly.
The TPMS will not activate the tire fill alert
properly under the following conditions:
.There is interference from an external
device or transmitter.
.The air pressure from the inflation device
is not sufficient to inflate the tire.
.There is a malfunction in the TPMS.
.There is a malfunction in the horn or turn
signal lamps.
.The identification code of the TPMS
sensor is not registered to the system.
.The battery of the TPMS sensor is low.
If the tire fill alert does not operate due to
TPMS interference, move the vehicle about
1 m (3 ft) back or forward and try again.
If the tire fill alert feature is not working,
use a tire pressure gauge.
TPMS Sensor Matching Process
Each TPMS sensor has a unique
identification code. The identification code
needs to be matched to a new tire/wheel
position after rotating the vehicle’s tires or
replacing one or more of the TPMS sensors.
Also, the TPMS sensor matching process
should be performed after replacing a spare
tire with a road tire containing the TPMS
sensor. The malfunction light and the DIC
message should go off at the next ignition
cycle. The sensors are matched to the tire/
wheel positions, using a TPMS relearn tool,
in the following order: driver side front tire,
passenger side front tire, passenger side rear
tire, and driver side rear. See your dealer for
service or to purchase a relearn tool. A TPMS relearn tool can also be purchased.
See Tire Pressure Monitor Sensor Activation
Tool at www.gmtoolsandequipment.com or
call 1-800-GM TOOLS (1-800-468-6657).
There are two minutes to match the first
tire/wheel position, and five minutes overall
to match all four tire/wheel positions. If it
takes longer, the matching process stops
and must be restarted.
The TPMS sensor matching process is:
1. Set the parking brake.
2. Turn the ignition on without starting the vehicle.
3. Uplevel DIC Only: Make sure the Tire Pressure info page option is turned on.
The info pages on the DIC can be turned
on and off through the Options menu.
See Driver Information Center (DIC) (Base
Level) 0124 or
Driver Information Center (DIC) (Midlevel
and Uplevel) 0125.
4. If the vehicle has an uplevel DIC, use the DIC controls on the right side of the
steering wheel to scroll to the Tire
Pressure screen under the DIC info page.
If the vehicle has a base level DIC, use
the trip odometer reset stem to scroll to
the Tire Pressure screen.
Page 356 of 441
Chevrolet Silverado 2500 HD/3500 HD Owner Manual (GMNA-Localizing-U.
S./Canada/Mexico-15546003) - 2022 - CRC - 5/5/21
Vehicle Care 355
The system is compatible with trailer tires
that have placard pressure values from 103 -
689 kpa (15 - 100 psi). The hole in the wheel
for the tire stem must be 11.43 mm
(0.453 in) or 15.88 mm (0.625 in) in
diameter. Use of the pressure sensors on a
wheel with a different stem hole size could
result in loss of air from the tire.
If a low trailer tire pressure condition is
detected, the TTPMS displays a warning
message on the DIC. If the warning message
is displayed, stop as soon as possible and
inflate the tires to the recommended
pressure shown on the tire placard on the
trailer.
In addition, the TTPMS monitors the
temperature of the trailer tires. If the
system detects a high temperature on one
or more of the trailer tires, a warning
message will be displayed on the DIC. If this
warning message is displayed, stop as soon
as possible, and inspect the overheated
trailer tire. Common causes for high trailer
tire temperature are underinflation,
overloading, or tire damage.TTPMS Malfunction Message
The TTPMS will not function properly if one
or more of the trailer tire sensors are
missing or inoperable. If the system detects
a malfunction, a DIC message indicates that
the system requires service. Some of the
conditions that can cause the service
message to occur are:
.One of the trailer tires has been replaced
with the spare tire which does not have a
learned TTPMS sensor. The DIC message
should turn off after the pressure sensor
is installed in the tire, and the learning
process is performed successfully. See
"TTPMS Sensor Learning Process" under
Trailering App0292.
.The TTPMS sensor learning process was
not done or not completed successfully.
The DIC message should go off after
successfully completing the sensor
learning process. See "TTPMS Sensor
Learning Process" under Trailering App
0 292.
.One or more TTPMS sensors are missing
or damaged. The DIC message should go
off when the TTPMS sensors are installed
and the sensor learning process is performed successfully. See "TTPMS
Sensor Learning Process" under
Trailering
App 0292.
.Operating electronic devices or being near
facilities using radio wave frequencies
similar to the TTPMS could cause
interference to the TTPMS which could
cause loss of signal reception from the
sensor.
.If the system does not receive the signal
from an individual sensor, an error
message may not occur until the vehicle
has been driver for a period of time.
If the TTPMS is not functioning properly, it
cannot detect or signal a low tire condition.
See your dealer for service if the DIC
message comes on and stays on when the
trailer tire pressures have been checked and
determined to be correct.
Tire Inspection
We recommend that the tires, including
the spare tire, if the vehicle has one, be
inspected for signs of wear or damage
at least once a month.
Replace the tire if:
.The indicators at three or more
places around the tire can be seen.
Page 357 of 441
Chevrolet Silverado 2500 HD/3500 HD Owner Manual (GMNA-Localizing-U.
S./Canada/Mexico-15546003) - 2022 - CRC - 5/5/21
356 Vehicle Care
.There is cord or fabric showing
through the tire's rubber.
.The tread or sidewall is cracked, cut,
or snagged deep enough to show
cord or fabric.
.The tire has a bump, bulge, or split.
.The tire has a puncture, cut, or other
damage that cannot be repaired well
because of the size or location of the
damage.
Tire Rotation
Tires should be rotated every 12 000 km
(7,500 mi). SeeMaintenance Schedule
0 392.
Tires are rotated to achieve a more
uniform wear for all tires. The first
rotation is the most important.
Anytime unusual wear is noticed, rotate
the tires as soon as possible, check for
proper tire inflation pressure, and check
for damaged tires or wheels. If the
unusual wear continues after the
rotation, check the wheel alignment. See
When It Is Time for New Tires
0 358 and
Wheel Replacement 0361.
If the full-size spare tire is part of the
tire rotation, make sure the tire rotated
into the spare position is stored
securely. Push, pull, and then try to
rotate or turn the tire. If it moves, use
the wheel wrench/hoist shaft to tighten
the cable. See Tire Changing0364.
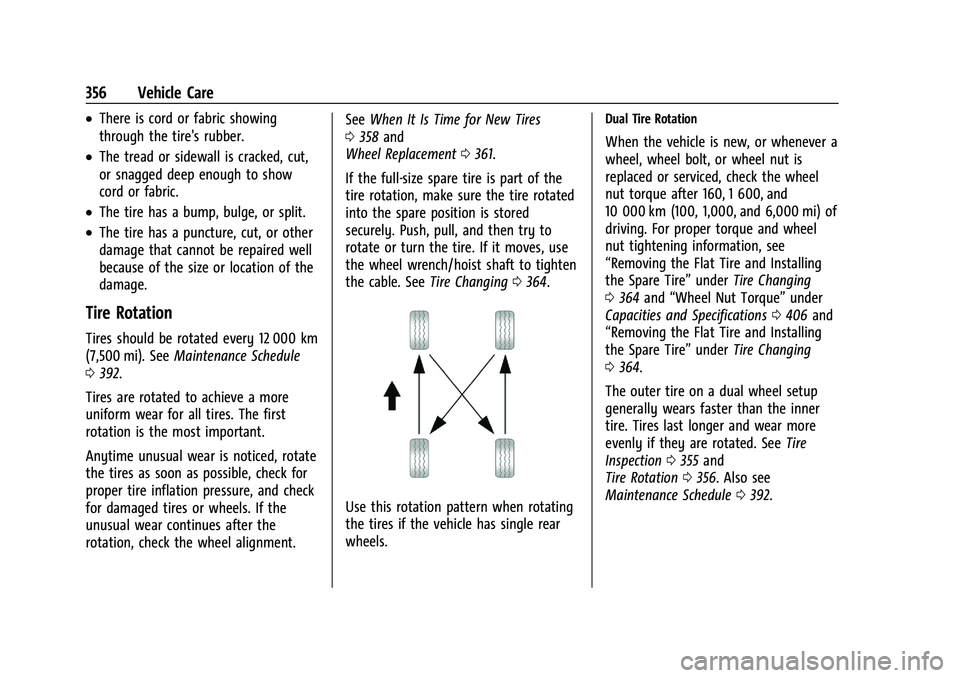
Use this rotation pattern when rotating
the tires if the vehicle has single rear
wheels.
Dual Tire Rotation
When the vehicle is new, or whenever a
wheel, wheel bolt, or wheel nut is
replaced or serviced, check the wheel
nut torque after 160, 1 600, and
10 000 km (100, 1,000, and 6,000 mi) of
driving. For proper torque and wheel
nut tightening information, see
“Removing the Flat Tire and Installing
the Spare Tire” underTire Changing
0 364 and “Wheel Nut Torque” under
Capacities and Specifications 0406 and
“Removing the Flat Tire and Installing
the Spare Tire” underTire Changing
0 364.
The outer tire on a dual wheel setup
generally wears faster than the inner
tire. Tires last longer and wear more
evenly if they are rotated. See Tire
Inspection 0355 and
Tire Rotation 0356. Also see
Maintenance Schedule 0392.
Page 358 of 441

Chevrolet Silverado 2500 HD/3500 HD Owner Manual (GMNA-Localizing-U.
S./Canada/Mexico-15546003) - 2022 - CRC - 5/5/21
Vehicle Care 357
Use this rotation pattern when rotating
the tires if the vehicle has dual rear
wheels (except polished forged
aluminum wheels).
Vehicles with polished forged aluminum
dual wheels have three unique wheels;
a front, a rear outer and a rear inner.
These wheels cannot be rotated to
another position, however, they can be
rotated from left to right to the same
position.Use this rotation pattern when rotating
the tires if the vehicle has polished
forged aluminum dual rear wheels. The
spare wheel can be used in any position
in the event of a flat tire, and can be
rotated with the rear inner wheels.
After the flat tire is repaired, if the
spare is not on one of the inner rear
positions, it must be replaced by the
correct wheel in the front or rear outer
positions.
When installing dual wheels, check that
the vent holes in the inner and outer
wheels on each side are lined up.Adjust the front and rear tires to the
recommended inflation pressure on the
Tire and Loading Information label after
the tires have been rotated. See
Tire
Pressure 0349 and
Vehicle Load Limits 0220.
Reset the Tire Pressure Monitor System.
See Tire Pressure Monitor Operation
0 351.
Check that all wheel nuts are properly
tightened. See “Wheel Nut Torque”
under Capacities and Specifications
0 406, and “Removing the Flat Tire and
Installing the Spare Tire” underTire
Changing 0364.
{Warning
Rust or dirt on a wheel, or on the
parts to which it is fastened, can
cause wheel nuts to become loose
over time. The wheel could come off
and cause a crash. When changing a
wheel, remove any rust or dirt from
places where the wheel attaches to
the vehicle. In an emergency, a cloth
(Continued)
Page 359 of 441
Chevrolet Silverado 2500 HD/3500 HD Owner Manual (GMNA-Localizing-U.
S./Canada/Mexico-15546003) - 2022 - CRC - 5/5/21
358 Vehicle Care
Warning (Continued)
or paper towel can be used; however,
use a scraper or wire brush later to
remove all rust or dirt.
Lightly coat the inner diameter of the
wheel hub opening with wheel bearing
grease after a wheel change or tire
rotation to prevent corrosion or rust
build-up.
{Warning
Do not apply grease to the wheel
mounting surface, wheel conical
seats, or the wheel nuts or bolts.
Grease applied to these areas could
cause a wheel to become loose or
come off, resulting in a crash.
When It Is Time for New Tires
Factors, such as maintenance, temperatures,
driving speeds, vehicle loading, and road
conditions affect the wear rate of the tires.
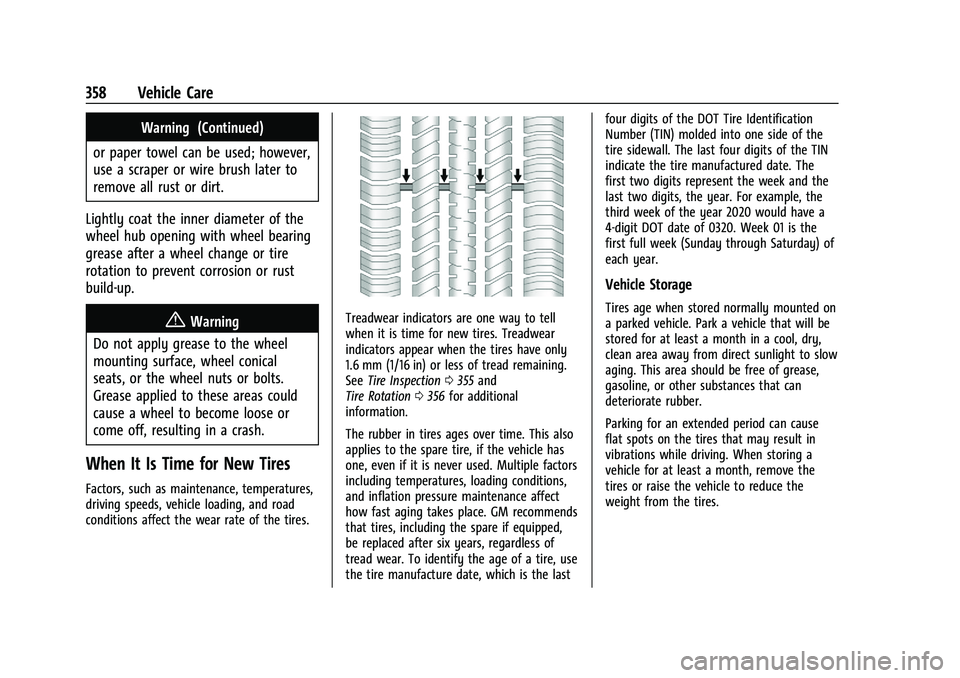
Treadwear indicators are one way to tell
when it is time for new tires. Treadwear
indicators appear when the tires have only
1.6 mm (1/16 in) or less of tread remaining.
See Tire Inspection 0355 and
Tire Rotation 0356 for additional
information.
The rubber in tires ages over time. This also
applies to the spare tire, if the vehicle has
one, even if it is never used. Multiple factors
including temperatures, loading conditions,
and inflation pressure maintenance affect
how fast aging takes place. GM recommends
that tires, including the spare if equipped,
be replaced after six years, regardless of
tread wear. To identify the age of a tire, use
the tire manufacture date, which is the last four digits of the DOT Tire Identification
Number (TIN) molded into one side of the
tire sidewall. The last four digits of the TIN
indicate the tire manufactured date. The
first two digits represent the week and the
last two digits, the year. For example, the
third week of the year 2020 would have a
4-digit DOT date of 0320. Week 01 is the
first full week (Sunday through Saturday) of
each year.
Vehicle Storage
Tires age when stored normally mounted on
a parked vehicle. Park a vehicle that will be
stored for at least a month in a cool, dry,
clean area away from direct sunlight to slow
aging. This area should be free of grease,
gasoline, or other substances that can
deteriorate rubber.
Parking for an extended period can cause
flat spots on the tires that may result in
vibrations while driving. When storing a
vehicle for at least a month, remove the
tires or raise the vehicle to reduce the
weight from the tires.
Page 375 of 441
Chevrolet Silverado 2500 HD/3500 HD Owner Manual (GMNA-Localizing-U.
S./Canada/Mexico-15546003) - 2022 - CRC - 5/5/21
374 Vehicle Care
Full-Size Spare Tire
If this vehicle came with a full-size spare
tire, it was fully inflated when new,
however, it can lose air over time. Check the
inflation pressure regularly. SeeTire Pressure
0 349 and
Vehicle Load Limits 0220 for information
regarding proper tire inflation and loading
the vehicle. For instructions on how to
remove, install, or store a spare tire, see Tire
Changing 0364.
After installing the spare tire on the vehicle,
stop as soon as possible and check that the
spare is correctly inflated. The spare tire is
made to perform well at speeds up to
112 km/h (70 MPH) at the recommended
inflation pressure, so you can finish
your trip.
Have the damaged or flat road tire repaired
or replaced and installed back onto the
vehicle as soon as possible so the spare tire
will be available in case it is needed again.
Do not mix tires and wheels of difference
sizes, because they will not fit. Keep the
spare tire and its wheel together.
Caution
If the vehicle has four-wheel drive and a
different size spare tire is installed, do
not drive in four-wheel drive until the flat
tire is repaired and/or replaced. The
vehicle could be damaged and the repairs
would not be covered by the warranty.
Never use four-wheel drive when a
different size spare tire is installed on the
vehicle.
The vehicle may have a different size spare
tire than the road tires originally installed
on the vehicle. This spare tire was developed
for use on this vehicle, so it is all right to
drive on it. If the vehicle has four-wheel
drive and a different size spare tire is
installed, drive only in two-wheel drive.
If the vehicle has a spare tire that does not
match the vehicle’s original road tires and
wheels, in size and type, do not include the
spare in the tire rotation.
Jump Starting
Jump Starting - North America
For more information about the vehicle
battery, see Battery - North America 0324.
If the vehicle's battery (or batteries) has run
down, you may want to use another vehicle
and some jumper cables to start your
vehicle. Be sure to use the following steps
to do it safely.
{Warning
WARNING: Battery posts, terminals and
related accessories can expose you to
chemicals including lead and lead
compounds, which are known to the
State of California to cause cancer and
birth defects or other reproductive harm.
Wash hands after handling. For more
information go to
www.P65Warnings.ca.gov.
See the warning on the back cover.
Page 393 of 441
Chevrolet Silverado 2500 HD/3500 HD Owner Manual (GMNA-Localizing-U.
S./Canada/Mexico-15546003) - 2022 - CRC - 5/5/21
392 Service and Maintenance
Because of the way people use vehicles,
maintenance needs vary. There may need to
be more frequent checks and services. The
Additional Required Services - Normal are for
vehicles that:
.Carry passengers and cargo within
recommended limits on the Tire and
Loading Information label. SeeVehicle
Load Limits 0220.
.Are driven on reasonable road surfaces
within legal driving limits.
.Use the recommended fuel. See
Recommended Fuel 0269.
Refer to the information in the Maintenance
Schedule Additional Required Services -
Normal chart.
The Additional Required Services - Severe are
for vehicles that are:
.Mainly driven in heavy city traffic in hot
weather
.Mainly driven in hilly or mountainous
terrain
.Frequently towing a trailer
.Used for high speed or competitive
driving
.Used for taxi, police, or delivery service Refer to the information in the Maintenance
Schedule Additional Required Services -
Severe chart.
{Warning
Performing maintenance work can be
dangerous and can cause serious injury.
Perform maintenance work only if the
required information, proper tools, and
equipment are available. If they are not,
see your dealer to have a trained
technician do the work. See
Doing Your
Own Service Work 0308.
Maintenance Schedule
Owner Checks and Services
Check the engine oil level. See Engine Oil
0 311.
Once a Month
.Check the tire inflation pressures,
including the spare. See Tire Pressure
0 349.
.Inspect the tires for wear. See Tire
Inspection 0355.
.Check the windshield washer fluid level.
See Washer Fluid 0321.
Engine Oil Change
When the CHANGE ENGINE OIL SOON
message displays, have the engine oil and
filter changed within the next 1 000 km/
600 mi. If driven under the best conditions,
the engine oil life system may not indicate
the need for vehicle service for up to a year.
The engine oil and filter must be changed at
least once a year and the oil life system
must be reset. Your trained dealer technician
can perform this work. If the engine oil life
system is reset accidentally, service the
vehicle within 5 000 km/3,000 mi since the
last service. Reset the oil life system when
the oil is changed. See Engine Oil Life
System 0313.
Engine Air Filter Change
When the REPLACE AT NEXT OIL CHANGE
message displays, the engine air filter
should be replaced at the next engine oil
change. When the REPLACE ENGINE AIR
FILTER SOON message displays, the engine
air filter should be replaced at the earliest
convenience. Reset the engine air filter life
system after the engine air filter is replaced.
See Engine Air Filter Life System 0314.
Page 394 of 441

Chevrolet Silverado 2500 HD/3500 HD Owner Manual (GMNA-Localizing-U.
S./Canada/Mexico-15546003) - 2022 - CRC - 5/5/21
Service and Maintenance 393
Passenger Compartment Air Filter
The passenger compartment air filter
removes dust, pollen, and other airborne
irritants from outside air that is pulled into
the vehicle. The filter should be replaced as
part of routine scheduled maintenance.
Inspect the passenger compartment air filter
every 36 000 km/22,500 miles or two years,
whichever comes first. Replace if necessary.
More frequent replacement may be needed
if the vehicle is driven in areas with heavy
traffic, areas with poor air quality, or areas
with high dust levels. Replacement may also
be needed if there is a reduction in air flow,
excessive window fogging, or odors.
Power Take Off (PTO) and Extended
Idle Use
When the vehicle is used with the PTO
equipment or used in a way that requires
extended idle time, one hour of use shall be
deemed the same as 53 km (33 mi). See
Driver Information Center (DIC) (Base Level)
0124 or
Driver Information Center (DIC) (Midlevel and
Uplevel) 0125 for hourmeter, if equipped.
Air Conditioning Desiccant (Replace Every
Seven Years)
The air conditioning system requires
maintenance every seven years. This service
requires replacement of the desiccant to
help the longevity and efficient operation of
the air conditioning system. This service can
be complex. See your dealer.
Tire Rotation and Required Services
Every 12 000 km/7,500 mi
Rotate the tires, if recommended for the
vehicle, and perform the following services.
See Tire Rotation 0356.
.Check engine oil level and oil
life percentage. If needed, change engine
oil and filter, and reset oil life system.
See Engine Oil 0311 and
Engine Oil Life System 0313.
.Check the air filter life percentage.
If necessary, replace the engine air filter
and reset the engine air filter life system.
See Engine Air Filter Life System 0314.
.Check engine coolant level. See Cooling
System 0316.
.Check windshield washer fluid level. See
Washer Fluid 0321.
.Check tire inflation pressures, including
the spare. See Tire Pressure0349.
.Inspect tire wear. See Tire Inspection
0 355.
.Visually check for fluid leaks.
.Inspect brake system. See Exterior Care
0 381.
.Visually inspect steering, suspension, and
chassis components for damage, including
cracks or tears in the rubber boots, loose
or missing parts, or signs of wear at least
once a year. See Exterior Care0381.
If equipped with grease fittings, lubricate
the suspension and steering components
every oil change.
.Inspect power steering for proper
attachment, connections, binding, leaks,
cracks, chafing, etc.
.Visually inspect drive shafts for excessive
wear, lubricant leaks or damage including:
tube dents, cracks, constant velocity joint
or universal joint looseness, cracked or
missing boots, loose or missing boot
clamps, center bearing excessive
looseness, missing or loose fasteners.
.Check restraint system components. See
Safety System Check 061.