2022 CHEVROLET SILVERADO 1500 spare tire location
[x] Cancel search: spare tire locationPage 310 of 461
 - 2021 - CRC - 11/9/20
Driving and Operating 309
The process stops without saving the
sensor locations if")
Chevrolet Silverado 1500 Owner Manual (GMNA-Localizing-U.S./Canada/
Mexico/Paraguay-14632303) - 2021 - CRC - 11/9/20
Driving and Operating 309
The process stops without saving the
sensor locations if this step takes more
than two minutes.
4. Move to the next tire and repeat Step 3 for each sensor. The horn chirps twice
when all sensors are completed.
5. Return to the vehicle to complete the setup.
Maintenance Reminders
To set up maintenance reminders, touch the
Trailer Maintenance icon. Select Yes to set
up the maintenance reminders for the
Trailer Profile. Follow the on-screen prompts.
The maximum number of reminders is 50.
Select No to return to the previous screen.
Towing Assistance
To set up towing assistance features,
if equipped, touch the Towing
Assistance icon.
Touch Yes to begin set up or touch No to
return to the previous screen.
1. Select the number of axles on the trailer.
2. Enter trailer dimensions as prompted.
3. Follow the on-screen instructions to complete setup for available features.
Transparent Trailer Setup (if equipped)
To complete setup for transparent trailer:
.Trailer Length: 300 cm (118.1 in) –970 cm
(381.8 in). Measure from center of coupler
to furthest rear point on the trailer.
.Trailer Width: 120 cm (47.2 in) –260 cm
(102.3 in). Measure from left edge to
right edge.
.Trailer Height: 1 cm (0.39 in) –450 cm
(177.1 in). Measure from ground to tallest
point.
.Hitching Point Length: 180 cm (70.8 in) –
970 cm (381.8 in). Measure from center of
coupler to middle of tires.
.Trailer Tongue Length: 50 cm (19.6 in) –
220 cm (86.6 in). Measure from center of
coupler to trailer front wall.
.Vehicle Hitch Height: 10 cm (3.9 in) –
100 cm (39.3 in). Measure from ground to
top of coupler.
.Vehicle Hitch Length: 10 cm (3.9 in) –
100 cm (39.3 in). Measure from hitch
receiver to center of ball.
1. If trailer dimensions are out of range, this feature will be unavailable.
2. Ensure rear trailer camera is connected. 3. Follow instructions to drive forward to
complete calibration.
Rear Trailer Guidance Setup (if equipped)
A rear trailer camera must be mounted on
the trailer and electrically connected to the
vehicle before transparent trailer feature can
be used. See Assistance Systems for Parking
or Backing 0266.
Trailer dimensions must be in range to
enable this feature.
.Trailer Length: 300 cm (118.1 in) –970 cm
(381.8 in). Measure from center of coupler
to furthest rear point on the trailer.
1. If trailer dimensions are out of range, this feature will be unavailable.
2. Ensure rear trailer camera is connected.
3. Follow instructions to drive forward to complete calibration.
Jack-Knife Alert Setup (if equipped)
Follow instructions to drive forward to
complete calibration.
Trailer Length Indicator Setup (if
equipped)
Follow instructions to drive forward to
complete calibration.
Page 371 of 461
 - 2021 - CRC - 11/9/20
370 Vehicle Care
For additional information and details about
the DIC operation and")
Chevrolet Silverado 1500 Owner Manual (GMNA-Localizing-U.S./Canada/
Mexico/Paraguay-14632303) - 2021 - CRC - 11/9/20
370 Vehicle Care
For additional information and details about
the DIC operation and displays, seeDriver
Information Center (DIC) (Base Level) 0124
or
Driver Information Center (DIC) (Midlevel and
Uplevel) 0125.
The low tire pressure warning light may
come on in cool weather when the vehicle is
first started, and then turn off as the vehicle
is driven. This could be an early indicator
that the air pressure is getting low and
needs to be inflated to the proper pressure.
A Tire and Loading Information label shows
the size of the original equipment tires and
the correct inflation pressure for the tires
when they are cold. See Vehicle Load Limits
0 222, for an example of the Tire and
Loading Information label and its location.
Also see Tire Pressure 0367.
The TPMS can warn about a low tire
pressure condition but it does not replace
normal tire maintenance. See Tire Inspection
0 374, Tire Rotation 0374 and
Tires 0361.Caution
Tire sealant materials are not all the
same. A non-approved tire sealant could
damage the TPMS sensors. TPMS sensor
damage caused by using an incorrect tire
sealant is not covered by the vehicle
warranty. Always use only the GM
approved tire sealant available through
your dealer or included in the vehicle.
TPMS Malfunction Light and Message
The TPMS will not function properly if one
or more of the TPMS sensors are missing or
inoperable. When the system detects a
malfunction, the low tire pressure warning
light flashes for about one minute and then
stays on for the remainder of the ignition
cycle. A DIC warning message also displays.
The malfunction light and DIC warning
message come on at each ignition cycle
until the problem is corrected. Some of the
conditions that can cause these to come
on are:
.One of the road tires has been replaced
with the spare tire. The spare tire does
not have a TPMS sensor. The malfunction
light and the DIC message should go off
after the road tire is replaced and the sensor matching process is performed
successfully. See "TPMS Sensor Matching
Process" later in this section.
.The TPMS sensor matching process was
not done or not completed successfully
after rotating the tires. The malfunction
light and the DIC message should go off
after successfully completing the sensor
matching process. See "TPMS Sensor
Matching Process" later in this section.
.One or more TPMS sensors are missing or
damaged. The malfunction light and the
DIC message should go off when the
TPMS sensors are installed and the sensor
matching process is performed
successfully. See your dealer for service.
.Replacement tires or wheels do not match
the original equipment tires or wheels.
Tires and wheels other than those
recommended could prevent the TPMS
from functioning properly. See
Buying
New Tires 0376.
.Operating electronic devices or being near
facilities using radio wave frequencies
similar to the TPMS could cause the TPMS
sensors to malfunction.
Page 375 of 461
Chevrolet Silverado 1500 Owner Manual (GMNA-Localizing-U.S./Canada/
Mexico/Paraguay-14632303) - 2021 - CRC - 11/9/20
374 Vehicle Care
and the sensor learning process is
performed successfully. See "TTPMS
Sensor Learning Process" underTrailering
App 0306.
.Operating electronic devices or being near
facilities using radio wave frequencies
similar to the TTPMS could cause
interference to the TTPMS which could
cause loss of signal reception from the
sensor.
.If the system does not receive the signal
from an individual sensor, an error
message may not occur until the vehicle
has been driver for a period of time.
If the TTPMS is not functioning properly, it
cannot detect or signal a low tire condition.
See your dealer for service if the DIC
message comes on and stays on when the
trailer tire pressures have been checked and
determined to be correct.
Tire Inspection
We recommend that the tires, including
the spare tire, if the vehicle has one, be
inspected for signs of wear or damage
at least once a month. Replace the tire if:
.The indicators at three or more
places around the tire can be seen.
.There is cord or fabric showing
through the tire's rubber.
.The tread or sidewall is cracked, cut,
or snagged deep enough to show
cord or fabric.
.The tire has a bump, bulge, or split.
.The tire has a puncture, cut, or other
damage that cannot be repaired well
because of the size or location of the
damage.
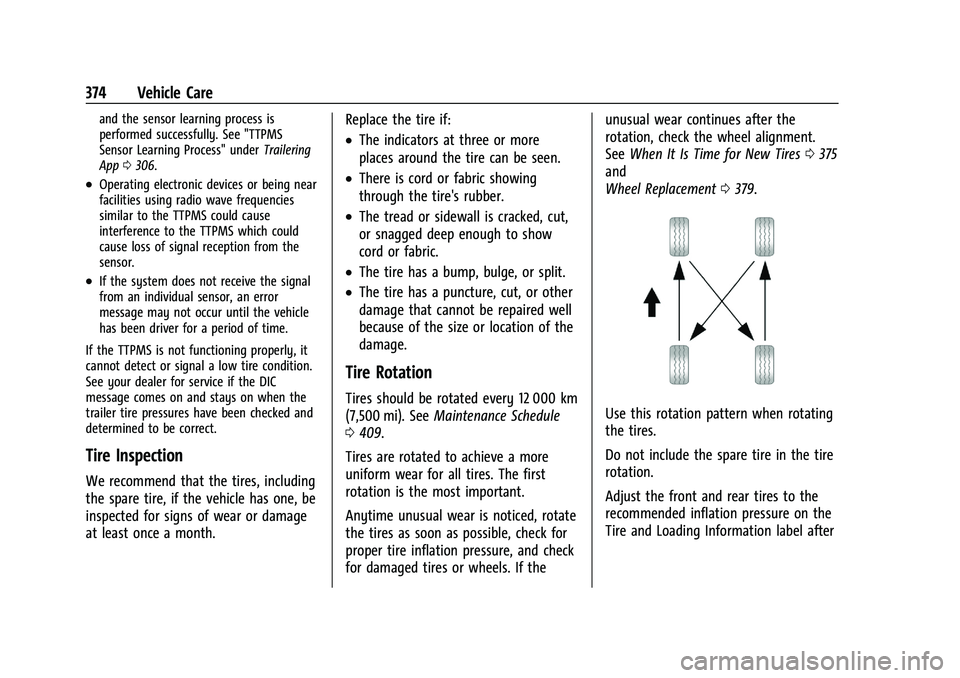
Tire Rotation
Tires should be rotated every 12 000 km
(7,500 mi). See
Maintenance Schedule
0 409.
Tires are rotated to achieve a more
uniform wear for all tires. The first
rotation is the most important.
Anytime unusual wear is noticed, rotate
the tires as soon as possible, check for
proper tire inflation pressure, and check
for damaged tires or wheels. If the unusual wear continues after the
rotation, check the wheel alignment.
See
When It Is Time for New Tires 0375
and
Wheel Replacement 0379.Use this rotation pattern when rotating
the tires.
Do not include the spare tire in the tire
rotation.
Adjust the front and rear tires to the
recommended inflation pressure on the
Tire and Loading Information label after
Page 386 of 461
 - 2021 - CRC - 11/9/20
Vehicle Care 385
Front Position
4. If the flat tire is on the front of the vehicle,")
Chevrolet Silverado 1500 Owner Manual (GMNA-Localizing-U.S./Canada/
Mexico/Paraguay-14632303) - 2021 - CRC - 11/9/20
Vehicle Care 385
Front Position
4. If the flat tire is on the front of the vehicle, position the jack under the
bracket attached to the vehicle's frame,
behind the flat tire, as shown.Rear Position
5. If the flat tire is on the rear, position the jack under the rear axle about 5 cm
(2 in) inboard of the shock absorber
bracket.
{Warning
Getting under a vehicle when it is lifted
on a jack is dangerous. If the vehicle slips
off the jack, you could be badly injured
or killed. Never get under a vehicle when
it is supported only by a jack.
{Warning
Raising the vehicle with the jack
improperly positioned can damage the
vehicle and even make the vehicle fall. To
help avoid personal injury and vehicle
damage, be sure to fit the jack lift head
into the proper location before raising
the vehicle.
{Warning
The jack has a feature to limit its travel
to prevent overextension. When the
height limit is reached, an increase in
resistance if felt when attempting to
raise the jack farther. Raising the jack
past the height limit can damage the jack
pin and cause the jack to lock into an
overextended position or not lower fully.
Do not attempt to force the jack higher
once the height limit is reached.
6. Turn the wheel wrench clockwise to raise the vehicle. Raise the vehicle far enough
off the ground so there is enough room
for the spare tire to fit under the
wheel well.
Page 390 of 461
 - 2021 - CRC - 11/9/20
Vehicle Care 389
cable through the looped end. The excess
cable wire should be on t")
Chevrolet Silverado 1500 Owner Manual (GMNA-Localizing-U.S./Canada/
Mexico/Paraguay-14632303) - 2021 - CRC - 11/9/20
Vehicle Care 389
cable through the looped end. The excess
cable wire should be on the valve stem
side of the spare tire.
2. Put the tire on the ground at the rear of the vehicle with the valve stem pointed
down, and to the rear.
3. Pull the cable and spring through the center of the wheel. Tilt the wheel
retainer plate down and through the
center wheel.
Make sure the retainer is fully seated
across the underside of the wheel.
4. Attach the wheel wrench (7) andextensions (6) together, as shown.
Caution
Use of an air wrench or other power
tools with the hoist mechanism is not
recommended and could damage the
system. Use only the tools supplied with
the hoist mechanism.
5. Insert the hoist end (10) through thehole (9) in the rear bumper and onto the
hoist shaft.
Do not use the chiseled end of the wheel
wrench.
6. Raise the tire part way upward. Make sure the retainer is seated in the wheel
opening.
7. If equipped with a spare tire cable, orientthe cable by rotating the spare tire so
that the cable is by the frame
attachment location.
8. Raise the tire fully against the underside of the vehicle by turning the wheel
wrench clockwise until you hear two
clicks or feel it skip twice. You cannot
overtighten the cable.
Page 391 of 461
 - 2021 - CRC - 11/9/20
390 Vehicle Care
9. Make sure the tire is stored securely.Push, pull, and then try")
Chevrolet Silverado 1500 Owner Manual (GMNA-Localizing-U.S./Canada/
Mexico/Paraguay-14632303) - 2021 - CRC - 11/9/20
390 Vehicle Care
9. Make sure the tire is stored securely.Push, pull, and then try to turn the tire.
If the tire moves, use the wheel wrench
to tighten the cable.
If equipped with a spare tire cable,
reattach the clip to the frame
attachment bracket. Note that there may
be slack in the cable.
Repeat this tightness check procedure
when checking the spare tire pressure
according to the scheduled maintenance
information or any time the spare tire is
handled due to service of other
components.
Correctly Stored
Incorrectly Stored
10. Reinstall the spare tire lock, if the vehicle has one.
Return the jack and tools to their original
location in the vehicle. See “Removing the
Spare Tire and Tools.”