2022 CHEVROLET SILVERADO 1500 brake sensor
[x] Cancel search: brake sensorPage 342 of 461
Chevrolet Silverado 1500 Owner Manual (GMNA-Localizing-U.S./Canada/
Mexico/Paraguay-14632303) - 2021 - CRC - 11/9/20
Vehicle Care 341
Brake Pedal Travel
See your dealer if the brake pedal does not
return to normal height, or if there is a
rapid increase in pedal travel. This could be
a sign that brake service may be required.
Replacing Brake System Parts
Always replace brake system parts with
new, approved replacement parts. If this is
not done, the brakes may not work
properly. The braking performance can
change in many ways if the wrong brake
parts are installed or if parts are improperly
installed.
Brake Pad Life System
When to Change Brake Pads
This vehicle has a system that estimates the
remaining life of the front and rear brake
pads. Brake pad life is displayed in the
Driver Information Center (DIC), along with
a percentage for each axle. The system must
be reset every time the brake pads are
changed.
When the system has determined that the
brake pads need to be replaced, a message
will display, which may include mileage
remaining.Brake pads should always be replaced as
complete axle sets.
How to Reset the Brake Pad Life System
The system will automatically detect when
significantly worn brake pads are replaced.
When the ignition is turned on after new
pads and wear sensors are installed, a
message will display. Follow the prompts to
reset the system.
The brake pad life system can also be
manually reset:
1. Display Brake Pad Life on the DIC. See Driver Information Center (DIC) (Base
Level) 0124 or
Driver Information Center (DIC) (Midlevel
and Uplevel) 0125.
2. Press the thumbwheel or the trip odometer reset stem if the vehicle does
not have DIC buttons. Select front or rear
pads as appropriate.
3. Select YES on the confirmation message, or press the trip odometer reset stem on
a base level DIC. Repeat for pads on the
other axle if they were also replaced.
How to Disable the Brake Pad Life
System
The brake pad life system can be turned off.
This may be necessary if aftermarket brake
pads without wear sensors are installed.
When the system is turned off, the front
and rear brake pad life percentages will not
display. However, the built-in wear
indicators that make a high-pitched warning
sound when the brake pads are worn can
still determine when the pads should be
replaced. See Brakes0340.
To turn off the brake pad life system: 1. Display Brake Pad Life on the DIC. See Driver Information Center (DIC) (Base
Level) 0124 or
Driver Information Center (DIC) (Midlevel
and Uplevel) 0125.
2. Select DISABLE.
To turn the brake pad life system back on,
follow the above steps but select ENABLE in
Step 2.
Page 348 of 461
Chevrolet Silverado 1500 Owner Manual (GMNA-Localizing-U.S./Canada/
Mexico/Paraguay-14632303) - 2021 - CRC - 11/9/20
Vehicle Care 347
.To check the parking brake's holding
ability: With the engine running and the
transmission in N (Neutral), slowly remove
foot pressure from the regular brake
pedal. Do this until the vehicle is held by
the parking brake only.
.To check the P (Park) mechanism's holding
ability: With the engine running, shift to
P (Park). Then release the parking brake
followed by the regular brake.
Contact your dealer if service is required.
Wiper Blade Replacement
Windshield wiper blades should be replaced
periodically. See Maintenance Schedule
0 409.
Replacement blades come in different types
and are removed in different ways. For
proper type and length, see Maintenance
Replacement Parts 0419.
Caution
Allowing the wiper arm to touch the
windshield when no wiper blade is
installed could damage the windshield.
Any damage that occurs would not be
(Continued)
Caution (Continued)
covered by the vehicle warranty. Do not
allow the wiper arm to touch the
windshield.
Front Wiper Blade Replacement
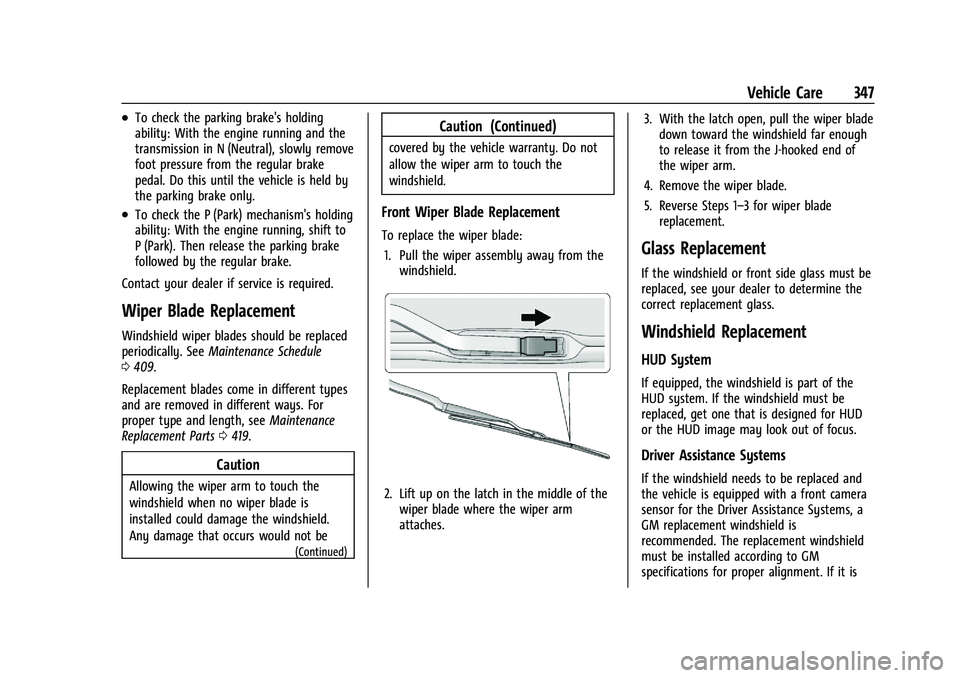
To replace the wiper blade:
1. Pull the wiper assembly away from the windshield.
2. Lift up on the latch in the middle of the
wiper blade where the wiper arm
attaches. 3. With the latch open, pull the wiper blade
down toward the windshield far enough
to release it from the J-hooked end of
the wiper arm.
4. Remove the wiper blade.
5. Reverse Steps 1–3 for wiper blade replacement.
Glass Replacement
If the windshield or front side glass must be
replaced, see your dealer to determine the
correct replacement glass.
Windshield Replacement
HUD System
If equipped, the windshield is part of the
HUD system. If the windshield must be
replaced, get one that is designed for HUD
or the HUD image may look out of focus.
Driver Assistance Systems
If the windshield needs to be replaced and
the vehicle is equipped with a front camera
sensor for the Driver Assistance Systems, a
GM replacement windshield is
recommended. The replacement windshield
must be installed according to GM
specifications for proper alignment. If it is
Page 357 of 461
Chevrolet Silverado 1500 Owner Manual (GMNA-Localizing-U.S./Canada/
Mexico/Paraguay-14632303) - 2021 - CRC - 11/9/20
356 Vehicle Care
FusesUsage
65 Auxiliary underhood electrical center
66 Cooling fan motor left 67 Active fuel management 2
68 –
69 Starter Pinion (LD) / Starter Motor (HD Gas)
71 Cooling fan
72 Cooling fan right/Lower
73 Trailer stop/turn lamp left
74 Trailer Interface Module 1
75 DEFC
76 Electric RNG BDS
78 Engine control module
79 Auxiliary battery
80 Cabin cooling pump 81 Trailer stop/turn lamp right Fuses
Usage
82 Trailer Interface Module 2
83 FTZM
84 Trailer brake 85 ENG
86 Engine control module 87 Injector B even
88 O2 B sensor
89 O2 A sensor
90 Injector A odd 91 Engine control module throttle control
92 Cool fan clutch/ Aeroshutter Relays
Usage
5 Headlamp
18 DC/AC inverter
23 Rear window defogger
35 Parking lamp
36 Run/Crank
43 –
59 A/C clutch
64 Starter Motor (LD & HD DSL)
70 Starter Pinion (LD) / Starter Motor (HD Gas)
77 Powertrain
Page 372 of 461
Chevrolet Silverado 1500 Owner Manual (GMNA-Localizing-U.S./Canada/
Mexico/Paraguay-14632303) - 2021 - CRC - 11/9/20
Vehicle Care 371
If the TPMS is not functioning properly, it
cannot detect or signal a low tire pressure
condition. See your dealer for service if the
TPMS malfunction light and DIC message
come on and stay on.
Tire Fill Alert (If Equipped)
This feature provides visual and audible
alerts outside the vehicle to help when
inflating an underinflated tire to the
recommended cold tire pressure.
When the low tire pressure warning light
comes on:1. Park the vehicle in a safe, level place.
2. Set the parking brake firmly.
3. Place the vehicle in P (Park).
4. Add air to the tire that is underinflated. The turn signal lamp will flash.
When the recommended pressure is
reached, the horn sounds once and the
turn signal lamp will stop flashing and
briefly turn solid.
Repeat these steps for all underinflated tires
that have illuminated the low tire pressure
warning light.
{Warning
Overinflating a tire could cause the tire
to rupture and you or others could be
injured. Do not exceed the maximum
pressure listed on the tire sidewall. See
Tire Sidewall Labeling 0362 and
Vehicle Load Limits 0222.
If the tire is overinflated by more than
35 kPa (5 psi), the horn will sound multiple
times and the turn signal lamp will continue
to flash for several seconds after filling
stops. To release and correct the pressure,
while the turn signal lamp is still flashing,
briefly press the center of the valve stem.
When the recommended pressure is reached,
the horn sounds once.
If the turn signal lamp does not flash within
15 seconds after starting to inflate the tire,
the tire fill alert has not been activated or is
not working.
If the hazard warning flashers are on, the
tire fill alert visual feedback will not work
properly.
The TPMS will not activate the tire fill alert
properly under the following conditions:
.There is interference from an external
device or transmitter.
.The air pressure from the inflation device
is not sufficient to inflate the tire.
.There is a malfunction in the TPMS.
.There is a malfunction in the horn or turn
signal lamps.
.The identification code of the TPMS
sensor is not registered to the system.
.The battery of the TPMS sensor is low.
If the tire fill alert does not operate due to
TPMS interference, move the vehicle about
1 m (3 ft) back or forward and try again.
If the tire fill alert feature is not working,
use a tire pressure gauge.
TPMS Sensor Matching Process
Each TPMS sensor has a unique
identification code. The identification code
needs to be matched to a new tire/wheel
position after rotating the vehicle’s tires or
replacing one or more of the TPMS sensors.
Also, the TPMS sensor matching process
should be performed after replacing a spare
tire with a road tire containing the TPMS
sensor. The malfunction light and the DIC
message should go off at the next ignition
cycle. The sensors are matched to the tire/
wheel positions, using a TPMS relearn tool,
Page 373 of 461

Chevrolet Silverado 1500 Owner Manual (GMNA-Localizing-U.S./Canada/
Mexico/Paraguay-14632303) - 2021 - CRC - 11/9/20
372 Vehicle Care
in the following order: driver side front tire,
passenger side front tire, passenger side rear
tire, and driver side rear. See your dealer for
service or to purchase a relearn tool.
A TPMS relearn tool can also be purchased.
See Tire Pressure Monitor Sensor Activation
Tool at www.gmtoolsandequipment.com or
call 1-800-GM TOOLS (1-800-468-6657).
There are two minutes to match the first
tire/wheel position, and five minutes overall
to match all four tire/wheel positions. If it
takes longer, the matching process stops
and must be restarted.
The TPMS sensor matching process is:1. Set the parking brake.
2. Turn the ignition on without starting the vehicle.
3. Uplevel DIC Only: Make sure the Tire Pressure info page option is turned on.
The info pages on the DIC can be turned
on and off through the Options menu.
See Driver Information Center (DIC) (Base
Level) 0124 or
Driver Information Center (DIC) (Midlevel
and Uplevel) 0125. 4. If the vehicle has an uplevel DIC, use the
DIC controls on the right side of the
steering wheel to scroll to the Tire
Pressure screen under the DIC info page.
If the vehicle has a base level DIC, use
the trip odometer reset stem to scroll to
the Tire Pressure screen.
5. If the vehicle has an uplevel DIC, press and hold the thumbwheel located in the
center of the DIC controls on the right
side of the steering wheel.
If the vehicle has a base level DIC, press
and hold the trip odometer reset stem
for about five seconds. A message asking
if the process should begin should
appear. Select yes and press the trip
odometer reset stem to confirm the
selection.
The horn sounds twice to signal the
receiver is in relearn mode and the TIRE
LEARNING ACTIVE message displays on
the DIC screen.
6. Start with the driver side front tire.
7. Place the relearn tool against the tire sidewall, near the valve stem. Then press
the button to activate the TPMS sensor.
A horn chirp confirms that the sensor
identification code has been matched to
this tire and wheel position. 8. Proceed to the passenger side front tire,
and repeat the procedure in Step 7.
9. Proceed to the passenger side rear tire, and repeat the procedure in Step 7.
10. Proceed to the driver side rear tire, and repeat the procedure in Step 7. The horn
sounds two times to indicate the sensor
identification code has been matched to
the driver side rear tire, and the TPMS
sensor matching process is no longer
active. The TIRE LEARNING ACTIVE
message on the DIC display screen
goes off.
11. Turn the vehicle off.
12. Set all four tires to the recommended air pressure level as indicated on the Tire
and Loading Information label.
Trailer Tire Pressure Monitoring
Operation
If equipped, the Trailer Tire Pressure
Monitoring System (TTPMS) is designed to
monitor the pressure of the trailer tires and
warn the driver when a low pressure
condition exists. TTPMS sensors for four tires
are provided. The system can accommodate
a trailer with up to six tires if additional
Page 380 of 461
Chevrolet Silverado 1500 Owner Manual (GMNA-Localizing-U.S./Canada/
Mexico/Paraguay-14632303) - 2021 - CRC - 11/9/20
Vehicle Care 379
Wheel Alignment and Tire
Balance
The tires and wheels were aligned and
balanced at the factory to provide the
longest tire life and best overall
performance. Adjustments to wheel
alignment and tire balancing are not
necessary on a regular basis. Consider an
alignment check if there is unusual tire wear
or the vehicle is significantly pulling to one
side or the other. Some slight pull to the
left or right, depending on the crown of the
road and/or other road surface variations
such as troughs or ruts, is normal. If the
vehicle is vibrating when driving on a
smooth road, the tires and wheels may
need to be rebalanced. See your dealer for
proper diagnosis.
Wheel Replacement
Replace any wheel that is bent, cracked,
or badly rusted or corroded. If wheel nuts
keep coming loose, the wheel, wheel bolts,
and wheel nuts should be replaced. If the
wheel leaks air, replace it. Some aluminum
wheels can be repaired. See your dealer if
any of these conditions exist.Your dealer will know the kind of wheel that
is needed.
Each new wheel should have the same
load-carrying capacity, diameter, width,
offset, and be mounted the same way as
the one it replaces.
Replace wheels, wheel bolts, wheel nuts,
or Tire Pressure Monitor System (TPMS)
sensors with new GM original equipment
parts.
{Warning
Using the wrong replacement wheels,
wheel bolts, or wheel nuts can be
dangerous. It could affect the braking and
handling of the vehicle. Tires can lose air,
and cause loss of control, causing a crash.
Always use the correct wheel, wheel
bolts, and wheel nuts for replacement.
Caution
The wrong wheel can also cause
problems with bearing life, brake cooling,
speedometer or odometer calibration,
headlamp aim, bumper height, vehicle
ground clearance, and tire or tire chain
clearance to the body and chassis.
Used Replacement Wheels
{Warning
Replacing a wheel with a used one is
dangerous. How it has been used or how
far it has been driven may be unknown.
It could fail suddenly and cause a crash.
When replacing wheels, use a new GM
original equipment wheel.
Tire Chains
{Warning
If the vehicle has 275/50R22, 275/60R20,
LT265/60R20, LT265/70R17, or LT275/65R18
size tires, do not use tire chains. There is
not enough clearance. Tire chains used on
a vehicle without the proper amount of
clearance can cause damage to the
brakes, suspension, or other vehicle parts.
The area damaged by the tire chains
could cause loss of control and a crash.
Use another type of traction device only
if its manufacturer recommends it for the
vehicle's tire size combination and road
conditions. Follow that manufacturer's
(Continued)