2022 CHEVROLET MALIBU horn
[x] Cancel search: hornPage 6 of 351
Chevrolet Malibu Owner Manual (GMNA-Localizing-U.S./Canada-
14584249) - 2021 - CRC - 11/9/20
Introduction 5
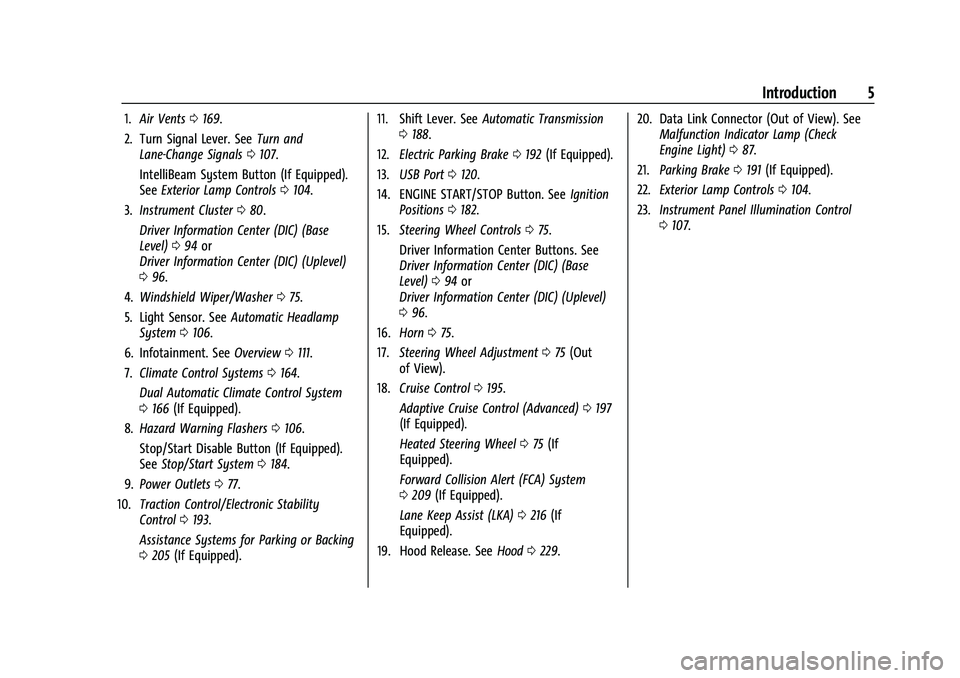
1.Air Vents 0169.
2. Turn Signal Lever. See Turn and
Lane-Change Signals 0107.
IntelliBeam System Button (If Equipped).
See Exterior Lamp Controls 0104.
3. Instrument Cluster 080.
Driver Information Center (DIC) (Base
Level) 094 or
Driver Information Center (DIC) (Uplevel)
0 96.
4. Windshield Wiper/Washer 075.
5. Light Sensor. See Automatic Headlamp
System 0106.
6. Infotainment. See Overview0111.
7. Climate Control Systems 0164.
Dual Automatic Climate Control System
0 166 (If Equipped).
8. Hazard Warning Flashers 0106.
Stop/Start Disable Button (If Equipped).
See Stop/Start System 0184.
9. Power Outlets 077.
10. Traction Control/Electronic Stability
Control 0193.
Assistance Systems for Parking or Backing
0 205 (If Equipped). 11. Shift Lever. See
Automatic Transmission
0 188.
12. Electric Parking Brake 0192 (If Equipped).
13. USB Port 0120.
14. ENGINE START/STOP Button. See Ignition
Positions 0182.
15. Steering Wheel Controls 075.
Driver Information Center Buttons. See
Driver Information Center (DIC) (Base
Level) 094 or
Driver Information Center (DIC) (Uplevel)
0 96.
16. Horn 075.
17. Steering Wheel Adjustment 075 (Out
of View).
18. Cruise Control 0195.
Adaptive Cruise Control (Advanced) 0197
(If Equipped).
Heated Steering Wheel 075 (If
Equipped).
Forward Collision Alert (FCA) System
0 209 (If Equipped).
Lane Keep Assist (LKA) 0216 (If
Equipped).
19. Hood Release. See Hood0229. 20. Data Link Connector (Out of View). See
Malfunction Indicator Lamp (Check
Engine Light) 087.
21. Parking Brake 0191 (If Equipped).
22. Exterior Lamp Controls 0104.
23. Instrument Panel Illumination Control
0107.
Page 9 of 351
Chevrolet Malibu Owner Manual (GMNA-Localizing-U.S./Canada-
14584249) - 2021 - CRC - 11/9/20
8 Keys, Doors, and Windows
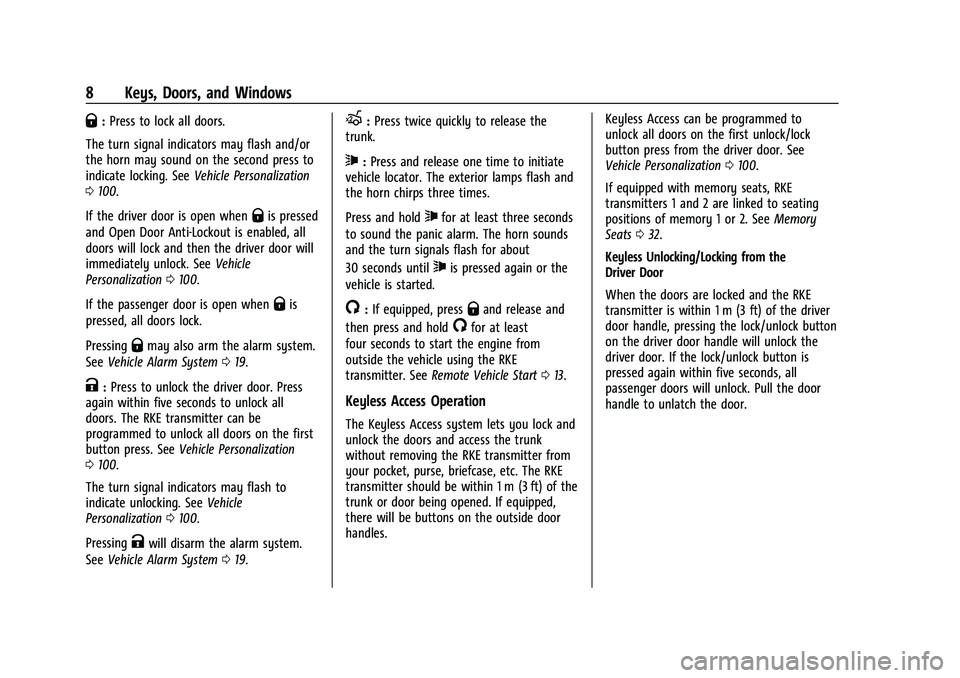
Q:Press to lock all doors.
The turn signal indicators may flash and/or
the horn may sound on the second press to
indicate locking. See Vehicle Personalization
0 100.
If the driver door is open when
Qis pressed
and Open Door Anti-Lockout is enabled, all
doors will lock and then the driver door will
immediately unlock. See Vehicle
Personalization 0100.
If the passenger door is open when
Qis
pressed, all doors lock.
Pressing
Qmay also arm the alarm system.
See Vehicle Alarm System 019.
K:Press to unlock the driver door. Press
again within five seconds to unlock all
doors. The RKE transmitter can be
programmed to unlock all doors on the first
button press. See Vehicle Personalization
0 100.
The turn signal indicators may flash to
indicate unlocking. See Vehicle
Personalization 0100.
Pressing
Kwill disarm the alarm system.
See Vehicle Alarm System 019.
X:Press twice quickly to release the
trunk.
7: Press and release one time to initiate
vehicle locator. The exterior lamps flash and
the horn chirps three times.
Press and hold
7for at least three seconds
to sound the panic alarm. The horn sounds
and the turn signals flash for about
30 seconds until
7is pressed again or the
vehicle is started.
/: If equipped, pressQand release and
then press and hold
/for at least
four seconds to start the engine from
outside the vehicle using the RKE
transmitter. See Remote Vehicle Start 013.
Keyless Access Operation
The Keyless Access system lets you lock and
unlock the doors and access the trunk
without removing the RKE transmitter from
your pocket, purse, briefcase, etc. The RKE
transmitter should be within 1 m (3 ft) of the
trunk or door being opened. If equipped,
there will be buttons on the outside door
handles. Keyless Access can be programmed to
unlock all doors on the first unlock/lock
button press from the driver door. See
Vehicle Personalization
0100.
If equipped with memory seats, RKE
transmitters 1 and 2 are linked to seating
positions of memory 1 or 2. See Memory
Seats 032.
Keyless Unlocking/Locking from the
Driver Door
When the doors are locked and the RKE
transmitter is within 1 m (3 ft) of the driver
door handle, pressing the lock/unlock button
on the driver door handle will unlock the
driver door. If the lock/unlock button is
pressed again within five seconds, all
passenger doors will unlock. Pull the door
handle to unlatch the door.
Page 11 of 351
Chevrolet Malibu Owner Manual (GMNA-Localizing-U.S./Canada-
14584249) - 2021 - CRC - 11/9/20
10 Keys, Doors, and Windows
heard. Passive locking will then remain
disabled until
Qon the interior door is
pressed, or until the vehicle is turned on.
Remote Left In Vehicle Alert
When the vehicle is turned off and an RKE
transmitter is left in the vehicle, the horn
will chirp three times after all doors are
closed. To turn on or off see Vehicle
Personalization 0100.
Remote No Longer In Vehicle Alert
If the vehicle is on with a door open, and
then all doors are closed, the vehicle will
check for an RKE transmitter inside. If an
RKE transmitter is not detected, the Driver
Information Center (DIC) will display NO
REMOTE DETECTED and the horn will chirp
three times.
This occurs only once each time the vehicle
is driven. See Vehicle Personalization 0100.
Keyless Trunk Opening
Press the touch pad on the rear of the trunk
to open it if the RKE transmitter is within
1 m (3 ft) of the trunk.
Key Access
To access a vehicle with a weak transmitter
battery, see Door Locks014.
Programming Transmitters to the Vehicle
Only RKE transmitters programmed to the
vehicle will work. If a transmitter is lost or
stolen, a replacement can be purchased and
programmed through your dealer. The
vehicle can be reprogrammed so that lost or
stolen transmitters no longer work. Any
remaining transmitters will need to be
reprogrammed. Each vehicle can have up to
eight transmitters matched to it.
Programming with Recognized Transmitters
A new transmitter can be programmed to
the vehicle when there are two recognized
transmitters. To program, the vehicle must
be off and all of the transmitters, both
currently recognized and new, must be
with you.
1. Place the two recognized transmitters in the cupholder.
2. Remove the key lock cylinder cap on the driver door handle. See Door Locks014.
Insert the vehicle key of the new
transmitter into the key lock cylinder on
the outside of the driver door and turn
the key counterclockwise five times
within 10 seconds.
The DIC displays READY FOR REMOTE #2,
3, 4 or 5.
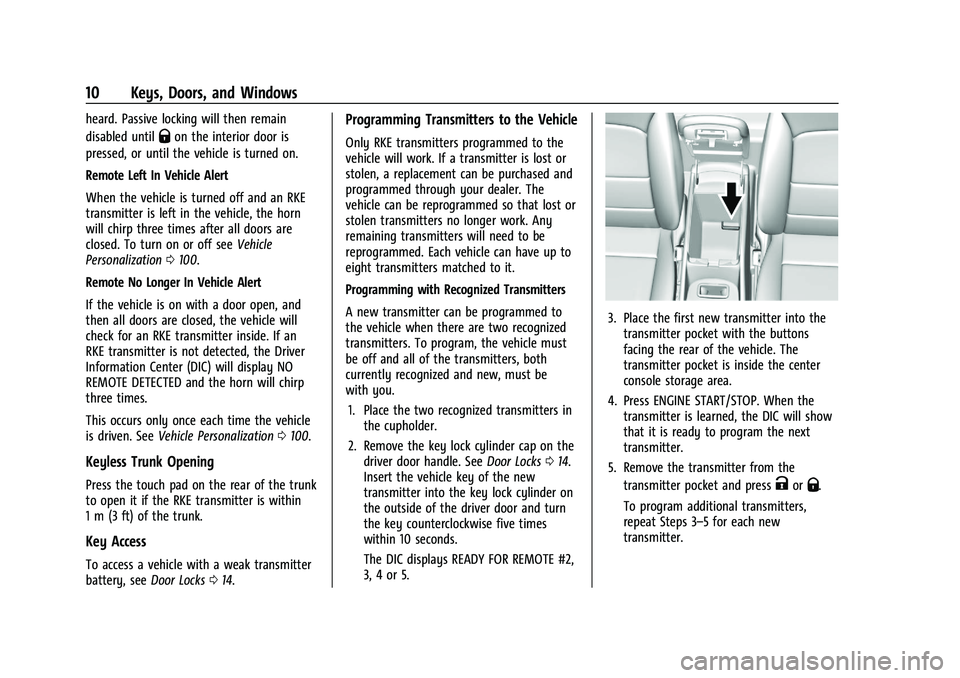
3. Place the first new transmitter into the transmitter pocket with the buttons
facing the rear of the vehicle. The
transmitter pocket is inside the center
console storage area.
4. Press ENGINE START/STOP. When the transmitter is learned, the DIC will show
that it is ready to program the next
transmitter.
5. Remove the transmitter from the transmitter pocket and press
KorQ.
To program additional transmitters,
repeat Steps 3–5 for each new
transmitter.
Page 18 of 351
Chevrolet Malibu Owner Manual (GMNA-Localizing-U.S./Canada-
14584249) - 2021 - CRC - 11/9/20
Keys, Doors, and Windows 17
Automatic Door Locks
The doors will lock automatically when all
doors are closed, the ignition is on, and the
vehicle is shifted out of P (Park).
If a vehicle door is unlocked, and then
opened and closed, the doors will lock either
when your foot is removed from the brake
or the vehicle speed becomes faster than
13 km/h (8 mph).
To unlock the doors:
.PressKon the power door lock switch.
.Shift the transmission into P (Park).
Automatic door locking cannot be disabled.
Automatic door unlocking can be
programmed. See Vehicle Personalization
0 100.
Lockout Protection
If the ignition is on or in ACC/ACCESSORY
and the power door lock switch is pressed
with the driver door open, all the doors will
lock and only the driver door will unlock.
If the vehicle is off and locking is requested
while a door is open, when all doors are
closed the vehicle will check for RKE
transmitters inside. If an RKE transmitter is
detected and the number of RKE transmitters inside has not reduced, the
driver door will unlock and the horn will
chirp three times.
Lockout Protection can be manually
overridden with the driver door open by
pressing and holding
Qon the power door
lock switch.
Open Door Anti-Lockout
If Open Door Anti-Lockout has been turned
on and the vehicle is off, the driver door is
open, and locking is requested, all the doors
will lock and the driver door will remain
open. The Open Door Anti-Lockout feature
can be turned on or off. See Vehicle
Personalization 0100.
Safety Locks
The rear door safety locks prevent
passengers from opening the rear doors
from inside the vehicle.
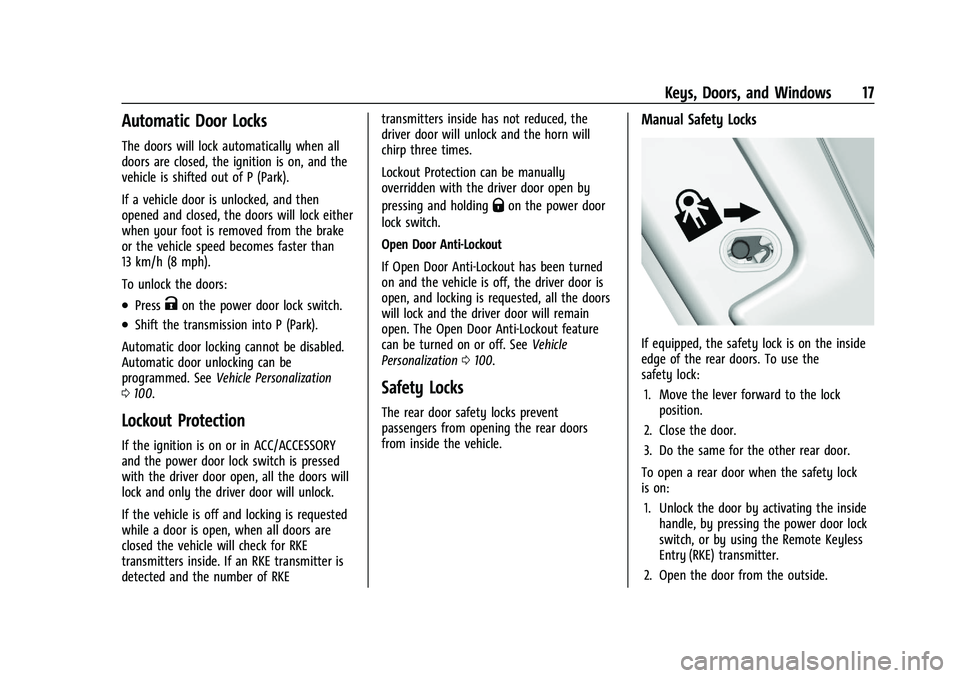
Manual Safety Locks
If equipped, the safety lock is on the inside
edge of the rear doors. To use the
safety lock:
1. Move the lever forward to the lock position.
2. Close the door.
3. Do the same for the other rear door.
To open a rear door when the safety lock
is on: 1. Unlock the door by activating the inside handle, by pressing the power door lock
switch, or by using the Remote Keyless
Entry (RKE) transmitter.
2. Open the door from the outside.
Page 21 of 351
Chevrolet Malibu Owner Manual (GMNA-Localizing-U.S./Canada-
14584249) - 2021 - CRC - 11/9/20
20 Keys, Doors, and Windows
.Use the Keyless Access system,
if equipped.
.With a door open, press the
inside
Q.
3. After 30 seconds the alarm system will arm, and the indicator light will begin to
slowly flash indicating the alarm system
is operating. Pressing
Qon the RKE
transmitter a second time will bypass
the 30-second delay and immediately
arm the alarm system.
The vehicle alarm system will not arm if the
doors are locked with the key.
If the driver door is opened without first
unlocking with the RKE transmitter, the horn
will chirp and the lights will flash to indicate
pre-alarm. If the vehicle is not started,
or the door is not unlocked by pressing
K
on the RKE transmitter during the 10-second
pre-alarm, the alarm will be activated.
If a door, the hood, or the trunk is opened
without first disarming the system, the turn
signals will flash and the horn will sound for
about 30 seconds. The alarm system will
then re-arm to monitor for the next
unauthorized event.
Disarming the Alarm System
Do one of the following to disarm the alarm
system or turn off the alarm if it has been
activated:
.PressKon the RKE transmitter.
.Unlock the vehicle using the Keyless
Access system, if equipped.
.Start the vehicle.
To avoid setting off the alarm by accident:
.Lock the vehicle after all occupants have
left the vehicle and all doors are closed.
.Always unlock a door with the RKE
transmitter or use the Keyless Access
system, if equipped.
Unlocking the driver door with the key will
not disarm the system or turn off the alarm.
How to Detect a Tamper Condition
IfKis pressed on the RKE transmitter and
the horn chirps and the lights flash three
times, an alarm occurred previously while
the alarm system was armed.
If the alarm has been activated, a message
will appear on the Driver Information
Center (DIC).
Immobilizer
See Radio Frequency Statement 0328.
Immobilizer Operation
This vehicle has a passive theft-deterrent
system.
The system does not have to be manually
armed or disarmed.
The vehicle is automatically immobilized
when the transmitter leaves the vehicle.
The immobilization system is disarmed
when the ignition button is pushed in and a
valid transmitter is in the vehicle.
The security light on the instrument cluster
comes on when there is a problem with
arming or disarming the theft-deterrent
system.
The system has one or more transmitters
matched to an immobilizer control unit in
the vehicle. Only a correctly matched
Page 75 of 351
Chevrolet Malibu Owner Manual (GMNA-Localizing-U.S./Canada-
14584249) - 2021 - CRC - 11/9/20
74 Instruments and Controls
Instruments and Controls
Controls
Steering Wheel Adjustment . . . . . . . . . . . . . 75
Steering Wheel Controls . . . . . . . . . . . . . . . . 75
Heated Steering Wheel . . . . . . . . . . . . . . . . . 75
Horn . . . . . . . . . . . . . . . . . . . . . . . . . . . . . . . . . . . . 75
Windshield Wiper/Washer . . . . . . . . . . . . . . 75
Clock . . . . . . . . . . . . . . . . . . . . . . . . . . . . . . . . . . . 76
Power Outlets . . . . . . . . . . . . . . . . . . . . . . . . . . 77
Wireless Charging . . . . . . . . . . . . . . . . . . . . . . 78
Warning Lights, Gauges, and Indicators
Warning Lights, Gauges, andIndicators . . . . . . . . . . . . . . . . . . . . . . . . . . . . 80
Instrument Cluster . . . . . . . . . . . . . . . . . . . . . 80
Speedometer . . . . . . . . . . . . . . . . . . . . . . . . . . . 82
Odometer . . . . . . . . . . . . . . . . . . . . . . . . . . . . . . 82
Trip Odometer . . . . . . . . . . . . . . . . . . . . . . . . . . 82
Tachometer . . . . . . . . . . . . . . . . . . . . . . . . . . . . 83
Fuel Gauge . . . . . . . . . . . . . . . . . . . . . . . . . . . . . 83
Engine Coolant Temperature Gauge . . . . 84
Voltmeter Gauge (Uplevel Cluster Only) . . . . . . . . . . . . . . . . . . . . . . . . . 84
Seat Belt Reminders . . . . . . . . . . . . . . . . . . . . 85
Airbag Readiness Light . . . . . . . . . . . . . . . . . 85
Passenger Airbag Status Indicator . . . . . . 86
Charging System Light . . . . . . . . . . . . . . . . . 86
Malfunction Indicator Lamp (Check Engine Light) . . . . . . . . . . . . . . . . . . . . . . . . . 87 Brake System Warning Light . . . . . . . . . . . 88
Electric Parking Brake Light . . . . . . . . . . . . . 89
Service Electric Parking Brake Light . . . . . 89
Antilock Brake System (ABS) Warning
Light . . . . . . . . . . . . . . . . . . . . . . . . . . . . . . . . . 89
Lane Keep Assist (LKA) Light . . . . . . . . . . . 90
Vehicle Ahead Indicator . . . . . . . . . . . . . . . . 90
Pedestrian Ahead Indicator . . . . . . . . . . . . . 90
Traction Off Light . . . . . . . . . . . . . . . . . . . . . . 90
StabiliTrak OFF Light . . . . . . . . . . . . . . . . . . . . 91
Traction Control System (TCS)/StabiliTrak Light . . . . . . . . . . . . . . . . . . . . . . . . . . . . . . . . . . 91
Engine Coolant Temperature Warning Light (Uplevel Only) . . . . . . . . . . . . . . . . . . 91
Tire Pressure Light . . . . . . . . . . . . . . . . . . . . . . 92
Engine Oil Pressure Light . . . . . . . . . . . . . . . 92
Low Fuel Warning Light . . . . . . . . . . . . . . . . 92
Security Light . . . . . . . . . . . . . . . . . . . . . . . . . . 93
High-Beam On Light . . . . . . . . . . . . . . . . . . . . 93
Lamps On Reminder . . . . . . . . . . . . . . . . . . . . 93
Cruise Control Light . . . . . . . . . . . . . . . . . . . . 93
Door Ajar Light (Uplevel) . . . . . . . . . . . . . . . 94
Information Displays
Driver Information Center (DIC) (Base Level) . . . . . . . . . . . . . . . . . . . . . . . . . . . . . . . . . 94
Driver Information Center (DIC) (Uplevel) . . . . . . . . . . . . . . . . . . . . . . . . . . . . . 96
Vehicle Messages
Vehicle Messages . . . . . . . . . . . . . . . . . . . . . . 99
Engine Power Messages . . . . . . . . . . . . . . . . 99
Vehicle Speed Messages . . . . . . . . . . . . . . . 100
Vehicle Personalization
Vehicle Personalization . . . . . . . . . . . . . . . . 100
Page 76 of 351

Chevrolet Malibu Owner Manual (GMNA-Localizing-U.S./Canada-
14584249) - 2021 - CRC - 11/9/20
Instruments and Controls 75
Controls
Steering Wheel Adjustment
To adjust the steering wheel:1. Pull the lever down.
2. Move the steering wheel up or down.
3. Pull or push the steering wheel closer or away from you.
4. Pull the lever up to lock the steering wheel in place.
Do not adjust the steering wheel while
driving.
Steering Wheel Controls
The infotainment system can be operated
by using the steering wheel controls. See
Steering Wheel Controls 0112.
Heated Steering Wheel
(:If equipped with a heated steering
wheel, press to turn on or off. A light on
the button displays when the feature is
turned on.
The steering wheel takes about
three minutes to reach maximum heat.
Horn
Pressaon the steering wheel pad to
sound the horn.
Windshield Wiper/Washer
The windshield wiper/washer lever is on the
side of the steering column. With the
ignition on or in ACC/ACCESSORY, move the
windshield wiper lever to select the wiper
speed.
HI : Use for fast wipes.
LO : Use for slow wipes.
Page 103 of 351
Chevrolet Malibu Owner Manual (GMNA-Localizing-U.S./Canada-
14584249) - 2021 - CRC - 11/9/20
102 Instruments and Controls
Vehicle Locator Lights
This setting flashes the vehicle’s headlamps
when
Kis pressed on the Remote Keyless
Entry (RKE) transmitter.
Touch Off or On.
Exit Lighting
This setting specifies how long the
headlamps stay on after the vehicle is
turned off and exited.
Touch Off, 30 Seconds, 60 Seconds,
or 120 Seconds.
Power Door Locks
Touch and the following may display:
.Open Door Anti Lock Out
.Auto Door Unlock
.Delayed Door Lock
Open Door Anti Lock Out
This setting prevents the driver door from
locking when the door is open. If this
setting is on, the Delayed Door Lock menu
will not be available.
Touch Off or On. Auto Door Unlock
This allows selection of which of the doors
will automatically unlock when the vehicle is
shifted into P (Park).
Touch Off, All Doors, or Driver Door.
Delayed Door Lock
When on, this feature will delay the locking
of the doors. To override the delay, press
the power door lock switch on the door.
Touch Off or On.
Remote Lock, Unlock, and Start
Touch and the following may display:
.Remote Unlock Light Feedback
.Remote Lock Feedback
.Remote Door Unlock
.Remote Start Auto Cool Seats
.Remote Start Auto Heat Seats
.Remote Window Operation
.Passive Door Unlock
.Passive Door Lock
.Remote Left in Vehicle Alert
Remote Unlock Light Feedback
This setting flashes the exterior lamps when
the vehicle is unlocked with the RKE
transmitter.
Touch Off or Flash Lights.
Remote Lock Feedback
This setting specifies how the vehicle
responds when the vehicle is locked with
the RKE transmitter.
Touch Off, Lights and Horn, Lights Only,
or Horn Only.
Remote Door Unlock
This setting specifies whether all doors,
or just the driver door, unlock when pressing
Kon the RKE transmitter.
Touch All Doors or Driver Door.
Remote Start Auto Cool Seats
If equipped and turned on, this feature will
turn the ventilated seats on when using
remote start on warm days.
Touch Off, On-Driver and Passenger,
or On-Driver.