2022 CHEVROLET MALIBU cooling
[x] Cancel search: coolingPage 234 of 351
Chevrolet Malibu Owner Manual (GMNA-Localizing-U.S./Canada-
14584249) - 2021 - CRC - 11/9/20
Vehicle Care 233
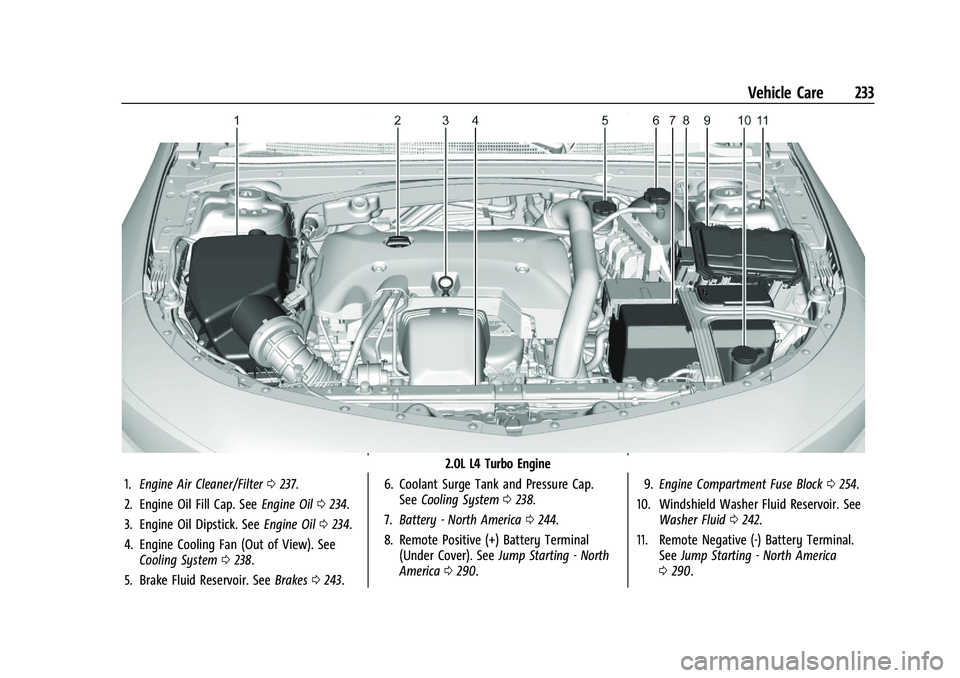
2.0L L4 Turbo Engine
1. Engine Air Cleaner/Filter 0237.
2. Engine Oil Fill Cap. See Engine Oil0234.
3. Engine Oil Dipstick. See Engine Oil0234.
4. Engine Cooling Fan (Out of View). See Cooling System 0238.
5. Brake Fluid Reservoir. See Brakes0243. 6. Coolant Surge Tank and Pressure Cap.
See Cooling System 0238.
7. Battery - North America 0244.
8. Remote Positive (+) Battery Terminal (Under Cover). See Jump Starting - North
America 0290. 9.
Engine Compartment Fuse Block 0254.
10. Windshield Washer Fluid Reservoir. See Washer Fluid 0242.
11. Remote Negative (-) Battery Terminal. SeeJump Starting - North America
0 290.
Page 239 of 351

Chevrolet Malibu Owner Manual (GMNA-Localizing-U.S./Canada-
14584249) - 2021 - CRC - 11/9/20
238 Vehicle Care
1.5L L4 Turbo Engine
2.0L L4 Turbo Engine
1. Remove the air cleaner housing cover screws. 2. Raise the air cleaner housing cover and
remove the air cleaner/filter from the air
cleaner housing.
3. Clean the filter sealing surface and the housing.
{Warning
If part replacement is necessary, the part
must be replaced with one of the same
part number or with an equivalent part.
Use of a replacement part without the
same fit, form, and function may result
in personal injury or damage to the
vehicle.
4. Install the new engine air cleaner/filter.
5. Lower the air cleaner housing cover and secure with the screws.
6. If equipped, reset the engine air filter life system after replacing the engine air
filter. See Engine Air Filter Life System
0 237.
{Warning
Operating the engine with the air
cleaner/filter off can cause you or others
to be burned. Use caution when working
on the engine. Do not start the engine or
drive the vehicle with the air cleaner/
filter off, as flames may be present if the
engine backfires.
Caution
If the air cleaner/filter is off, dirt can
easily get into the engine, which could
damage it. Always have the air cleaner/
filter in place when driving.
Cooling System
The cooling system allows the engine to
maintain the correct working temperature.
Page 240 of 351
Chevrolet Malibu Owner Manual (GMNA-Localizing-U.S./Canada-
14584249) - 2021 - CRC - 11/9/20
Vehicle Care 239
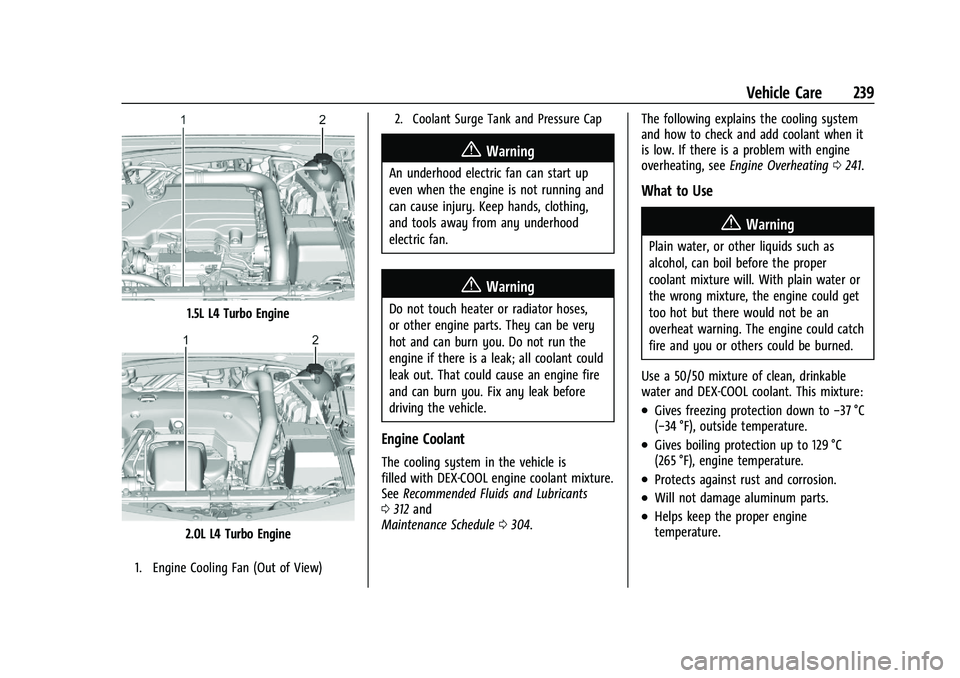
1.5L L4 Turbo Engine
2.0L L4 Turbo Engine
1. Engine Cooling Fan (Out of View)2. Coolant Surge Tank and Pressure Cap
{Warning
An underhood electric fan can start up
even when the engine is not running and
can cause injury. Keep hands, clothing,
and tools away from any underhood
electric fan.
{Warning
Do not touch heater or radiator hoses,
or other engine parts. They can be very
hot and can burn you. Do not run the
engine if there is a leak; all coolant could
leak out. That could cause an engine fire
and can burn you. Fix any leak before
driving the vehicle.
Engine Coolant
The cooling system in the vehicle is
filled with DEX-COOL engine coolant mixture.
See
Recommended Fluids and Lubricants
0 312 and
Maintenance Schedule 0304. The following explains the cooling system
and how to check and add coolant when it
is low. If there is a problem with engine
overheating, see
Engine Overheating 0241.
What to Use
{Warning
Plain water, or other liquids such as
alcohol, can boil before the proper
coolant mixture will. With plain water or
the wrong mixture, the engine could get
too hot but there would not be an
overheat warning. The engine could catch
fire and you or others could be burned.
Use a 50/50 mixture of clean, drinkable
water and DEX-COOL coolant. This mixture:
.Gives freezing protection down to −37 °C
(−34 °F), outside temperature.
.Gives boiling protection up to 129 °C
(265 °F), engine temperature.
.Protects against rust and corrosion.
.Will not damage aluminum parts.
.Helps keep the proper engine
temperature.
Page 241 of 351
Chevrolet Malibu Owner Manual (GMNA-Localizing-U.S./Canada-
14584249) - 2021 - CRC - 11/9/20
240 Vehicle Care
Caution
Do not use anything other than a mix of
DEX-COOL coolant that meets GM
Standard GMW3420 and clean, drinkable
water. Anything else can cause damage
to the engine cooling system and the
vehicle, which would not be covered by
the vehicle warranty.
Never dispose of engine coolant by putting
it in the trash, or by pouring it on the
ground, or into sewers, streams or bodies of
water. Have the coolant changed by an
authorized service center, familiar with legal
requirements regarding used coolant
disposal. This will help protect the
environment and your health.
Checking Coolant
The vehicle must be on a level surface when
checking the coolant level.
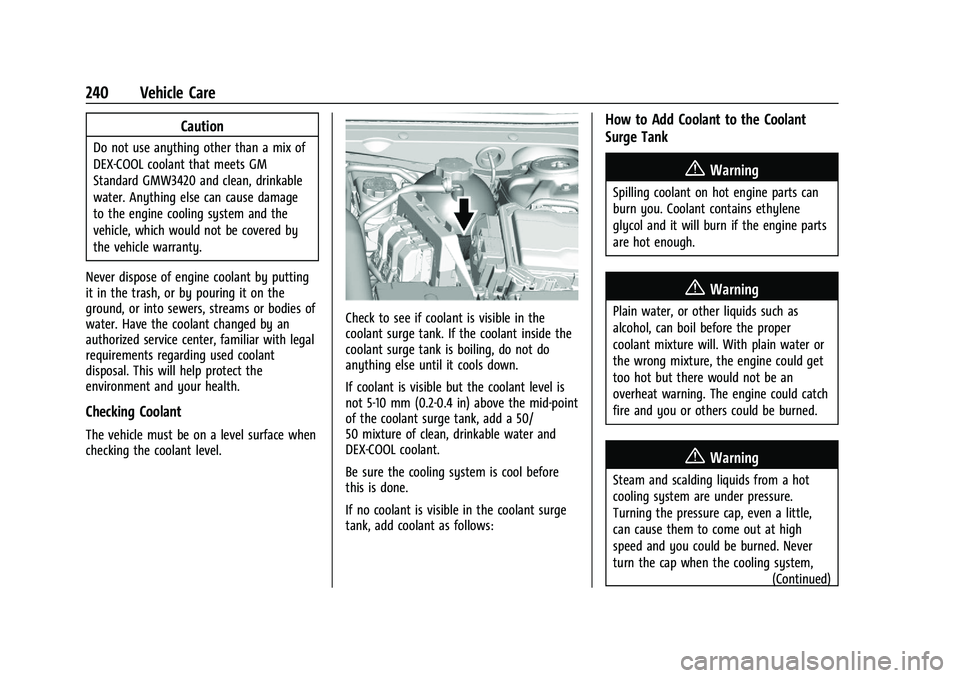
Check to see if coolant is visible in the
coolant surge tank. If the coolant inside the
coolant surge tank is boiling, do not do
anything else until it cools down.
If coolant is visible but the coolant level is
not 5-10 mm (0.2-0.4 in) above the mid-point
of the coolant surge tank, add a 50/
50 mixture of clean, drinkable water and
DEX-COOL coolant.
Be sure the cooling system is cool before
this is done.
If no coolant is visible in the coolant surge
tank, add coolant as follows:
How to Add Coolant to the Coolant
Surge Tank
{Warning
Spilling coolant on hot engine parts can
burn you. Coolant contains ethylene
glycol and it will burn if the engine parts
are hot enough.
{Warning
Plain water, or other liquids such as
alcohol, can boil before the proper
coolant mixture will. With plain water or
the wrong mixture, the engine could get
too hot but there would not be an
overheat warning. The engine could catch
fire and you or others could be burned.
{Warning
Steam and scalding liquids from a hot
cooling system are under pressure.
Turning the pressure cap, even a little,
can cause them to come out at high
speed and you could be burned. Never
turn the cap when the cooling system, (Continued)
Page 242 of 351
Chevrolet Malibu Owner Manual (GMNA-Localizing-U.S./Canada-
14584249) - 2021 - CRC - 11/9/20
Vehicle Care 241
Warning (Continued)
including the pressure cap, is hot. Wait
for the cooling system and pressure cap
to cool.
Caution
Failure to follow the specific coolant fill
procedure could cause the engine to
overheat and could cause system
damage. If coolant is not visible in the
surge tank, contact your dealer.
The coolant surge tank pressure cap can be
removed when the cooling system, including
the surge tank pressure cap and upper
radiator hose, is no longer hot.
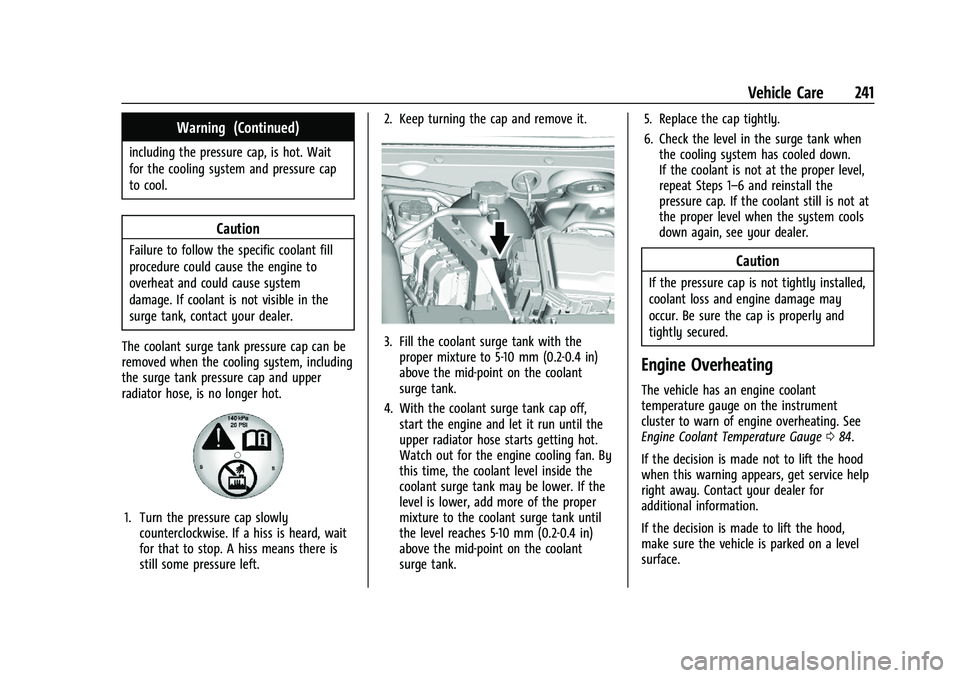
1. Turn the pressure cap slowly counterclockwise. If a hiss is heard, wait
for that to stop. A hiss means there is
still some pressure left. 2. Keep turning the cap and remove it.
3. Fill the coolant surge tank with the
proper mixture to 5-10 mm (0.2-0.4 in)
above the mid-point on the coolant
surge tank.
4. With the coolant surge tank cap off, start the engine and let it run until the
upper radiator hose starts getting hot.
Watch out for the engine cooling fan. By
this time, the coolant level inside the
coolant surge tank may be lower. If the
level is lower, add more of the proper
mixture to the coolant surge tank until
the level reaches 5-10 mm (0.2-0.4 in)
above the mid-point on the coolant
surge tank. 5. Replace the cap tightly.
6. Check the level in the surge tank when
the cooling system has cooled down.
If the coolant is not at the proper level,
repeat Steps 1–6 and reinstall the
pressure cap. If the coolant still is not at
the proper level when the system cools
down again, see your dealer.
Caution
If the pressure cap is not tightly installed,
coolant loss and engine damage may
occur. Be sure the cap is properly and
tightly secured.
Engine Overheating
The vehicle has an engine coolant
temperature gauge on the instrument
cluster to warn of engine overheating. See
Engine Coolant Temperature Gauge 084.
If the decision is made not to lift the hood
when this warning appears, get service help
right away. Contact your dealer for
additional information.
If the decision is made to lift the hood,
make sure the vehicle is parked on a level
surface.
Page 243 of 351
Chevrolet Malibu Owner Manual (GMNA-Localizing-U.S./Canada-
14584249) - 2021 - CRC - 11/9/20
242 Vehicle Care
Then check to see if the engine cooling fans
are running. If the engine is overheating,
both fans should be running. If they are not,
do not continue to run the engine. Have the
vehicle serviced.
Caution
Do not run the engine if there is a leak
in the engine cooling system. This can
cause a loss of all coolant and can
damage the system and vehicle. Have
any leaks fixed right away.
If Steam Is Coming from the Engine
Compartment
{Warning
Steam and scalding liquids from a hot
cooling system are under pressure.
Turning the pressure cap, even a little,
can cause them to come out at high
speed and you could be burned. Never
turn the cap when the cooling system,
including the pressure cap, is hot. Wait
for the cooling system and pressure cap
to cool.
If No Steam Is Coming from the Engine
Compartment
If an engine overheat warning is displayed
but no steam can be seen or heard, the
problem may not be too serious. Sometimes
the engine can get a little too hot when the
vehicle:
.Climbs a long hill on a hot day.
.Stops after high-speed driving.
.Idles for long periods in traffic.
If the overheat warning is displayed with no
sign of steam: 1. Turn the air conditioning off.
2. Turn the heater on to the highest temperature and to the highest fan
speed. Open the windows as necessary.
3. When it is safe to do so, pull off the road, shift to P (Park) or N (Neutral), and
let the engine idle.
If the engine coolant temperature gauge is
no longer in the overheat zone, the vehicle
can be driven. Continue to drive the vehicle
slowly for about 10 minutes. Keep a safe
distance from the vehicle in front. If the
warning does not come back on, continue to
drive normally and have the cooling system
checked for proper fill and function. If the warning continues, pull over, stop, and
park the vehicle right away.
If there is no sign of steam, idle the engine
for three minutes while parked. If the
warning is still displayed, turn off the
engine until it cools down.
Washer Fluid
What to Use
When windshield washer fluid is needed, be
sure to read the manufacturer's instructions
before use. If operating the vehicle in an
area where the temperature may fall below
freezing, use a fluid that has sufficient
protection against freezing.
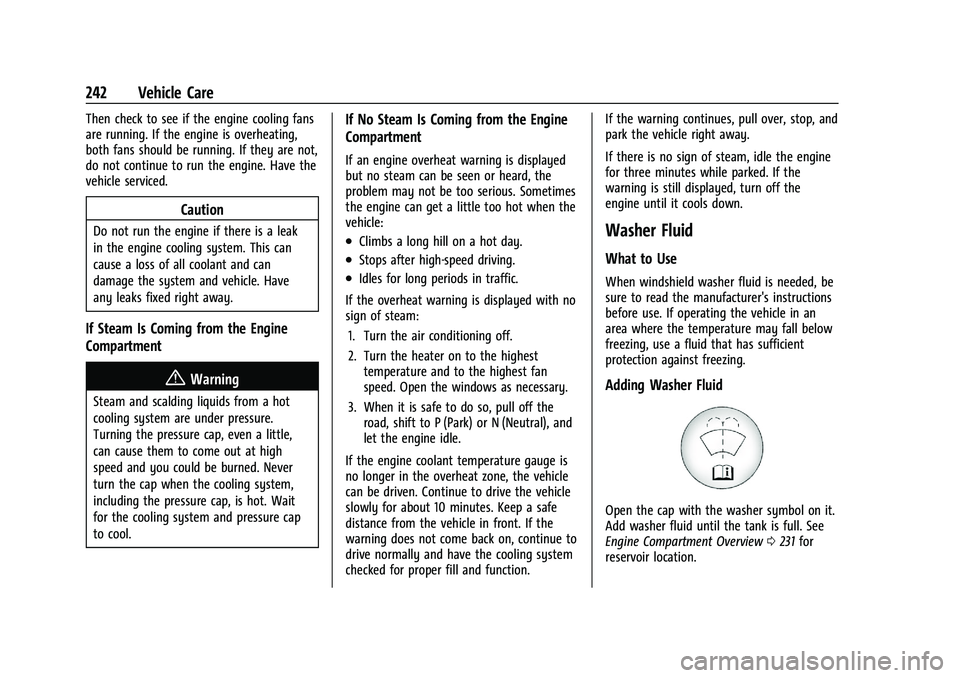
Adding Washer Fluid
Open the cap with the washer symbol on it.
Add washer fluid until the tank is full. See
Engine Compartment Overview
0231 for
reservoir location.
Page 258 of 351
Chevrolet Malibu Owner Manual (GMNA-Localizing-U.S./Canada-
14584249) - 2021 - CRC - 11/9/20
Vehicle Care 257
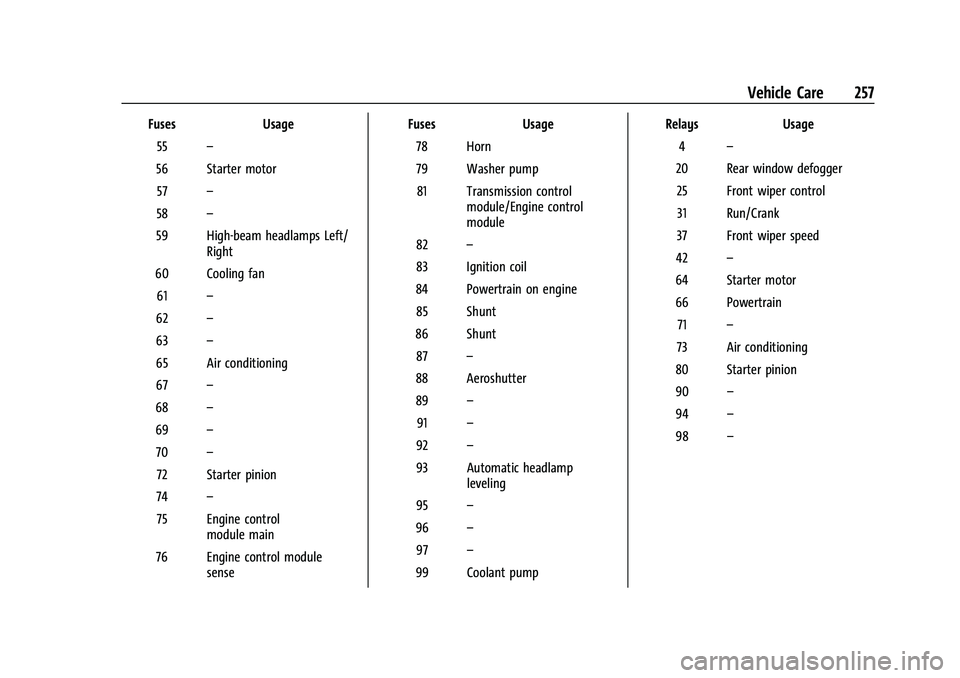
FusesUsage
55 –
56 Starter motor 57 –
58 –
59 High-beam headlamps Left/ Right
60 Cooling fan 61 –
62 –
63 –
65 Air conditioning
67 –
68 –
69 –
70 –
72 Starter pinion
74 –
75 Engine control module main
76 Engine control module sense Fuses
Usage
78 Horn
79 Washer pump 81 Transmission control module/Engine control
module
82 –
83 Ignition coil
84 Powertrain on engine 85 Shunt
86 Shunt 87 –
88 Aeroshutter
89 –
91 –
92 –
93 Automatic headlamp leveling
95 –
96 –
97 –
99 Coolant pump Relays
Usage
4 –
20 Rear window defogger 25 Front wiper control31 Run/Crank
37 Front wiper speed
42 –
64 Starter motor
66 Powertrain 71 –
73 Air conditioning
80 Starter pinion
90 –
94 –
98 –
Page 278 of 351
Chevrolet Malibu Owner Manual (GMNA-Localizing-U.S./Canada-
14584249) - 2021 - CRC - 11/9/20
Vehicle Care 277
Your dealer will know the kind of wheel that
is needed.
Each new wheel should have the same
load-carrying capacity, diameter, width,
offset, and be mounted the same way as
the one it replaces.
Replace wheels, wheel bolts, wheel nuts,
or Tire Pressure Monitor System (TPMS)
sensors with new GM original equipment
parts.
{Warning
Using the wrong replacement wheels,
wheel bolts, or wheel nuts can be
dangerous. It could affect the braking and
handling of the vehicle. Tires can lose air,
and cause loss of control, causing a crash.
Always use the correct wheel, wheel
bolts, and wheel nuts for replacement.
Caution
The wrong wheel can also cause
problems with bearing life, brake cooling,
speedometer or odometer calibration,
headlamp aim, bumper height, vehicle
ground clearance, and tire or tire chain
clearance to the body and chassis.
Used Replacement Wheels
{Warning
Replacing a wheel with a used one is
dangerous. How it has been used or how
far it has been driven may be unknown.
It could fail suddenly and cause a crash.
When replacing wheels, use a new GM
original equipment wheel.
Tire Chains
{Warning
If the vehicle has 245/45R18 or 245/40R19
size tires, do not use tire chains. There is
not enough clearance. Tire chains used on
a vehicle without the proper amount of
clearance can cause damage to the
brakes, suspension, or other vehicle parts.
The area damaged by the tire chains
could cause loss of control and a crash.
Use another type of traction device only
if its manufacturer recommends it for the
vehicle's tire size combination and road
conditions. Follow that manufacturer's
instructions. To avoid vehicle damage,
drive slow and readjust or remove the(Continued)
Warning (Continued)
traction device if it contacts the vehicle.
Do not spin the wheels. If traction
devices are used, install them on the
front tires.
Caution
If the vehicle is equipped with a tire size
other than 245/45R18 or 245/40R19, use
tire chains only where legal and only
when necessary. Use low profile chains
that add no more than 12 mm thickness
to the tire tread and inner sidewall. Use
chains that are the proper size for the
tires. Install them on the tires of the
front axle. Do not use chains on the tires
of the rear axle. Tighten them as tightly
as possible with the ends securely
fastened. Drive slowly and follow the
chain manufacturer's instructions. If the
chains contact the vehicle, stop and
retighten them. If the contact continues,
slow down until it stops. Driving too fast
or spinning the wheels with chains on
will damage the vehicle.