2022 CHEVROLET COLORADO wheel
[x] Cancel search: wheelPage 253 of 362
Chevrolet Colorado Owner Manual (GMNA-Localizing-U.S./Canada/Mexico-
15274222) - 2022 - CRC - 11/2/21
252 Vehicle Care
{Warning
The brake wear warning sound means
that soon the brakes will not work well.
That could lead to a crash. When the
brake wear warning sound is heard, have
the vehicle serviced.
Caution
Continuing to drive with worn-out brake
linings could result in costly brake
repairs.
Some driving conditions or climates can
cause a brake squeal when the brakes are
first applied, clearing up following several
applications. This does not mean something
is wrong with the brakes.
Properly torqued wheel nuts are necessary
to help prevent brake pulsation. When tires
are rotated, inspect brake linings for wear
and evenly tighten wheel nuts in the proper
sequence to torque specifications. See
Capacities and Specifications 0328.
Brake pads should be replaced as complete
axle sets.
Brake Pedal Travel
See your dealer if the brake pedal does not
return to normal height, or if there is a
rapid increase in pedal travel. This could be
a sign that brake service may be required.
Replacing Brake System Parts
Always replace brake system parts with
new, approved replacement parts. If this is
not done, the brakes may not work
properly. The braking performance can
change in many ways if the wrong brake
parts are installed or if parts are improperly
installed.
Brake Fluid
The brake master cylinder reservoir is filled
with GM approved DOT 4 brake fluid as
indicated on the reservoir cap. See Engine
Compartment Overview 0239 for the
location of the reservoir. Checking Brake Fluid
With the vehicle in P (Park) on a level
surface, the brake fluid level should be
between the minimum and maximum marks
on the brake fluid reservoir.
There are only two reasons why the brake
fluid level in the reservoir may go down:
.Normal brake lining wear. When new
linings are installed, the fluid level goes
back up.
.A fluid leak in the brake hydraulic system.
Have the brake hydraulic system fixed.
With a leak, the brakes will not
work well.
Always clean the brake fluid reservoir cap
and the area around the cap before
removing it.
Do not top off the brake fluid. Adding fluid
does not correct a leak. If fluid is added
when the linings are worn, there will be too
much fluid when new brake linings are
installed. Add or remove fluid, as necessary,
only when work is done on the brake
hydraulic system.
Page 255 of 362
Chevrolet Colorado Owner Manual (GMNA-Localizing-U.S./Canada/Mexico-
15274222) - 2022 - CRC - 11/2/21
254 Vehicle Care
Extended Storage: Remove the black,
negative (−) cable from the battery or use a
battery trickle charger.
Four-Wheel Drive
Transfer Case
When to Check Lubricant
Refer toMaintenance Schedule 0314 to
determine when to check the lubricant.
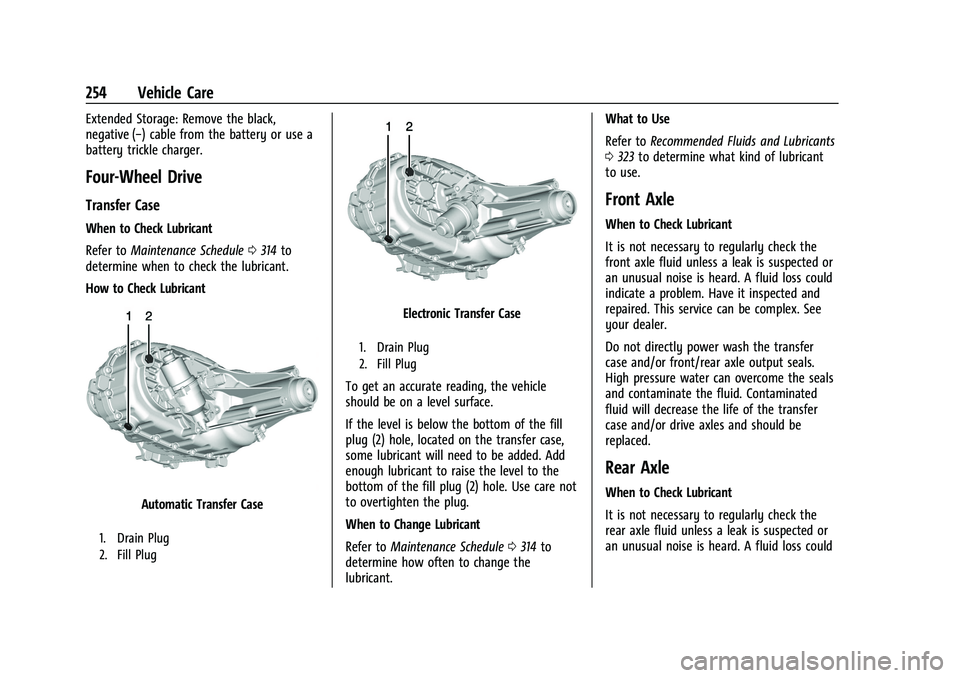
How to Check Lubricant
Automatic Transfer Case
1. Drain Plug
2. Fill Plug
Electronic Transfer Case
1. Drain Plug
2. Fill Plug
To get an accurate reading, the vehicle
should be on a level surface.
If the level is below the bottom of the fill
plug (2) hole, located on the transfer case,
some lubricant will need to be added. Add
enough lubricant to raise the level to the
bottom of the fill plug (2) hole. Use care not
to overtighten the plug.
When to Change Lubricant
Refer to Maintenance Schedule 0314 to
determine how often to change the
lubricant. What to Use
Refer to
Recommended Fluids and Lubricants
0 323 to determine what kind of lubricant
to use.
Front Axle
When to Check Lubricant
It is not necessary to regularly check the
front axle fluid unless a leak is suspected or
an unusual noise is heard. A fluid loss could
indicate a problem. Have it inspected and
repaired. This service can be complex. See
your dealer.
Do not directly power wash the transfer
case and/or front/rear axle output seals.
High pressure water can overcome the seals
and contaminate the fluid. Contaminated
fluid will decrease the life of the transfer
case and/or drive axles and should be
replaced.
Rear Axle
When to Check Lubricant
It is not necessary to regularly check the
rear axle fluid unless a leak is suspected or
an unusual noise is heard. A fluid loss could
Page 269 of 362
Chevrolet Colorado Owner Manual (GMNA-Localizing-U.S./Canada/Mexico-
15274222) - 2022 - CRC - 11/2/21
268 Vehicle Care
FusesUsage
F1 BCM 1 –Body Control
Module 1 –Indicator
Dimming Control, Retained
Accessory Power (RAP)
Relay Coil Control, Rear
License Lamp Supply
Voltage, Windshield
Washer Relay Control, Run/
Crank Relay Coil Control,
Cruise/Electronic Torque
Control/Torque Converter
Clutch Brake Signal, Run
Ignition 3 Voltage
F2 –
F3 –
F4 STR/WHL/CNTL –Steering
Wheel Controls
F5 –
BCM 2–Body Control
Module 2 –Interior Lamp
Control, Accessory
Voltage (1), Backup Lamp
Relay Control, Park Lock
Solenoid Control, Trailer
Brake Apply Signal
F6 – Fuses
Usage
F7 –
F8 MIR WNDW MDL –Mirror
Window Module
F9 I/P CLUSTER –Instrument
Panel Cluster
F10 –
F11 BCM 8 –Body Control
Module 8 –Door Lock
Actuator Lock Control 2,
Door Lock Control (2), Door
Lock Actuator Unlock
Control
F12 –
F13 OnStar/HVAC
F14 RDO/INFOTMNT –Radio/
Infotainment
F15 BCM 6 –Body Control
Module 6 –LED Backlight
Dimming Control, Interior
Lamps, Lights Exterior
Reverse/Backup Lamps
Direct Drive, Stop Lamp
Relay Coil Supply Voltage Fuses
Usage
F16 CGM –Communication
Gateway Module
F17 BCM 4 –Body Control
Module 4 –Left Headlamp
Low Beam Supply Voltage,
Right Park Lamp Supply
Voltage, Left Rear Stop
Lamp Supply Voltage, Right
Rear Park Lamp Supply
Voltage
F18 AIRBAG/SDM/AOS MDL –
Airbag/Sensing and
Diagnostic Module/
Automatic Occupant
Sensing Module
F19 –
F20 –
AMP–Amplifier
F21 –
F22 –
F23 DLC/USB FRT –Data Link
Connector/USB Front
Page 270 of 362

Chevrolet Colorado Owner Manual (GMNA-Localizing-U.S./Canada/Mexico-
15274222) - 2022 - CRC - 11/2/21
Vehicle Care 269
FusesUsage
F24 HVAC IGN/AUX HTR –
HVAC Ignition/Auxiliary
Heater
F25 BCM 7 –Body Control
Module 7 –Right Rear Stop
Lamp Supply Voltage, Left
Front Turn Signal Lamp
Supply Voltage, Standing
Lamp Relay Control
F26 –
F27 –
F28 I/P IGN/AOS DISPLY –
Instrument Panel Cluster/
Automatic Occupant
Sensing Display
F29 MISC RUN/CRNK –Rear
Vision Camera/Transfer
Case Control Module
(4WD)/Inside Rear View
Mirror
F30 –
F31 FRT CAMERA/RPA –Front
Camera/Rear Park Assist Fuses
Usage
F32 SWC BKLT –Steering
Wheel Controls
Backlighting
F33 HTD STR WHL/CGM_IGN –
Heated Steering Wheel/
Communication Gateway
Module Ignition
F34 VENT SEAT FRT –Front
Vented Seats
F35 PRNDL DISPLY/WCM/USB RR–Park/Reverse/Neutral/
Drive/Low Display/Wireless
Charging Module/USB Rear
F36 DLIS –Discrete Logic
Ignition Sensor
F37 –
F38 –
F39 APO 2 –Auxiliary Power
Outlet 2
F40 –
F41 APO 1/LTR –Auxiliary
Power Outlet 1/Cigarrette
Lighter Fuses
Usage
F42 LT PWR WNDW –Left
Power Window
F43 DRVR PWR SEAT –Driver
Power Seat
F44 APO –Auxiliary Power
Outlet
F45 RT PWR WNDW –Right
Power Window
F46 PASS PWR SEAT –
Passenger Power Seats
Relays Usage
K1 RAP/ACCY –Retained
Accessory Power
K2 Run/Crank
K3 –
Wheels and Tires
Tires
Every new GM vehicle has high-quality
tires made by a leading tire
manufacturer. See the warranty manual
for information regarding the tire
Page 272 of 362
Chevrolet Colorado Owner Manual (GMNA-Localizing-U.S./Canada/Mexico-
15274222) - 2022 - CRC - 11/2/21
Vehicle Care 271
If using winter tires:
.Use tires of the same brand and tread
type on all four wheel positions.
.Use only radial ply tires of the same size,
load range, and speed rating as the
original equipment tires.
Winter tires with the same speed rating as
the original equipment tires may not be
available for H, V, W, Y, and ZR speed rated
tires. If winter tires with a lower speed
rating are chosen, never exceed the tire's
maximum speed capability.
All-Terrain Tires
This vehicle may have all-terrain or
mud-terrain tires. These tires provide good
performance on most road surfaces, weather
conditions, and for off-road driving. See
Off-Road Driving 0172.
The tread pattern on these tires may wear
more unevenly than other tires. Consider
rotating the tires more frequently than at
12 000 km (7,500 mi) intervals if irregular
wear is noted when the tires are inspected.
See Tire Inspection 0280.
Tire Sidewall Labeling
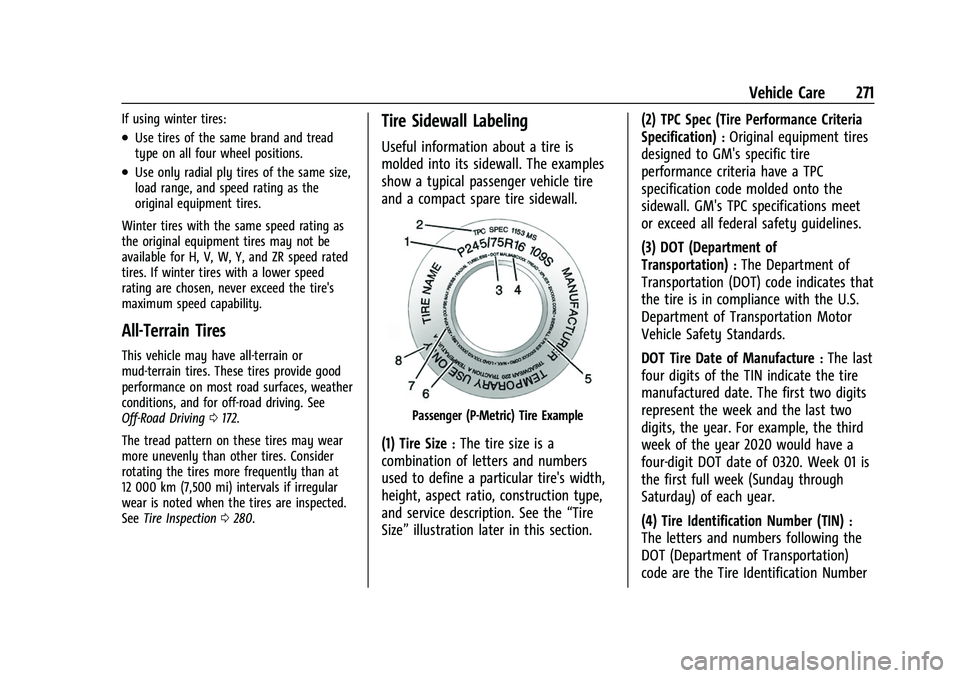
Useful information about a tire is
molded into its sidewall. The examples
show a typical passenger vehicle tire
and a compact spare tire sidewall.
Passenger (P-Metric) Tire Example
(1) Tire Size:The tire size is a
combination of letters and numbers
used to define a particular tire's width,
height, aspect ratio, construction type,
and service description. See the “Tire
Size” illustration later in this section. (2) TPC Spec (Tire Performance Criteria
Specification)
:Original equipment tires
designed to GM's specific tire
performance criteria have a TPC
specification code molded onto the
sidewall. GM's TPC specifications meet
or exceed all federal safety guidelines.
(3) DOT (Department of
Transportation)
:The Department of
Transportation (DOT) code indicates that
the tire is in compliance with the U.S.
Department of Transportation Motor
Vehicle Safety Standards.
DOT Tire Date of Manufacture
:The last
four digits of the TIN indicate the tire
manufactured date. The first two digits
represent the week and the last two
digits, the year. For example, the third
week of the year 2020 would have a
four-digit DOT date of 0320. Week 01 is
the first full week (Sunday through
Saturday) of each year.
(4) Tire Identification Number (TIN)
:
The letters and numbers following the
DOT (Department of Transportation)
code are the Tire Identification Number
Page 274 of 362
Chevrolet Colorado Owner Manual (GMNA-Localizing-U.S./Canada/Mexico-
15274222) - 2022 - CRC - 11/2/21
Vehicle Care 273
and service description. The letter T as
the first character in the tire size means
the tire is for temporary use only.
(7) TPC Spec (Tire Performance Criteria
Specification)
:Original equipment tires
designed to GM's specific tire
performance criteria have a TPC
specification code molded onto the
sidewall. GM's TPC specifications meet
or exceed all federal safety guidelines.
Tire Designations
Tire Size
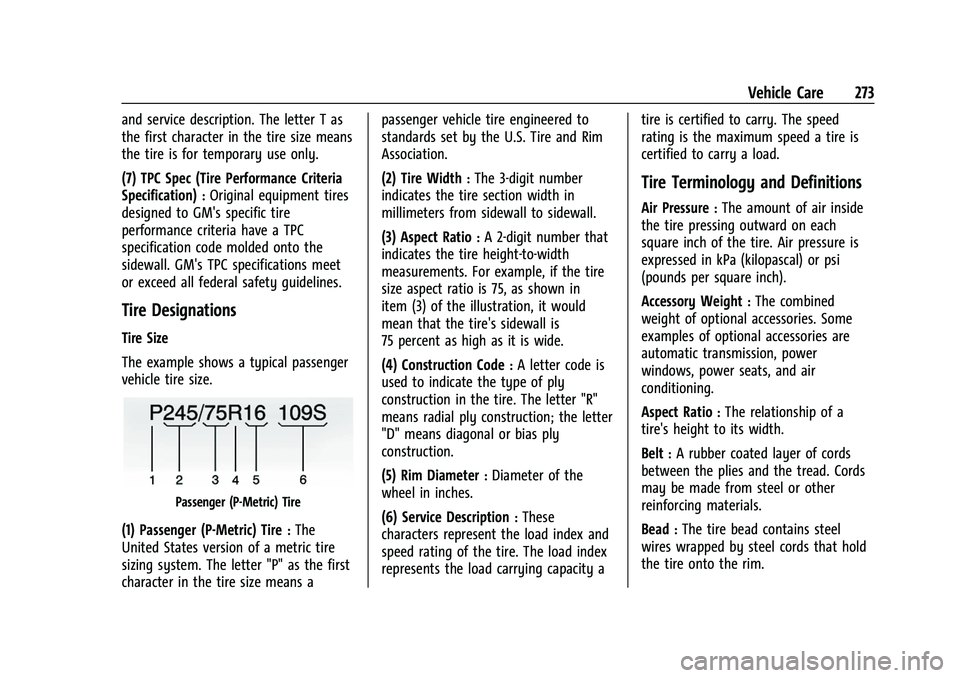
The example shows a typical passenger
vehicle tire size.
Passenger (P-Metric) Tire
(1) Passenger (P-Metric) Tire:The
United States version of a metric tire
sizing system. The letter "P" as the first
character in the tire size means a passenger vehicle tire engineered to
standards set by the U.S. Tire and Rim
Association.
(2) Tire Width
:The 3-digit number
indicates the tire section width in
millimeters from sidewall to sidewall.
(3) Aspect Ratio
:A 2-digit number that
indicates the tire height-to-width
measurements. For example, if the tire
size aspect ratio is 75, as shown in
item (3) of the illustration, it would
mean that the tire's sidewall is
75 percent as high as it is wide.
(4) Construction Code
:A letter code is
used to indicate the type of ply
construction in the tire. The letter "R"
means radial ply construction; the letter
"D" means diagonal or bias ply
construction.
(5) Rim Diameter
:Diameter of the
wheel in inches.
(6) Service Description
:These
characters represent the load index and
speed rating of the tire. The load index
represents the load carrying capacity a tire is certified to carry. The speed
rating is the maximum speed a tire is
certified to carry a load.
Tire Terminology and Definitions
Air Pressure:The amount of air inside
the tire pressing outward on each
square inch of the tire. Air pressure is
expressed in kPa (kilopascal) or psi
(pounds per square inch).
Accessory Weight
:The combined
weight of optional accessories. Some
examples of optional accessories are
automatic transmission, power
windows, power seats, and air
conditioning.
Aspect Ratio
:The relationship of a
tire's height to its width.
Belt
:A rubber coated layer of cords
between the plies and the tread. Cords
may be made from steel or other
reinforcing materials.
Bead
:The tire bead contains steel
wires wrapped by steel cords that hold
the tire onto the rim.
Page 278 of 362

Chevrolet Colorado Owner Manual (GMNA-Localizing-U.S./Canada/Mexico-
15274222) - 2022 - CRC - 11/2/21
Vehicle Care 277
As an added safety feature, your vehicle has
been equipped with a tire pressure
monitoring system (TPMS) that illuminates a
low tire pressure telltale when one or more
of your tires is significantly under-inflated.
Accordingly, when the low tire pressure
telltale illuminates, you should stop and
check your tires as soon as possible, and
inflate them to the proper pressure. Driving
on a significantly under-inflated tire causes
the tire to overheat and can lead to tire
failure. Under-inflation also reduces fuel
efficiency and tire tread life, and may affect
the vehicle's handling and stopping ability.
Please note that the TPMS is not a
substitute for proper tire maintenance, and
it is the driver's responsibility to maintain
correct tire pressure, even if under-inflation
has not reached the level to trigger
illumination of the TPMS low tire pressure
telltale.
Your vehicle has also been equipped with a
TPMS malfunction indicator to indicate when
the system is not operating properly. The
TPMS malfunction indicator is combined
with the low tire pressure telltale. When the
system detects a malfunction, the telltale
will flash for approximately one minute and
then remain continuously illuminated. Thissequence will continue upon subsequent
vehicle start-ups as long as the malfunction
exists.
When the malfunction indicator is
illuminated, the system may not be able to
detect or signal low tire pressure as
intended. TPMS malfunctions may occur for
a variety of reasons, including the
installation of replacement or alternate tires
or wheels on the vehicle that prevent the
TPMS from functioning properly. Always
check the TPMS malfunction telltale after
replacing one or more tires or wheels on
your vehicle to ensure that the replacement
or alternate tires and wheels allow the
TPMS to continue to function properly.
See
Tire Pressure Monitor Operation 0277.
See Radio Frequency Statement 0339.
Tire Pressure Monitor Operation
This vehicle may have a Tire Pressure
Monitor System (TPMS). The TPMS is
designed to warn the driver when a low tire
pressure condition exists. TPMS sensors are
mounted onto each tire and wheel
assembly, excluding the spare tire and
wheel assembly. The TPMS sensors monitor the air pressure in the tires and transmit the
tire pressure readings to a receiver located
in the vehicle.
When a low tire pressure condition is
detected, the TPMS illuminates the low tire
pressure warning light located on the
instrument cluster. If the warning light
comes on, stop as soon as possible and
inflate the tires to the recommended
pressure shown on the Tire and Loading
Information label. See
Vehicle Load Limits
0 178.
A message to check the pressure in a
specific tire displays in the Driver
Information Center (DIC). The low tire
pressure warning light and the DIC warning
message come on at each ignition cycle
until the tires are inflated to the correct
inflation pressure. If the vehicle has DIC
buttons, tire pressure levels can be viewed.
For additional information and details about
Page 279 of 362

Chevrolet Colorado Owner Manual (GMNA-Localizing-U.S./Canada/Mexico-
15274222) - 2022 - CRC - 11/2/21
278 Vehicle Care
the DIC operation and displays, seeDriver
Information Center (DIC) (Base Level) 093 or
Driver Information Center (DIC) (Uplevel)
0 96.
The low tire pressure warning light may
come on in cool weather when the vehicle is
first started, and then turn off as the vehicle
is driven. This could be an early indicator
that the air pressure is getting low and
needs to be inflated to the proper pressure.
A Tire and Loading Information label shows
the size of the original equipment tires and
the correct inflation pressure for the tires
when they are cold. See Vehicle Load Limits
0 178, for an example of the Tire and
Loading Information label and its location.
Also see Tire Pressure 0275.
The TPMS can warn about a low tire
pressure condition but it does not replace
normal tire maintenance. See Tire Inspection
0 280, Tire Rotation 0280 and
Tires 0269.
Caution
Tire sealant materials are not all the
same. A non-approved tire sealant could
damage the TPMS sensors. TPMS sensor
(Continued)
Caution (Continued)
damage caused by using an incorrect tire
sealant is not covered by the vehicle
warranty. Always use only the GM
approved tire sealant available through
your dealer or included in the vehicle.
TPMS Malfunction Light and Message
The TPMS will not function properly if one
or more of the TPMS sensors are missing or
inoperable. When the system detects a
malfunction, the low tire pressure warning
light flashes for about one minute and then
stays on for the remainder of the ignition
cycle. A DIC warning message also displays.
The malfunction light and DIC warning
message come on at each ignition cycle
until the problem is corrected. Some of the
conditions that can cause these to come
on are:
.One of the road tires has been replaced
with the spare tire. The spare tire does
not have a TPMS sensor. The malfunction
light and the DIC message should go off
after the road tire is replaced and the
sensor matching process is performed
successfully. See "TPMS Sensor Matching
Process" later in this section.
.The TPMS sensor matching process was
not done or not completed successfully
after rotating the tires. The malfunction
light and the DIC message should go off
after successfully completing the sensor
matching process. See "TPMS Sensor
Matching Process" later in this section.
.One or more TPMS sensors are missing or
damaged. The malfunction light and the
DIC message should go off when the
TPMS sensors are installed and the sensor
matching process is performed
successfully. See your dealer for service.
.Replacement tires or wheels do not match
the original equipment tires or wheels.
Tires and wheels other than those
recommended could prevent the TPMS
from functioning properly. See Buying
New Tires 0282.
.Operating electronic devices or being near
facilities using radio wave frequencies
similar to the TPMS could cause the TPMS
sensors to malfunction.
If the TPMS is not functioning properly, it
cannot detect or signal a low tire pressure
condition. See your dealer for service if the
TPMS malfunction light and DIC message
come on and stay on.