2022 CHEVROLET COLORADO replace
[x] Cancel search: replacePage 210 of 362
Chevrolet Colorado Owner Manual (GMNA-Localizing-U.S./Canada/Mexico-
15274222) - 2022 - CRC - 11/2/21
Driving and Operating 209
Driver Information Center (DIC) (Uplevel)
096. The increment value used depends on
the units displayed.
Reducing Speed While Using Cruise Control
If the cruise control system is already
activated:
.Press and hold SET– until the desired
lower speed is reached, then release it.
.To slow down in small increments, briefly
press SET– . For each press, the vehicle
goes about 1 km/h (1 mph) slower.
The speedometer reading can be displayed
in either English or metric units. See Driver
Information Center (DIC) (Base Level) 093 or
Driver Information Center (DIC) (Uplevel)
0 96. The increment value used depends on
the units displayed.
Passing Another Vehicle While Using Cruise
Control
Use the accelerator pedal to increase the
vehicle speed. When you take your foot off
the pedal, the vehicle will slow down to the
previous set cruise speed. While pressing the
accelerator pedal or shortly following the
release to override cruise control, briefly
pressing SET– will result in cruise control set
to the current vehicle speed. Using Cruise Control on Hills
How well the cruise control will work on
hills depends on the vehicle speed, load, and
the steepness of the hills. When going up
steep hills, you might have to step on the
accelerator pedal to maintain your speed.
When going downhill, you might have to
brake or shift to a lower gear to keep your
speed down. If the brake pedal is applied,
cruise control will disengage.
Ending Cruise Control
There are three ways to end cruise control:
.Step lightly on the brake pedal.
.Press*.
.To turn off cruise control, press5.
Erasing Speed Memory
The cruise control set speed is erased from
memory if
5is pressed or if the ignition is
turned off.
Driver Assistance Systems
This vehicle may have features that work
together to help avoid crashes or reduce
crash damage while driving, backing, and
parking. Read this entire section before
using these systems.
{Warning
Do not rely on the Driver Assistance
Systems. These systems do not replace
the need for paying attention and driving
safely. You may not hear or see alerts or
warnings provided by these systems.
Failure to use proper care when driving
may result in injury, death, or vehicle
damage. See Defensive Driving 0169.
Under many conditions, these systems
will not:
.Detect children, pedestrians, bicyclists,
or animals.
.Detect vehicles or objects outside the
area monitored by the system.
.Work at all driving speeds.
.Warn you or provide you with enough
time to avoid a crash.
.Work under poor visibility or bad
weather conditions.
.Work if the detection sensor is not
cleaned or is covered by ice, snow,
mud, or dirt. (Continued)
Page 237 of 362

Chevrolet Colorado Owner Manual (GMNA-Localizing-U.S./Canada/Mexico-
15274222) - 2022 - CRC - 11/2/21
236 Vehicle Care
Vehicle Care
General Information
General Information . . . . . . . . . . . . . . . . . . . 237
California Perchlorate MaterialsRequirements . . . . . . . . . . . . . . . . . . . . . . . . 237
Accessories and Modifications . . . . . . . . . 237
Vehicle Checks
Doing Your Own Service Work . . . . . . . . . 237
Hood . . . . . . . . . . . . . . . . . . . . . . . . . . . . . . . . . . 238
Engine Compartment Overview . . . . . . . . 239
Engine Oil . . . . . . . . . . . . . . . . . . . . . . . . . . . . . 242
Engine Oil Life System . . . . . . . . . . . . . . . . 244
Automatic Transmission Fluid . . . . . . . . . 245
Engine Air Cleaner/Filter . . . . . . . . . . . . . . . 245
Cooling System . . . . . . . . . . . . . . . . . . . . . . . 246
Engine Overheating . . . . . . . . . . . . . . . . . . . 249
Engine Fan . . . . . . . . . . . . . . . . . . . . . . . . . . . . 250
Washer Fluid . . . . . . . . . . . . . . . . . . . . . . . . . . 251
Brakes . . . . . . . . . . . . . . . . . . . . . . . . . . . . . . . . . 251
Brake Fluid . . . . . . . . . . . . . . . . . . . . . . . . . . . . 252
Battery - North America . . . . . . . . . . . . . . . 253
Four-Wheel Drive . . . . . . . . . . . . . . . . . . . . . . 254
Front Axle . . . . . . . . . . . . . . . . . . . . . . . . . . . . . 254
Rear Axle . . . . . . . . . . . . . . . . . . . . . . . . . . . . . . 254
Starter Switch Check . . . . . . . . . . . . . . . . . . . 255
Automatic Transmission Shift Lock Control Function Check . . . . . . . . . . . . . . 255
Ignition Transmission Lock Check . . . . . . 255 Park Brake and P (Park) Mechanism
Check . . . . . . . . . . . . . . . . . . . . . . . . . . . . . . . . 255
Wiper Blade Replacement . . . . . . . . . . . . . 256
Windshield Replacement . . . . . . . . . . . . . . 256
Gas Strut(s) . . . . . . . . . . . . . . . . . . . . . . . . . . . 256
Headlamp Aiming
Front Headlamp Aiming . . . . . . . . . . . . . . . 257
Bulb Replacement
Bulb Replacement . . . . . . . . . . . . . . . . . . . . . 257
Halogen Bulbs . . . . . . . . . . . . . . . . . . . . . . . . . 258
Headlamps, Front Turn Signal, Sidemarker, and Parking Lamps . . . . . . 258
Taillamps, Turn Signal, Stoplamps, and Back-Up Lamps . . . . . . . . . . . . . . . . . . . . . . 258
Center High-Mounted Stoplamp (CHMSL) and Cargo Lamp . . . . . . . . . . . 260
Electrical System
Electrical System Overload . . . . . . . . . . . . 260
Fuses and Circuit Breakers . . . . . . . . . . . . . 262
Engine Compartment Fuse Block . . . . . . 262
Instrument Panel Fuse Block . . . . . . . . . . 267
Wheels and Tires
Tires . . . . . . . . . . . . . . . . . . . . . . . . . . . . . . . . . . 269
All-Season Tires . . . . . . . . . . . . . . . . . . . . . . . 270
Winter Tires . . . . . . . . . . . . . . . . . . . . . . . . . . . 270
All-Terrain Tires . . . . . . . . . . . . . . . . . . . . . . . . 271
Tire Sidewall Labeling . . . . . . . . . . . . . . . . . . 271
Tire Designations . . . . . . . . . . . . . . . . . . . . . . 273 Tire Terminology and Definitions . . . . . . 273
Tire Pressure . . . . . . . . . . . . . . . . . . . . . . . . . . 275
Tire Pressure Monitor System . . . . . . . . . 276
Tire Pressure Monitor Operation . . . . . . . 277
Tire Inspection . . . . . . . . . . . . . . . . . . . . . . . . 280
Tire Rotation . . . . . . . . . . . . . . . . . . . . . . . . . . 280
When It Is Time for New Tires . . . . . . . . . 281
Buying New Tires . . . . . . . . . . . . . . . . . . . . . 282
Different Size Tires and Wheels . . . . . . . 283
Uniform Tire Quality Grading . . . . . . . . . 283
Wheel Alignment and Tire Balance . . . . 284
Wheel Replacement . . . . . . . . . . . . . . . . . . . 284
Tire Chains . . . . . . . . . . . . . . . . . . . . . . . . . . . . 285
If a Tire Goes Flat . . . . . . . . . . . . . . . . . . . . . 286
Tire Changing . . . . . . . . . . . . . . . . . . . . . . . . . 287
Compact Spare Tire . . . . . . . . . . . . . . . . . . . 296
Full-Size Spare Tire . . . . . . . . . . . . . . . . . . . . 297
Jump Starting
Jump Starting - North America . . . . . . . . 297
Towing the Vehicle
Towing the Vehicle . . . . . . . . . . . . . . . . . . . 300
Recreational Vehicle Towing . . . . . . . . . . . 301
Appearance Care
Exterior Care . . . . . . . . . . . . . . . . . . . . . . . . . . 304
Interior Care . . . . . . . . . . . . . . . . . . . . . . . . . . 308
Floor Mats . . . . . . . . . . . . . . . . . . . . . . . . . . . . . 311
Page 246 of 362
Chevrolet Colorado Owner Manual (GMNA-Localizing-U.S./Canada/Mexico-
15274222) - 2022 - CRC - 11/2/21
Vehicle Care 245
Automatic Transmission Fluid
How to Check Automatic Transmission
Fluid
It is not necessary to check the transmission
fluid level. A transmission fluid leak is the
only reason for fluid loss. If a leak occurs,
take the vehicle to your dealer and have it
repaired as soon as possible.
There is a special procedure for checking and
changing the transmission fluid. Because this
procedure is difficult, this should be done at
your dealer. Contact your dealer for
additional information.
Caution
Use of the incorrect automatic
transmission fluid may damage the
vehicle, and the damage may not be
covered by the vehicle warranty. Always
use the correct automatic transmission
fluid. SeeRecommended Fluids and
Lubricants 0323.
Change the fluid and filter at the intervals
listed in Maintenance Schedule 0314, and
be sure to use the fluid listed in
Recommended Fluids and Lubricants 0323.
Engine Air Cleaner/Filter
The engine air cleaner/filter is in the engine
compartment on the passenger side of the
vehicle. See Engine Compartment Overview
0 239.
When to Inspect/Replace the Engine Air
Cleaner/Filter
For intervals on changing and inspecting the
engine air cleaner/filter, see Maintenance
Schedule 0314.
How to Inspect/Replace the Engine Air
Cleaner/Filter
Do not start the engine or have the engine
running with the engine air cleaner/filter
housing open. Before removing the engine
air cleaner/filter, make sure that the engine
air cleaner/filter housing and nearby
components are free of dirt and debris.
Remove the engine air cleaner/filter. Lightly
tap and shake the engine air cleaner/filter
(away from the vehicle), to release loose
dust and dirt. Inspect the engine air cleaner/
filter for damage, and replace if damaged.
Do not clean the engine air cleaner/filter or
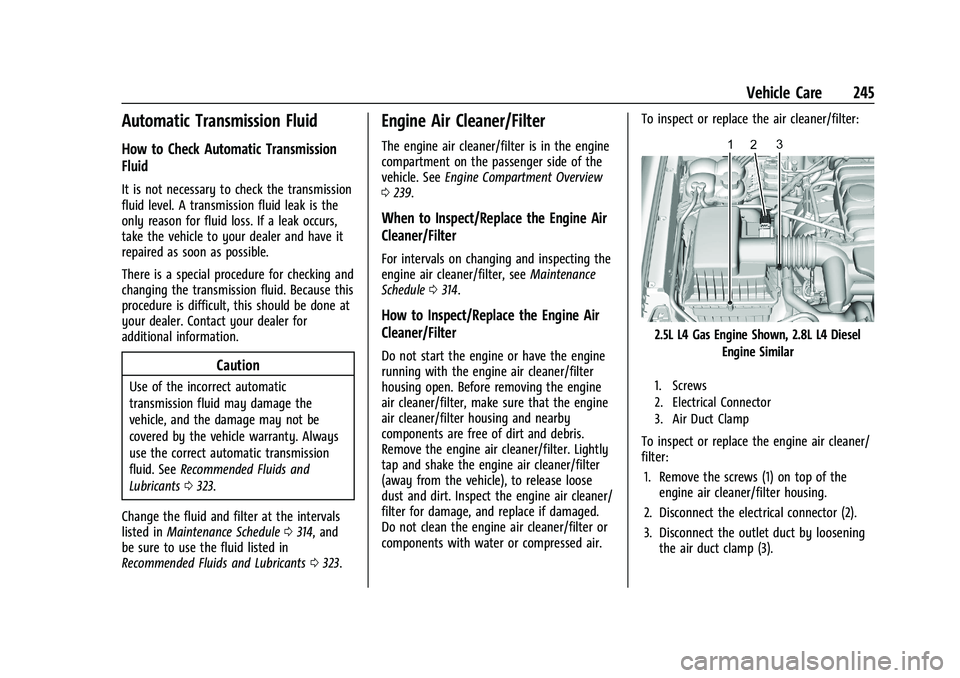
components with water or compressed air. To inspect or replace the air cleaner/filter:
2.5L L4 Gas Engine Shown, 2.8L L4 Diesel
Engine Similar
1. Screws
2. Electrical Connector
3. Air Duct Clamp
To inspect or replace the engine air cleaner/
filter:
1. Remove the screws (1) on top of the engine air cleaner/filter housing.
2. Disconnect the electrical connector (2).
3. Disconnect the outlet duct by loosening the air duct clamp (3).
Page 247 of 362
Chevrolet Colorado Owner Manual (GMNA-Localizing-U.S./Canada/Mexico-
15274222) - 2022 - CRC - 11/2/21
246 Vehicle Care
4. Lift the filter cover housing away fromthe engine air cleaner/filter housing.
5. Pull out the filter.
{Warning
If part replacement is necessary, the part
must be replaced with one of the same
part number or with an equivalent part.
Use of a replacement part without the
same fit, form, and function may result
in personal injury or damage to the
vehicle.
6. Inspect or replace the engine air cleaner/ filter.
7. Reverse Steps 2–5 to reinstall the filter cover housing.
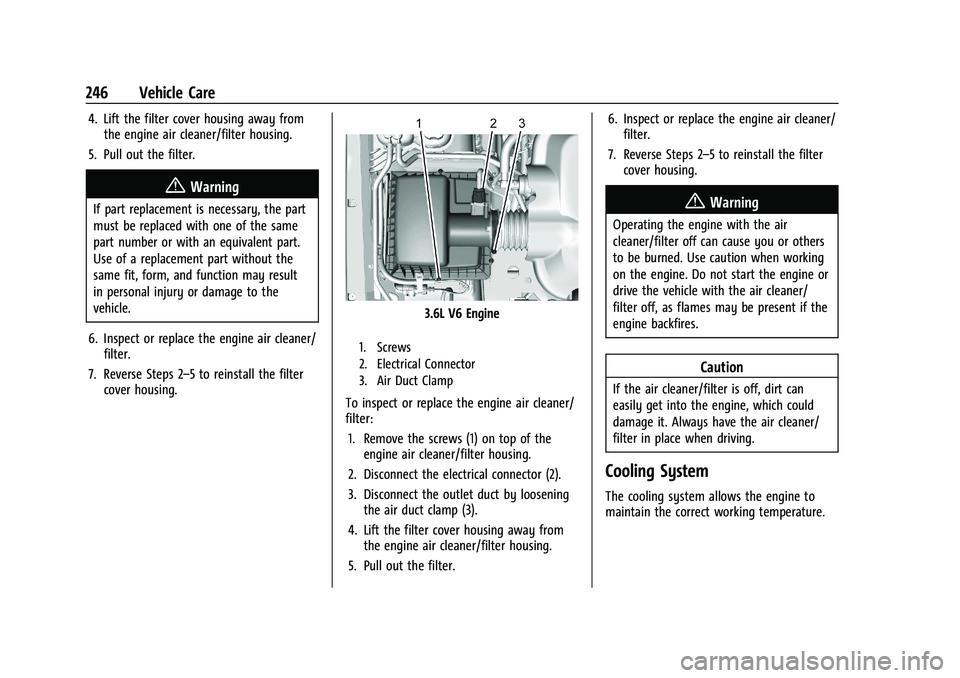
3.6L V6 Engine
1. Screws
2. Electrical Connector
3. Air Duct Clamp
To inspect or replace the engine air cleaner/
filter:
1. Remove the screws (1) on top of the engine air cleaner/filter housing.
2. Disconnect the electrical connector (2).
3. Disconnect the outlet duct by loosening the air duct clamp (3).
4. Lift the filter cover housing away from the engine air cleaner/filter housing.
5. Pull out the filter. 6. Inspect or replace the engine air cleaner/
filter.
7. Reverse Steps 2–5 to reinstall the filter cover housing.
{Warning
Operating the engine with the air
cleaner/filter off can cause you or others
to be burned. Use caution when working
on the engine. Do not start the engine or
drive the vehicle with the air cleaner/
filter off, as flames may be present if the
engine backfires.
Caution
If the air cleaner/filter is off, dirt can
easily get into the engine, which could
damage it. Always have the air cleaner/
filter in place when driving.
Cooling System
The cooling system allows the engine to
maintain the correct working temperature.
Page 250 of 362

Chevrolet Colorado Owner Manual (GMNA-Localizing-U.S./Canada/Mexico-
15274222) - 2022 - CRC - 11/2/21
Vehicle Care 249
{Warning
Steam and scalding liquids from a hot
cooling system are under pressure.
Turning the pressure cap, even a little,
can cause them to come out at high
speed and you could be burned. Never
turn the cap when the cooling system,
including the pressure cap, is hot. Wait
for the cooling system and pressure cap
to cool.
Caution
Failure to follow the specific coolant fill
procedure could cause the engine to
overheat and could cause system
damage. If coolant is not visible in the
surge tank, contact your dealer.
The coolant surge tank pressure cap can be
removed when the cooling system, including
the surge tank pressure cap and upper
radiator hose, is no longer hot.
1. Turn the pressure cap slowly counterclockwise. If a hiss is heard, wait
for that to stop. A hiss means there is
still some pressure left.
2. Keep turning the cap and remove it.
3. Fill the coolant surge tank with the proper mixture to the mark pointed to
on the front of the coolant surge tank. 4. With the coolant surge tank cap off,
start the engine and let it run until the
upper radiator hose starts getting hot.
Watch out for the engine cooling fan. By
this time, the coolant level inside the
coolant surge tank may be lower. If the
level is lower, add more of the proper
mixture to the coolant surge tank until
the level reaches the mark pointed to on
the front of the coolant surge tank.
5. Replace the cap tightly.
6. Verify coolant level after the engine is shut off and the coolant is cold.
If necessary, repeat coolant fill procedure
Steps 1–6.
Caution
If the pressure cap is not tightly installed,
coolant loss and engine damage may
occur. Be sure the cap is properly and
tightly secured.
Engine Overheating
The vehicle has an engine coolant
temperature gauge on the instrument
cluster to warn of engine overheating. See
Engine Coolant Temperature Gauge 085.
Page 253 of 362
Chevrolet Colorado Owner Manual (GMNA-Localizing-U.S./Canada/Mexico-
15274222) - 2022 - CRC - 11/2/21
252 Vehicle Care
{Warning
The brake wear warning sound means
that soon the brakes will not work well.
That could lead to a crash. When the
brake wear warning sound is heard, have
the vehicle serviced.
Caution
Continuing to drive with worn-out brake
linings could result in costly brake
repairs.
Some driving conditions or climates can
cause a brake squeal when the brakes are
first applied, clearing up following several
applications. This does not mean something
is wrong with the brakes.
Properly torqued wheel nuts are necessary
to help prevent brake pulsation. When tires
are rotated, inspect brake linings for wear
and evenly tighten wheel nuts in the proper
sequence to torque specifications. See
Capacities and Specifications 0328.
Brake pads should be replaced as complete
axle sets.
Brake Pedal Travel
See your dealer if the brake pedal does not
return to normal height, or if there is a
rapid increase in pedal travel. This could be
a sign that brake service may be required.
Replacing Brake System Parts
Always replace brake system parts with
new, approved replacement parts. If this is
not done, the brakes may not work
properly. The braking performance can
change in many ways if the wrong brake
parts are installed or if parts are improperly
installed.
Brake Fluid
The brake master cylinder reservoir is filled
with GM approved DOT 4 brake fluid as
indicated on the reservoir cap. See Engine
Compartment Overview 0239 for the
location of the reservoir. Checking Brake Fluid
With the vehicle in P (Park) on a level
surface, the brake fluid level should be
between the minimum and maximum marks
on the brake fluid reservoir.
There are only two reasons why the brake
fluid level in the reservoir may go down:
.Normal brake lining wear. When new
linings are installed, the fluid level goes
back up.
.A fluid leak in the brake hydraulic system.
Have the brake hydraulic system fixed.
With a leak, the brakes will not
work well.
Always clean the brake fluid reservoir cap
and the area around the cap before
removing it.
Do not top off the brake fluid. Adding fluid
does not correct a leak. If fluid is added
when the linings are worn, there will be too
much fluid when new brake linings are
installed. Add or remove fluid, as necessary,
only when work is done on the brake
hydraulic system.
Page 254 of 362

Chevrolet Colorado Owner Manual (GMNA-Localizing-U.S./Canada/Mexico-
15274222) - 2022 - CRC - 11/2/21
Vehicle Care 253
{Warning
If too much brake fluid is added, it can
spill on the engine and burn, if the
engine is hot enough. You or others could
be burned, and the vehicle could be
damaged. Add brake fluid only when
work is done on the brake hydraulic
system.
When the brake fluid falls to a low level,
the brake warning light comes on. See Brake
System Warning Light 088.
Brake fluid absorbs water over time which
degrades the effectiveness of the brake fluid.
Replace brake fluid at the specified intervals
to prevent increased stopping distance. See
Maintenance Schedule 0314.
What to Add
Use only GM approved DOT 4 brake fluid
from a clean, sealed container. See
Recommended Fluids and Lubricants 0323.
{Warning
The wrong or contaminated brake fluid
could result in damage to the brake
system. This could result in the loss of
(Continued)
Warning (Continued)
braking leading to a possible injury.
Always use the proper GM approved
brake fluid.
Caution
If brake fluid is spilled on the vehicle's
painted surfaces, the paint finish can be
damaged. Immediately wash off any
painted surface.
Battery - North America
For diesel engine vehicles, see“Battery”in
the Duramax diesel supplement.
The original equipment battery is
maintenance free. Do not remove the cap
and do not add fluid.
Refer to the replacement number shown on
the original battery label when a new
battery is needed. See Engine Compartment
Overview 0239 for battery location.
{Warning
WARNING: Battery posts, terminals and
related accessories can expose you to
chemicals including lead and lead
compounds, which are known to the
State of California to cause cancer and
birth defects or other reproductive harm.
Wash hands after handling. For more
information go to
www.P65Warnings.ca.gov.
See the warning on the back cover.
Vehicle Storage
{Warning
Batteries have acid that can burn you and
gas that can explode. You can be badly
hurt if you are not careful. See Jump
Starting - North America 0297 for tips on
working around a battery without
getting hurt.
Infrequent Usage: Remove the black,
negative (−) cable from the battery to keep
the battery from running down.
Page 255 of 362
Chevrolet Colorado Owner Manual (GMNA-Localizing-U.S./Canada/Mexico-
15274222) - 2022 - CRC - 11/2/21
254 Vehicle Care
Extended Storage: Remove the black,
negative (−) cable from the battery or use a
battery trickle charger.
Four-Wheel Drive
Transfer Case
When to Check Lubricant
Refer toMaintenance Schedule 0314 to
determine when to check the lubricant.
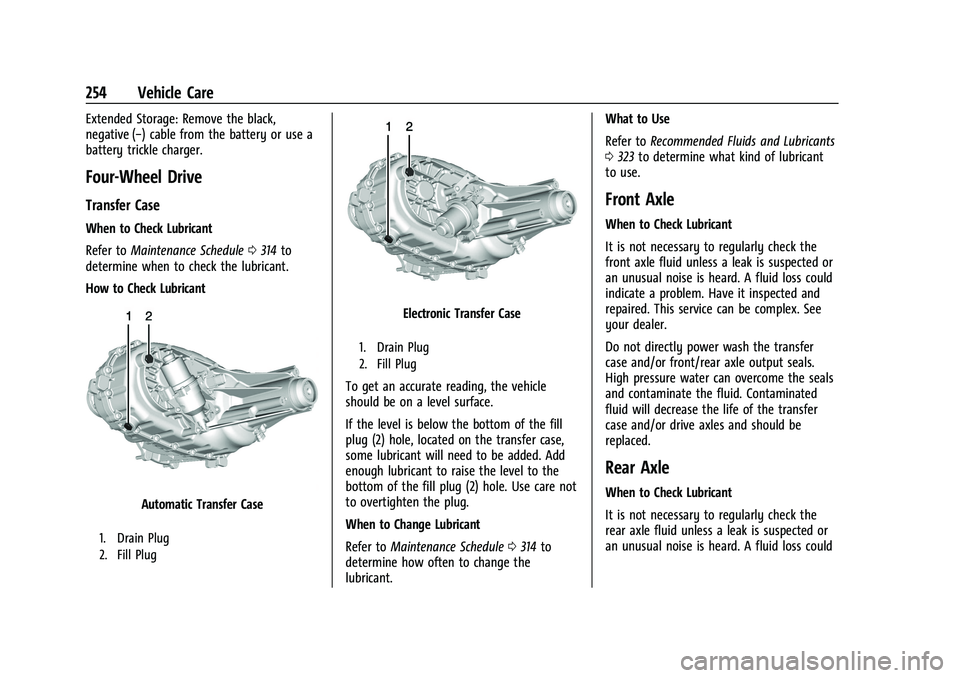
How to Check Lubricant
Automatic Transfer Case
1. Drain Plug
2. Fill Plug
Electronic Transfer Case
1. Drain Plug
2. Fill Plug
To get an accurate reading, the vehicle
should be on a level surface.
If the level is below the bottom of the fill
plug (2) hole, located on the transfer case,
some lubricant will need to be added. Add
enough lubricant to raise the level to the
bottom of the fill plug (2) hole. Use care not
to overtighten the plug.
When to Change Lubricant
Refer to Maintenance Schedule 0314 to
determine how often to change the
lubricant. What to Use
Refer to
Recommended Fluids and Lubricants
0 323 to determine what kind of lubricant
to use.
Front Axle
When to Check Lubricant
It is not necessary to regularly check the
front axle fluid unless a leak is suspected or
an unusual noise is heard. A fluid loss could
indicate a problem. Have it inspected and
repaired. This service can be complex. See
your dealer.
Do not directly power wash the transfer
case and/or front/rear axle output seals.
High pressure water can overcome the seals
and contaminate the fluid. Contaminated
fluid will decrease the life of the transfer
case and/or drive axles and should be
replaced.
Rear Axle
When to Check Lubricant
It is not necessary to regularly check the
rear axle fluid unless a leak is suspected or
an unusual noise is heard. A fluid loss could