2022 CHEVROLET COLORADO four wheel drive
[x] Cancel search: four wheel drivePage 224 of 362
Chevrolet Colorado Owner Manual (GMNA-Localizing-U.S./Canada/Mexico-
15274222) - 2022 - CRC - 11/2/21
Driving and Operating 223
Disconnect the wiring to the trailer before
backing the trailer into the water to prevent
damage to the electrical circuits on the
trailer. Reconnect the wiring to the trailer
after removing the trailer from the water.
If the trailer has electric brakes that can
function when the trailer is submerged, it
might help to leave the electrical trailer
connector attached to maintain trailer brake
functionality while on the boat ramp.
To back the trailer into the water:1. If equipped, place the vehicle in four-wheel-drive high.
2. Slowly back down the boat ramp until the boat is floating, but no further than
necessary.
3. Press and hold the brake pedal, but do not shift into P (Park) yet.
4. Have someone place chocks under the front wheels of the vehicle.
5. Gradually release the brake pedal to allow the chocks to absorb the load of
the trailer.
6. Reapply the brake pedal. Then apply the parking brake and shift into P (Park).
7. Release the brake pedal. Pulling the Trailer from the Water
To pull the trailer of the water:
1. Press and hold the brake pedals.
2. Start the engine and shift into gear.
3. Release the parking brake.
4. Let up on the brake pedal.
5. Drive slowly until the tires are clear of the chocks.
6. Stop and have someone pick up and store the chocks.
7. Slowly pull the trailer from the water.
8. Once the vehicle and trailer have been driven from the sloped part of the boat
ramp, the vehicle can be shifted from
four-wheel-drive high. Shift into the drive
mode that is appropriate for the road
conditions.
Caution
If the vehicle tires begin to spin and the
vehicle begins to slide toward the water,
remove your foot from the accelerator
pedal and apply the brake pedal. Seek
help to have the vehicle towed up
the ramp.
Maintenance when Trailer Towing
The vehicle needs service more often when
used to tow trailers. See Maintenance
Schedule 0314. It is especially important to
check the automatic transmission fluid,
engine oil, axle lubricant, belts, cooling
system, and brake system before and during
each trip.
Check periodically to see that all nuts and
bolts on the trailer hitch are tight.
Engine Cooling When Trailer Towing
The cooling system may temporarily
overheat during severe operating conditions.
See Engine Overheating 0249.
Trailer Towing
If equipped with a diesel engine, see the
Duramax diesel supplement.
Caution
Towing a trailer improperly can damage
the vehicle and result in costly repairs
not covered by the vehicle warranty. To
tow a trailer correctly, follow the
directions in this section and see your
dealer for important information about
towing a trailer with the vehicle.
Page 237 of 362

Chevrolet Colorado Owner Manual (GMNA-Localizing-U.S./Canada/Mexico-
15274222) - 2022 - CRC - 11/2/21
236 Vehicle Care
Vehicle Care
General Information
General Information . . . . . . . . . . . . . . . . . . . 237
California Perchlorate MaterialsRequirements . . . . . . . . . . . . . . . . . . . . . . . . 237
Accessories and Modifications . . . . . . . . . 237
Vehicle Checks
Doing Your Own Service Work . . . . . . . . . 237
Hood . . . . . . . . . . . . . . . . . . . . . . . . . . . . . . . . . . 238
Engine Compartment Overview . . . . . . . . 239
Engine Oil . . . . . . . . . . . . . . . . . . . . . . . . . . . . . 242
Engine Oil Life System . . . . . . . . . . . . . . . . 244
Automatic Transmission Fluid . . . . . . . . . 245
Engine Air Cleaner/Filter . . . . . . . . . . . . . . . 245
Cooling System . . . . . . . . . . . . . . . . . . . . . . . 246
Engine Overheating . . . . . . . . . . . . . . . . . . . 249
Engine Fan . . . . . . . . . . . . . . . . . . . . . . . . . . . . 250
Washer Fluid . . . . . . . . . . . . . . . . . . . . . . . . . . 251
Brakes . . . . . . . . . . . . . . . . . . . . . . . . . . . . . . . . . 251
Brake Fluid . . . . . . . . . . . . . . . . . . . . . . . . . . . . 252
Battery - North America . . . . . . . . . . . . . . . 253
Four-Wheel Drive . . . . . . . . . . . . . . . . . . . . . . 254
Front Axle . . . . . . . . . . . . . . . . . . . . . . . . . . . . . 254
Rear Axle . . . . . . . . . . . . . . . . . . . . . . . . . . . . . . 254
Starter Switch Check . . . . . . . . . . . . . . . . . . . 255
Automatic Transmission Shift Lock Control Function Check . . . . . . . . . . . . . . 255
Ignition Transmission Lock Check . . . . . . 255 Park Brake and P (Park) Mechanism
Check . . . . . . . . . . . . . . . . . . . . . . . . . . . . . . . . 255
Wiper Blade Replacement . . . . . . . . . . . . . 256
Windshield Replacement . . . . . . . . . . . . . . 256
Gas Strut(s) . . . . . . . . . . . . . . . . . . . . . . . . . . . 256
Headlamp Aiming
Front Headlamp Aiming . . . . . . . . . . . . . . . 257
Bulb Replacement
Bulb Replacement . . . . . . . . . . . . . . . . . . . . . 257
Halogen Bulbs . . . . . . . . . . . . . . . . . . . . . . . . . 258
Headlamps, Front Turn Signal, Sidemarker, and Parking Lamps . . . . . . 258
Taillamps, Turn Signal, Stoplamps, and Back-Up Lamps . . . . . . . . . . . . . . . . . . . . . . 258
Center High-Mounted Stoplamp (CHMSL) and Cargo Lamp . . . . . . . . . . . 260
Electrical System
Electrical System Overload . . . . . . . . . . . . 260
Fuses and Circuit Breakers . . . . . . . . . . . . . 262
Engine Compartment Fuse Block . . . . . . 262
Instrument Panel Fuse Block . . . . . . . . . . 267
Wheels and Tires
Tires . . . . . . . . . . . . . . . . . . . . . . . . . . . . . . . . . . 269
All-Season Tires . . . . . . . . . . . . . . . . . . . . . . . 270
Winter Tires . . . . . . . . . . . . . . . . . . . . . . . . . . . 270
All-Terrain Tires . . . . . . . . . . . . . . . . . . . . . . . . 271
Tire Sidewall Labeling . . . . . . . . . . . . . . . . . . 271
Tire Designations . . . . . . . . . . . . . . . . . . . . . . 273 Tire Terminology and Definitions . . . . . . 273
Tire Pressure . . . . . . . . . . . . . . . . . . . . . . . . . . 275
Tire Pressure Monitor System . . . . . . . . . 276
Tire Pressure Monitor Operation . . . . . . . 277
Tire Inspection . . . . . . . . . . . . . . . . . . . . . . . . 280
Tire Rotation . . . . . . . . . . . . . . . . . . . . . . . . . . 280
When It Is Time for New Tires . . . . . . . . . 281
Buying New Tires . . . . . . . . . . . . . . . . . . . . . 282
Different Size Tires and Wheels . . . . . . . 283
Uniform Tire Quality Grading . . . . . . . . . 283
Wheel Alignment and Tire Balance . . . . 284
Wheel Replacement . . . . . . . . . . . . . . . . . . . 284
Tire Chains . . . . . . . . . . . . . . . . . . . . . . . . . . . . 285
If a Tire Goes Flat . . . . . . . . . . . . . . . . . . . . . 286
Tire Changing . . . . . . . . . . . . . . . . . . . . . . . . . 287
Compact Spare Tire . . . . . . . . . . . . . . . . . . . 296
Full-Size Spare Tire . . . . . . . . . . . . . . . . . . . . 297
Jump Starting
Jump Starting - North America . . . . . . . . 297
Towing the Vehicle
Towing the Vehicle . . . . . . . . . . . . . . . . . . . 300
Recreational Vehicle Towing . . . . . . . . . . . 301
Appearance Care
Exterior Care . . . . . . . . . . . . . . . . . . . . . . . . . . 304
Interior Care . . . . . . . . . . . . . . . . . . . . . . . . . . 308
Floor Mats . . . . . . . . . . . . . . . . . . . . . . . . . . . . . 311
Page 255 of 362
Chevrolet Colorado Owner Manual (GMNA-Localizing-U.S./Canada/Mexico-
15274222) - 2022 - CRC - 11/2/21
254 Vehicle Care
Extended Storage: Remove the black,
negative (−) cable from the battery or use a
battery trickle charger.
Four-Wheel Drive
Transfer Case
When to Check Lubricant
Refer toMaintenance Schedule 0314 to
determine when to check the lubricant.
How to Check Lubricant
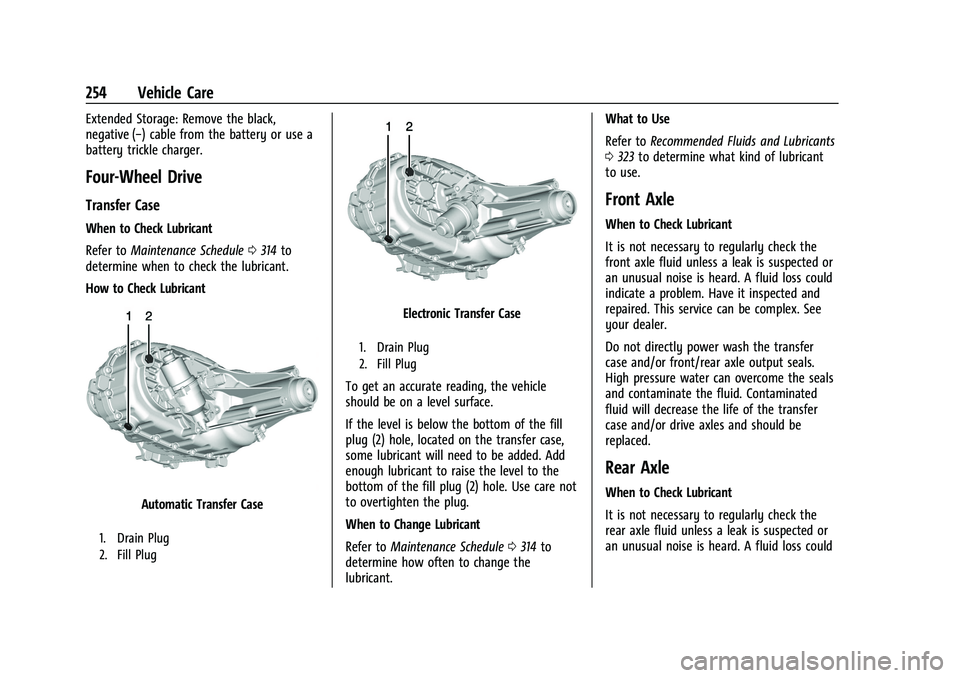
Automatic Transfer Case
1. Drain Plug
2. Fill Plug
Electronic Transfer Case
1. Drain Plug
2. Fill Plug
To get an accurate reading, the vehicle
should be on a level surface.
If the level is below the bottom of the fill
plug (2) hole, located on the transfer case,
some lubricant will need to be added. Add
enough lubricant to raise the level to the
bottom of the fill plug (2) hole. Use care not
to overtighten the plug.
When to Change Lubricant
Refer to Maintenance Schedule 0314 to
determine how often to change the
lubricant. What to Use
Refer to
Recommended Fluids and Lubricants
0 323 to determine what kind of lubricant
to use.
Front Axle
When to Check Lubricant
It is not necessary to regularly check the
front axle fluid unless a leak is suspected or
an unusual noise is heard. A fluid loss could
indicate a problem. Have it inspected and
repaired. This service can be complex. See
your dealer.
Do not directly power wash the transfer
case and/or front/rear axle output seals.
High pressure water can overcome the seals
and contaminate the fluid. Contaminated
fluid will decrease the life of the transfer
case and/or drive axles and should be
replaced.
Rear Axle
When to Check Lubricant
It is not necessary to regularly check the
rear axle fluid unless a leak is suspected or
an unusual noise is heard. A fluid loss could
Page 287 of 362
Chevrolet Colorado Owner Manual (GMNA-Localizing-U.S./Canada/Mexico-
15274222) - 2022 - CRC - 11/2/21
286 Vehicle Care
If a Tire Goes Flat
It is unusual for a tire to blow out while
driving, especially if the tires are maintained
properly. If air goes out of a tire, it is much
more likely to leak out slowly. But if there
ever is a blowout, here are a few tips about
what to expect and what to do:
If a front tire fails, the flat tire creates a
drag that pulls the vehicle toward that side.
Take your foot off the accelerator pedal and
grip the steering wheel firmly. Steer to
maintain lane position, and then gently
brake to a stop, well off the road,
if possible.
A rear blowout, particularly on a curve, acts
much like a skid and may require the same
correction as used in a skid. Stop pressing
the accelerator pedal and steer to straighten
the vehicle. It may be very bumpy and
noisy. Gently brake to a stop, well off the
road, if possible.
{Warning
Driving on a flat tire will cause
permanent damage to the tire.
Re-inflating a tire after it has been driven
on while severely underinflated or flat(Continued)
Warning (Continued)
may cause a blowout and a serious crash.
Never attempt to re-inflate a tire that has
been driven on while severely
underinflated or flat. Have your dealer or
an authorized tire service center repair or
replace the flat tire as soon as possible.
{Warning
Lifting a vehicle and getting under it to
do maintenance or repairs is dangerous
without the appropriate safety equipment
and training. If a jack is provided with
the vehicle, it is designed only for
changing a flat tire. If it is used for
anything else, you or others could be
badly injured or killed if the vehicle slips
off the jack. If a jack is provided with the
vehicle, only use it for changing a
flat tire.
If a tire goes flat, avoid further tire and
wheel damage by driving slowly to a level
place, well off the road, if possible. Turn on
the hazard warning flashers. See Hazard
Warning Flashers 0104.
{Warning
Changing a tire can be dangerous. The
vehicle can slip off the jack and roll over
or fall causing injury or death. Find a
level place to change the tire. To help
prevent the vehicle from moving:
1. Set the parking brake firmly.
2. Put the shift lever in P (Park).
3. For vehicles with four-wheel drive with an N (Neutral) transfer case
position, be sure the transfer case is
in a drive gear —not in N (Neutral).
4. Turn off the engine and do not restart while the vehicle is raised.
5. Do not allow passengers to remain in the vehicle.
6. Place wheel blocks, if equipped, on both sides of the tire at the opposite
corner of the tire being changed.
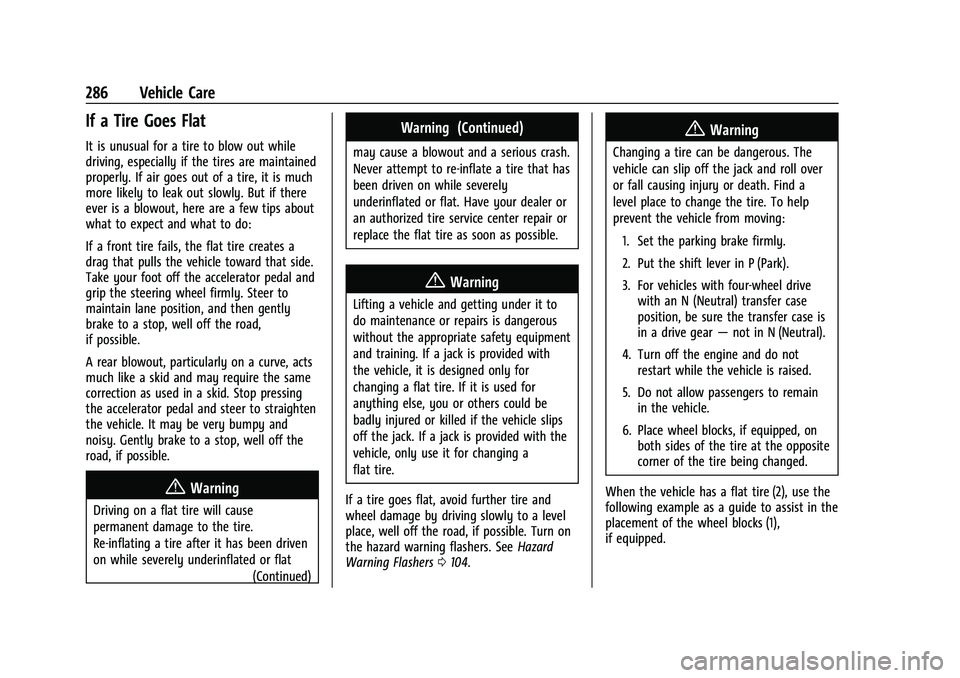
When the vehicle has a flat tire (2), use the
following example as a guide to assist in the
placement of the wheel blocks (1),
if equipped.
Page 298 of 362

Chevrolet Colorado Owner Manual (GMNA-Localizing-U.S./Canada/Mexico-
15274222) - 2022 - CRC - 11/2/21
Vehicle Care 297
Do not mix the compact spare tire or wheel
with other wheels or tires. They will not fit.
Keep the spare tire and its wheel together.
Caution
Tire chains will not fit the compact spare.
Using them can damage the vehicle and
the chains. Do not use tire chains on the
compact spare.
Full-Size Spare Tire
If this vehicle came with a full-size spare
tire, it was fully inflated when new,
however, it can lose air over time. Check the
inflation pressure regularly. SeeTire Pressure
0 275 and
Vehicle Load Limits 0178 for information
regarding proper tire inflation and loading
the vehicle. For instructions on how to
remove, install, or store a spare tire, see Tire
Changing 0287.
If equipped with a temporary use full-size
spare tire, it is indicated on the tire sidewall.
See Tire Sidewall Labeling 0271. This spare
tire should not be driven on over 112 km/h
(70 mph), or 88 km/h (55 mph) when
pulling a trailer, at the proper inflation pressure. Repair and replace the road tire as
soon as it is convenient, and stow the spare
tire for future use.
Caution
If the vehicle has four-wheel drive and a
different size spare tire is installed, do
not drive in four-wheel drive until the flat
tire is repaired and/or replaced. The
vehicle could be damaged and the repairs
would not be covered by the warranty.
Never use four-wheel drive when a
different size spare tire is installed on the
vehicle.
The vehicle may have a different size spare
tire than the road tires originally installed
on the vehicle. This spare tire was developed
for use on this vehicle, so it is all right to
drive on it. If the vehicle has four-wheel
drive and a different size spare tire is
installed, drive only in two-wheel drive.
After installing the spare tire on the vehicle,
stop as soon as possible and check that the
spare is correctly inflated. The spare tire is
made to perform well at speeds up to
112 km/h (70 MPH) at the recommended
inflation pressure, so you can finish
your trip. Have the damaged or flat road tire repaired
or replaced and installed back onto the
vehicle as soon as possible so the spare tire
will be available in case it is needed again.
Do not mix tires and wheels of difference
sizes, because they will not fit. Keep the
spare tire and its wheel together.
If the vehicle has a spare tire that does not
match the original road tires and wheels in
size and type, do not include the spare in
the tire rotation.
Jump Starting
Jump Starting - North America
For more information about the vehicle
battery, see
Battery - North America 0253.
If the battery has run down, try to use
another vehicle and some jumper cables to
start your vehicle. Be sure to use the
following steps to do it safely.
{Warning
WARNING: Battery posts, terminals and
related accessories can expose you to
chemicals including lead and lead
compounds, which are known to the
(Continued)
Page 302 of 362
Chevrolet Colorado Owner Manual (GMNA-Localizing-U.S./Canada/Mexico-
15274222) - 2022 - CRC - 11/2/21
Vehicle Care 301
.If unsuccessful, the vehicle will not move.
Tire skates or dollies must be used under
the non-rolling tires to prevent vehicle
damage.
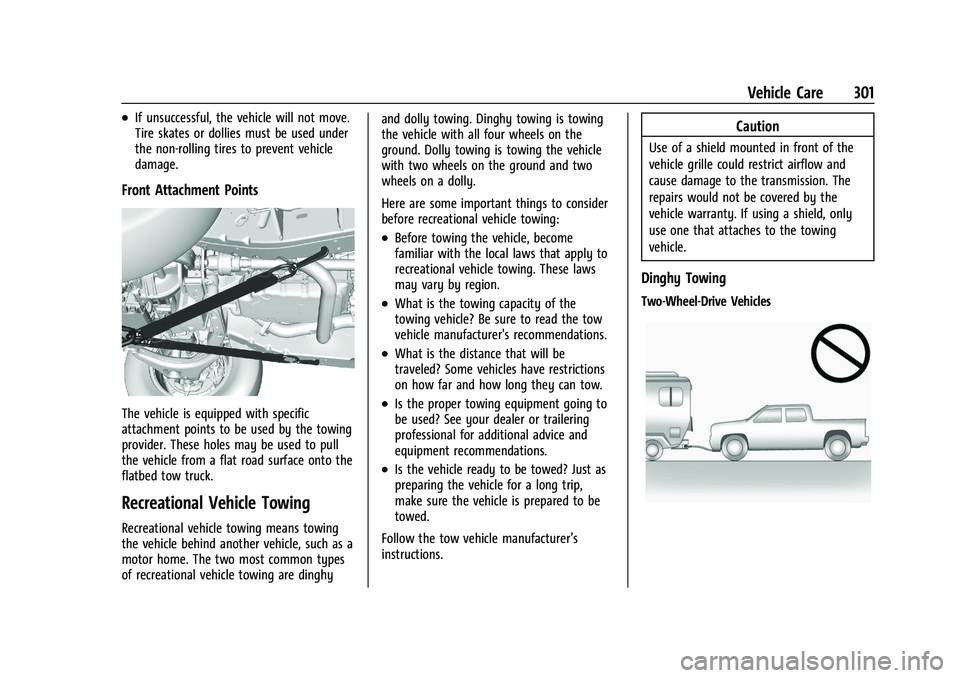
Front Attachment Points
The vehicle is equipped with specific
attachment points to be used by the towing
provider. These holes may be used to pull
the vehicle from a flat road surface onto the
flatbed tow truck.
Recreational Vehicle Towing
Recreational vehicle towing means towing
the vehicle behind another vehicle, such as a
motor home. The two most common types
of recreational vehicle towing are dinghyand dolly towing. Dinghy towing is towing
the vehicle with all four wheels on the
ground. Dolly towing is towing the vehicle
with two wheels on the ground and two
wheels on a dolly.
Here are some important things to consider
before recreational vehicle towing:
.Before towing the vehicle, become
familiar with the local laws that apply to
recreational vehicle towing. These laws
may vary by region.
.What is the towing capacity of the
towing vehicle? Be sure to read the tow
vehicle manufacturer's recommendations.
.What is the distance that will be
traveled? Some vehicles have restrictions
on how far and how long they can tow.
.Is the proper towing equipment going to
be used? See your dealer or trailering
professional for additional advice and
equipment recommendations.
.Is the vehicle ready to be towed? Just as
preparing the vehicle for a long trip,
make sure the vehicle is prepared to be
towed.
Follow the tow vehicle manufacturer’s
instructions.
Caution
Use of a shield mounted in front of the
vehicle grille could restrict airflow and
cause damage to the transmission. The
repairs would not be covered by the
vehicle warranty. If using a shield, only
use one that attaches to the towing
vehicle.
Dinghy Towing
Two-Wheel-Drive Vehicles
Page 303 of 362
Chevrolet Colorado Owner Manual (GMNA-Localizing-U.S./Canada/Mexico-
15274222) - 2022 - CRC - 11/2/21
302 Vehicle Care
Caution
If the two-wheel-drive vehicle is towed
with all four wheels on the ground, the
drivetrain components could be damaged.
The repairs would not be covered by the
vehicle warranty.
Two-wheel-drive vehicles should not be
towed with all four wheels on the ground.
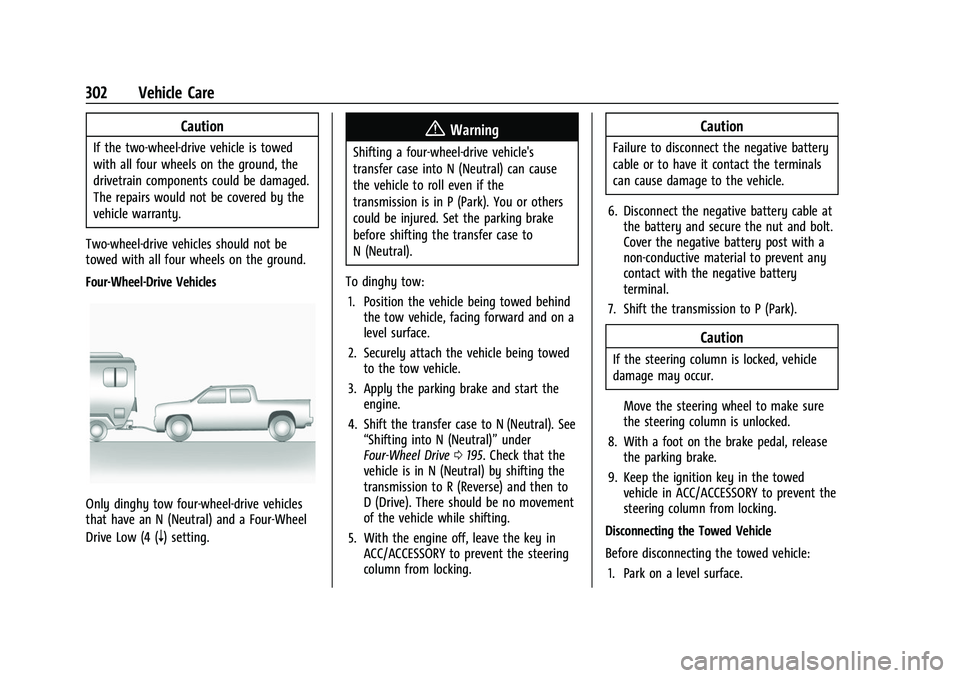
Four-Wheel-Drive Vehicles
Only dinghy tow four-wheel-drive vehicles
that have an N (Neutral) and a Four-Wheel
Drive Low (4 (
n) setting.
{Warning
Shifting a four-wheel-drive vehicle's
transfer case into N (Neutral) can cause
the vehicle to roll even if the
transmission is in P (Park). You or others
could be injured. Set the parking brake
before shifting the transfer case to
N (Neutral).
To dinghy tow: 1. Position the vehicle being towed behind the tow vehicle, facing forward and on a
level surface.
2. Securely attach the vehicle being towed to the tow vehicle.
3. Apply the parking brake and start the engine.
4. Shift the transfer case to N (Neutral). See “Shifting into N (Neutral)” under
Four-Wheel Drive 0195. Check that the
vehicle is in N (Neutral) by shifting the
transmission to R (Reverse) and then to
D (Drive). There should be no movement
of the vehicle while shifting.
5. With the engine off, leave the key in ACC/ACCESSORY to prevent the steering
column from locking.
Caution
Failure to disconnect the negative battery
cable or to have it contact the terminals
can cause damage to the vehicle.
6. Disconnect the negative battery cable at the battery and secure the nut and bolt.
Cover the negative battery post with a
non-conductive material to prevent any
contact with the negative battery
terminal.
7. Shift the transmission to P (Park).
Caution
If the steering column is locked, vehicle
damage may occur.
Move the steering wheel to make sure
the steering column is unlocked.
8. With a foot on the brake pedal, release the parking brake.
9. Keep the ignition key in the towed vehicle in ACC/ACCESSORY to prevent the
steering column from locking.
Disconnecting the Towed Vehicle
Before disconnecting the towed vehicle: 1. Park on a level surface.
Page 304 of 362
Chevrolet Colorado Owner Manual (GMNA-Localizing-U.S./Canada/Mexico-
15274222) - 2022 - CRC - 11/2/21
Vehicle Care 303
2. Set the parking brake, then shift thetransmission to P (Park), and move the
ignition key to OFF.
3. Connect the battery.
4. With your foot off the brake, turn the ignition on with the engine off.
5. Shift the transfer case out of N (Neutral) to Two-Wheel Drive High. See “Shifting
out of N (Neutral)” underFour-Wheel
Drive 0195. See your dealer if the
transfer case cannot be shifted out of
N (Neutral).
6. Start the engine and check that the vehicle is in Two-Wheel Drive High by
shifting the transmission to R (Reverse)
and then to D (Drive). There should be
movement of the vehicle while shifting.
7. Shift the transmission to P (Park) and turn off the ignition.
8. Disconnect the vehicle from the tow vehicle.
9. Release the parking brake.
10. Reset any lost presets. The outside temperature display will
default to 0 °C (32 °F) but will reset with
normal usage.Dolly Towing
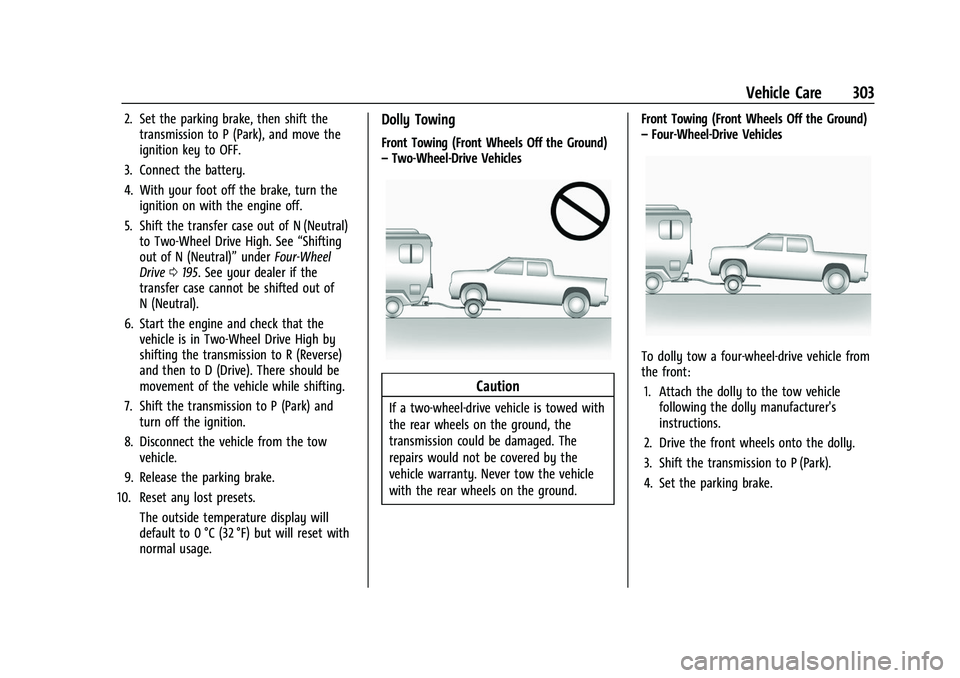
Front Towing (Front Wheels Off the Ground)
–Two-Wheel-Drive Vehicles
Caution
If a two-wheel-drive vehicle is towed with
the rear wheels on the ground, the
transmission could be damaged. The
repairs would not be covered by the
vehicle warranty. Never tow the vehicle
with the rear wheels on the ground. Front Towing (Front Wheels Off the Ground)
–
Four-Wheel-Drive Vehicles
To dolly tow a four-wheel-drive vehicle from
the front:
1. Attach the dolly to the tow vehicle following the dolly manufacturer's
instructions.
2. Drive the front wheels onto the dolly.
3. Shift the transmission to P (Park).
4. Set the parking brake.