2022 CHEVROLET COLORADO engine
[x] Cancel search: enginePage 257 of 362

Chevrolet Colorado Owner Manual (GMNA-Localizing-U.S./Canada/Mexico-
15274222) - 2022 - CRC - 11/2/21
256 Vehicle Care
.To check the parking brake's holding
ability: With the engine running and the
transmission in N (Neutral), slowly remove
foot pressure from the regular brake
pedal. Do this until the vehicle is held by
the parking brake only.
.To check the P (Park) mechanism's holding
ability: With the engine running, shift to
P (Park). Then release the parking brake
followed by the regular brake.
Contact your dealer if service is required.
Wiper Blade Replacement
Windshield wiper blades should be inspected
for wear or cracking.
Replacement blades come in different types
and are removed in different ways. For
proper windshield wiper blade length and
type, see Maintenance Replacement Parts
0 324.
Caution
Allowing the wiper arm to touch the
windshield when no wiper blade is
installed could damage the windshield.
Any damage that occurs would not be
(Continued)
Caution (Continued)
covered by the vehicle warranty. Do not
allow the wiper arm to touch the
windshield.
To replace the windshield wiper blade: 1. Pull the windshield wiper assembly away from the windshield.
2. Press the release lever in the middle ofthe wiper blade where the wiper blade
attaches.
3. Remove the wiper blade.
4. Reverse Steps 1–3 for wiper blade replacement.
Windshield Replacement
Driver Assistance Systems
If the windshield needs to be replaced and
the vehicle is equipped with a front camera
sensor for the Driver Assistance Systems, a
GM replacement windshield is
recommended. The replacement windshield
must be installed according to GM
specifications for proper alignment. If it is
not, these systems may not work properly,
they may display messages, or they may
not work at all. See your dealer for proper
windshield replacement.
Gas Strut(s)
This vehicle is equipped with gas strut(s) to
provide assistance in lifting and holding
open the hood/trunk/liftgate system in full
open position.
{Warning
If the gas struts that hold open the hood,
trunk, and/or liftgate fail, you or others
could be seriously injured. Take the
vehicle to your dealer for service
immediately. Visually inspect the gas
struts for signs of wear, cracks, or other
(Continued)
Page 262 of 362
Chevrolet Colorado Owner Manual (GMNA-Localizing-U.S./Canada/Mexico-
15274222) - 2022 - CRC - 11/2/21
Vehicle Care 261
Replacing a Blown Fuse
1. Turn off the vehicle.
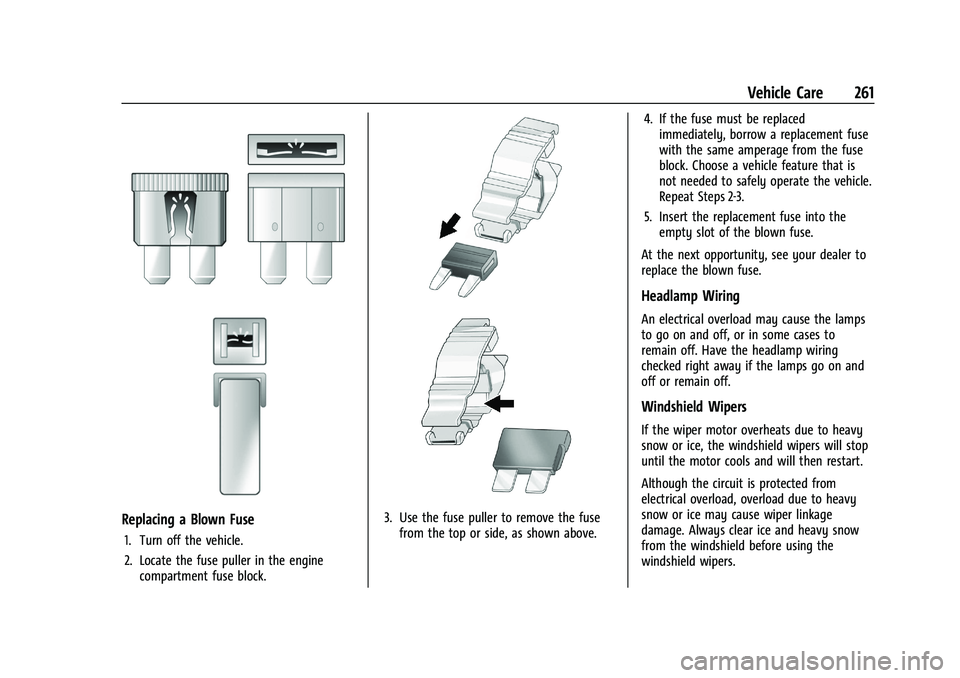
2. Locate the fuse puller in the enginecompartment fuse block.
3. Use the fuse puller to remove the fusefrom the top or side, as shown above. 4. If the fuse must be replaced
immediately, borrow a replacement fuse
with the same amperage from the fuse
block. Choose a vehicle feature that is
not needed to safely operate the vehicle.
Repeat Steps 2-3.
5. Insert the replacement fuse into the empty slot of the blown fuse.
At the next opportunity, see your dealer to
replace the blown fuse.
Headlamp Wiring
An electrical overload may cause the lamps
to go on and off, or in some cases to
remain off. Have the headlamp wiring
checked right away if the lamps go on and
off or remain off.
Windshield Wipers
If the wiper motor overheats due to heavy
snow or ice, the windshield wipers will stop
until the motor cools and will then restart.
Although the circuit is protected from
electrical overload, overload due to heavy
snow or ice may cause wiper linkage
damage. Always clear ice and heavy snow
from the windshield before using the
windshield wipers.
Page 263 of 362
Chevrolet Colorado Owner Manual (GMNA-Localizing-U.S./Canada/Mexico-
15274222) - 2022 - CRC - 11/2/21
262 Vehicle Care
If the overload is caused by an electrical
problem and not snow or ice, be sure to get
it fixed.
Fuses and Circuit Breakers
The wiring circuits in the vehicle are
protected from short circuits by a
combination of fuses and circuit breakers.
This greatly reduces the chance of damage
caused by electrical problems.
{Danger
Fuses and circuit breakers are marked
with their ampere rating. Do not exceed
the specified amperage rating when
replacing fuses and circuit breakers. Use
of an oversized fuse or circuit breaker can
result in a vehicle fire. You and others
could be seriously injured or killed.
{Warning
Installation or use of fuses that do not
meet GM’s original fuse specifications is
dangerous. The fuses could fail, and result
in a fire. You or others could be injured
or killed, and the vehicle could be
damaged.
See Accessories and Modifications 0237 and
General Information 0237.
To check or replace a blown fuse, see
Electrical System Overload 0260.
Engine Compartment Fuse Block
If the vehicle has a diesel engine, see the
Duramax diesel supplement.
The engine compartment fuse block is in the
engine compartment, on the driver side of
the vehicle. See Engine Compartment
Overview 0239
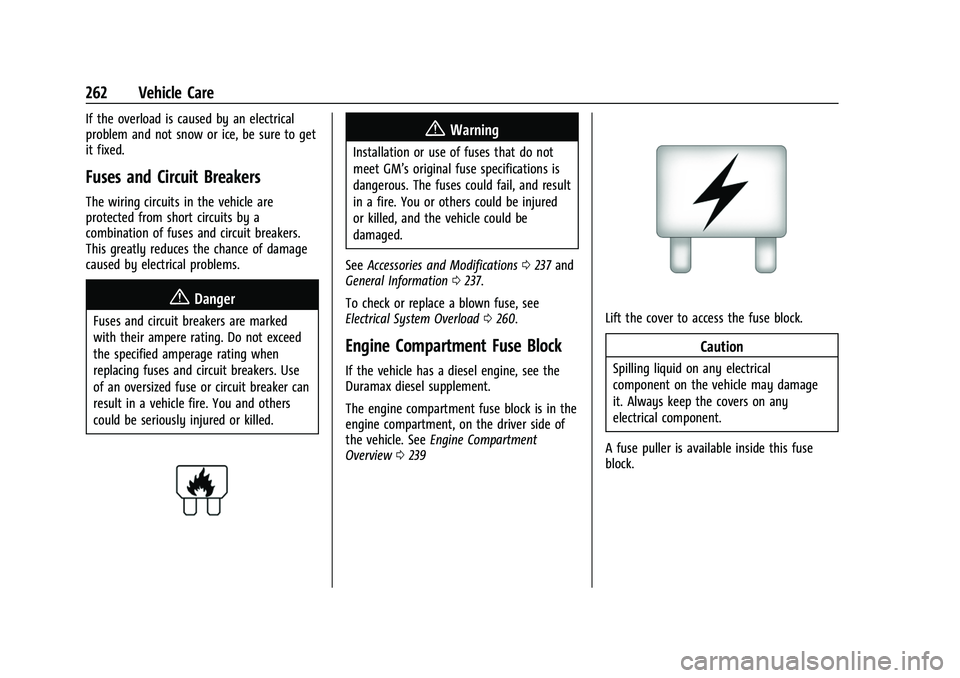
Lift the cover to access the fuse block.
Caution
Spilling liquid on any electrical
component on the vehicle may damage
it. Always keep the covers on any
electrical component.
A fuse puller is available inside this fuse
block.
Page 265 of 362

Chevrolet Colorado Owner Manual (GMNA-Localizing-U.S./Canada/Mexico-
15274222) - 2022 - CRC - 11/2/21
264 Vehicle Care
The vehicle may not be equipped with all of
the fuses, relays, and features shown.Fuses Usage
F1 TCM BATT –Traction Control
Module Power
F2 ECM BATT –Engine Control
Module Power
F3 A/C CLTCH –Air Conditioning
Clutch
F4 –
F5 4 CYL Engine –ECM/FPPM
RUN/CRANK –Engine Control
Module Run/Crank –Fuel
Pump Power Module Run
Crank
6 CYL Engine –ECM/ICCM/
FPPM RUN/CRANK –
Integrated Chassis Control
Module Run/Crank –Engine
Control Module Run/Crank –
Fuel Pump Power Module Run
Crank
F6 WIPER –Front Wipers
F7 Cargo Lamp/Bed Lighting Fuses
Usage
F8 4 CYL Engine –Spare
6 CYL Engine –INJ EVEN –
Fuel Injectors Even
F9 4 CYL Engine –Injectors
6 CYL Engine –INJ ODD –Fuel
Injectors Odd
F10 ECM IGN –Engine Control
Module Ignition
F11 MISC 1 –Oxygen/Mass Air
Flow/Humidity/Induction Air
Temperature/Throttle Inlet
Pressure Sensors
F12 Starter
F13 TCM RUN/CRNK –Traction
Control Module Run/Crank
F14 –
F15 –
F16 –
F17 FRT AXLE ACT –Front Axle
Actuator
F18 –
F19 AERO SHTR –Aeroshutters Fuses
Usage
F20 –
F21 FRT BLWR –Front Blower
F22 ABS VLV –Antilock Brake
System Valves
F23 –
F24 TRLR –Trailer
F25 TREC –Transfer Case
Electronic Control
F26 ABS PUMP –Antilock Brake
System Pump
F27 TRLR BRK CNTRL MDL –Trailer
Brake Control Module
F28 REAR WNDW DEFOG - Rear Window Defogger
F29 –
F30 HTD SEAT DVR –Driver
Heated Seat
F31 –
F32 HTD SEAT PASS –Passenger
Heated Seat
Page 266 of 362

Chevrolet Colorado Owner Manual (GMNA-Localizing-U.S./Canada/Mexico-
15274222) - 2022 - CRC - 11/2/21
Vehicle Care 265
FusesUsage
F33 BCM 3 –Body Control
Module 3 –Right Headlamp
Low Beam Supply Voltage,
Right Front Turn Signal Lamp
Supply Voltage, Left Park
Lamp Supply Voltage, Left
Rear Park Lamp Supply
Voltage
F34 FPPM –Fuel Pump Power
Module
F35 4 CYL Engine –Not Used
6 CYL Engine –ICCM –
Integrated Chassis Control
Module
F36 CHMSL –Center High
Mounted Stoplamp
F37 HI BEAM RT –Right
High-beam Headlamp
F38 HI BEAM LT –Left High-beam
Headlamp Fuses
Usage
F39 4 CYL Engine –Not Used
6 CYL Engine –Not Used
6 CYL Engine –BISON –RR
DIFF LOCK ACT –Rear
Differential Lock Actuators
F40 4 CYL Engine –Not Used
6 CYL Engine –Not Used
6 CYL Engine –BISON –FRT
DIFF LOCK ACT –Front
Differential Lock Actuators
F41 –
F42 –
F43 4 CYL Engine –COOL FAN –
Cooling Fan
6 CYL Engine –Not Used
F44 –
F45 4 CYL Engine –Not Used
6 CYL Engine –VAC PUMP –
Brake Vacuum Pump
F46 4 CYL Engine –Not Used
6 CYL Engine –ECM 2 –
Engine Control Module 2 Fuses
Usage
F47 MISC 2 –Mid Park Phase
Lock/Active Fuel
Management/Engine Oil and
Canister Purge Solenoid(s)/
Oxygen Sensor
F48 Fog lamps
F49 –
F50 TRLR PRK LAMP –Trailer
Parking Lamp
F51 Horn
F52 –
F53 –
F54 –
F55 –
F56 WASH PUMP –Washer Pump
F57 –
F58 –
F59 –
F60 MIR DEFOG –Mirror Defogger
F61 –
F62 CNSTR VENT SOL –Canister
Vent Solenoid
Page 267 of 362
Chevrolet Colorado Owner Manual (GMNA-Localizing-U.S./Canada/Mexico-
15274222) - 2022 - CRC - 11/2/21
266 Vehicle Care
FusesUsage
F63 –
F64 TRLR REV LAMP –Trailer
Reverse Lamps
F65 TRLR STOP/TRN LAMP LT –
Left Trailer Stoplamp/
Turnlamp
F66 TRLR STOP/TRN LAMP RT –
Right Trailer Stoplamp/
Turnlamp
F67 EPS –Electric Power Steering
F68 –
F69 RVC –Battery Regulated
Voltage Control
F70 –
F71 –
F72 –
F73 –
F74 GEN –Generator
F75 – Relays
Usage
K1 A/C Clutch –Air
Conditioning Clutch
K2 STRTR –Starter
K3 –
K4 WPR SPD –Wiper
Speed
K5 WPR CNTRL –Wiper
Control
K6 Cargo Lamp/Bed Lighting
K7 PWR TRN –Powertrain
K8 –
K9 4 CYL Engine –
Not Used
6 CYL Engine –
Not Used
6 CYL Engine –BISON –
FRT DIFF LOCK ACT –
Front Differential Lock
Actuators Relays
Usage
K10 4 CYL Engine –
Not Used
6 CYL Engine –
Not Used
6 CYL Engine –BISON –
FRT DIFF LOCK ACT –
Front Differential Lock
Actuators
K11 CHMSL –Center High
Mounted Stop Lamp
K12 –
K13 4 CYL Engine –
Not Used
6 CYL Engine –VAC
PUMP –Brake
Vacuum Pump
K14 TRLR PRK LAMPS –
Trailer Park Lamps
K15 RUN/CRNK –Run/Crank
K16 –
K17 REAR WNDW DEFOG –
Rear Window/Mirror
Defogger
Page 274 of 362
Chevrolet Colorado Owner Manual (GMNA-Localizing-U.S./Canada/Mexico-
15274222) - 2022 - CRC - 11/2/21
Vehicle Care 273
and service description. The letter T as
the first character in the tire size means
the tire is for temporary use only.
(7) TPC Spec (Tire Performance Criteria
Specification)
:Original equipment tires
designed to GM's specific tire
performance criteria have a TPC
specification code molded onto the
sidewall. GM's TPC specifications meet
or exceed all federal safety guidelines.
Tire Designations
Tire Size
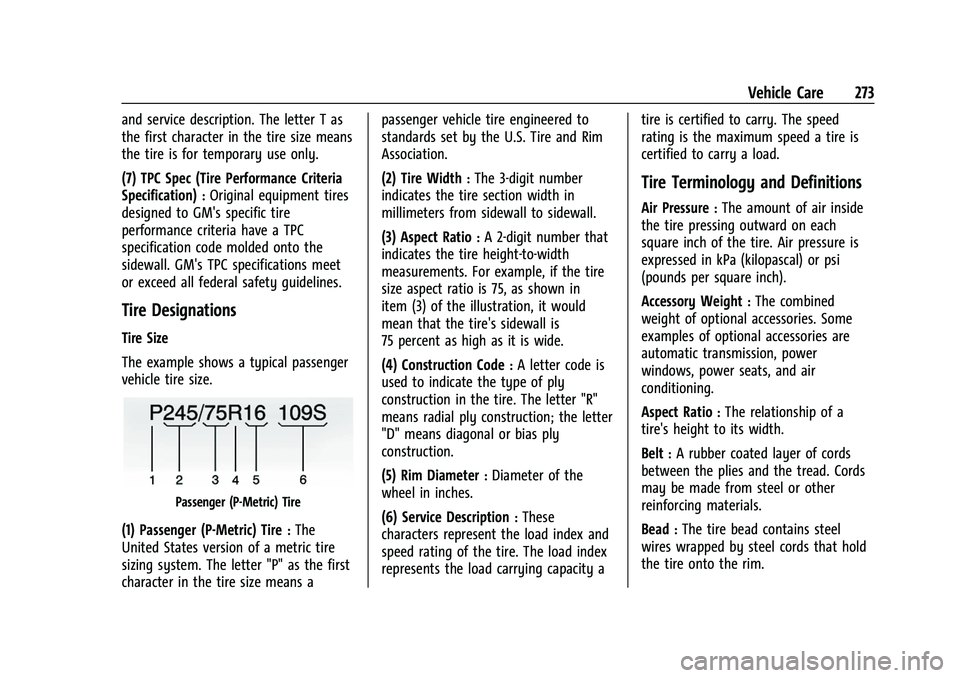
The example shows a typical passenger
vehicle tire size.
Passenger (P-Metric) Tire
(1) Passenger (P-Metric) Tire:The
United States version of a metric tire
sizing system. The letter "P" as the first
character in the tire size means a passenger vehicle tire engineered to
standards set by the U.S. Tire and Rim
Association.
(2) Tire Width
:The 3-digit number
indicates the tire section width in
millimeters from sidewall to sidewall.
(3) Aspect Ratio
:A 2-digit number that
indicates the tire height-to-width
measurements. For example, if the tire
size aspect ratio is 75, as shown in
item (3) of the illustration, it would
mean that the tire's sidewall is
75 percent as high as it is wide.
(4) Construction Code
:A letter code is
used to indicate the type of ply
construction in the tire. The letter "R"
means radial ply construction; the letter
"D" means diagonal or bias ply
construction.
(5) Rim Diameter
:Diameter of the
wheel in inches.
(6) Service Description
:These
characters represent the load index and
speed rating of the tire. The load index
represents the load carrying capacity a tire is certified to carry. The speed
rating is the maximum speed a tire is
certified to carry a load.
Tire Terminology and Definitions
Air Pressure:The amount of air inside
the tire pressing outward on each
square inch of the tire. Air pressure is
expressed in kPa (kilopascal) or psi
(pounds per square inch).
Accessory Weight
:The combined
weight of optional accessories. Some
examples of optional accessories are
automatic transmission, power
windows, power seats, and air
conditioning.
Aspect Ratio
:The relationship of a
tire's height to its width.
Belt
:A rubber coated layer of cords
between the plies and the tread. Cords
may be made from steel or other
reinforcing materials.
Bead
:The tire bead contains steel
wires wrapped by steel cords that hold
the tire onto the rim.
Page 287 of 362
Chevrolet Colorado Owner Manual (GMNA-Localizing-U.S./Canada/Mexico-
15274222) - 2022 - CRC - 11/2/21
286 Vehicle Care
If a Tire Goes Flat
It is unusual for a tire to blow out while
driving, especially if the tires are maintained
properly. If air goes out of a tire, it is much
more likely to leak out slowly. But if there
ever is a blowout, here are a few tips about
what to expect and what to do:
If a front tire fails, the flat tire creates a
drag that pulls the vehicle toward that side.
Take your foot off the accelerator pedal and
grip the steering wheel firmly. Steer to
maintain lane position, and then gently
brake to a stop, well off the road,
if possible.
A rear blowout, particularly on a curve, acts
much like a skid and may require the same
correction as used in a skid. Stop pressing
the accelerator pedal and steer to straighten
the vehicle. It may be very bumpy and
noisy. Gently brake to a stop, well off the
road, if possible.
{Warning
Driving on a flat tire will cause
permanent damage to the tire.
Re-inflating a tire after it has been driven
on while severely underinflated or flat(Continued)
Warning (Continued)
may cause a blowout and a serious crash.
Never attempt to re-inflate a tire that has
been driven on while severely
underinflated or flat. Have your dealer or
an authorized tire service center repair or
replace the flat tire as soon as possible.
{Warning
Lifting a vehicle and getting under it to
do maintenance or repairs is dangerous
without the appropriate safety equipment
and training. If a jack is provided with
the vehicle, it is designed only for
changing a flat tire. If it is used for
anything else, you or others could be
badly injured or killed if the vehicle slips
off the jack. If a jack is provided with the
vehicle, only use it for changing a
flat tire.
If a tire goes flat, avoid further tire and
wheel damage by driving slowly to a level
place, well off the road, if possible. Turn on
the hazard warning flashers. See Hazard
Warning Flashers 0104.
{Warning
Changing a tire can be dangerous. The
vehicle can slip off the jack and roll over
or fall causing injury or death. Find a
level place to change the tire. To help
prevent the vehicle from moving:
1. Set the parking brake firmly.
2. Put the shift lever in P (Park).
3. For vehicles with four-wheel drive with an N (Neutral) transfer case
position, be sure the transfer case is
in a drive gear —not in N (Neutral).
4. Turn off the engine and do not restart while the vehicle is raised.
5. Do not allow passengers to remain in the vehicle.
6. Place wheel blocks, if equipped, on both sides of the tire at the opposite
corner of the tire being changed.
When the vehicle has a flat tire (2), use the
following example as a guide to assist in the
placement of the wheel blocks (1),
if equipped.