2022 CHEVROLET BOLT EV door lock
[x] Cancel search: door lockPage 153 of 316
Chevrolet BOLT EV Owner Manual (GMNA-Localizing-U.S./Canada-
15082216) - 2022 - CRC - 6/25/21
152 Climate Controls
outside air temperature. The climate control
system uses the information to adjust the
climate system operation.
Afterblow Feature
If equipped, under certain conditions, the
fan may stay on or may turn on and off
several times after you turn off and lock the
vehicle. This is normal.
Air Vents
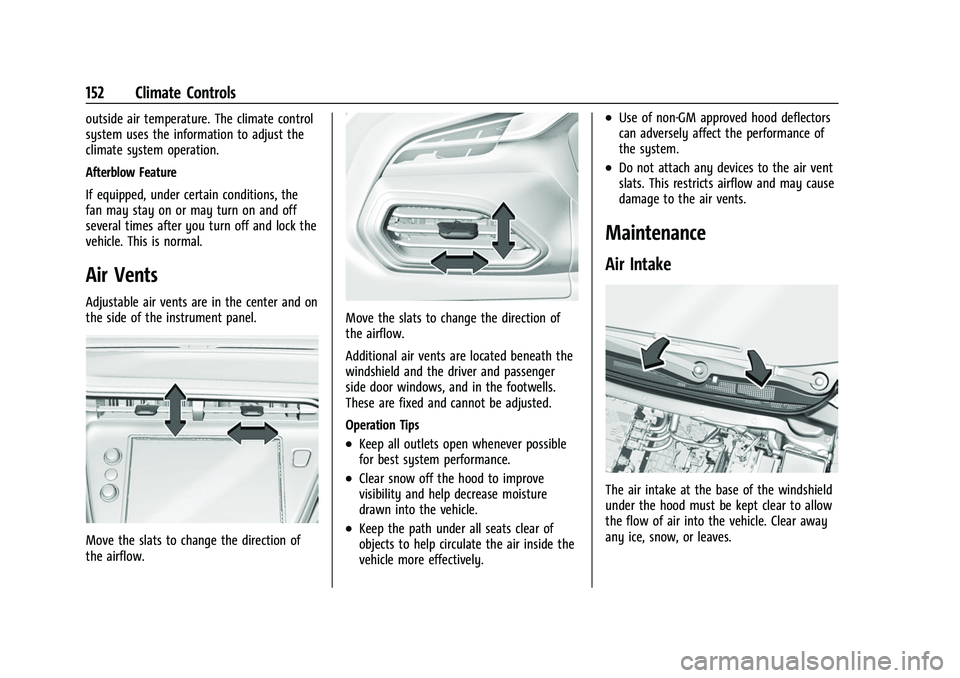
Adjustable air vents are in the center and on
the side of the instrument panel.
Move the slats to change the direction of
the airflow.
Move the slats to change the direction of
the airflow.
Additional air vents are located beneath the
windshield and the driver and passenger
side door windows, and in the footwells.
These are fixed and cannot be adjusted.
Operation Tips
.Keep all outlets open whenever possible
for best system performance.
.Clear snow off the hood to improve
visibility and help decrease moisture
drawn into the vehicle.
.Keep the path under all seats clear of
objects to help circulate the air inside the
vehicle more effectively.
.Use of non-GM approved hood deflectors
can adversely affect the performance of
the system.
.Do not attach any devices to the air vent
slats. This restricts airflow and may cause
damage to the air vents.
Maintenance
Air Intake
The air intake at the base of the windshield
under the hood must be kept clear to allow
the flow of air into the vehicle. Clear away
any ice, snow, or leaves.
Page 203 of 316
Chevrolet BOLT EV Owner Manual (GMNA-Localizing-U.S./Canada-
15082216) - 2022 - CRC - 6/25/21
202 Driving and Operating
AC Charging
AC Charge Cord Vehicle Plug
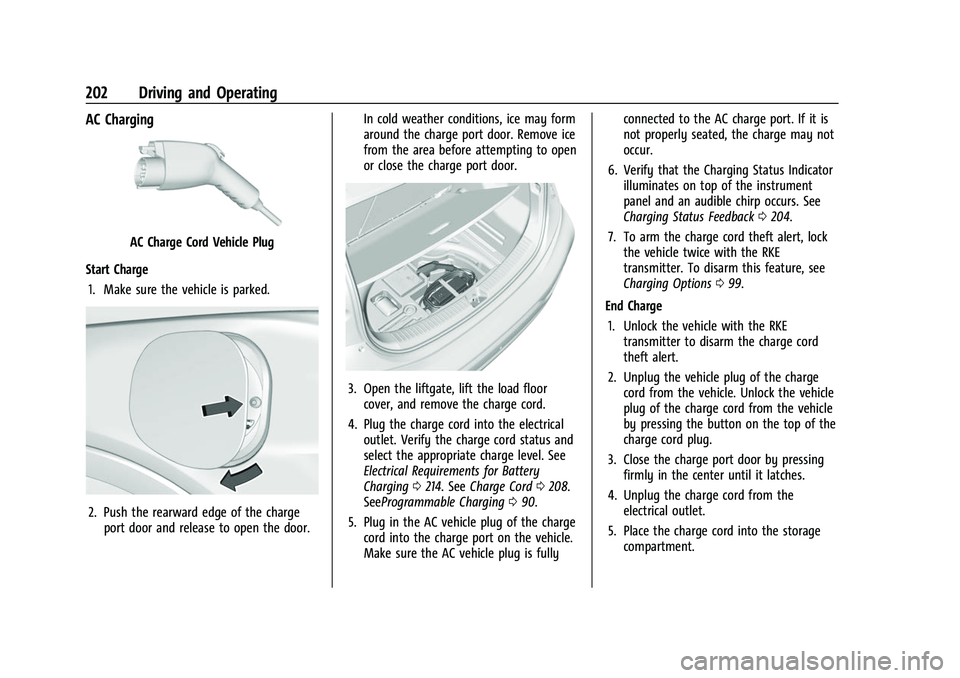
Start Charge 1. Make sure the vehicle is parked.
2. Push the rearward edge of the charge port door and release to open the door. In cold weather conditions, ice may form
around the charge port door. Remove ice
from the area before attempting to open
or close the charge port door.
3. Open the liftgate, lift the load floor
cover, and remove the charge cord.
4. Plug the charge cord into the electrical outlet. Verify the charge cord status and
select the appropriate charge level. See
Electrical Requirements for Battery
Charging 0214. See Charge Cord 0208.
SeeProgrammable Charging 090.
5. Plug in the AC vehicle plug of the charge cord into the charge port on the vehicle.
Make sure the AC vehicle plug is fully connected to the AC charge port. If it is
not properly seated, the charge may not
occur.
6. Verify that the Charging Status Indicator illuminates on top of the instrument
panel and an audible chirp occurs. See
Charging Status Feedback 0204.
7. To arm the charge cord theft alert, lock the vehicle twice with the RKE
transmitter. To disarm this feature, see
Charging Options 099.
End Charge 1. Unlock the vehicle with the RKE transmitter to disarm the charge cord
theft alert.
2. Unplug the vehicle plug of the charge cord from the vehicle. Unlock the vehicle
plug of the charge cord from the vehicle
by pressing the button on the top of the
charge cord plug.
3. Close the charge port door by pressing firmly in the center until it latches.
4. Unplug the charge cord from the electrical outlet.
5. Place the charge cord into the storage compartment.
Page 204 of 316

Chevrolet BOLT EV Owner Manual (GMNA-Localizing-U.S./Canada-
15082216) - 2022 - CRC - 6/25/21
Driving and Operating 203
DC Charging (If Equipped)
DC Charging Station Hardware
Check the charge station DC vehicle plug for
compatibility with the DC charge port on
this vehicle. When recharging at a DC charge
station, the charging cable connected to the
vehicle must be less than 10 m (33 ft) in
length to meet functionality and regulatory
requirement.
Follow the steps listed on the charging
station to perform a DC vehicle charge.
If for any reason DC charging does not
begin or is interrupted, check the DC charge
station display for messages. Unplug to
restart the DC charge process.
Start Charge1. Make sure the vehicle is parked.
2. Push the rearward edge of the charge port door and release to open the door.
In cold weather conditions, ice may form
around the charge port door. The charge
port door may not open on the first
attempt. Remove ice from the area and
repeat attempting to open the charge
port door.
3. Unlatch the DC charging dust cover andlower it fully.
4. Plug in the DC vehicle plug into the DC charge port on the vehicle. Make sure
that the DC vehicle plug is fully
connected to the DC charge port. If it is
not properly seated then the charge may
not occur. Proper plug connection can be
checked by information on the DIC.
5. Follow the steps listed on the charging station to start charging.
6. Once charging, the DC vehicle plug will be locked to the DC charge port and
cannot be disconnected while charging is
active. 7. Verify that the Charging Status Indicator
illuminates on top of the instrument
panel and an audible chirp occurs. See
Charging Status Feedback 0204.
Caution
Do not attempt to disconnect the DC
vehicle plug while charging is active. This
action may damage the vehicle or
charging station hardware.
Stop Charge
Controls on the charging station can be used
to stop the charge process at any time.
To stop the charge when inside the vehicle,
use the Stop button on the Charging screen,
or press the button on top of the AC vehicle
cord handle.
Stop Charge —Automatic
When the vehicle no longer needs to use
power from the charging station, it will stop
charging and the DC vehicle plug will be
unlocked from the DC charge port.
Energy can still be consumed from the
charging station when the vehicle’s displays
and indicators show that the battery is fully
charged. This is to ensure the battery is in
Page 205 of 316
Chevrolet BOLT EV Owner Manual (GMNA-Localizing-U.S./Canada-
15082216) - 2022 - CRC - 6/25/21
204 Driving and Operating
optimal temperature operating range to
maximize vehicle range. SeeProgrammable
Charging 090.
End Charge 1. Wait until the charging process has been fully stopped, the vehicle plug is
unlocked, and the Charging Status
Indicator is solid green or off.
If the vehicle plug does not unlock from
the vehicle charge port after a charge,
contact Roadside Assistance for
assistance. See Roadside Assistance
Program 0289.
2. Unplug the DC vehicle plug from the DC charge port on the vehicle and close the
dust cover.
3. Close the charge port door by pressing firmly in the center until it latches.
4. The Electric Parking Brake should be manually disengaged before driving the
vehicle.
5. To start another DC charge, remove the DC vehicle plug and reconnect.Delayed Charging Override
To temporarily override a delayed charge
event, unplug the charge cord from the
charge port and then plug it back in within
five seconds. A single audible chirp will
sound and charging will begin immediately.
To cancel a temporary override, unplug the
charge cord, wait for 10 seconds, and then
plug the charge cord back in. A double
audible chirp will sound and charging will be
delayed.
See Programmable Charging 090 for
advanced charge scheduling options.
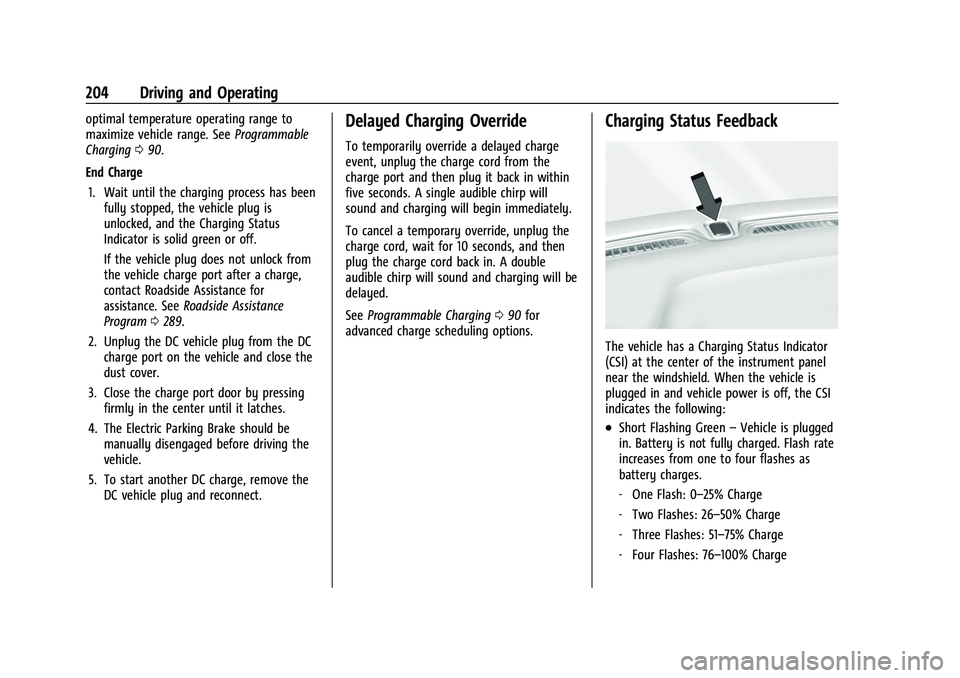
Charging Status Feedback
The vehicle has a Charging Status Indicator
(CSI) at the center of the instrument panel
near the windshield. When the vehicle is
plugged in and vehicle power is off, the CSI
indicates the following:
.Short Flashing Green –Vehicle is plugged
in. Battery is not fully charged. Flash rate
increases from one to four flashes as
battery charges.
‐ One Flash: 0–25% Charge
‐ Two Flashes: 26–50% Charge
‐ Three Flashes: 51–75% Charge
‐ Four Flashes: 76–100% Charge
Page 238 of 316

Chevrolet BOLT EV Owner Manual (GMNA-Localizing-U.S./Canada-
15082216) - 2022 - CRC - 6/25/21
Vehicle Care 237
The instrument panel fuse block is on the
left side of the instrument panel. To access
the fuses, open the fuse panel door by
pulling out.
To reinstall the door, insert the top tab first,
then push the door back into its original
location.Fuses Usage
F01 Video Processing Module
F02 Indicator Light Solar Sensor
F03 Side Blind Zone Alert
F04 Passive Entry, Passive Start F05 CGM –Central Gateway
Module
F06 Body Control Module 4 F07 Body Control Module 3
F08 Body Control Module 2
F09 Body control module 1 F10 Police SSV F11 Amplifier
F12 Body Control Module 8
F13 Data Link Connector
F14 Parking Assist Fuses
Usage
F15 Headlamp LH
F16 Single Power Inverter Module 1
F17 Body Control Module 6
F18 Body Control Module 5
F19 –
F20 –
F21 –
F22 –
F23 USB
F24 Wireless Charging Module F25 Reflected LED Alert Display
F26 Heated Steering Wheel F27 CGM –Central Gateway
Module 2
F28 Instrument Cluster 2
F29 –
F30 –
F31 TCP –Telemetics Control
Platform (OnStar)
F32 – Fuses
Usage
F33 Heating, Ventilation, and Air Conditioning Module
F34 Heating, Ventilation and Air Conditioning Display/
Integrated Center Stack
F35 Instrument Cluster 1
F36 Center Stack Module F37 –
F38 –
F39 –
F40 –
F41 –
F42 –
F43 Body Control Module 7
F44 Sensing and Diagnostic Module
F45 Front Camera Module
F46 Vehicle Integration Control Module
F47 Single Power Inverter Module 2
F48 Headlamp RH
Page 258 of 316
Chevrolet BOLT EV Owner Manual (GMNA-Localizing-U.S./Canada-
15082216) - 2022 - CRC - 6/25/21
Vehicle Care 257
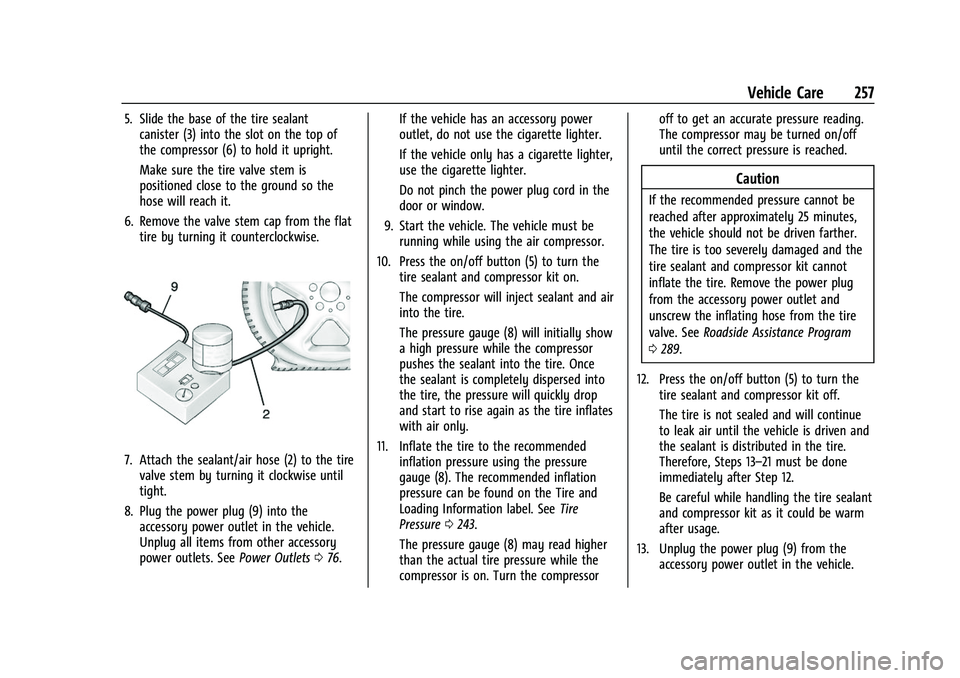
5. Slide the base of the tire sealantcanister (3) into the slot on the top of
the compressor (6) to hold it upright.
Make sure the tire valve stem is
positioned close to the ground so the
hose will reach it.
6. Remove the valve stem cap from the flat tire by turning it counterclockwise.
7. Attach the sealant/air hose (2) to the tirevalve stem by turning it clockwise until
tight.
8. Plug the power plug (9) into the accessory power outlet in the vehicle.
Unplug all items from other accessory
power outlets. See Power Outlets076. If the vehicle has an accessory power
outlet, do not use the cigarette lighter.
If the vehicle only has a cigarette lighter,
use the cigarette lighter.
Do not pinch the power plug cord in the
door or window.
9. Start the vehicle. The vehicle must be running while using the air compressor.
10. Press the on/off button (5) to turn the tire sealant and compressor kit on.
The compressor will inject sealant and air
into the tire.
The pressure gauge (8) will initially show
a high pressure while the compressor
pushes the sealant into the tire. Once
the sealant is completely dispersed into
the tire, the pressure will quickly drop
and start to rise again as the tire inflates
with air only.
11. Inflate the tire to the recommended inflation pressure using the pressure
gauge (8). The recommended inflation
pressure can be found on the Tire and
Loading Information label. See Tire
Pressure 0243.
The pressure gauge (8) may read higher
than the actual tire pressure while the
compressor is on. Turn the compressor off to get an accurate pressure reading.
The compressor may be turned on/off
until the correct pressure is reached.
Caution
If the recommended pressure cannot be
reached after approximately 25 minutes,
the vehicle should not be driven farther.
The tire is too severely damaged and the
tire sealant and compressor kit cannot
inflate the tire. Remove the power plug
from the accessory power outlet and
unscrew the inflating hose from the tire
valve. See
Roadside Assistance Program
0 289.
12. Press the on/off button (5) to turn the tire sealant and compressor kit off.
The tire is not sealed and will continue
to leak air until the vehicle is driven and
the sealant is distributed in the tire.
Therefore, Steps 13–21 must be done
immediately after Step 12.
Be careful while handling the tire sealant
and compressor kit as it could be warm
after usage.
13. Unplug the power plug (9) from the accessory power outlet in the vehicle.
Page 260 of 316
Chevrolet BOLT EV Owner Manual (GMNA-Localizing-U.S./Canada-
15082216) - 2022 - CRC - 6/25/21
Vehicle Care 259
Using the Tire Sealant and Compressor
Kit without Sealant to Inflate a Tire (Not
Punctured)
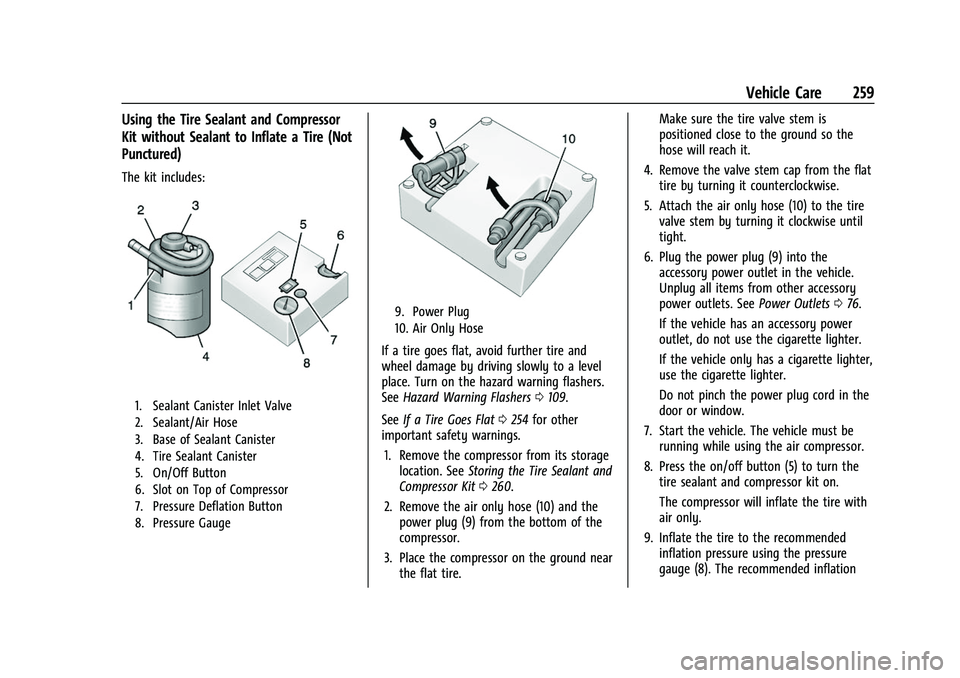
The kit includes:
1. Sealant Canister Inlet Valve
2. Sealant/Air Hose
3. Base of Sealant Canister
4. Tire Sealant Canister
5. On/Off Button
6. Slot on Top of Compressor
7. Pressure Deflation Button
8. Pressure Gauge
9. Power Plug
10. Air Only Hose
If a tire goes flat, avoid further tire and
wheel damage by driving slowly to a level
place. Turn on the hazard warning flashers.
SeeHazard Warning Flashers 0109.
See If a Tire Goes Flat 0254 for other
important safety warnings.
1. Remove the compressor from its storage location. See Storing the Tire Sealant and
Compressor Kit 0260.
2. Remove the air only hose (10) and the power plug (9) from the bottom of the
compressor.
3. Place the compressor on the ground near the flat tire. Make sure the tire valve stem is
positioned close to the ground so the
hose will reach it.
4. Remove the valve stem cap from the flat tire by turning it counterclockwise.
5. Attach the air only hose (10) to the tire valve stem by turning it clockwise until
tight.
6. Plug the power plug (9) into the accessory power outlet in the vehicle.
Unplug all items from other accessory
power outlets. See Power Outlets076.
If the vehicle has an accessory power
outlet, do not use the cigarette lighter.
If the vehicle only has a cigarette lighter,
use the cigarette lighter.
Do not pinch the power plug cord in the
door or window.
7. Start the vehicle. The vehicle must be running while using the air compressor.
8. Press the on/off button (5) to turn the tire sealant and compressor kit on.
The compressor will inflate the tire with
air only.
9. Inflate the tire to the recommended inflation pressure using the pressure
gauge (8). The recommended inflation
Page 271 of 316
Chevrolet BOLT EV Owner Manual (GMNA-Localizing-U.S./Canada-
15082216) - 2022 - CRC - 6/25/21
270 Vehicle Care
Visually check constant velocity joint boots
and axle seals for leaks.
Body Component Lubrication
Lubricate all key lock cylinders, hood hinges,
liftgate hinges, steel charge port door, and
power assist step hinges, unless the
components are plastic. Applying silicone
grease on weatherstrips with a clean cloth
will make them last longer, seal better, and
not stick or squeak.
Underbody Maintenance
At least twice a year, spring and fall, use
plain water to flush any corrosive materials
from the underbody. Take care to
thoroughly clean any areas where mud and
other debris can collect.
Sheet Metal Damage
If the vehicle is damaged and requires sheet
metal repair or replacement, make sure the
body repair shop applies anti-corrosion
material to parts repaired or replaced to
restore corrosion protection.
Original manufacturer replacement parts will
provide the corrosion protection while
maintaining the vehicle warranty.
Finish Damage
Quickly repair minor chips and scratches
with touch-up materials available from your
dealer to avoid corrosion. Larger areas of
finish damage can be corrected in your
dealer's body and paint shop.
Chemical Paint Spotting
Airborne pollutants can fall upon and attack
painted vehicle surfaces causing blotchy,
ring-shaped discolorations, and small,
irregular dark spots etched into the paint
surface. See“Finish Care” previously in this
section.
Interior Care
To prevent dirt particle abrasions, regularly
clean the vehicle's interior. Before using
cleaners, read and follow all safety
instructions on the label. While cleaning the
interior, open the doors and windows to get
proper ventilation. Newspapers or dark
garments can transfer color to the vehicle’s
interior.
Caution
Immediately remove cleaners, hand
lotions, sunscreen, and insect repellent
from all interior surfaces or permanent
damage may result.
Caution
Use cleaners specifically designed for the
surfaces being cleaned to prevent
permanent damage to the vehicle. Apply
all cleaners directly to a cleaning cloth.
Do not spray cleaners on any switches or
controls.
When using liquid soap cleaners, follow the
directions on the specific cleaner or soap
solution for dilution instructions.
Caution
To prevent damage:
.Never use a razor or any other sharp
object to remove soil from any interior
surface
.Never use a brush with stiff bristles.(Continued)