2022 CHEVROLET BOLT EV horn
[x] Cancel search: hornPage 98 of 316

Chevrolet BOLT EV Owner Manual (GMNA-Localizing-U.S./Canada-
15082216) - 2022 - CRC - 6/25/21
Instruments and Controls 97
changed. See“Weekday or Weekend
Schedule Editing” section below for
additional steps to set the Summer/
Winter schedule.
Weekday or Weekend Schedule Editing
To edit the weekday or weekend schedule: 1. From the Utility Rate Charging screen, touch Weekday Schedule or Weekend
Schedule.
2. Touch Add A Rate Period or Subtract A Rate Period.
.Weekdays are Monday through
Friday and use the same rate
schedule.
.Weekends are Saturday and Sunday
and use the same rate schedule.
Both weekday and weekend schedules must
be set. The rate schedule only applies for a
24-hour period, starting at 12:00 am and
ending at 12:00 am. There can be five rate
changes for each day; not all must be used.
The finish times must be consecutive. If a
finish time does not follow a start time, this
error message displays: “An invalid entry
was found in the data entered. Please
re-enter data.”
Energy Summary Pop-Up
When this function is turned on, the Energy
Summary Pop-Up will provide a summary of
energy usage when the vehicle is turned off.
Select On or Off.
Charge Status Feedback
When this function is turned on, the vehicle
will provide audible feedback of the charge
status.
1 beep : Immediate charging
2 beeps : Delayed charging
3 beeps : Charge port door is open
4 beeps : Desired time cannot be met
Select On or Off.
Charge Cord Theft Alert
When this function is turned on and the
vehicle is off and locked, the horn will sound
if the charge cord is removed.
Select On or Off.
Charge Power Loss Alert
When this function is turned on and the
vehicle is charging, the horn will sound if
power is lost. Select On or Off.
Charging Interrupted or Overridden
Pop-Up
The Charging Interrupted or Overridden
message will appear if there was an
unintended loss of AC power during the plug
in charge event. For example, there was a
power outage or the charge cord was
unplugged from the wall.
See
Instrument Cluster 079.
Programmable Charging Disabled
When the Programmable Charging system is
disabled, the main charging screen will
display “- -:- -”for the Charge Complete
Time. The Programmable Charging system
will be disabled if the Charge Complete Time
cannot be confidently estimated. If the
Programmable Charging system is
consistently disabled, see your dealer.
A message displays if the vehicle is not able
to charge.
Energy Information
To view Energy Detail, Range Impacts, and
Efficiency History, touch Energy on the
infotainment display, and then the desired
screen button on the left side of the screen.
Page 100 of 316

Chevrolet BOLT EV Owner Manual (GMNA-Localizing-U.S./Canada-
15082216) - 2022 - CRC - 6/25/21
Instruments and Controls 99
Charging Options
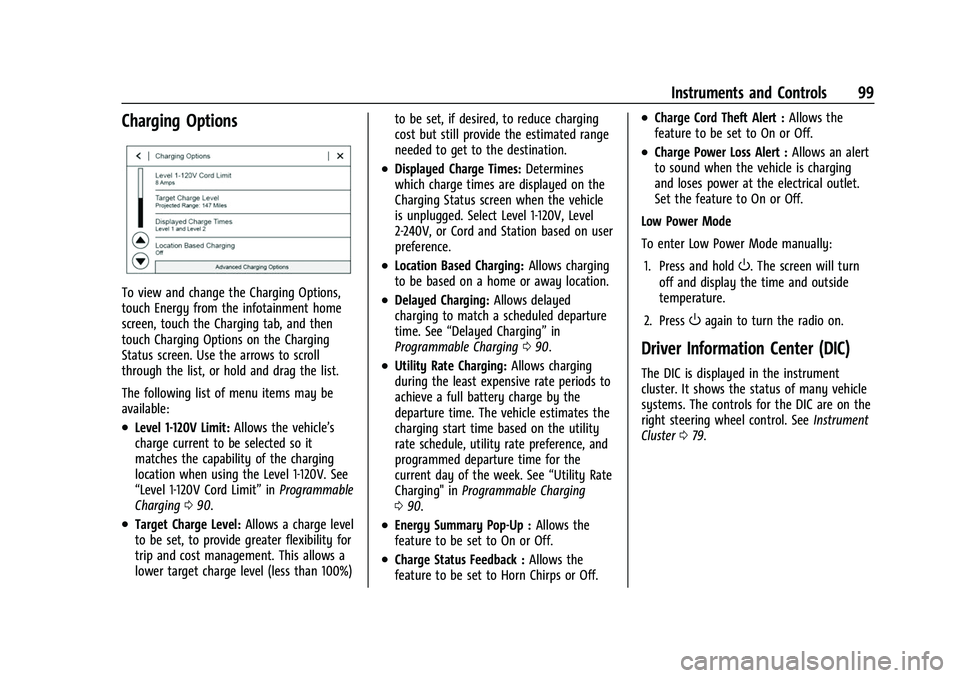
To view and change the Charging Options,
touch Energy from the infotainment home
screen, touch the Charging tab, and then
touch Charging Options on the Charging
Status screen. Use the arrows to scroll
through the list, or hold and drag the list.
The following list of menu items may be
available:
.Level 1-120V Limit:Allows the vehicle’s
charge current to be selected so it
matches the capability of the charging
location when using the Level 1-120V. See
“Level 1-120V Cord Limit” inProgrammable
Charging 090.
.Target Charge Level: Allows a charge level
to be set, to provide greater flexibility for
trip and cost management. This allows a
lower target charge level (less than 100%) to be set, if desired, to reduce charging
cost but still provide the estimated range
needed to get to the destination.
.Displayed Charge Times:
Determines
which charge times are displayed on the
Charging Status screen when the vehicle
is unplugged. Select Level 1-120V, Level
2-240V, or Cord and Station based on user
preference.
.Location Based Charging: Allows charging
to be based on a home or away location.
.Delayed Charging: Allows delayed
charging to match a scheduled departure
time. See “Delayed Charging” in
Programmable Charging 090.
.Utility Rate Charging: Allows charging
during the least expensive rate periods to
achieve a full battery charge by the
departure time. The vehicle estimates the
charging start time based on the utility
rate schedule, utility rate preference, and
programmed departure time for the
current day of the week. See “Utility Rate
Charging" in Programmable Charging
0 90.
.Energy Summary Pop-Up : Allows the
feature to be set to On or Off.
.Charge Status Feedback : Allows the
feature to be set to Horn Chirps or Off.
.Charge Cord Theft Alert : Allows the
feature to be set to On or Off.
.Charge Power Loss Alert : Allows an alert
to sound when the vehicle is charging
and loses power at the electrical outlet.
Set the feature to On or Off.
Low Power Mode
To enter Low Power Mode manually:
1. Press and hold
O. The screen will turn
off and display the time and outside
temperature.
2. Press
Oagain to turn the radio on.
Driver Information Center (DIC)
The DIC is displayed in the instrument
cluster. It shows the status of many vehicle
systems. The controls for the DIC are on the
right steering wheel control. See Instrument
Cluster 079.
Page 105 of 316

Chevrolet BOLT EV Owner Manual (GMNA-Localizing-U.S./Canada-
15082216) - 2022 - CRC - 6/25/21
104 Instruments and Controls
Open Door Anti Lock Out
When on, this feature will keep the driver
door from locking when the door is open.
If Off is selected, the Delayed Door Lock
menu will be available.
Touch Off or On.
Auto Door Unlock
This allows selection of which of the doors
will automatically unlock when the vehicle is
shifted into P (Park).
Touch Off, All Doors, or Driver Door.
Delayed Door Lock
When on, this feature will delay the locking
of the doors. To override the delay, press
the power door lock switch on the door.
Touch Off or On.
Remote Lock, Unlock, and Start
Touch and the following may display:
.Remote Unlock Light Feedback
.Remote Lock Feedback
.Remote Door Unlock
.Remote Start Auto Heat Seats
.Remote Window Operation
.Passive Door Unlock
.Passive Door Lock
.Remote Left in Vehicle Alert
Remote Unlock Light Feedback
When on, the exterior lamps will flash when
unlocking the vehicle with the RKE
transmitter.
Touch Off or Flash Lights.
Remote Lock Feedback
This allows selection of what type of
feedback is given when locking the vehicle
with the RKE transmitter.
Touch Off, Lights and Horn, Lights Only,
or Horn Only.
Remote Door Unlock
This allows selection of which doors will
unlock when pressing
Kon the RKE
transmitter.
Touch All Doors or Driver Door.
Remote Start Auto Heat Seats
If equipped and turned on, this feature will
turn on the heated seats when using remote
start on cold days. See Heated Front Seats
0 29 and
Remote Start 013.
Touch Off or On. Remote Window Operation
If equipped, this feature enables remote
operation of the windows with the remote
key. See
Remote Keyless Entry (RKE) System
Operation 07.
Touch Off or On.
Passive Door Unlock
This allows the selection of what doors will
unlock when using the button on the driver
door to unlock the vehicle.
Touch All Doors or Driver Door Only.
Passive Door Lock
This allows passive locking to be turned on
or off and selects feedback. See Remote
Keyless Entry (RKE) System Operation 07.
Touch Off, On with Horn Chirp, or On.
Remote Left in Vehicle Alert
This feature sounds an alert when the RKE
transmitter is left in the vehicle. This menu
also enables the Remote No Longer In
Vehicle Alert.
Touch Off or On.
Teen Driver
See Teen Driver 0140.
Page 208 of 316

Chevrolet BOLT EV Owner Manual (GMNA-Localizing-U.S./Canada-
15082216) - 2022 - CRC - 6/25/21
Driving and Operating 207
Charging Status IndicatorSoundAction/Reason
None (upon plug-in) None Check charge cord connection.
None (after Green or Yellow
CSI observed) None
Check charge cord connection. If connection is good,
this may be due to a power failure or a total utility
interruption, and charging will begin later. This may
also occur if the vehicle has detected a high voltage
charging system fault. See Utility Interruption of
Charging 0214 or
Service Vehicle Soon Light 085.
None Repeated audible chirps
To disable this feature, see “Charge Power Loss Alert”
under Vehicle Personalization 0102.
To stop this alert, do one of the following:
.Unplug the charge cord.
.PressKon the RKE transmitter.
.Press and hold7on the RKE transmitter, then
press again to stop the panic alarm.
.Press the horn pad. Electricity was interrupted before charging was
complete. Repeated chirps will stop if power is
restored within 90 seconds.
None Three audible chirps Charge port door is open.
Page 236 of 316

Chevrolet BOLT EV Owner Manual (GMNA-Localizing-U.S./Canada-
15082216) - 2022 - CRC - 6/25/21
Vehicle Care 235
A fuse puller is in the underhood
compartment fuse block.
The vehicle may not be equipped with all of
the fuses, relays, and features shown.Fuses Usage
1 –
2 Power Window Rear
3 Cargo Lamp
4 Rechargeable Energy
Storage System 1
5 Power Seat Driver
7 –
8 –
9 –
10 –
11 Horn
12 –
13 Front Wiper Motor Driver
15 Front Wiper Motor
Co-driver
16 Electronic Brake Control
Module Supply Electronics
17 Rear Wiper Fuses
Usage
18 Liftgate
19 Seat Module Front
20 Washer 22 Linear Power Module
23 Electronic Brake Control
Module Supply Motor
24 Power Seat Lumbar
26 Transmission Range Control
Module
27 Aeroshutter
28 Auxiliary Oil Pump
29 Electric Brake Boost Motor
Source
30 Front Power Windows
31 In-panel Bussed Electrical
Center
32 Rear Window Defogger
33 Heated Exterior Rearview
Mirror
34 Pedestrian Friendly Alert
Function
35 – Fuses
Usage
36 –
37 Current Sensor
38 –/Humidity Sensor
39 –
40 Electric Brake Boost (ECU)
41 Power Line Communication
Module
42 Infant Only Supression
43 Window Switch
44 Rechargeable Energy
Storage System
45 Vehicle Integration Control
Module
46 Shifter Interface Board 47 Humidity Sensor
48 Shifter Interface Board
49 Interior Rearview Mirror 50 –
51 Electric Brake Boost
52 –
54 A/C Control Module
Page 248 of 316

Chevrolet BOLT EV Owner Manual (GMNA-Localizing-U.S./Canada-
15082216) - 2022 - CRC - 6/25/21
Vehicle Care 247
If the TPMS is not functioning properly it
cannot detect or signal a low tire condition.
See your dealer for service if the TPMS
malfunction light and DIC message come on
and stay on.
Tire Fill Alert (If Equipped)
This feature provides visual and audible
alerts outside the vehicle to help when
inflating an underinflated tire to the
recommended cold tire pressure.
When the low tire pressure warning light
comes on:1. Park the vehicle in a safe, level place.
2. Set the parking brake firmly.
3. Place the vehicle in P (Park).
4. Add air to the tire that is underinflated. The turn signal lamp will flash.
When the recommended pressure is
reached, the horn sounds once and the
turn signal lamp will stop flashing and
briefly turn solid.
Repeat these steps for all underinflated tires
that have illuminated the low tire pressure
warning light.
{Warning
Overinflating a tire could cause the tire
to rupture and you or others could be
injured. Do not exceed the maximum
pressure listed on the tire sidewall. See
Tire Sidewall Labeling 0240 and
Vehicle Load Limits 0162.
If the tire is overinflated by more than
35 kPa (5 psi), the horn will sound multiple
times and the turn signal lamp will continue
to flash for several seconds after filling
stops. To release and correct the pressure,
while the turn signal lamp is still flashing,
briefly press the center of the valve stem.
When the recommended pressure is reached,
the horn sounds once.
If the turn signal lamp does not flash within
15 seconds after starting to inflate the tire,
the tire fill alert has not been activated or is
not working.
If the hazard warning flashers are on, the
tire fill alert visual feedback will not work
properly. The TPMS will not activate the tire fill alert
properly under the following conditions:.There is interference from an external
device or transmitter.
.The air pressure from the inflation device
is not sufficient to inflate the tire.
.There is a malfunction in the TPMS.
.There is a malfunction in the horn or turn
signal lamps.
.The identification code of the TPMS
sensor is not registered to the system.
.The battery of the TPMS sensor is low.
If the tire fill alert does not operate due to
TPMS interference, move the vehicle about
1 m (3 ft) back or forward and try again.
If the tire fill alert feature is not working,
use a tire pressure gauge.
TPMS Sensor Matching Process
Each TPMS sensor has a unique
identification code. The identification code
needs to be matched to a new tire/wheel
position after rotating the vehicle’s tires or
replacing one or more of the TPMS sensors.
The TPMS sensor matching process should
also be performed after replacing a spare
tire with a road tire containing the TPMS
sensor. The malfunction light and the DIC
message should go off at the next ignition
Page 249 of 316

Chevrolet BOLT EV Owner Manual (GMNA-Localizing-U.S./Canada-
15082216) - 2022 - CRC - 6/25/21
248 Vehicle Care
cycle using POWERO. The sensors are
matched to the tire/wheel positions, using a
TPMS relearn tool, in the following order:
driver side front tire, passenger side front
tire, passenger side rear tire, and driver side
rear. See your dealer for service or to
purchase a relearn tool. A TPMS relearn tool
can also be purchased. See Tire Pressure
Monitor Sensor Activation Tool at
www.gmtoolsandequipment.com or call
1-800-GM TOOLS (1-800-468-6657).
There are two minutes to match the first
tire/wheel position, and five minutes overall
to match all four tire/wheel positions. If it
takes longer, the matching process stops
and must be restarted.
The TPMS sensor matching process is:
1. Set the parking brake.
2. Press POWER
Oto start the vehicle. See
Power Button 0165.
3. Make sure the Tire Pressure info page option is turned on. The info pages on
the DIC can be turned on and off
through the Options menu. See Driver
Information Center (DIC) 099.
4. Use the DIC controls on the right side of the steering wheel to scroll to the Tire
Pressure screen under the DIC info page. 5. Press and hold the thumbwheel in the
center of the DIC controls.
A message requesting acceptance of the
process may display.
The horn sounds twice to signal the
receiver is in relearn mode and the TIRE
LEARNING ACTIVE message displays on
the DIC screen.
6. Start with the driver side front tire.
7. Place the relearn tool against the tire sidewall, near the valve stem. Then press
the button to activate the TPMS sensor.
A horn chirp confirms that the sensor
identification code has been matched to
this tire and wheel position.
8. Proceed to the passenger side front tire, and repeat the procedure in Step 7.
9. Proceed to the passenger side rear tire, and repeat the procedure in Step 7.
10. Proceed to the driver side rear tire, and repeat the procedure in Step 7. The horn
sounds two times to indicate the sensor
identification code has been matched to
the driver side rear tire, and the TPMS
sensor matching process is no longer
active. The TIRE LEARNING ACTIVE
message on the DIC display screen
goes off. 11. Turn the vehicle off.
12. Set all four tires to the recommended air
pressure level as indicated on the Tire
and Loading Information label.
Tire Inspection
We recommend that the tires, including
the spare tire, if the vehicle has one, be
inspected for signs of wear or damage
at least once a month.
Replace the tire if:
.The indicators at three or more
places around the tire can be seen.
.There is cord or fabric showing
through the tire's rubber.
.The tread or sidewall is cracked, cut,
or snagged deep enough to show
cord or fabric.
.The tire has a bump, bulge, or split.
.The tire has a puncture, cut, or other
damage that cannot be repaired well
because of the size or location of the
damage.
Page 304 of 316

Chevrolet BOLT EV Owner Manual (GMNA-Localizing-U.S./Canada-
15082216) - 2022 - CRC - 6/25/21
Connected Services 303
Ensuring Security
.Change the default passwords for the
Wi-Fi hotspot and myChevrolet mobile
application. Make these passwords
different from each other and use a
combination of letters and numbers to
increase the security.
.Change the default name of the SSID
(Service Set Identifier). This is your
network’s name that is visible to other
wireless devices. Choose a unique name
and avoid family names or vehicle
descriptions.
Wi-Fi Hotspot (If Equipped)
The vehicle may have a built-in Wi-Fi
hotspot that provides access to the Internet
and web content at 4G LTE speed. Up to
seven mobile devices can be connected.
A data plan is required. Use the in-vehicle
controls only when it is safe to do so. 1. To retrieve Wi-Fi hotspot information, press
=to open the OnStar app on the
infotainment display, then select Wi-Fi
Hotspot. On some vehicles, touch Wi-Fi
or Wi-Fi Settings on the screen.
2. The Wi-Fi settings will display the Wi-Fi hotspot name (SSID), password, and on
some vehicles, the connection type (no Internet connection, 3G, 4G, 4G LTE), and
signal quality (poor, good, excellent). The
LTE icon shows connection to Wi-Fi. It is
possible that the icon may not illuminate
even though the vehicle has an active
connection.
3. To change the SSID or password, press
Qor call 1-888-4ONSTAR to connect
with an Advisor. On some vehicles, the
SSID and password can be changed in
the Wi-Fi Hotspot menu.
After initial set-up, your vehicle’s Wi-Fi
hotspot will connect automatically to your
mobile devices. Manage data usage by
turning Wi-Fi on or off on your mobile
device, using the myChevrolet mobile app,
or by contacting an OnStar Advisor. On
some vehicles, Wi-Fi can also be managed
from the Wi-Fi Hotspot menu.
MyChevrolet Mobile App (If Available)
Download the myChevrolet mobile app to
compatible Apple and Android smartphones.
Chevrolet users can access the following
services from a smartphone:
.Remotely start/stop the vehicle,
if factory-equipped.
.Lock/unlock doors, if equipped with
automatic locks.
.Activate the horn and lamps.
.Check the vehicle’s energy level, range or
tire pressure, if factory-equipped with the
Tire Pressure Monitor System.
.Send destinations to the vehicle.
.Locate the vehicle on a map (U.S.
market only).
.Turn the vehicle's Wi-Fi hotspot on/off,
manage settings, and monitor data
consumption, if equipped.
.Locate a dealer and schedule service.
.Request Roadside Assistance.
.Set a parking reminder with pin drop,
take a photo, make a note, and set a
timer.
.Connect with Chevrolet on social media.
Features are subject to change. For
myChevrolet mobile app information and
compatibility, see my.chevrolet.com.
An active OnStar or connected service plan
may be required. A compatible device,
factory-installed remote start, and power
locks are required. Data rates apply. See
www.onstar.com for details and system
limitations.