2022 CHEVROLET BOLT EV ECO mode
[x] Cancel search: ECO modePage 61 of 316

Chevrolet BOLT EV Owner Manual (GMNA-Localizing-U.S./Canada-
15082216) - 2022 - CRC - 6/25/21
60 Seats and Restraints
Warning (Continued)
retractor, but it cannot do this if it is
wrapped around a child’s neck. If the
shoulder belt is locked and tightened
around a child’s neck, the only way to
loosen the belt is to cut it.
Buckle any unused seat belts behind the
child restraint so children cannot reach
them. Pull the shoulder belt all the way
out of the retractor to set the lock, and
tighten the belt behind the child restraint
after the child restraint has been
installed.
Caution
Do not let the LATCH attachments rub
against the vehicle’s seat belts. This may
damage these parts. If necessary, move
buckled seat belts to avoid rubbing the
LATCH attachments.
Do not fold the rear seatback when the
seat is occupied. Do not fold the empty
rear seat with a seat belt buckled. This
(Continued)
Caution (Continued)
could damage the seat belt or the seat.
Unbuckle and return the seat belt to its
stowed position, before folding the seat.
If you need to secure more than one child
restraint in the rear seat, see Where to Put
the Restraint 054 for additional
information.
Rear Seat Delete Model
1. For models without a rear seat, forward-facing child restraints should
only be installed in the right front
seating position with the seat belt and a
top tether. See Securing Child Restraints
(With the Seat Belt in the Rear Seat)
0 64 or
Securing Child Restraints (With the Seat
Belt in the Front Seat) 066.
If the child restraint manufacturer
recommends that the top tether be
attached, attach and tighten the top
tether to the top tether anchor, if your
vehicle has one. Refer to the child
restraint instructions and the following
steps:
1.1. Find the top tether anchor. 1.2. Route, attach, and tighten the top
tether according to your child
restraint instructions and the
following instructions:
If the position you are using has an
adjustable head restraint and you
are using a dual tether, route the
tether around the head restraint.
If the position you are using has an
adjustable head restraint and you
are using a single tether, raise the
Page 62 of 316

Chevrolet BOLT EV Owner Manual (GMNA-Localizing-U.S./Canada-
15082216) - 2022 - CRC - 6/25/21
Seats and Restraints 61
head restraint and route the tether
under the head restraint and in
between the head restraint posts.
2. Secure the child restraint in the right front seating position with the vehicle
belts. See Securing Child Restraints (With
the Seat Belt in the Rear Seat) 064 or
Securing Child Restraints (With the Seat
Belt in the Front Seat) 066.
3. Before placing a child in the child restraint, make sure it is securely held in
place. To check, grasp the child restraint
at the belt path and attempt to move it
side to side and back and forth. There
should be no more than 2.5 cm (1 in) of
movement for proper installation.
Sedan Models 1. Attach and tighten the lower attachments to the lower anchors. If the
child restraint does not have lower
attachments or the desired seating
position does not have lower anchors,
secure the child restraint with the top
tether and the seat belt. Refer to the
child restraint manufacturer instructions
and the instructions in this manual.
1.1. Find the lower anchors for the desired seating position. 1.2. Put the child restraint on the seat.
For rear outboard seating positions,
if the head restraint interferes with
the proper installation of the child
restraint, the head restraint may be
removed. See “Head Restraint
Removal and Reinstallation” at the
end of this section.
When installing a rear-facing child
restraint, it may be necessary to
move the front seat forward to
properly install the child restraint
per the child restraint manufacturer
instructions.
1.3. Attach and tighten the lower attachments on the child restraint
to the lower anchors.
2. If the child restraint manufacturer recommends that the top tether be
attached, attach and tighten the top
tether to the top tether anchor,
if equipped. Refer to the child restraint
instructions and the following steps:
2.1. Find the top tether anchor.
2.2. Remove the cargo cover before installing the top tether. Place the
cargo cover in its original location
after installing your child restraint
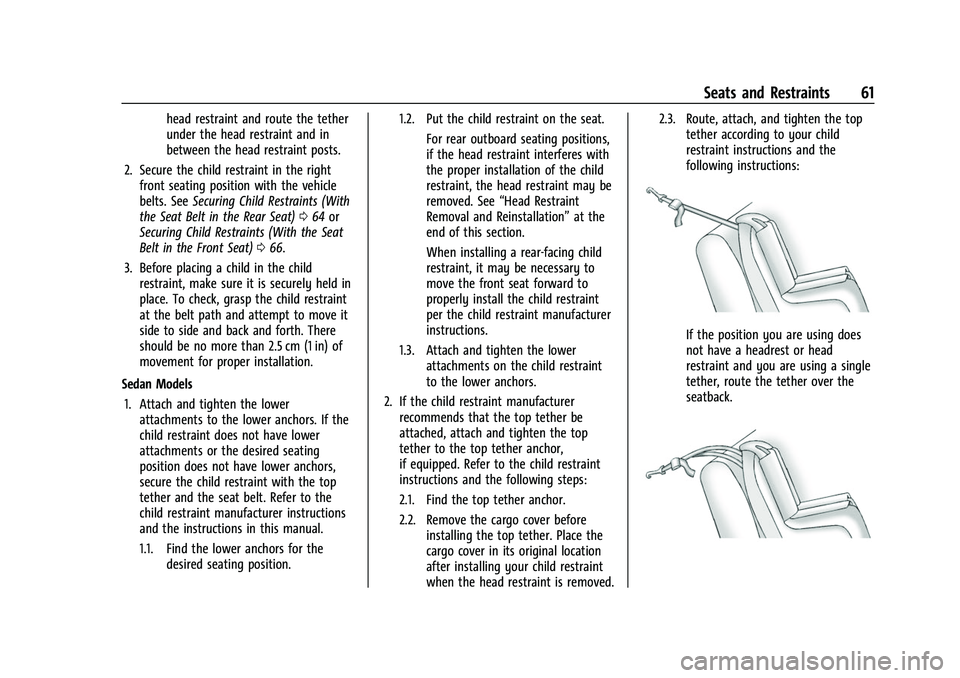
when the head restraint is removed. 2.3. Route, attach, and tighten the top
tether according to your child
restraint instructions and the
following instructions:
If the position you are using does
not have a headrest or head
restraint and you are using a single
tether, route the tether over the
seatback.
Page 80 of 316

Chevrolet BOLT EV Owner Manual (GMNA-Localizing-U.S./Canada-
15082216) - 2022 - CRC - 6/25/21
Instruments and Controls 79
Warning Lights, Gauges, and
Indicators
Warning lights and gauges can signal that
something is wrong before it becomes
serious enough to cause an expensive repair
or replacement. Paying attention to the
warning lights and gauges could prevent
injury.
Some warning lights come on briefly when
the propulsion system is started to indicate
they are working. When one of the warning
lights comes on and stays on while driving,
or when one of the gauges shows there
may be a problem, check the section that
explains what to do. Waiting to do repairs
can be costly and even dangerous.
Instrument Cluster
The instrument cluster displays a preview of
information that includes electric range,
charging, odometer, and battery status. This
happens upon entry when the driver door is
opened, before starting the vehicle. This
preview will dismiss after starting the
vehicle or soon after closing the driver door.
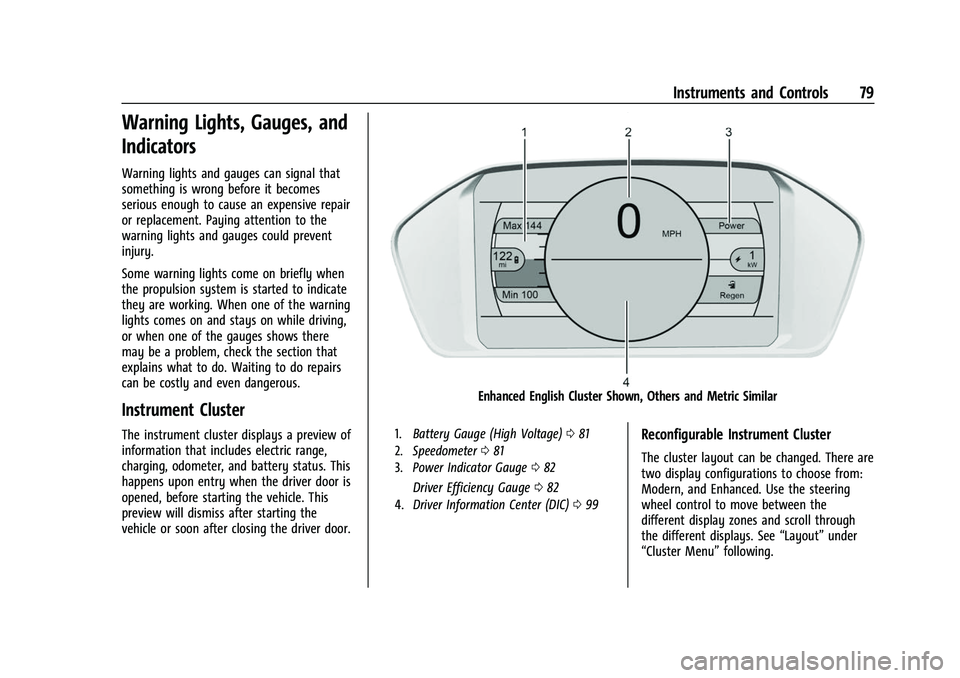
Enhanced English Cluster Shown, Others and Metric Similar
1.Battery Gauge (High Voltage) 081
2. Speedometer 081
3. Power Indicator Gauge 082
Driver Efficiency Gauge 082
4. Driver Information Center (DIC) 099
Reconfigurable Instrument Cluster
The cluster layout can be changed. There are
two display configurations to choose from:
Modern, and Enhanced. Use the steering
wheel control to move between the
different display zones and scroll through
the different displays. See “Layout”under
“Cluster Menu” following.
Page 94 of 316

Chevrolet BOLT EV Owner Manual (GMNA-Localizing-U.S./Canada-
15082216) - 2022 - CRC - 6/25/21
Instruments and Controls 93
If the Target Charge Level is higher than
80%, fast charging on the instrument cluster
will show an 80% point, a shaded line up to
the Target Charge Level, a solid line for
current charge level, and the time to
complete 80%.
If the Target Charge Level is less than 80%,
fast charging on the instrument cluster will
show a shaded line up to the Target Charge
Level and the time to complete.
Target Charge Level defaults to 100% if the
12 volt battery becomes discharged.
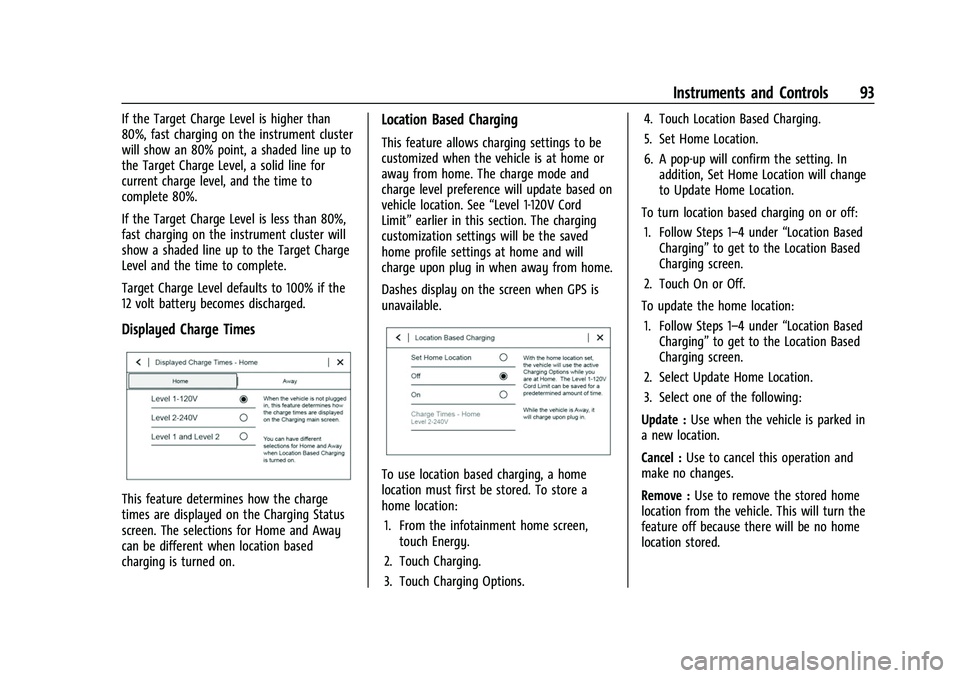
Displayed Charge Times
This feature determines how the charge
times are displayed on the Charging Status
screen. The selections for Home and Away
can be different when location based
charging is turned on.
Location Based Charging
This feature allows charging settings to be
customized when the vehicle is at home or
away from home. The charge mode and
charge level preference will update based on
vehicle location. See“Level 1-120V Cord
Limit” earlier in this section. The charging
customization settings will be the saved
home profile settings at home and will
charge upon plug in when away from home.
Dashes display on the screen when GPS is
unavailable.
To use location based charging, a home
location must first be stored. To store a
home location:
1. From the infotainment home screen, touch Energy.
2. Touch Charging.
3. Touch Charging Options. 4. Touch Location Based Charging.
5. Set Home Location.
6. A pop-up will confirm the setting. In
addition, Set Home Location will change
to Update Home Location.
To turn location based charging on or off: 1. Follow Steps 1–4 under “Location Based
Charging” to get to the Location Based
Charging screen.
2. Touch On or Off.
To update the home location: 1. Follow Steps 1–4 under “Location Based
Charging” to get to the Location Based
Charging screen.
2. Select Update Home Location.
3. Select one of the following:
Update : Use when the vehicle is parked in
a new location.
Cancel : Use to cancel this operation and
make no changes.
Remove : Use to remove the stored home
location from the vehicle. This will turn the
feature off because there will be no home
location stored.
Page 112 of 316

Chevrolet BOLT EV Owner Manual (GMNA-Localizing-U.S./Canada-
15082216) - 2022 - CRC - 6/25/21
Lighting 111
This feature can be changed. See“Vehicle
Locator Lights” underVehicle Personalization
0 102.
Exit Lighting
Some exterior lamps and interior lamps turn
on when the vehicle is powered off.
The exterior and interior lamps remain on
for a set amount of time, then automatically
turn off. If equipped with Keyless Access,
the exterior lamps automatically turn on
when the driver door is opened after the
vehicle is powered off.
The interior lights turn on when the vehicle
is powered off.
The exterior lamps turn off immediately by
turning the exterior lamp control off.
This feature can be changed. See Vehicle
Personalization 0102.
Battery Power Protection
This feature helps prevent the battery from
being drained if the interior courtesy lamps
or reading lamps are accidentally left on.
If any of these lamps are left on, they
automatically turn off after 10 minutes if the
ignition is off. The lamps will not come back
on again until one of the following occurs:
.The vehicle is powered on.
.The doors are closed and then re-opened.
Battery Saver
The vehicle is equipped with electrical power
management (EPM). EPM monitors and
controls the charging system. The message
BATTERY SAVER ACTIVE displays on the
Driver Information Center (DIC) when the
EPM detects the battery may be draining
too quickly, the charge state needs to be
reset, or the Auxiliary Power Module failed.
If safe to do so, when BATTERY SAVER
ACTIVE displays, manually shut off
windshield wipers, communications
equipment, climate controls, etc. to slow the
battery from draining. See Automatic
Climate Control System 0148.
If the message still displays, fully charge the
vehicle. Once fully charged, unplug the
vehicle and let the vehicle sit an additional
8.5 hours or greater without being
interrupted to allow the Body Control
Module (BCM) to reset the battery to the
required state of charge.
The following may interrupt the vehicle:
.Charging the vehicle
.Battery Maintenance Mode
.Approach Detection is activated
.The Key Fob is left in the car or left in
close proximity of the vehicle
.Pressing buttons on the Remote Keyless
Entry (RKE) transmitter
.Opening the doors or tailgate
To reduce the occurrence of this alert, GM
recommends letting the vehicle sit
uninterrupted for 8.5 hours or greater on a
weekly basis.
If after completing this process the BATTERY
SAVER ACTIVE message remains, see your
dealer for service.
Exterior Lighting Battery Saver
The exterior lamps turn off about 10 minutes
after the vehicle is turned off, if the parking
lamps or headlamps have been manually
left on. This protects against draining the
battery. To restart the 10-minute timer, turn
the exterior lamp control to the
Oposition
and then back to the
;or2position.
To keep the lamps on for more than
10 minutes, the vehicle must be powered on.
Page 114 of 316

Chevrolet BOLT EV Owner Manual (GMNA-Localizing-U.S./Canada-
15082216) - 2022 - CRC - 6/25/21
Infotainment System 113
.Set up the audio by presetting favorite
stations, setting the tone, and adjusting
the speakers.
.Set up phone numbers in advance so they
can be called easily by pressing a single
control or by using a single voice
command.
See Distracted Driving 0157.
Overview
Infotainment System
The infotainment system is controlled by
using the infotainment display, controls on
the center stack, steering wheel controls,
and voice recognition.
1.O(Power)
.Press to turn the power on.
.Press and hold to turn the
power off.
.Press to mute/unmute the system
when on.
.When the power is on and the
system is not muted, a quick
status pane may display when
O
is pressed. PressingOwill mute
the system and may trigger this
pane to show a long press is
required to actually power down
the system.
.Turn to decrease or increase the
volume.
2.{
.Press to go to the Home Page. See
“Home Page” later in this section.
.Press to exit Android Auto or Apple
CarPlay. To enter back into Android
Auto or Apple CarPlay, press and
hold. SeeApple CarPlay and
Android Auto 0132.
3.V
.Where applicable, turn to highlight
a feature. Press to activate the
highlighted feature.
Home Page
The Home Page is where vehicle application
icons are accessed. Some applications are
disabled when the vehicle is moving.
Swipe left or right across the display to
access the pages of icons.
Managing Home Page Icons 1. Touch and hold any of the Home Page icons to enter edit mode.
2. Continue holding the icon and drag it to the desired position.
3. Release your finger to drop the icon in the desired position.
4. To move an application to another page, drag the icon to the edge of the display
toward the desired page.
5. Continue dragging and dropping application icons as desired.
Page 120 of 316

Chevrolet BOLT EV Owner Manual (GMNA-Localizing-U.S./Canada-
15082216) - 2022 - CRC - 6/25/21
Infotainment System 119
Radio Data System (RDS)
If equipped, RDS features are available for
use only on FM stations that broadcast RDS
information. With RDS, the radio can:
.Group stations by Category (i.e., Program
Type) such as Rock, Jazz, Classical, etc.
.Display messages from radio stations.
This system relies on receiving specific
information from these stations and only
works when the information is available.
It is possible that a radio station could
broadcast incorrect information that causes
the radio features to work improperly. If this
happens, contact the radio station.
When information is broadcast from a RDS
station, the station name or call letters
display on the audio screen. Radio text
supporting the currently playing broadcast
may also appear.
Satellite Radio
SiriusXM Radio Service
If equipped, vehicles with a valid SiriusXM
radio subscription can receive SiriusXM
programming. SiriusXM radio has a wide variety of
programming and commercial-free music,
coast to coast, in digital-quality sound. In
the U.S., see www.siriusxm.com or call
1-888-601-6296. In Canada, see
www.siriusxm.ca or call 1-877-438-9677.
When SiriusXM is active, the channel name,
number, song title, and artist appear on the
display.
SiriusXM with 360L
SiriusXM with 360L interface has enhanced
in-vehicle listening experience for
subscribers. The experience now offers more
categories and system learned
recommendations toward discovering more
personalized content.
To use the full SiriusXM 360L program,
including streaming content and listening
recommendations, OnStar Connected Access
is required. Connected vehicle services vary
by model and require a complete working
electrical system, cell reception, and GPS
signal. An active connected plan is required.
Reference the SiriusXM user guide for use
and subscription information.
Radio Reception
Unplug electronic devices from the accessory
power outlets if there is interference or
static in the radio.
FM
FM signals only reach about 16 to 65 km (10
to 40 mi). Although the radio has a built-in
electronic circuit that automatically works to
reduce interference, some static can occur,
especially around tall buildings or hills,
causing the sound to fade in and out.
AM
The range for most AM stations is greater
than for FM, especially at night. The longer
range can cause station frequencies to
interfere with each other. Static can also
occur when things like storms and power
lines interfere with radio reception. When
this happens, try reducing the treble on the
radio.
SiriusXM Satellite Radio Service
If equipped, SiriusXM Satellite Radio Service
provides digital radio reception. Tall
buildings or hills can interfere with satellite
radio signals, causing the sound to fade in
and out. In addition, traveling or standing
Page 124 of 316

Chevrolet BOLT EV Owner Manual (GMNA-Localizing-U.S./Canada-
15082216) - 2022 - CRC - 6/25/21
Infotainment System 123
Media Playback and Mute
USB playback will be paused if the system is
muted. If the steering wheel mute control is
pressed again, playback will resume.
If the source is changed while in mute,
playback resumes and audio will unmute.
Bluetooth Audio
Music may be played from a paired
Bluetooth device. SeeBluetooth (Pairing and
Using a Phone) 0128 or
Bluetooth (Overview) 0128 for help pairing
a device.
Volume and song selection may be
controlled by using the infotainment
controls or the mobile device. If Bluetooth is
selected and no volume is present, check the
volume setting on the infotainment system.
Music can be launched by touching
Bluetooth from the recent sources list on
the left of the display or by touching the
More option and then touching the
Bluetooth device.
To play music via Bluetooth:
1. Power on the device, and pair to connect the device. 2. Once paired, touch Audio from the Home
Page, then touch Bluetooth from the
recent sources list on the left of the
display.
Bluetooth Sound Menu
See “Infotainment System Sound Menu”
under AM-FM Radio 0117.
Manage Bluetooth Devices
From the Home Page: 1. Touch Audio.
2. Touch More.
3. Touch Bluetooth.
4. Touch Devices to add or delete devices.
When touching Bluetooth, the radio may
not be able to launch the audio player on
the connected device to start playing. When
the vehicle is not moving, use the mobile
device to begin playback.
All devices launch audio differently. When
selecting Bluetooth as a source, the radio
may show as paused on the display. Press
play on the device or touch
pon the
display to begin playback. Browse functionality will be provided where
supported by the Bluetooth device. This
media content will not be part of the
MyMedia source mode.
Some smartphones support sending
Bluetooth music information to display on
the radio. When the radio receives this
information, it will check to see if any is
available and display it. For more
information about supported Bluetooth
features, see my.chevrolet.com/learn.
Voice Recognition
If equipped, voice recognition allows for
hands-free operation within the audio,
phone, and weather applications. This
feature can be started by pressing
gon the
steering wheel or touching
gon the
infotainment display.
However, not all features within these areas
are supported by voice commands.
Generally, only complex tasks that require
multiple manual interactions to complete
are supported by voice commands.
For example, tasks that take more than one
or two touches, such as a song or artist to
play from a media device, would be
supported by voice commands. Other tasks,