2022 ALFA ROMEO GIULIA headlight bulb
[x] Cancel search: headlight bulbPage 14 of 248

12
ENGINE COMPARTMENT....................... 187
Checking Levels — 2.0L Engine .......... 187
Checking Levels — 2.9L Engine .........188
Engine Oil ............................................. 188
Engine Coolant ..................................... 190
Washer Fluid For Windshield/
Headlights ............................................ 190 Brake Fluid ...........................................190
Automatic Transmission Activation
System Oil ............................................ 190 Useful Advice For Extending The Life
Of Your Battery ..................................... 190 Battery ..................................................190
Pressure Washing ................................ 191
BATTERY RECHARGING......................... 191
Important Notes ...................................191
VEHICLE MAINTENANCE ....................... 192
Engine Oil ............................................. 192
Engine Oil Filter ....................................192
Engine Air Cleaner ............................... 192
Air Conditioning System
Maintenance ........................................192 Lubricating Moving Parts Of The
Bodywork ..............................................193 Windshield Wiper .................................193
Exhaust System ...................................194
Engine Cooling System ........................ 195
Braking System ....................................196
Automatic Transmission ......................196
Replacing The Battery ......................... 197
Fuses ................................................... 197
Bulb Replacement ............................... 202
TIRES ..................................................... 206
Tire Safety Information ....................... 206
Tires — General Information .............. 212
Spare Tires — If Equipped ................... 216
Wheel And Wheel Trim Care ............... 217
Tire Types ............................................. 217
Snow Traction Devices ........................ 218
Tire Rotation Recommendations........ 219
DEPARTMENT OF TRANSPORTATION
UNIFORM TIRE QUALITY GRADES ........ 219
Treadwear ............................................ 219
Traction Grades ................................... 220
Temperature Grades ........................... 220
STORING THE VEHICLE ......................... 220
BODYWORK ............................................ 221
Protection Against Atmospheric
Agents .................................................. 221 Corrosion Warranty.............................. 221
Preserving The Bodywork.................... 222
INTERIORS.............................................. 222
Seats And Fabric Parts........................ 222
Leather Seats ...................................... 223
Plastic And Coated Parts .................... 223
Alcantara Parts — If Equipped ............ 223
Genuine Leather Surfaces —
If Equipped ........................................... 223 Carbon Fiber Parts .............................. 223
TECHNICAL SPECIFICATIONS
VEHICLE IDENTIFICATION NUMBER
(VIN) ........................................................ 224
Vehicle Identification Number (VIN)
Plate ..................................................... 224
ENGINE .................................................. 224
POWER SUPPLY ..................................... 225 TRANSMISSION ..................................... 225BRAKES.................................................. 226
SUSPENSION ......................................... 226
STEERING SYSTEM ............................... 226DIMENSIONS — 2.0L ENGINE ............... 227
DIMENSIONS — 2.9L Engine ................ 228
WEIGHTS — 2.0L ENGINE ..................... 229
WEIGHTS — 2.9L ENGINE ..................... 229
FUEL REQUIREMENTS .......................... 230
Reformulated Gasoline....................... 230
Gasoline/Oxygenate Blends ............... 230
CNG And LP Fuel System
Modifications ....................................... 230 Methylcyclopentadienyl Manganese
Tricarbonyl (MMT) In Gasoline ........... 230 Materials Added To Fuel ..................... 230
Fuel System Cautions ......................... 231
FLUID CAPACITIES ................................. 231
2.0L Engine ......................................... 231
2.9L V6 Engine .................................... 232
ENGINE FLUIDS AND LUBRICANTS ...... 233
2.0L Engine ......................................... 233
2.9L Engine ......................................... 233
CHASSIS FLUIDS AND LUBRICANTS..... 234
2.0L Engine ......................................... 234
2.9L Engine ......................................... 234
PERFORMANCE — 2.0L ENGINE........... 235 PERFORMANCE — 2.9L ENGINE........... 235
22_GA_OM_EN_USC_t.book Page 12
Page 79 of 248

77
Dusk Sensor Failure
The telltale will illuminate in the case of
failure of the automatic low beam
alignment.
Contact an authorized dealer as soon as possible.
Blind Spot Monitoring System Failure —
If Equipped
The telltale will illuminate in the event of
a Blind Spot Monitoring system failure.
Contact an authorized dealer as soon as possible.
Fuel Level Sensor Failure
The telltale will illuminate in the event of
fuel level sensor failure.
Contact an authorized dealer as soon as possible.
Exterior Lights Failure
The telltale will illuminate to indicate a
failure on the following lights: daytime
running lights (DRLs) / parking lights /
trailer turn signal indicators (if present) /
trailer lights (if present) / side lights / turn signal
indicators / rear fog light / reversing light / brake
lights / license plate lights.
The failure may be caused by a blown bulb, a
blown protection fuse, or an interruption of the
electrical connection.
Replace the bulb or the relevant fuse. Contact an
authorized dealer.
Keyless System Failure
The telltale will illuminate in the event of
keyless system failure.
Contact an authorized dealer as soon as possible.
Fuel Cut-Off System Failure
The telltale will illuminate in the event of
fuel cut-off system failure.
Contact an authorized dealer as soon as possible.
Lane Departure Warning (LDW) System
Failure — If Equipped
The telltale will illuminate in the event of
a fault in the Lane Departure Warning
system.
Contact an authorized dealer as soon as possible.
Automatic High Beam Headlights
Failure — If Equipped
The telltale will illuminate to report a
failure of the automatic high beam
headlights.
Contact an authorized dealer as soon as possible
to have the failure eliminated.
Automatic Transmission Fluid
Overheating
The telltale will illuminate in the case of
transmission overheating, after a partic -
ularly demanding use. In this case an
engine performance limitation is carried
out.
Wait for the telltale to turn off with the engine off
or idling.
Audio System Failure
The telltale will illuminate to report a
failure of the audio system.
Contact an authorized dealer as soon as possible
to have the failure eliminated.
Speed Limiter System Failure
While driving, the telltale will illuminate
to signal a Speed Limiter system failure.
Contact an authorized dealer as soon as possible
to have the failure eliminated.
Loose Fuel Filler Cap
Lights up if the fuel tank cap is open or
not properly closed.
Tighten the cap properly.
Electric Park Brake Failure
The telltale will illuminate and a
message will display to signal a failure
in the electric park brake system.
This failure may partially or completely block the
vehicle because the park brake could remain
activated even if automatically or manually
disengaged using the relevant controls. In these
circumstances, you can disengage the park brake
following the emergency disengagement
procedure
Ú
page 179.
If you are still able to drive the vehicle (park brake
is not engaged), drive to the nearest authorized
dealer and remember, when executing any
maneuvers/commands, that the electric park
brake is not operational.
22_GA_OM_EN_USC_t.book Page 77
Page 204 of 248

SERVICING AND MAINTENANCE
202
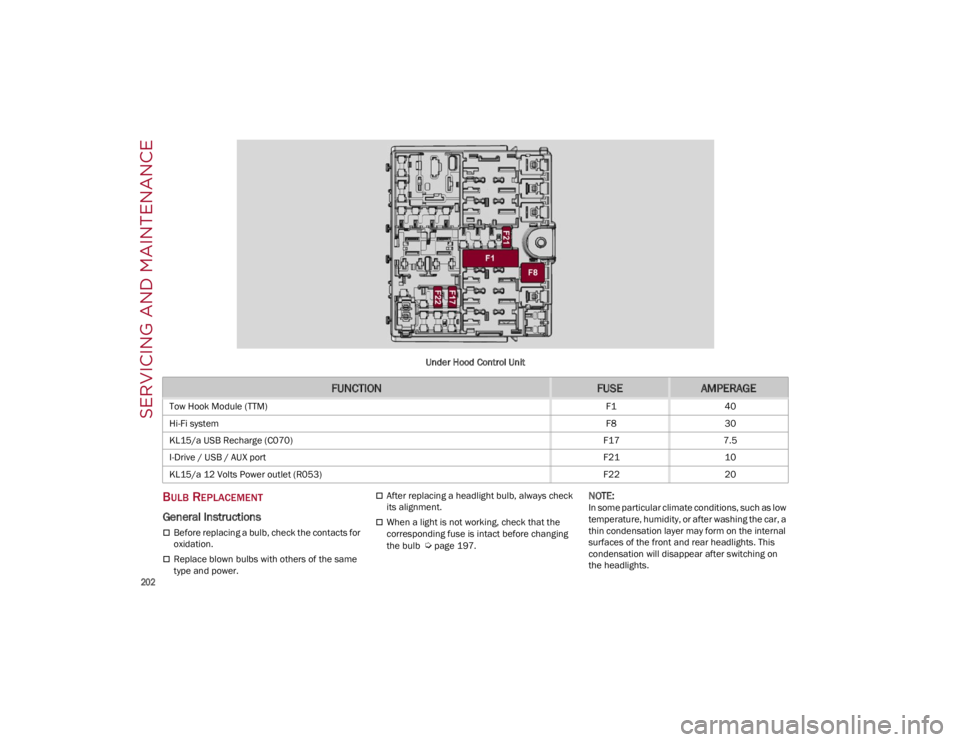
Under Hood Control Unit
BULB REPLACEMENT
General Instructions
Before replacing a bulb, check the contacts for
oxidation.
Replace blown bulbs with others of the same
type and power.
After replacing a headlight bulb, always check
its alignment.
When a light is not working, check that the
corresponding fuse is intact before changing
the bulb
Ú
page 197.
NOTE:
In some particular climate conditions, such as low
temperature, humidity, or after washing the car, a
thin condensation layer may form on the internal
surfaces of the front and rear headlights. This
condensation will disappear after switching on
the headlights.
FUNCTIONFUSEAMPERAGE
Tow Hook Module (TTM)
F140
Hi-Fi system F830
KL15/a USB Recharge (C070) F177.5
I-Drive / USB / AUX port F2110
KL15/a 12 Volts Power outlet (R053) F2220
22_GA_OM_EN_USC_t.book Page 202
Page 205 of 248

203
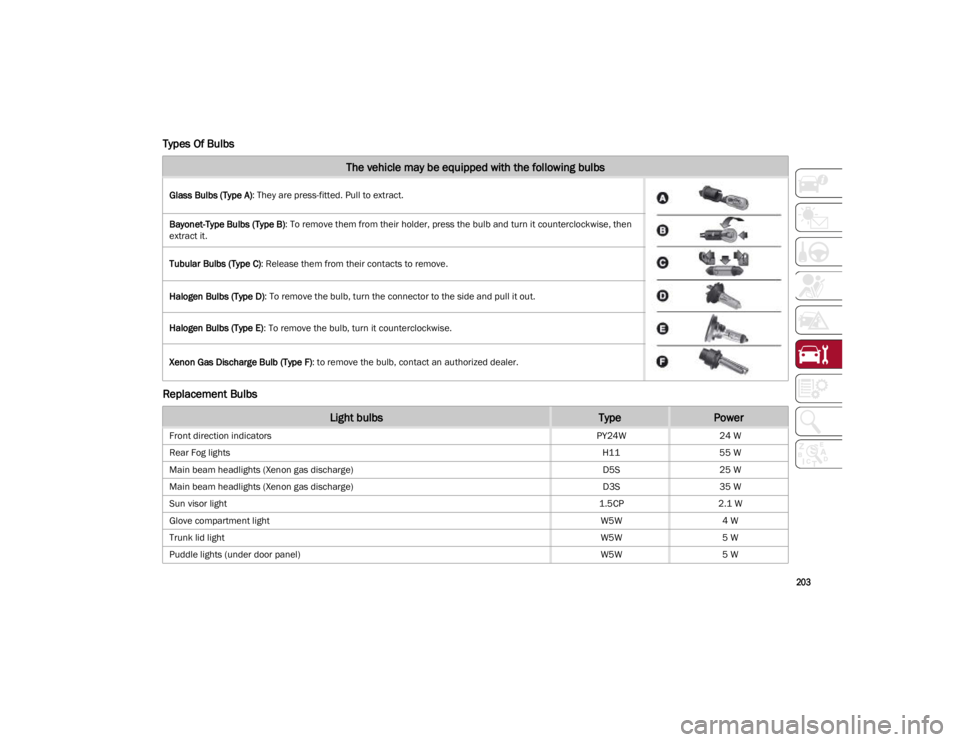
Types Of Bulbs
Replacement Bulbs
The vehicle may be equipped with the following bulbs
Glass Bulbs (Type A): They are press-fitted. Pull to extract.
Bayonet-Type Bulbs (Type B) : To remove them from their holder, press the bulb and turn it counterclockwise, then
extract it.
Tubular Bulbs (Type C) : Release them from their contacts to remove.
Halogen Bulbs (Type D) : To remove the bulb, turn the connector to the side and pull it out.
Halogen Bulbs (Type E) : To remove the bulb, turn it counterclockwise.
Xenon Gas Discharge Bulb (Type F) : to remove the bulb, contact an authorized dealer.
Light bulbsTypePower
Front direction indicators PY24W24 W
Rear Fog lights H1155 W
Main beam headlights (Xenon gas discharge) D5S25 W
Main beam headlights (Xenon gas discharge) D3S35 W
Sun visor light 1.5CP2.1 W
Glove compartment light W5W4 W
Trunk lid light W5W5 W
Puddle lights (under door panel) W5W5 W
22_GA_OM_EN_USC_t.book Page 203
Page 206 of 248

SERVICING AND MAINTENANCE
204
Replacing Exterior Bulbs
NOTE:
Only replace the bulb when the engine is off. Also
ensure that the engine is cold, to prevent the risk
of burns.
Direction Indicators
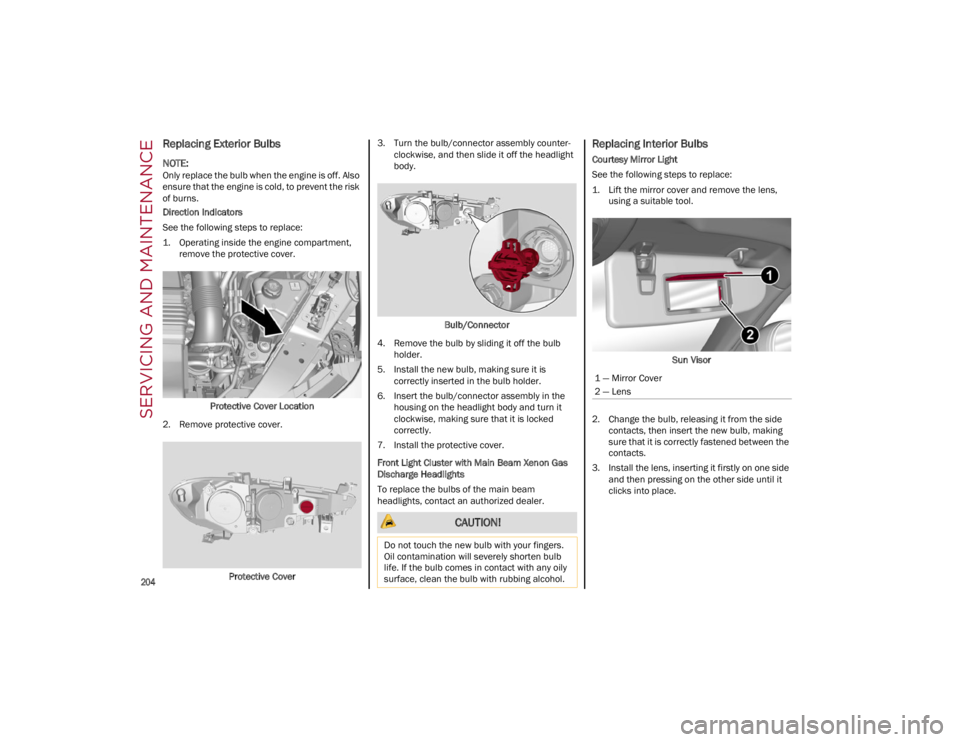
See the following steps to replace:
1. Operating inside the engine compartment,remove the protective cover.
Protective Cover Location
2. Remove protective cover.
Protective Cover 3. Turn the bulb/connector assembly counter
-
clockwise, and then slide it off the headlight
body.
Bulb/Connector
4. Remove the bulb by sliding it off the bulb holder.
5. Install the new bulb, making sure it is correctly inserted in the bulb holder.
6. Insert the bulb/connector assembly in the housing on the headlight body and turn it
clockwise, making sure that it is locked
correctly.
7. Install the protective cover.
Front Light Cluster with Main Beam Xenon Gas
Discharge Headlights
To replace the bulbs of the main beam
headlights, contact an authorized dealer.
Replacing Interior Bulbs
Courtesy Mirror Light
See the following steps to replace:
1. Lift the mirror cover and remove the lens, using a suitable tool.
Sun Visor
2. Change the bulb, releasing it from the side contacts, then insert the new bulb, making
sure that it is correctly fastened between the
contacts.
3. Install the lens, inserting it firstly on one side and then pressing on the other side until it
clicks into place.
CAUTION!
Do not touch the new bulb with your fingers.
Oil contamination will severely shorten bulb
life. If the bulb comes in contact with any oily
surface, clean the bulb with rubbing alcohol.
1 — Mirror Cover
2 — Lens
22_GA_OM_EN_USC_t.book Page 204
Page 241 of 248

239
INDEX
A
Accessories Purchased By The Owner.......... 3
Active Blind Spot Assist .............................134
Active Safety Systems ................................ 129
Active Torque Vectoring (ATV) System ......129
Adaptive Cruise Control (ACC)
(Cruise Control) ............................................ 97Off ........................................................... 101
On............................................................101
Additives, Fuel ............................................ 230
Adjust Forward.............................................. 31, 33
Rearward ........................................... 31, 33
Air Bag......................................................... 150 Air Bag Operation ...................................151Air Bag Warning Light ............................149
Driver Knee Air Bag................................ 152Enhanced Accident Response .....155, 181
Event Data Recorder (EDR) ...................181
Front Air Bag...........................................150
If Deployment Occurs ............................154
Knee Impact Bolsters ............................152
Maintaining Your Air Bag System.......... 157
Maintenance ..........................................157
Redundant Air Bag Warning Light.........150
Side Air Bags ..........................................152
Transporting Pets...................................166
Air Bag Light ......................................149, 166
Air Pressure Tires ........................................................212
Alarm Security Alarm .......................................... 24 Alfa Active Suspension (AAS) .......................94
Alfa DNA System ...........................................91
Anti-Lock Braking (ABS) System ............... 129
Anti-Lock Warning Light ...............................72
Automatic Door Locks ..................................27
Automatic Headlights ...................................43
Automatic Temperature Control (ATC) ........49
Automatic Transmission ..............................86
Auxiliary Driving Systems .......................... 132
B
Back-Up Camera ........................................ 122
Battery ..................................................74, 190 Charging System Light .............................74
Battery Recharging .................................... 191
Belts, Seat .................................................. 166
Blind Spot Monitoring ............................... 132
Bodywork (Cleaning And Maintenance) ... 221
B-Pillar Location......................................... 209
Brake System Warning Light .................................... 70, 72
Brakes ........................................................ 226 Brake Fluid Level................................... 190
Bulbs, Light ................................................ 167
C
Camera, Rear ............................................. 122
Carbon Monoxide Warning .............. 167, 168
Cargo Tie-Downs ...........................................62
Certification Label ..................................... 125
Chart, Tire Sizing........................................ 207 Check Engine Light (Malfunction
Indicator Light) ............................................. 80
Checking Levels ................................ 187, 188
Checking Your Vehicle For Safety ............. 165
Checks, Safety ........................................... 165
Child Restraint ........................................... 157
Child Restraints
Booster Seats ........................................ 159
Child Seat Installation ........................... 164
How To Stow An unused ALR SeatBelt ..................................................... 163
Infant And Child Restraints ................... 158
LATCH Positions ..................................... 160
Lower Anchors And Tethers For Children .............................................. 160
Older Children And Child Restraints ..... 159
Seating Positions ................................... 160
Using The Top Tether Anchorage.......... 165
Clean Air Gasoline ..................................... 230
Cleaning Wheels.................................................... 217
Climate Control ......................................48, 54
Compact Spare Tire ................................... 216
Contract, Service........................................ 236
Cruise Control (Speed Control) ................... 97
Customer Assistance ................................. 236
D
Daytime Running Lights .............................. 42
Deck Lid Power Release ......................................... 61
Defroster, Windshield ................................ 166
22_GA_OM_EN_USC_t.book Page 239