2022 ALFA ROMEO GIULIA ESP
[x] Cancel search: ESPPage 204 of 248

SERVICING AND MAINTENANCE
202
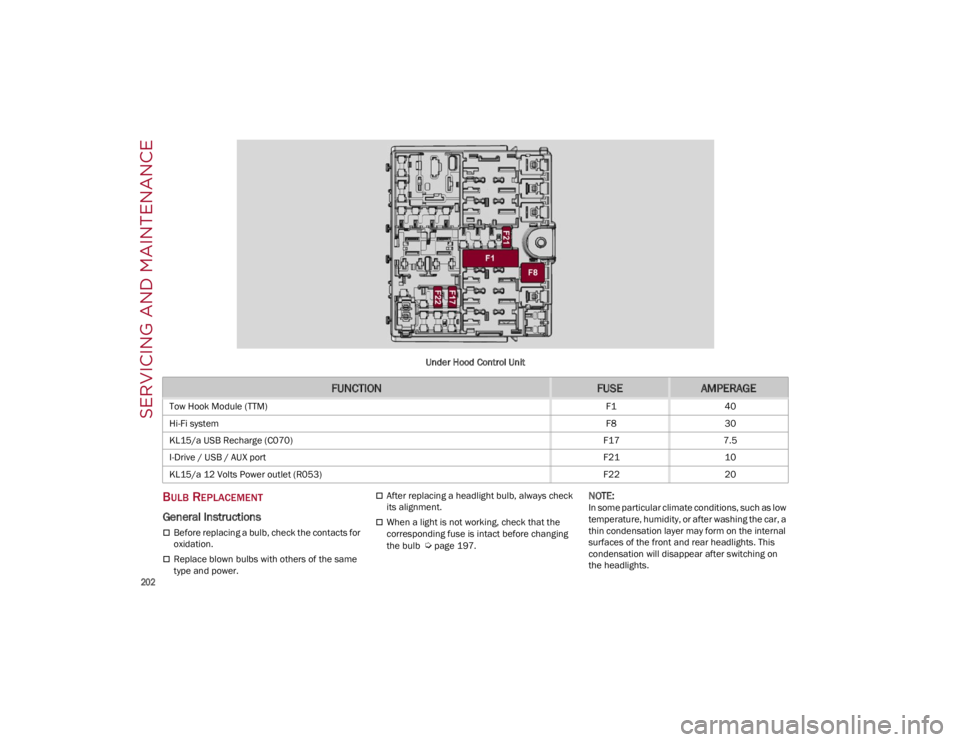
Under Hood Control Unit
BULB REPLACEMENT
General Instructions
Before replacing a bulb, check the contacts for
oxidation.
Replace blown bulbs with others of the same
type and power.
After replacing a headlight bulb, always check
its alignment.
When a light is not working, check that the
corresponding fuse is intact before changing
the bulb
Ú
page 197.
NOTE:
In some particular climate conditions, such as low
temperature, humidity, or after washing the car, a
thin condensation layer may form on the internal
surfaces of the front and rear headlights. This
condensation will disappear after switching on
the headlights.
FUNCTIONFUSEAMPERAGE
Tow Hook Module (TTM)
F140
Hi-Fi system F830
KL15/a USB Recharge (C070) F177.5
I-Drive / USB / AUX port F2110
KL15/a 12 Volts Power outlet (R053) F2220
22_GA_OM_EN_USC_t.book Page 202
Page 209 of 248

207
Tire Sizing Chart
EXAMPLE:
Example Size Designation: P215/65R15XL 95H, 215/65R15 96H, LT235/85R16C, T145/80D18 103M, 31x10.5 R15 LT
P
= Passenger car tire size based on US design standards, or
"....blank...." = Passenger car tire based on European design standards, or
LT = Light truck tire based on US design standards, or
T or S = Temporary spare tire or
31 = Overall diameter in inches (in)
215, 235, 145 = Section width in millimeters (mm)
65, 85, 80 = Aspect ratio in percent (%)
Ratio of section height to section width of tire, or
10.5 = Section width in inches (in)
R = Construction code
"R" means radial construction, or
"D" means diagonal or bias construction
15, 16, 18 = Rim diameter in inches (in)
Service Description:
95 = Load Index
A numerical code associated with the maximum load a tire can carry
H = Speed Symbol
A symbol indicating the range of speeds at which a tire can carry a load corresponding to its load index under certain operating conditions
The maximum speed corresponding to the speed symbol should only be achieved under specified operating conditions (i.e., tire pressure, vehicle
loading, road conditions, and posted speed limits)
Load Identification:
Absence of the following load identification symbols on the sidewall of the tire indicates a Standard Load (SL) tire:
XL = Extra load (or reinforced) tire, or
LL = Light load tire or
C, D, E, F, G = Load range associated with the maximum load a tire can carry at a specified pressure
22_GA_OM_EN_USC_t.book Page 207
Page 214 of 248

SERVICING AND MAINTENANCE
212
(Continued)
TIRES — GENERAL INFORMATION
Tire Pressure
Proper tire inflation pressure is essential to the
safe and satisfactory operation of your vehicle.
Four primary areas are affected by improper tire
pressure:
Safety
Fuel Economy
Tread Wear
Ride Comfort and Vehicle Stability
Safety Both underinflation and overinflation affect the
stability of the vehicle and can produce a feeling
of sluggish response or over responsiveness in
the steering.
NOTE:
Unequal tire pressures from side to side may
cause erratic and unpredictable steering
response.
Unequal tire pressure from side to side may
cause the vehicle to drift left or right.
Fuel Economy
Underinflated tires will increase tire rolling
resistance resulting in higher fuel consumption.
Tread Wear
Improper cold tire inflation pressures can cause
abnormal wear patterns and reduced tread life,
resulting in the need for earlier tire replacement.
Ride Comfort And Vehicle Stability
Proper tire inflation contributes to a comfortable
ride. Overinflation produces a jarring and
uncomfortable ride.
Tire Inflation Pressures
The proper cold tire inflation pressure is listed on
the driver's side B-pillar or rear edge of the
driver's side door.
At least once a month:
Check and adjust tire pressure with a good
quality pocket-type pressure gauge. Do not make a visual judgment when determining
proper inflation. Tires may look properly
inflated even when they are under-inflated.
Inspect tires for signs of tire wear or visible
damage.
Inflation pressures specified on the placard are
always “cold tire inflation pressure”. Cold tire
inflation pressure is defined as the tire pressure
after the vehicle has not been driven for at least
three hours, or driven less than 1 mile (1.6 km)
after sitting for a minimum of three hours. The
cold tire inflation pressure must not exceed the
maximum inflation pressure molded into the tire
sidewall.
Check tire pressures more often if subject to a
wide range of outdoor temperatures, as tire
pressures vary with temperature changes.
Tire pressures change by approximately 1 psi
(7 kPa) per 12°F (7°C) of air temperature
change. Keep this in mind when checking tire
pressure inside a garage, especially in the Winter.
Example: If garage temperature = 68°F (20°C)
and the outside temperature = 32°F (0°C) then
the cold tire inflation pressure should be
increased by 3 psi (21 kPa), which equals 1 psi
(7 kPa) for every 12°F (7°C) for this outside
temperature condition.
WARNING!
Improperly inflated tires are dangerous and
can cause collisions.
Underinflation increases tire flexing and can
result in overheating and tire failure.
Overinflation reduces a tire's ability to
cushion shock. Objects on the road and
chuckholes can cause damage that result in
tire failure.
Overinflated or underinflated tires can affect
vehicle handling and can fail suddenly,
resulting in loss of vehicle control.
Unequal tire pressures can cause steering
problems. You could lose control of your
vehicle.
Unequal tire pressures from one side of the
vehicle to the other can cause the vehicle to
drift to the right or left.
Always drive with each tire inflated to the
recommended cold tire inflation pressure.
WARNING!
CAUTION!
After inspecting or adjusting the tire pressure,
always reinstall the valve stem cap. This will
prevent moisture and dirt from entering the
valve stem, which could damage the valve
stem.
22_GA_OM_EN_USC_t.book Page 212
Page 219 of 248

217
WHEEL AND WHEEL TRIM CARE
All wheels and wheel trim, especially aluminum
and chrome plated wheels, should be cleaned
regularly using mild (neutral Ph) soap and water
to maintain their luster and to prevent corrosion.
Wash wheels with the same soap solution
recommended for the body of the vehicle and
remember to always wash when the surfaces are
not hot to the touch.
Your wheels are susceptible to deterioration
caused by salt, sodium chloride, magnesium
chloride, calcium chloride, etc., and other road
chemicals used to melt ice or control dust on dirt
roads. Use a soft cloth or sponge and mild soap to
wipe away promptly. Do not use harsh chemicals
or a stiff brush. They can damage the wheel’s
protective coating that helps keep them from
corroding and tarnishing.When cleaning extremely dirty wheels including
excessive brake dust, care must be taken in the
selection of tire and wheel cleaning chemicals
and equipment to prevent damage to the wheels.
Select a non-abrasive, non-acidic cleaner for
aluminum or chrome wheels.
NOTE:
If you intend parking or storing your vehicle for an
extended period after cleaning the wheels with
wheel cleaner, drive your vehicle and apply the
brakes to remove the water droplets from the
brake components. This activity will remove the
red rust on the brake rotors and prevent vehicle
vibration when braking.Dark Or Low Gloss Wheels
TIRE TYPES
All Season Tires — If Equipped
All Season tires provide traction for all seasons
(Spring, Summer, Autumn, and Winter). Traction
levels may vary between different all season tires.
All season tires can be identified by the M+S,
M&S, M/S or MS designation on the tire sidewall.
Use all season tires only in sets of four; failure to
do so may adversely affect the safety and
handling of your vehicle.
Summer Or Three Season Tires —
If Equipped
Summer tires provide traction in both wet and dry
conditions, and are not intended to be driven in
snow or on ice. If your vehicle is equipped with
Summer tires, be aware these tires are not
designed for Winter or cold driving conditions.
Install Winter tires on your vehicle when ambient
temperatures are less than 40°F (5°C) or if roads
are covered with ice or snow. For more
information, contact an authorized dealer.
WARNING!
Limited use spares are for emergency use
only. Installation of this limited use spare tire
affects vehicle handling. With this tire, do not
drive more than the speed listed on the limited
use spare wheel. Keep inflated to the cold tire
inflation pressures listed on your Tire and
Loading Information Placard located on the
driver’s side B-pillar or the rear edge of the
driver’s side door. Replace (or repair) the origi -
nal equipment tire at the first opportunity and
reinstall it on your vehicle. Failure to do so
could result in loss of vehicle control.
CAUTION!
Avoid products or automatic car washes that
use acidic solutions or strong alkaline
additives or harsh brushes. Many aftermarket
wheel cleaners and automatic car washes
may damage the wheel's protective finish.
Such damage is not covered by the New
Vehicle Limited Warranty. Only car wash soap
is recommended.
CAUTION!
Do not use scouring pads, steel wool, a bristle
brush, metal polishes or oven cleaner. These
products may damage the wheel's protective
finish. Such damage is not covered by the New
Vehicle Limited Warranty. Only car wash soap
is recommended.
CAUTION!
If your vehicle is equipped with these specialty
wheels, DO NOT USE wheel cleaners,
abrasives, or polishing compounds. They will
permanently damage this finish and such
damage is not covered by the New Vehicle
Limited Warranty. HAND WASH ONLY USING
MILD SOAP AND WATER WITH A SOFT CLOTH.
Used on a regular basis; this is all that is
required to maintain this finish.
22_GA_OM_EN_USC_t.book Page 217
Page 220 of 248

SERVICING AND MAINTENANCE
218
Summer tires do not contain the all season
designation or mountain/snowflake symbol on
the tire sidewall. Use Summer tires only in sets of
four; failure to do so may adversely affect the
safety and handling of your vehicle.
Snow Tires
Some areas of the country require the use of
snow tires during the Winter. Snow tires can be
identified by a “mountain/snowflake” symbol on
the tire sidewall.If you need snow tires, select tires
equivalent in size and type to the
original equipment tires. Use snow tires
only in sets of four; failure to do so may
adversely affect the safety and handling of your
vehicle.
Snow tires generally have lower speed ratings
than what was originally equipped with your
vehicle and should not be operated at sustained
speeds over 75 mph (120 km/h). For speeds
above 75 mph (120 km/h) refer to original equipment or an authorized tire dealer for
recommended safe operating speeds, loading
and cold tire inflation pressures. While studded tires improve performance on ice,
skid and traction capability on wet or dry surfaces
may be poorer than that of non-studded tires.
Some states prohibit studded tires; therefore,
local laws should be checked before using these
tire types.
SNOW TRACTION DEVICES
Use of traction devices require sufficient
tire-to-body clearance. Follow these recommen
-
dations to guard against damage.
NOTE:
Traction device must be of proper size for the
tire, as recommended by the traction device
manufacturer.
Use on rear tires only.
Due to limited clearance, the following traction
devices are recommended:
For a 255/35R19 tire, use of a snow traction
device with a maximum projection of 7 mm
beyond the tire profile is recommended.
For 225/50R17, 225/45R18 or 225/40R19
tires, use of a snow traction device with a
maximum projection of 9 mm beyond the tire
profile is recommended.
For a 265/35R19 98V tire, use of a
zero-clearance snow traction device
recommended.
It is not possible to install traction devices on
285/30R19 tires.
WARNING!
Do not use Summer tires in snow/ice
conditions. You could lose vehicle control,
resulting in severe injury or death. Driving too
fast for conditions also creates the possibility
of loss of vehicle control.
CAUTION!
To avoid damage to your vehicle or tires,
observe the following precautions:
Because of restricted traction device
clearance between tires and other
suspension components, it is important that
only traction devices in good condition are
used. Broken devices can cause serious
damage. Stop the vehicle immediately if
noise occurs that could indicate device
breakage. Remove the damaged parts of the
device before further use.
Install device as tightly as possible and then
retighten after driving about ½ mile (0.8 km).
Autosock devices do not require
retightening.
Do not exceed 30 mph (48 km/h).
Drive cautiously and avoid severe turns and
large bumps, especially with a loaded
vehicle.
Do not drive for a prolonged period on dry
pavement.
Observe the traction device manufacturer’s
instructions on the method of installation,
operating speed, and conditions for use.
Always use the suggested operating speed of
the device manufacturer’s if it is less than
30 mph (48 km/h).
Do not use traction devices on a compact
spare tire.
22_GA_OM_EN_USC_t.book Page 218
Page 222 of 248

SERVICING AND MAINTENANCE
220
TRACTION GRADES
The Traction grades, from highest to
lowest, are AA, A, B, and C. These
grades represent the tire's ability to
stop on wet pavement, as measured
under controlled conditions on
specified government test surfaces of
asphalt and concrete. A tire marked C
may have poor traction performance.
TEMPERATURE GRADES
The temperature grades are A (the
highest), B, and C, representing the
tire's resistance to the generation of
heat and its ability to dissipate heat,
when tested under controlled
conditions on a specified indoor
laboratory test wheel. Sustained high
temperature can cause the material of
the tire to degenerate and reduce tire
life, and excessive temperature can
lead to sudden tire failure. The grade C
corresponds to a level of performance,
which all passenger vehicle tires must
meet under the Federal Motor Vehicle Safety Standard No. 109. Grades B and
A represent higher levels of
performance on the laboratory test
wheel, than the minimum required by
law.
STORING THE VEHICLE
If the vehicle is left inactive for longer than a
month, the following precautions should be
observed:
Park the vehicle in an area that is covered and
dry, and well-ventilated if possible. Slightly
open the windows.
Check that the Electric Park Brake is not
activated.
Carry out the procedure: “manual trunk
opening device” procedure described in this
paragraph.
Disconnect the negative battery terminal and
check the battery charge. Repeat this check
once every three months during storage.
If the battery is not disconnected from the
electrical system, check its state of charge
every 30 days.
Clean and protect the painted parts using
protective wax.
Clean and protect the shiny metal parts using
special compounds available commercially.
Sprinkle talcum powder on the windshield
wiper rubber blades, and lift them off the
glass.
Cover the vehicle with a fabric or perforated
plastic sheet, paying particular care not to
damage the painted surface by dragging any
dust that may have accumulated on it. Do not
use compact plastic sheets, as they do not
allow humidity to evaporate from the surface
of the vehicle.
Inflate tires to +7.25 psi (+0.5 bar) above the
standard prescribed pressure and check it
periodically.
Do not drain the engine cooling system.
Any time the vehicle is left inactive for two
weeks or more, operate the air conditioning
system with engine idling for at least five
minutes, setting external air and with fan set to
maximum speed. This operation will ensure
appropriate lubrication for the system, thus
minimizing the possibility of damage to the
compressor when the system is operated
again.
NOTE:
After placing the ignition in STOP and having
closed the driver side door, wait at least one
minute before disconnecting the electrical supply
from the battery. When reconnecting the elec
-
trical supply to the battery, make sure that the
ignition is in the STOP position and the driver side
door is closed.
WARNING!
The traction grade assigned to this tire is
based on straight-ahead braking traction
tests, and does not include acceleration,
cornering, hydroplaning, or peak traction
characteristics.
WARNING!
The temperature grade for this tire is
established for a tire that is properly inflated
and not overloaded. Excessive speed,
underinflation, or excessive loading, either
separately or in combination, can cause heat
buildup and possible tire failure.
22_GA_OM_EN_USC_t.book Page 220
Page 226 of 248

224
TECHNICAL SPECIFICATIONS
For the enthusiasts, the technician, or those who
just want to know every detail of their vehicle,
useful information on understanding how your
vehicle works is contained in this chapter and
illustrated with data, tables, and graphics.
VEHICLE IDENTIFICATION
NUMBER (VIN)
The VIN is stamped on a plate on the front left
corner of the dashboard cover, which can be seen
from outside the vehicle, through the windshield.Windshield VIN Location
VEHICLE IDENTIFICATION NUMBER (VIN)
P
LATE
The plates are located on the left side A-pillar and
contain data about:
Vehicle Identification Number (VIN).
Vehicle type (USA and Canada only).
Color code.
Place of manufacturing of the vehicle (USA and
Mexico only).
Vehicle manufacturing date.
Maximum permitted weights.
Permitted tire inflation pressure (USA and
Canada only).
ENGINE
2.0L Engine
Cycle Four
Number and position of cylinders 4 inline
Piston bore and stroke (mm) 84 / 90
Total displacement (cm³) 1,995
Compression ratio 10:1
Maximum power (SAE) (HP) 280
Maximum power (kW) 209
Corresponding engine speed (RPM) 5,200
Maximum torque (SAE) (ft-lb) 295
Maximum torque (Nm) 400
Corresponding engine speed (RPM) 2,250 – 4,000
Fuel 87 Octane (R+M)/2 Method Minimum, 91 Recommended, ethanol
percentage is 0–15%
22_GA_OM_EN_USC_t.book Page 224
Page 227 of 248

225
POWER SUPPLY
TRANSMISSION
2.9L Engine
CycleFour
Number and position of cylinders 6 / V
Piston bore and stroke (mm) 86.5 × 82
Total displacement (cm³) 2,891
Compression ratio 9.3:1
Maximum power (SAE) (kW) 375
Maximum power (SAE) (HP) 505
Corresponding engine speed (RPM) 6,500
Maximum torque (SAE) (Nm) 600
Maximum torque (SAE) (ft-lb) 443
Corresponding engine speed (RPM) 2,500
Fuel 87 Octane (R+M)/2 Method Minimum, 91 Recommended, ethanol
percentage is 0–15%
Power Supply
2.0L Engine Electronic timed sequential injection with knock control
2.9L Engine Phased sequential electronic injection with knock control and variable
intake valve actuation
ModelTransmissionTraction
2.0L Engine Eight forward gears plus reverseRear-wheel drive
or
All-wheel drive
2.9L Engine Eight forward gears plus reverseRear
22_GA_OM_EN_USC_t.book Page 225