2022 ALFA ROMEO GIULIA trunk
[x] Cancel search: trunkPage 185 of 248
183
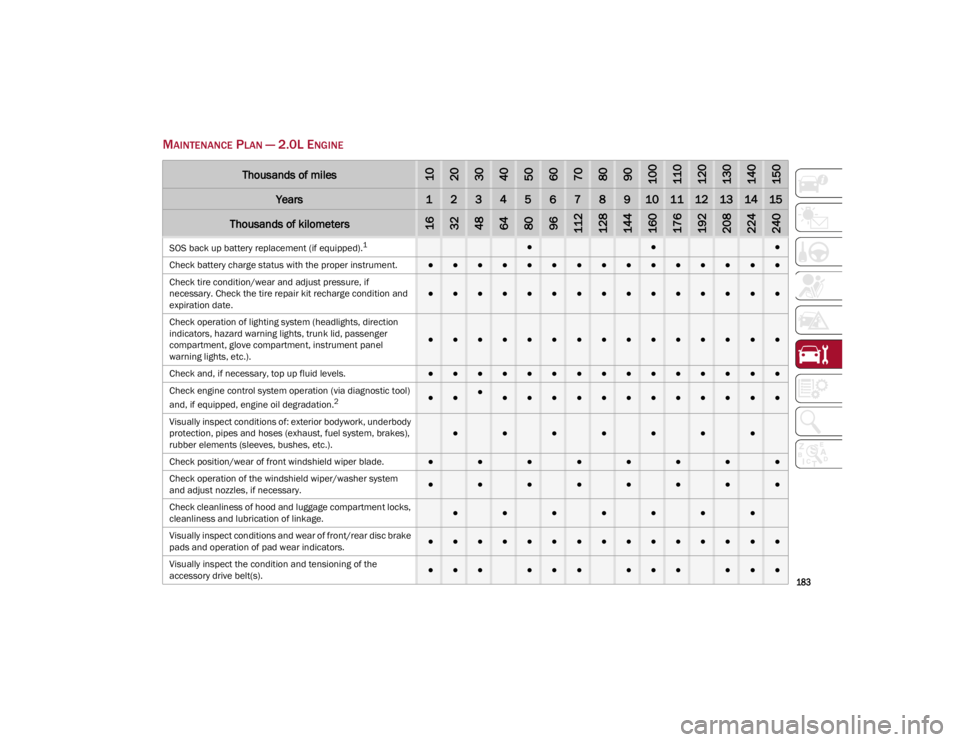
MAINTENANCE PLAN — 2.0L ENGINE
Thousands of miles102030405060708090100110120130140150
Years123456789101112131415
Thousands of kilometers163248648096112128144160176192208224240
SOS back up battery replacement (if equipped).1●●●
Check battery charge status with the proper instrument.
●●●●●●●●●●●●●●●
Check tire condition/wear and adjust pressure, if
necessary. Check the tire repair kit recharge condition and
expiration date.
●●●●●●●●●●●●●●●
Check operation of lighting system (headlights, direction
indicators, hazard warning lights, trunk lid, passenger
compartment, glove compartment, instrument panel
warning lights, etc.).
●●●●●●●●●●●●●●●
Check and, if necessary, top up fluid levels.
●●●●●●●●●●●●●●●
Check engine control system operation (via diagnostic tool)
and, if equipped, engine oil degradation.
2●●●●●●●●●●●●●●●
Visually inspect conditions of: exterior bodywork, underbody
protection, pipes and hoses (exhaust, fuel system, brakes),
rubber elements (sleeves, bushes, etc.).
●●●●●●●
Check position/wear of front windshield wiper blade.●●●●●●●●
Check operation of the windshield wiper/washer system
and adjust nozzles, if necessary.
●●●●●●●●
Check cleanliness of hood and luggage compartment locks,
cleanliness and lubrication of linkage.
●●●●●●●
Visually inspect conditions and wear of front/rear disc brake
pads and operation of pad wear indicators.●●●●●●●●●●●●●●●
Visually inspect the condition and tensioning of the
accessory drive belt(s).
●●●●●●●●●●●●
22_GA_OM_EN_USC_t.book Page 183
Page 187 of 248
185
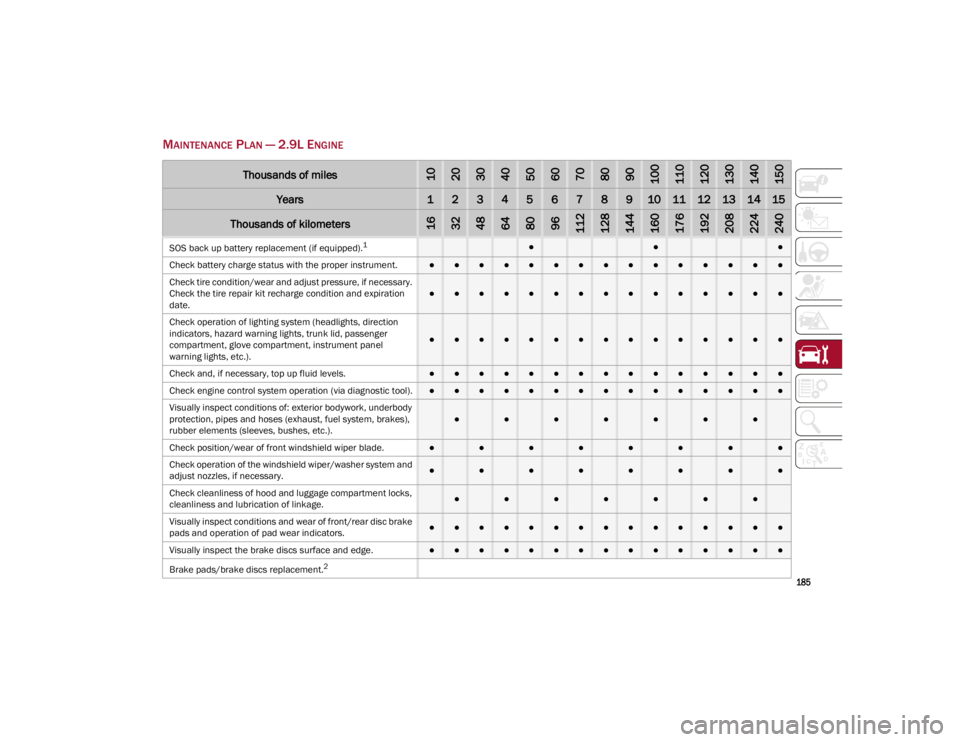
MAINTENANCE PLAN — 2.9L ENGINE
Thousands of miles102030405060708090100110120130140150
Years123456789101112131415
Thousands of kilometers163248648096112128144160176192208224240
SOS back up battery replacement (if equipped).1●●●
Check battery charge status with the proper instrument.
●●●●●●●●●●●●●●●
Check tire condition/wear and adjust pressure, if necessary.
Check the tire repair kit recharge condition and expiration
date.
●●●●●●●●●●●●●●●
Check operation of lighting system (headlights, direction
indicators, hazard warning lights, trunk lid, passenger
compartment, glove compartment, instrument panel
warning lights, etc.).
●●●●●●●●●●●●●●●
Check and, if necessary, top up fluid levels.
●●●●●●●●●●●●●●●
Check engine control system operation (via diagnostic tool).
●●●●●●●●●●●●●●●
Visually inspect conditions of: exterior bodywork, underbody
protection, pipes and hoses (exhaust, fuel system, brakes),
rubber elements (sleeves, bushes, etc.).
●●●●●●●
Check position/wear of front windshield wiper blade.●●●●●●●●
Check operation of the windshield wiper/washer system and
adjust nozzles, if necessary.
●●●●●●●●
Check cleanliness of hood and luggage compartment locks,
cleanliness and lubrication of linkage.
●●●●●●●
Visually inspect conditions and wear of front/rear disc brake
pads and operation of pad wear indicators.●●●●●●●●●●●●●●●
Visually inspect the brake discs surface and edge.
●●●●●●●●●●●●●●●
Brake pads/brake discs replacement.
2
22_GA_OM_EN_USC_t.book Page 185
Page 192 of 248
SERVICING AND MAINTENANCE
190
(Continued)
ENGINE COOLANT
If the level is too low, remove the cap of reservoir
and add the fluid described on
Ú
page 233.
WASHER FLUID FOR WINDSHIELD/
H
EADLIGHTS
The windshield and headlights washer fluid
reservoir has a telescopic filler.
If the level is too low, remove reservoir cap and lift
the filler. Then, add the fluid described on
Ú
page 233.
NOTE:
Use care when filling under hood fluids such as
engine oil, windshield washer fluid, antifreeze
etc. to minimize spillage onto the top of the
engine. Any excess fluid that is spilled onto the
top of the engine should be removed using
compressed air or an absorbent cloth.
NOTE:
The headlight washing system will not work if the
liquid level is low (as indicated by the symbol on
the instrument cluster display). On vehicles
equipped with headlight washers, there is a refer -
ence notch on the dipstick: ONLY the windshield/
rear window washer operates with the level below
this reference.
BRAKE FLUID
Check that the fluid is at the maximum level. If
the fluid level in the tank is low, contact an
authorized dealer to have the system checked.
AUTOMATIC TRANSMISSION ACTIVATION
S
YSTEM OIL
The transmission control oil level should only be
checked at an authorized dealer.
USEFUL ADVICE FOR EXTENDING THE
L
IFE OF YOUR BATTERY
To avoid draining your battery and make it last
longer, observe the following instructions:
When you park the car, ensure that the doors
and trunk are closed properly to prevent any
lights from remaining on inside the
passenger's compartment.
Do not keep accessories (e.g. radio, hazard
warning lights, etc.) switched on for a long time
when the engine is not running.
Before performing any operation on the
electrical system, disconnect the negative
battery cable.
If you wish to install electrical accessories after
purchasing the car that require permanent
electrical supply (e.g. alarm, etc.), or accessories
which influence the electrical supply
requirements, contact an authorized dealer,
whose qualified staff will evaluate the overall
electrical consumption.
NOTE:
After the battery is disconnected, the steering
must be initialized. The warning light on the
instrument panel switches on to indicate this. To
carry out this procedure, simply turn the steering
wheel all the way from one end to the other, and
then turn it back to the central position.
BATTERY
The battery does not require the electrolyte to be
topped up with distilled water. A periodic check
carried out at an authorized dealer, however, is
necessary to check efficiency.
Follow the battery manufacturer's instructions for
maintenance.
Replacing The Battery
If necessary, replace the battery with another
original battery with the same specifications.
Follow the battery manufacturer’s instructions for
maintenance.
CAUTION!
If the charge level remains under 50% for a
long time, the battery may be damaged by
sulphation, reducing its capacity and
efficiency during a vehicle start. The battery is
also more prone to the risk of freezing (at
temperatures as high as 14°F (-10°C).
WARNING!
Battery acid is a corrosive solution and can
burn or even blind you. Do not allow battery
acid to contact your eyes, skin, or clothing.
Do not lean over a battery when attaching
clamps
Ú
page 177. If acid splashes in eyes
or on skin, flush the area immediately with
large amounts of water.
Battery gas is flammable and explosive.
Keep flame or sparks away from the battery.
Do not use a booster battery or any other
booster source with an output greater than
12 Volts. Do not allow cable clamps to touch
each other.
22_GA_OM_EN_USC_t.book Page 190
Page 193 of 248
191
(Continued)
NOTE:
It will not be possible to open the trunk with a key
or by pushing the button in the passenger
compartment when the battery is disconnected.
So, always position the manual trunk opening
strap on the trunk lock before disconnecting the
battery
Ú
page 220.
PRESSURE WASHING
Cleaning the engine compartment with a high
pressure washer is not recommended.
BATTERY RECHARGING
IMPORTANT NOTES
NOTE:
Before using the charging device, always make
sure that it is appropriate for the installed
battery, with constant voltage (below 14.8
Volts) and low amperage (maximum 15 Amps).
Recharge the battery in a well ventilated
environment.
Before using any devices to charge or to
maintain the charge of the battery, carefully
follow the instructions provided with the device
in order to properly and safely connect it to the
car battery.
You can recharge the battery without discon -
necting the wires of the vehicle's electrical
system.
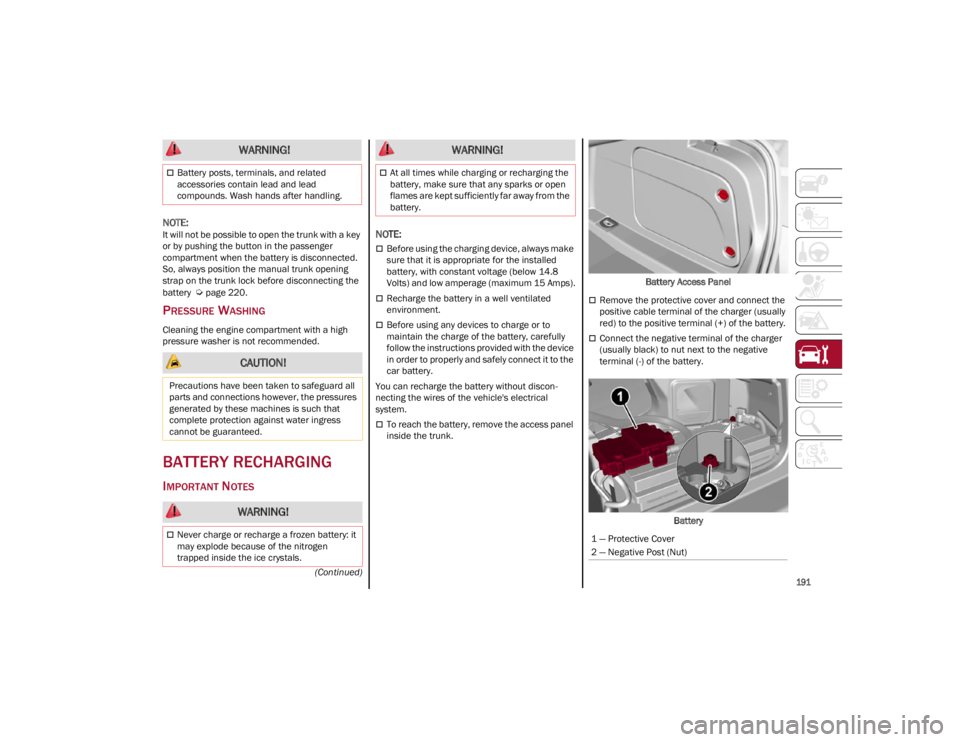
To reach the battery, remove the access panel
inside the trunk. Battery Access Panel
Remove the protective cover and connect the
positive cable terminal of the charger (usually
red) to the positive terminal (+) of the battery.
Connect the negative terminal of the charger
(usually black) to nut next to the negative
terminal (-) of the battery.
Battery
Battery posts, terminals, and related
accessories contain lead and lead
compounds. Wash hands after handling.
CAUTION!
Precautions have been taken to safeguard all
parts and connections however, the pressures
generated by these machines is such that
complete protection against water ingress
cannot be guaranteed.
WARNING!
Never charge or recharge a frozen battery: it
may explode because of the nitrogen
trapped inside the ice crystals.
WARNING!
At all times while charging or recharging the
battery, make sure that any sparks or open
flames are kept sufficiently far away from the
battery.
WARNING!
1 — Protective Cover
2 — Negative Post (Nut)
22_GA_OM_EN_USC_t.book Page 191
Page 195 of 248
193
Replace The Cabin Air Cleaner
For the correct servicing intervals
Ú
page 182.
For cabin air cleaner replacement, contact an
authorized dealer.
LUBRICATING MOVING PARTS OF THE
B
ODYWORK
Ensure that the locks and bodywork junction
points, including components such as the seat
guides, door hinges (and rollers), trunk and hood
are periodically lubricated with lithium-based
grease to ensure correct, silent operation and to
protect them from rust and wear.
Thoroughly clean the components, eliminating
every trace of dirt and dust. After lubricating,
eliminate excess oil and grease. Also pay
particular attention to the hood closing devices,
to ensure correct operation. During operations on
the hood, to be carried out with the engine cold,
also remember to check, clean and lubricate the
locking, release and safety devices.
Lubricate the external lock barrels twice a year.
Apply a small amount of high-quality lubricant
directly into the lock barrel. If necessary, contact an authorized dealer as
soon as possible.
WINDSHIELD WIPER
Periodically clean the windshield and rear window
and rubber profile of the windshield wiper blades,
using a sponge or a soft cloth and a non-abrasive
detergent. This eliminates the salt or impurities
accumulated when driving.
Prolonged operation of the windshield window
wipers with dry glass may cause the deterioration
of the blades, in addition to abrasion of the
surface of the glass. To eliminate the impurities
on the dry glass, always operate the windshield
washers.
In the event of very low outdoor temperatures,
below 0°F (-17.8°C), ensure that the movement
of the rubber part in contact with the glass is not
obstructed. Use a suitable deicing product to
release it if required.
Avoid using the windshield wipers to remove frost
or ice.
Also avoid contact of the rubber profile of the
blades with petroleum derivatives such as engine
oil, gas, etc.
NOTE:
The life of the windshield wiper blades varies
according to the usage frequency. In any case, it
is advised to replace the blades approximately
once a year. When the blades are worn, noise, marks on the glass or streaks of water may be
noticed. In the presence of these conditions,
clean the windshield wiper blades or, if neces
-
sary, replace them.
Raising The Windshield Wiper Blades
(“Service Position” Function)
The “service position” function allows the driver
to replace the windshield wiper blades more
easily. It is also recommended to activate this
function when it is snowing and to make it easier
to remove any dirt deposits in the area where the
blades are normally positioned, when washing.
Activation Of The Function
To activate this function, disable the windshield
wiper before setting the ignition device to OFF.
This function can only be activated within two
minutes of placing the ignition in OFF.
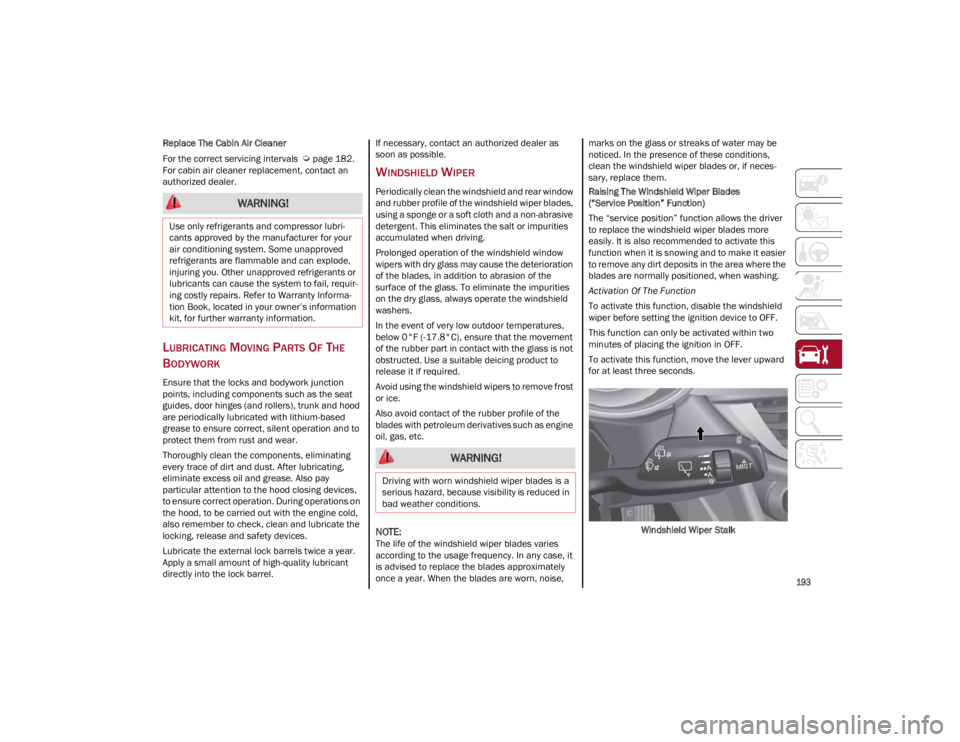
To activate this function, move the lever upward
for at least three seconds.
Windshield Wiper Stalk
WARNING!
Use only refrigerants and compressor lubri -
cants approved by the manufacturer for your
air conditioning system. Some unapproved
refrigerants are flammable and can explode,
injuring you. Other unapproved refrigerants or
lubricants can cause the system to fail, requir -
ing costly repairs. Refer to Warranty Informa -
tion Book, located in your owner’s information
kit, for further warranty information.
WARNING!
Driving with worn windshield wiper blades is a
serious hazard, because visibility is reduced in
bad weather conditions.
22_GA_OM_EN_USC_t.book Page 193
Page 199 of 248

197
(Continued)
Frequency Of Oil Changes
In normal vehicle operating conditions, it is not
necessary to change the transmission oil.
REPLACING THE BATTERY
If necessary, replace the battery with another
battery with the same specifications. It is advised
to contact an authorized dealer for replacement.
NOTE:
Each time the 12V battery is reconnected, cycle
the steering wheel all the way to the left. Then
cycle the steering wheel all the way to the right to
allow the steering angle sensor to learn the
steering angle thresholds. Follow the battery manufacturer's instructions for
maintenance.
NOTE:
It will not be possible to open the trunk with a key
or by pressing the button in the passenger
compartment when the battery is disconnected.
So, always position the manual trunk opening
strap on the trunk lock before disconnecting the
battery
Ú
page 220.
FUSES
General Information
The fuses protect electrical systems against
excessive current.
When a device does not work, you must check the
electrical circuit inside of the fuse for a break/
melt.
Also, please be aware that using power outlets for
extended periods of time with the engine off may
result in vehicle battery discharge.
Blade Fuses
CAUTION!
Do not use chemical flushes in your
transmission as the chemicals can damage
your transmission components. Such damage
is not covered by the New Vehicle Limited
Warranty.
CAUTION!
If a transmission fluid leak occurs, visit an
authorized dealer immediately. Severe
transmission damage may occur. An
authorized dealer has the proper tools to
adjust the fluid level accurately.
WARNING!
When replacing a blown fuse, always use an
appropriate replacement fuse with the same
amp rating as the original fuse. Never
replace a fuse with another fuse of higher
amp rating. Never replace a blown fuse with
metal wires or any other material. Do not
place a fuse inside a circuit breaker cavity or
vice versa. Failure to use proper fuses may
result in serious personal injury, fire and/or
property damage.
Before replacing a fuse, make sure that the
ignition is off and that all the other services
are switched off and/or disengaged.
If the replaced fuse blows again, contact an
authorized dealer.
If a general protection fuse for safety
systems (air bag system, braking system),
power unit systems (engine system,
transmission system) or steering system
blows, contact an authorized dealer.
1 — Electrical Circuit
2 — Blade Fuse With Good Electrical Circuit
3 — Blade Fuse With Bad Electrical Circuit
WARNING!
22_GA_OM_EN_USC_t.book Page 197
Page 200 of 248
SERVICING AND MAINTENANCE
198
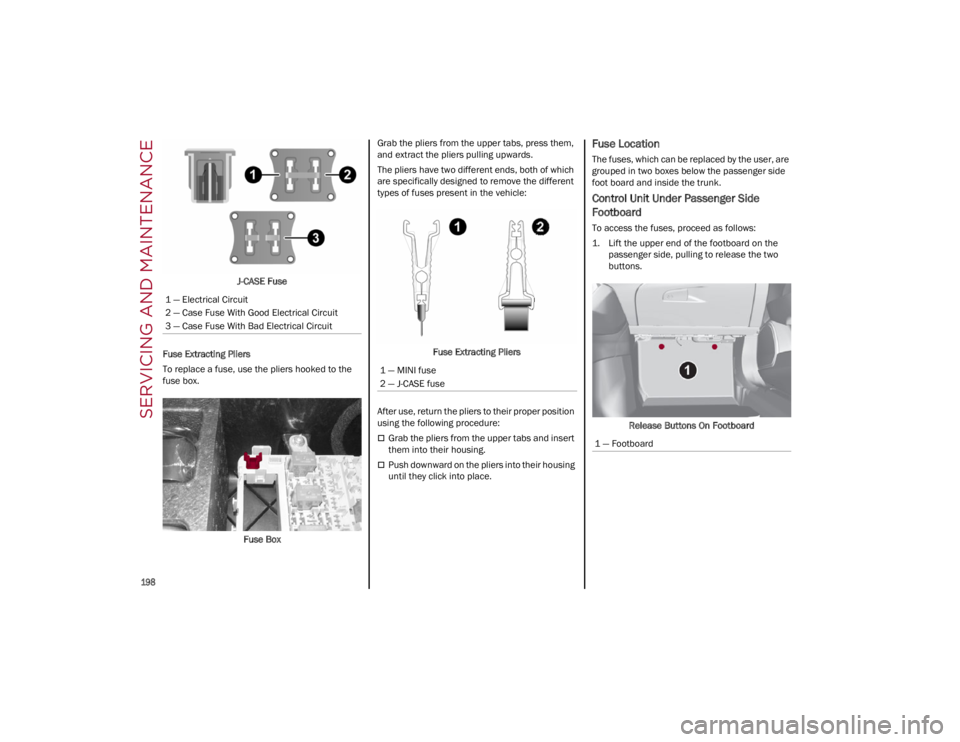
J-CASE Fuse
Fuse Extracting Pliers
To replace a fuse, use the pliers hooked to the
fuse box.
Fuse Box Grab the pliers from the upper tabs, press them,
and extract the pliers pulling upwards.
The pliers have two different ends, both of which
are specifically designed to remove the different
types of fuses present in the vehicle:
Fuse Extracting Pliers
After use, return the pliers to their proper position
using the following procedure:
Grab the pliers from the upper tabs and insert
them into their housing.
Push downward on the pliers into their housing
until they click into place.
Fuse Location
The fuses, which can be replaced by the user, are
grouped in two boxes below the passenger side
foot board and inside the trunk.
Control Unit Under Passenger Side
Footboard
To access the fuses, proceed as follows:
1. Lift the upper end of the footboard on the passenger side, pulling to release the two
buttons.
Release Buttons On Footboard
1 — Electrical Circuit
2 — Case Fuse With Good Electrical Circuit
3 — Case Fuse With Bad Electrical Circuit
1 — MINI fuse
2 — J-CASE fuse
1 — Footboard
22_GA_OM_EN_USC_t.book Page 198
Page 205 of 248
203
Types Of Bulbs
Replacement Bulbs
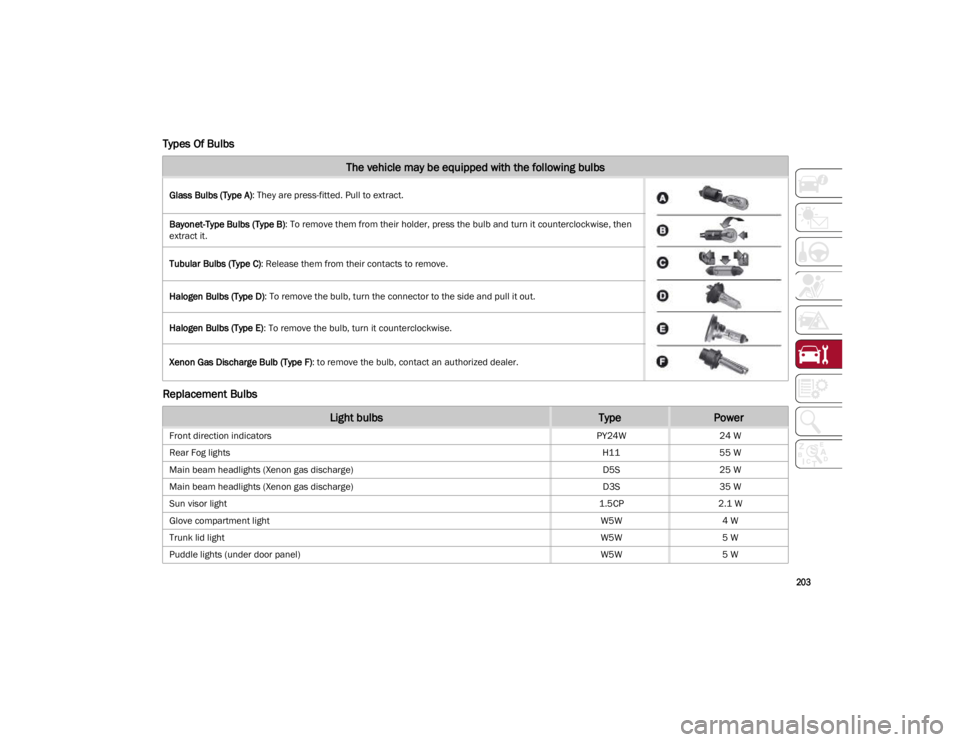
The vehicle may be equipped with the following bulbs
Glass Bulbs (Type A): They are press-fitted. Pull to extract.
Bayonet-Type Bulbs (Type B) : To remove them from their holder, press the bulb and turn it counterclockwise, then
extract it.
Tubular Bulbs (Type C) : Release them from their contacts to remove.
Halogen Bulbs (Type D) : To remove the bulb, turn the connector to the side and pull it out.
Halogen Bulbs (Type E) : To remove the bulb, turn it counterclockwise.
Xenon Gas Discharge Bulb (Type F) : to remove the bulb, contact an authorized dealer.
Light bulbsTypePower
Front direction indicators PY24W24 W
Rear Fog lights H1155 W
Main beam headlights (Xenon gas discharge) D5S25 W
Main beam headlights (Xenon gas discharge) D3S35 W
Sun visor light 1.5CP2.1 W
Glove compartment light W5W4 W
Trunk lid light W5W5 W
Puddle lights (under door panel) W5W5 W
22_GA_OM_EN_USC_t.book Page 203