Page 7 of 712
6
Quick Reference Guide
Quick Reference Guide
Visual Index
❚Steering Wheel Adjustments (P186)
❚ENGINE START/STOP Button (P166)
❚Audio System (P238)
❚System Indicators (P84)
❚Gauges (P104)
❚Driver Information
Interface
(P108)
❚ (Vehicle Stability AssistTM (VSA®)
System OFF) Button
(P464)
❚Parking Sensor System Button* (P563)
❚Safety Support Switch (P473, 483, 493, 538)
❚Brightness Control (P181)
❚Heated Windshield Button* (P180)
❚Hazard Warning Button
❚Rear Defogger/Heated Door Mirror
Button
(P180)
❚Front Seat Heater Buttons (P227)
❚Front Seat Ventilation Buttons* (P227)
❚Climate Control System (P229)
❚True Touchpad Interface (P245)
❚Head-Up Display Buttons* (P122)
❚Audio/Information Screen (P248)
❚Navigation System*
() See the Navigation System Manual
❚Electric Parking Brake Switch (P551)
22 ACURA MDX-31TYA6000_02.book 6 ページ 2020年11月5日 木曜日 午前11時39分
Page 184 of 712

183
uuOperating the Switches Around the Steering Wheel uDriving Position Memory System
Continued
Controls
Driving Position Memory System
You can store three driver’s seat, front passenger’s seat*, steering wheel*1 and door
mirror*1 positions with the drivin g position memory system.
When you unlock and open the driver’s door with a remote transmitter, or keyless
access system, door mirrors adjust to one of the three preset positions
*1 and the seat
adjusts to retracted position s of one of the three preset positions automatically.
The steering wheel and the seat will move to the stored position when you set the
power mode to ACCESSORY
*1.
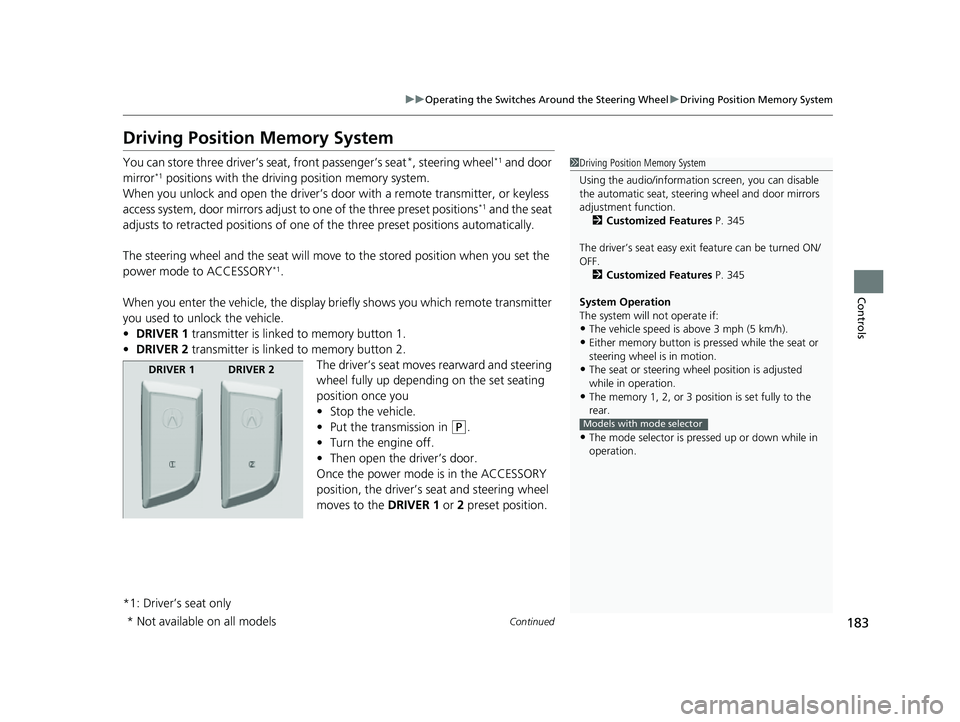
When you enter the vehicle, the display briefly shows you which remote transmitter
you used to unlock the vehicle.
• DRIVER 1 transmitter is linked to memory button 1.
• DRIVER 2 transmitter is linked to memory button 2.
The driver’s seat moves rearward and steering
wheel fully up depending on the set seating
position once you
•Stop the vehicle.
• Put the transmission in
(P.
• Turn the engine off.
• Then open the driver’s door.
Once the power mode is in the ACCESSORY
position, the driver’s s eat and steering wheel
moves to the DRIVER 1 or 2 preset position.
*1: Driver’s seat only
1 Driving Position Memory System
Using the audio/informati on screen, you can disable
the automatic seat, steeri ng wheel and door mirrors
adjustment function. 2 Customized Features P. 345
The driver’s seat easy exit feature can be turned ON/
OFF. 2 Customized Features P. 345
System Operation
The system will not operate if:
•The vehicle speed is above 3 mph (5 km/h).•Either memory button is pr essed while the seat or
steering wheel is in motion.
•The seat or steering wheel position is adjusted
while in operation.
•The memory 1, 2, or 3 position is set fully to the
rear.
•The mode selector is pressed up or down while in
operation.
Models with mode selector
DRIVER 1 DRIVER 2
* Not available on all models
22 ACURA MDX-31TYA6000_02.book 183 ページ 2020年11月5日 木曜日 午前11時39分
Page 191 of 712

190
Controls
Seats
Front Seats
Adjust the driver’s seat as far back as possible
while allowing you to maintain full control of
the vehicle. You should be able to sit upright,
well back in the seat and be able to
adequately press the pedals without leaning
forward, and grip the steering wheel
comfortably. The passenger’s seat should be
adjusted in a similar manner, so that it is as far
back from the front airbag in the dashboard
as possible.
■Adjusting the front power seats
1Seats
Always make seat adjustments before driving.
Move back.
Allow sufficient
space.
■Adjusting the Seat Positions
1
Front Seats
The National Highway Traffic Safety Administration
and Transport Cana da recommend that drivers allow
at least 10 inches (25 cm) between the center of the
steering wheel and the chest.
3WARNING
Sitting too close to a front airbag can result
in serious injury or death if the front
airbags inflate.
Always sit as far back from the front
airbags as possible while maintaining
control of the vehicle.
Horizontal
Position
Adjustment
Height
Adjustment Seat-back
Angle
Adjustment Mode
Selector
*
2 Seat
Control
Interface
*
P. 192
* Not available on all models
22 ACURA MDX-31TYA6000_02.book 190 ページ 2020年11月5日 木曜日 午前11時39分
Page 194 of 712

Continued193
uuSeats uFront Seats
Controls
To adjust the bolster support:
Press the front: To increase the bolster
support.
Press the rear: To decrease the bolster
support.
To adjust the thigh support:
Press the front: The tucked-down seat
cushion end rolls out to support your thighs.
Press the rear: The tucked-down seat
cushion end rolls in to support your thighs.
3. To close the adjusting mode display, hov er over the A-zone touchpad and/or B-
zone touchpad, then press the True Touchpad Interface.
u When you want to close the driver’s side adjusting mode display, hover over
and press the A-zone touchpad.
u When you want to close the passenger’ s side adjusting mode display, hover
over and press the B-zone touchpad.1 Seat Control Interface*
The lumbar support, bolster support and thigh
support can be adjusted even when the power mode
is in VEHICLE OFF. However, the adjusting mode
display does not come on with the power mode in
VEHICLE OFF.Adjustment
Switch
Adjustment
Switch
* Not available on all models
22 ACURA MDX-31TYA6000_02.book 193 ページ 2020年11月5日 木曜日 午前11時39分