2021 YAMAHA XSR 125 clutch
[x] Cancel search: clutchPage 40 of 90

Operation and important rid ing points
5-3
5
EAU16675
Shiftin gShifting gears lets you control the
amount of engine power available for
starting off, accelerating, climbing hills,
etc.
The gear positions are shown in the il-
lustration.TIPTo shift the transmission into the neu-
tral position ( ), press the shift pedal
down repeatedly until it reaches the
end of its travel, and then slightly raise
it.
NOTICE
ECA10262
When shiftin g, press the shift
pe dal firmly until you feel the
g ear shift is complete.
Even with the transmission in
the neutral position, do not
coast for lon g period s of time
with the en gine off, nor tow the
motorcycle for lon g d istances.
The transmission is properly lu-
b ricate d only when the en gine is
runnin g. Ina dequate lu brication
may damag e the transmission.
Always use the clutch while
chan gin g g ears to avoi d d am-
a g in g the en gine, transmission,
an d d rive train, which are not
d esi gne d to withstan d the
shock of force d shiftin g.
EAU85370
To start out an d accelerate
1. Pull the clutch lever to disengage the clutch.
2. Shift the transmission into first gear. The neutral indicator light
should go out. 3. Open the throttle gradually, and at
the same time, release the clutch
lever slowly.
4. After starting out, close the throt- tle, and at the same time, quickly
pull the clutch lever in.
5. Shift the transmission into second gear. (Make sure not to shift the
transmission into the neutral posi-
tion.)
6. Open the throttle part way and gradually release the clutch lever.
7. Follow the same procedure when shifting to the next higher gear.
EAU85380
To decelerate
1. Release the throttle and apply both the front and the rear brakes
smoothly to slow the motorcycle.
2. As the vehicle decelerates, shift to a lower gear.
3. When the engine is about to stall or runs roughly, pull the clutch le-
ver in, use the brakes to slow the
motorcycle, and continue to
downshift as necessary.
1. Neutral position
2. Shift pedalZAUM2034
UBFGE0E0.book Page 3 Friday, April 9, 2021 9:25 AM
Page 41 of 90

Operation and important ri din g points
5-4
5
4. Once the motorcycle has
stopped, the transmission can be
shifted into the neutral position.
The neutral indicator light should
come on and then the clutch lever
can be released.
WARNING
EWA17380
Improper brakin g can cause
loss of control or traction. Al-
ways use both brakes an d apply
them smoothly.
Make sure that the motorcycle
and the en gine have sufficiently
slowe d b efore shiftin g to a low-
er gear. En gag in g a lower gear
when the vehicle or en gine
spee d is too hi gh coul d make
the rear wheel lose traction or
the en gine to over-rev. This
coul d cause loss of control, an
acci dent an d injury. It coul d also
cause en gine or d rive train dam-
a g e.
EAU16811
Tips for re ducin g fuel con-
sumptionFuel consumption depends largely on
your riding style. Consider the follow-
ing tips to reduce fuel consumption:
Shift up swiftly, and avoid high en-
gine speeds during acceleration.
Do not rev the engine while shift-
ing down, and avoid high engine
speeds with no load on the en-
gine.
Turn the engine off instead of let-
ting it idle for an extended length
of time (e.g., in traffic jams, at traf-
fic lights or at railroad crossings).
EAU17214
Parkin gWhen parking, stop the engine, and
then remove the key from the main
switch.
WARNING
EWA10312
Since the en gine an d exhaust
system can become very hot,
park in a place where pe destri-
ans or chil dren are not likely to
touch them and b e burne d.
Do not park on a slope or on soft
groun d, otherwise the vehicle
may overturn, increasin g the
risk of a fuel leak an d fire.
Do not park near grass or other
flammab le materials which
mi ght catch fire.
UBFGE0E0.book Page 4 Friday, April 9, 2021 9:25 AM
Page 45 of 90

Periodic maintenance an d a djustment
6-4
6
EAU71342
General maintenance an d lu brication chartNO. ITEM CHECK OR MAINTENANCE JOB ODOMETER READING
ANNUAL
CHECK
1000 km
(600 mi) 6000 km
(3500 mi) 12000 km
(7000 mi) 18000 km
(10500 mi) 24000 km
(14000 mi)
1 *Dia
gnostic system
check • Perform dynamic inspection us-
ing Yamaha diagnostic tool.
• Check the error codes. √√√√√√
2 *Air filter element •Replace. √√
3 Air filter case check
hose • Clean.
√√√√√
4Clutch • Check operation.
•Adjust.
√√√√√
5 *Front brake • Check operation, fluid level, and
for fluid leakage.
• Replace brake pads if necessary. √√√√√√
6 *Rear brake • Check operation, fluid level, and
for fluid leakage.
• Replace brake pads if necessary. √√√√√√
7 *Brake hoses • Check for cracks or damage.
√√√√√
• Replace. Every 4 years
8 *Brake flui d • Change. Every 2 years
9 *Wheels • Check runout and for damage.
• Replace if necessary. √√√√
10 *Tires • Check tread depth and for dam-
age.
• Replace if necessary.
• Check air pressure.
• Correct if necessary. √√√√√
UBFGE0E0.book Page 4 Friday, April 9, 2021 9:25 AM
Page 46 of 90

Periodic maintenance an d a djustment
6-5
6
11 *Wheel bearin gs • Check bearing for looseness or
damage. √√√√
12 *Swin
garm pivot
b earin gs • Check operation and for exces-
sive play. √√√√
• Lubricate with lithium-soap- based grease. Every 24000 km (14000 mi)
13 Drive chain • Check chain slack, alignment and
condition.
• Adjust and lubricate chain with a special O-ring chain lubricant
thoroughly. Every 1000 km (600 mi) and after washing the motorcycle, riding in the rain or
riding in wet areas
14 *Steerin g b earin gs • Check bearing assemblies for
looseness. √√√√
• Moderately repack with lithium- soap-based grease. √
15 *Chassis fasteners • Make sure that all nuts, bolts and
screws are properly tightened. √√√√√
16 Brake lever pivot
shaft
• Lubricate with silicone grease.
√√√√√
17 Brake ped
al pivot
shaft • Lubricate with lithium-soap-
based grease. √√√√√
18 Clutch lever pivot
shaft • Lubricate with lithium-soap-
based grease. √√√√√
19 Shift pe
dal pivot
shaft • Lubricate with lithium-soap-
based grease. √√√√√
NO. ITEM CHECK OR MAINTENANCE JOB
ODOMETER READING
ANNUAL
CHECK
1000 km
(600 mi) 6000 km
(3500 mi) 12000 km
(7000 mi) 18000 km
(10500 mi) 24000 km
(14000 mi)UBFGE0E0.book Page 5 Friday, April 9, 2021 9:25 AM
Page 53 of 90

Periodic maintenance an d a djustment
6-12
6
9. Refill with the specified amount of
the recommended engine oil, and
then install and tighten the oil filler
cap.
NOTICE
ECA11621
In or der to prevent clutch slip-
pa ge (since the en gine oil also
lu bricates the clutch), do not
mix any chemical additives. Do
not use oils with a diesel speci-
fication of “CD” or oils of a hi gh-
er quality than specifie d. In
a ddition, do not use oils lab eled
“ENERGY CONSERVING II” or
hi gher.
Make sure that no forei gn mate-
rial enters the crankcase.
10. Start the engine, and then let it idle for several minutes while checking
it for oil leakage. If oil is leaking,
immediately turn the engine off
and check for the cause.
11. Turn the engine off, and then check the oil level and correct it if
necessary.
EAU85450
Why Yamalu beYAMALUBE oil is a Genuine YAMAHA
Part born of the engineers’ passion
and belief that engine oil is an impor-
tant liquid engine component. We form
teams of specialists in the fields of me-
chanical engineering, chemistry, elec-
tronics and track testing, and have
them develop the engine together with
the oil it will use. Yamalube oils take full
advantage of the base oil’s qualities
and blend in the ideal balance of addi-
tives to make sure the final oil clears
our performance standards. Thus,
Yamalube mineral, semisynthetic and
synthetic oils have their own distinct
characters and value. Yamaha’s expe-
rience gained over many years of re-
search and development into oil since
the 1960’s helps make Yamalube the
best choice for your Yamaha engine.
Recommen ded en gine oil:
See page 8-1.
Oil quantity: Oil change:
0.85 L (0.90 US qt, 0.75 Imp.qt)
With oil filter removal: 0.95 L (1.00 US qt, 0.84 Imp.qt)
UBFGE0E0.book Page 12 Friday, April 9, 2021 9:25 AM
Page 59 of 90

Periodic maintenance an d a djustment
6-18
6
ageing. Old and aged tires shall be
checked by tire specialists to ascertain
their suitability for further use.
WARNING
EWA10462
The front an
d rear tires shoul d b e of
the same make an d d esi gn, other-
wise the han dlin g characteristics of
the vehicle may be different, which
coul d lea d to an acci dent.After extensive tests, only the tires list-
ed below have been approved for this
model by Yamaha.
EAU21963
Cast wheelsTo maximize the performance, durabil-
ity, and safe operation of your vehicle,
note the following points regarding the
specified wheels.
The wheel rims should be
checked for cracks, bends, warp-
age or other damage before each
ride. If any damage is found, have
a Yamaha dealer replace the
wheel. Do not attempt even the
smallest repair to the wheel. A de-
formed or cracked wheel must be
replaced.
The wheel should be balanced
whenever either the tire or wheel
has been changed or replaced. An
unbalanced wheel can result in
poor performance, adverse han-
dling characteristics, and a short-
ened tire life.
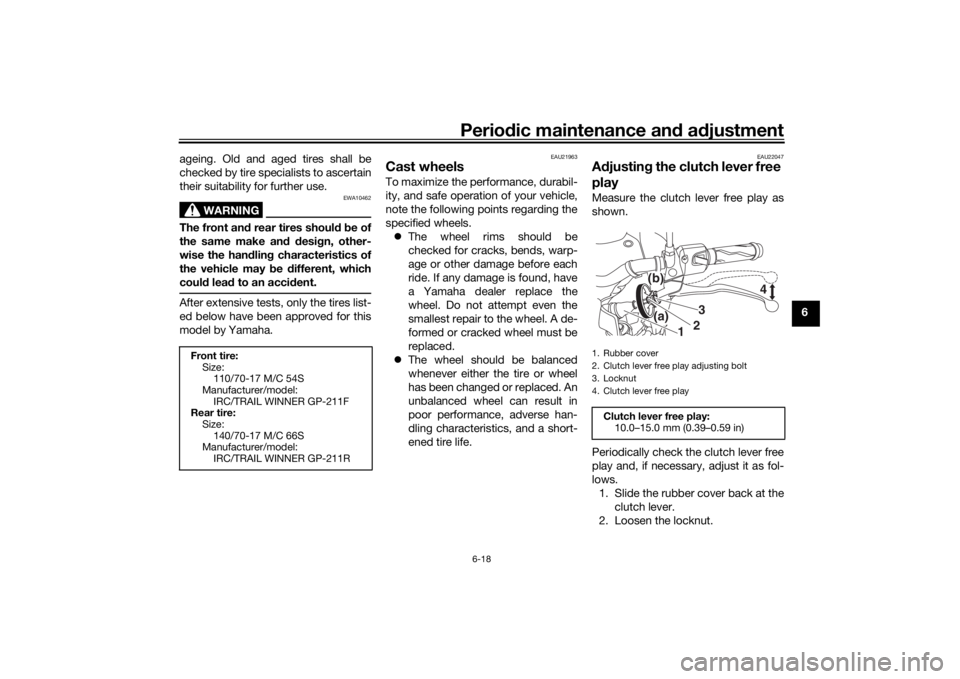
EAU22047
Adjustin g the clutch lever free
playMeasure the clutch lever free play as
shown.
Periodically check the clutch lever free
play and, if necessary, adjust it as fol-
lows.
1. Slide the rubber cover back at the clutch lever.
2. Loosen the locknut.
Front tire: Size:110/70-17 M/C 54S
Manufacturer/model: IRC/TRAIL WINNER GP-211F
Rear tire:
Size:140/70-17 M/C 66S
Manufacturer/model:
IRC/TRAIL WINNER GP-211R
1. Rubber cover
2. Clutch lever free play adjusting bolt
3. Locknut
4. Clutch lever free play
Clutch lever free play:10.0–15.0 mm (0.39–0.59 in)
4
1 2
(a)
(b)
3
UBFGE0E0.book Page 18 Friday, April 9, 2021 9:25 AM
Page 60 of 90

Periodic maintenance an d a djustment
6-19
6 3. To increase the clutch lever free
play, turn the clutch lever free play
adjusting bolt in direction (a). To
decrease the clutch lever free
play, turn the adjusting bolt in di-
rection (b).
TIPIf the specified clutch lever free play
could be obtained as described above,
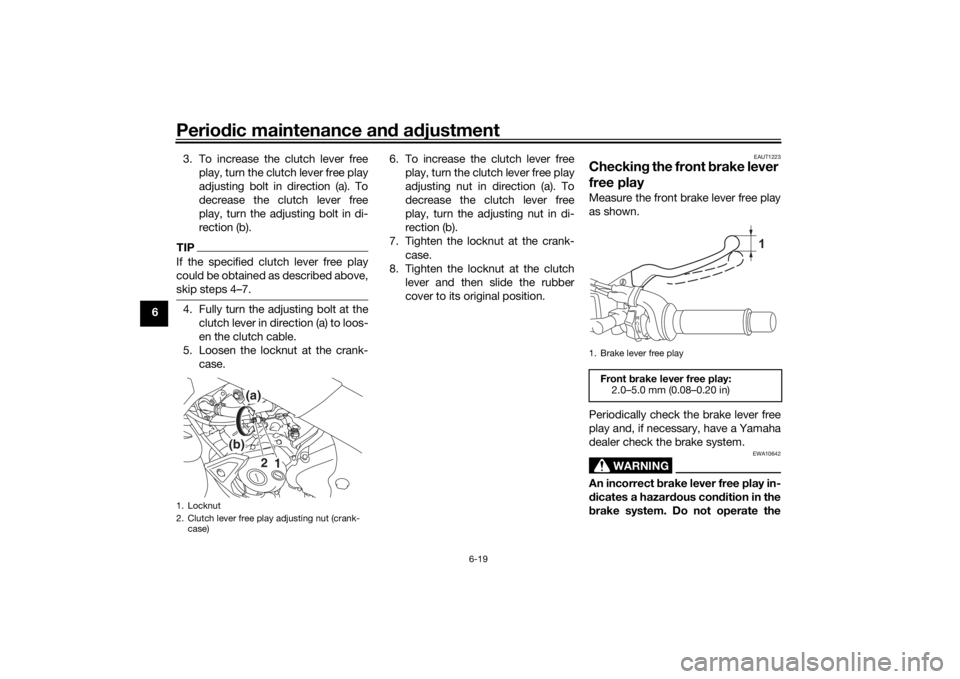
skip steps 4–7.4. Fully turn the adjusting bolt at theclutch lever in direction (a) to loos-
en the clutch cable.
5. Loosen the locknut at the crank- case. 6. To increase the clutch lever free
play, turn the clutch lever free play
adjusting nut in direction (a). To
decrease the clutch lever free
play, turn the adjusting nut in di-
rection (b).
7. Tighten the locknut at the crank- case.
8. Tighten the locknut at the clutch lever and then slide the rubber
cover to its original position.
EAUT1223
Checkin g the front b rake lever
free playMeasure the front brake lever free play
as shown.
Periodically check the brake lever free
play and, if necessary, have a Yamaha
dealer check the brake system.
WARNING
EWA10642
An incorrect b rake lever free play in-
d icates a hazar dous con dition in the
b rake system. Do not operate the
1. Locknut
2. Clutch lever free play adjusting nut (crank-
case)
1
2
(a)
(b)
1. Brake lever free playFront brake lever free play:
2.0–5.0 mm (0.08–0.20 in)
1
UBFGE0E0.book Page 19 Friday, April 9, 2021 9:25 AM
Page 68 of 90

Periodic maintenance an d a djustment
6-27
6
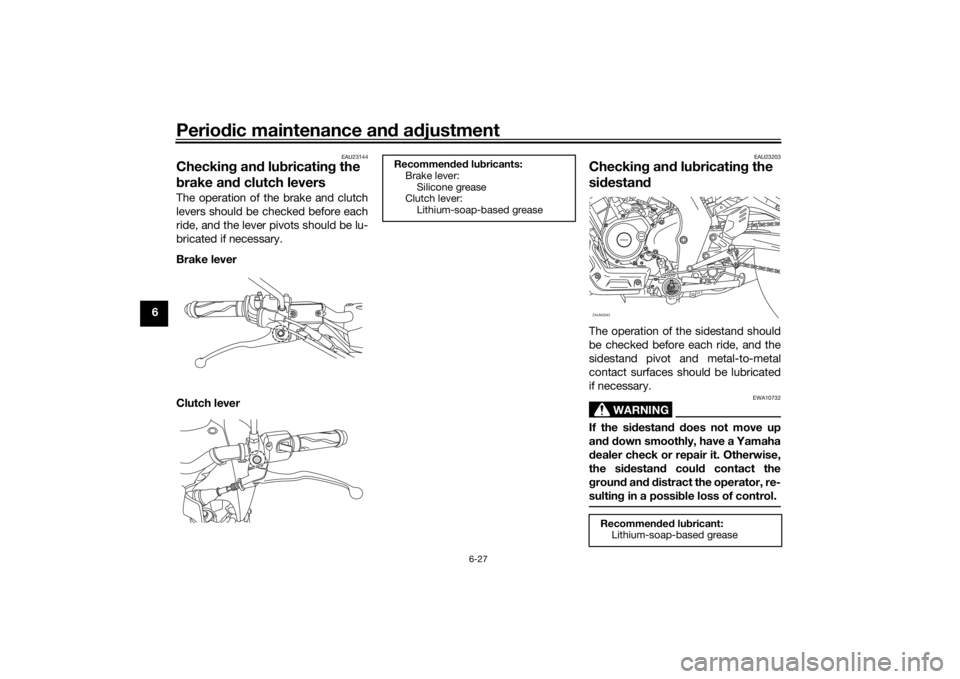
EAU23144
Checkin g an d lu bricatin g the
b rake an d clutch leversThe operation of the brake and clutch
levers should be checked before each
ride, and the lever pivots should be lu-
bricated if necessary.
Brake lever
Clutch lever
EAU23203
Checkin g an d lu bricatin g the
si destan dThe operation of the sidestand should
be checked before each ride, and the
sidestand pivot and metal-to-metal
contact surfaces should be lubricated
if necessary.
WARNING
EWA10732
If the si destan d d oes not move up
an d d own smoothly, have a Yamaha
d ealer check or repair it. Otherwise,
the si destan d coul d contact the
g roun d an d d istract the operator, re-
sultin g in a possi ble loss of control.
Recommen ded lu bricants:
Brake lever:
Silicone grease
Clutch lever:
Lithium-soap-based grease
Recommen ded lu bricant:
Lithium-soap-based greaseZAUM2043
UBFGE0E0.book Page 27 Friday, April 9, 2021 9:25 AM