2021 YAMAHA TENERE 700 tires
[x] Cancel search: tiresPage 71 of 104

Periodic maintenance an d a djustment
6-19
6
Tires age, even if they have not been
used or have only been used occasion-
ally. Cracking of the tread and sidewall
rubber, sometimes accompanied by
carcass deformation, is an evidence of
ageing. Old and aged tires shall be
checked by tire specialists to ascertain
their suitability for further use.
WARNING
EWA10462
The front an
d rear tires shoul d b e of
the same make an d d esi gn, other-
wise the han dlin g characteristics of
the vehicle may be different, which
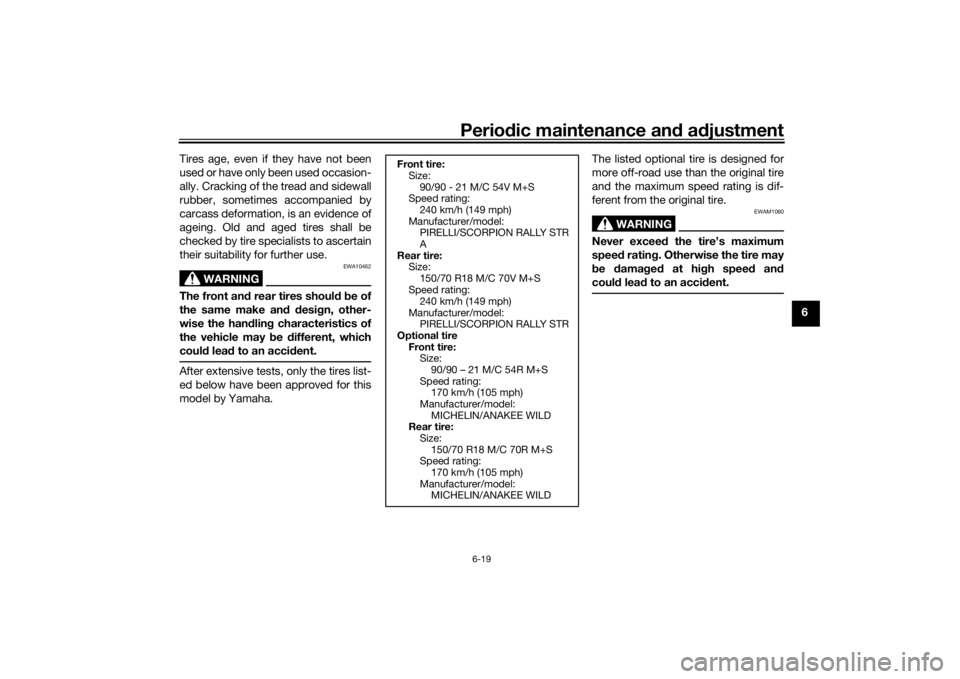
coul d lea d to an acci dent.After extensive tests, only the tires list-
ed below have been approved for this
model by Yamaha. The listed optional tire is designed for
more off-road use than the original tire
and the maximum speed rating is dif-
ferent from the original tire.
WARNING
EWAM1060
Never excee
d the tire’s maximum
speed rating. Otherwise the tire may
b e damag ed at hi gh spee d an d
coul d lea d to an acci dent.
Front tire:
Size:
90/90 - 21 M/C 54V M+S
Speed rating:
240 km/h (149 mph)
Manufacturer/model: PIRELLI/SCORPION RALLY STR
A
Rear tire: Size:
150/70 R18 M/C 70V M+S
Speed rating: 240 km/h (149 mph)
Manufacturer/model: PIRELLI/SCORPION RALLY STR
Optional tire
Front tire:Size: 90/90 – 21 M/C 54R M+S
Speed rating: 170 km/h (105 mph)
Manufacturer/model:
MICHELIN/ANAKEE WILD
Rear tire: Size:
150/70 R18 M/C 70R M+S
Speed rating: 170 km/h (105 mph)
Manufacturer/model: MICHELIN/ANAKEE WILD
UBEHE0E0.book Page 19 Tuesday, December 8, 2020 6:57 PM
Page 72 of 104

Periodic maintenance an d a djustment
6-20
6
EAU21945
Spoke wheelsTo maximize the performance, durabil-
ity, and safe operation of the vehicle,
note the following points.
Check each wheel for cracks, de-
formation and other damage. If
any damage is found, have the
wheel inspected by your Yamaha
dealer. Do not attempt to repair or
straighten a bent or damaged
wheel.
Check the spokes for looseness. If
any loose spokes are found, have
the wheel adjusted by your
Yamaha dealer. Improperly tight-
ened spokes can cause wheel
misalignment.
Have the wheel balanced whenev-
er the tire or tube has been re-
placed. An unbalanced wheel can
result in adverse handling charac-
teristics and shortened tire life.
WARNING
EWA10611
The wheels on this mo del are not
d esi gne d for use with tu beless tires.
Do not attempt to use tu beless tires
on this mod el.
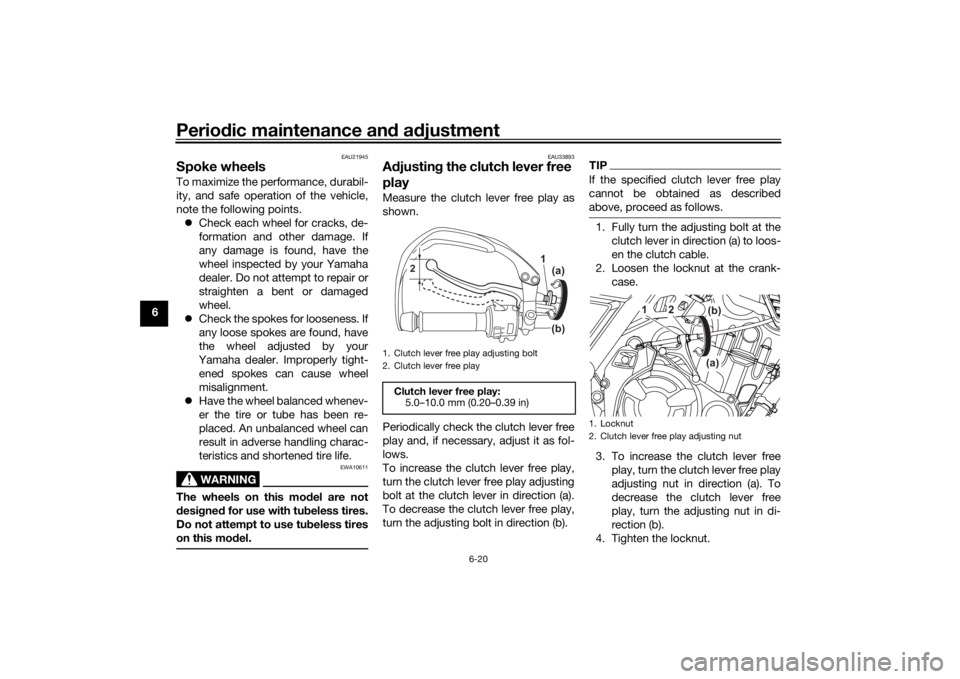
EAU33893
Adjustin g the clutch lever free
playMeasure the clutch lever free play as
shown.
Periodically check the clutch lever free
play and, if necessary, adjust it as fol-
lows.
To increase the clutch lever free play,
turn the clutch lever free play adjusting
bolt at the clutch lever in direction (a).
To decrease the clutch lever free play,
turn the adjusting bolt in direction (b).
TIPIf the specified clutch lever free play
cannot be obtained as described
above, proceed as follows.1. Fully turn the adjusting bolt at the
clutch lever in direction (a) to loos-
en the clutch cable.
2. Loosen the locknut at the crank- case.
3. To increase the clutch lever free play, turn the clutch lever free play
adjusting nut in direction (a). To
decrease the clutch lever free
play, turn the adjusting nut in di-
rection (b).
4. Tighten the locknut.
1. Clutch lever free play adjusting bolt
2. Clutch lever free playClutch lever free play: 5.0–10.0 mm (0.20–0.39 in)
1(a)
(b)
2
1. Locknut
2. Clutch lever free play adjusting nut
2 (b)
(a)
1
UBEHE0E0.book Page 20 Tuesday, December 8, 2020 6:57 PM
Page 93 of 104
![YAMAHA TENERE 700 2021 Owners Manual Motorcycle care and stora ge
7-3
7
will
become slippery, which
coul d cause loss of control.
Thorou ghly clean the surfaces
of these parts before operatin g
the vehicle.
[EWA20650]
5. Treat rubber, YAMAHA TENERE 700 2021 Owners Manual Motorcycle care and stora ge
7-3
7
will
become slippery, which
coul d cause loss of control.
Thorou ghly clean the surfaces
of these parts before operatin g
the vehicle.
[EWA20650]
5. Treat rubber,](/manual-img/51/51766/w960_51766-92.png)
Motorcycle care and stora ge
7-3
7
will
become slippery, which
coul d cause loss of control.
Thorou ghly clean the surfaces
of these parts before operatin g
the vehicle.
[EWA20650]
5. Treat rubber, vinyl, and unpainted plastic parts with a suitable care
product.
6. Touch up minor paint damage caused by stones, etc.
7. Wax all painted surfaces using a non-abrasive wax or use a detail
spray for motorcycles.
8. When finished cleaning, start the engine and let it idle for several
minutes to help dry any remaining
moisture.
9. If the headlight lens has fogged up, start the engine and turn on
the headlight to help remove the
moisture.
10. Let the vehicle dry completely be- fore storing or covering it.NOTICE
ECA26320
Do not apply wax to ru bber or
unpainte d plastic parts.
Do not use a brasive polishin g
compoun ds as they will wear
away the paint.
Apply sprays an d wax sparin gly.
Wipe off excess afterwar ds.
WARNING
EWA20660
Contaminants left on the brakes or
tires can cause loss of control. Make sure there is no lu bricant
or wax on the brakes or tires.
If necessary, wash the tires with
warm water an d a mil d d eter-
g ent.
If necessary, clean the b rake
d iscs an d pa ds with b rake
cleaner or acetone.
Before ri din g at hi gher spee ds,
test the vehicle’s brakin g per-
formance an d cornerin g b ehav-
ior.
EAU83472
Stora geAlways store the vehicle in a cool, dry
place. If necessary, protect it against
dust with a porous cover. Be sure the
engine and the exhaust system are
cool before covering the vehicle. If the
vehicle often sits for weeks at a time
between uses, the use of a quality fuel
stabilizer is recommended after each
fill-up.NOTICE
ECA21170
Storin g the vehicle in a poorly
ventilate d room or coverin g it
with a tarp, while it is still wet,
will allow water an d humi dity to
seep in an d cause rust.
To prevent corrosion, avoi d
d amp cellars, stab les (because
of the presence of ammonia)
an d areas where stron g chemi-
cals are stored .Long term stora ge
Before storing the vehicle long term (60
days or more):
UBEHE0E0.book Page 3 Tuesday, December 8, 2020 6:57 PM
Page 94 of 104

Motorcycle care and stora ge
7-4
7 1. Make all necessary repairs and
perform any outstanding mainte-
nance.
2. Follow all instructions in the Care section of this chapter.
3. Fill up the fuel tank, adding fuel stabilizer according to product in-
structions. Run the engine for 5
minutes to distribute treated fuel
through the fuel system.
4. For vehicles equipped with a fuel cock: Turn the fuel cock lever to
the off position.
5. For vehicles with a carburetor: To prevent fuel deposits from build-
ing up, drain the fuel in the carbu-
retor float chamber into a clean
container. Retighten the drain bolt
and pour the fuel back into the fuel
tank.
6. Use a quality engine fogging oil according to product instructions
to protect internal engine compo-
nents from corrosion. If engine
fogging oil is not available, per-
form the following steps for each
cylinder:a. Remove the spark plug cap and spark plug. b. Pour a teaspoonful of engine
oil into the spark plug bore.
c. Install the spark plug cap onto the spark plug, and then place
the spark plug on the cylinder
head so that the electrodes are
grounded. (This will limit spark-
ing during the next step.)
d. Turn the engine over several times with the starter. (This will
coat the cylinder wall with oil.)
WARNING! To prevent d am-
a g e or injury from sparkin g,
make sure to groun d the
spark plu g electro des while
turnin g the en gine over.
[EWA10952]
e. Remove the spark plug cap
from the spark plug, and then
install the spark plug and the
spark plug cap.
7. Lubricate all control cables, piv- ots, levers and pedals, as well as
the sidestand and centerstand (if
equipped).
8. Check and correct the tire air pressure, and then lift the vehicle
so that all wheels are off the
ground. Otherwise, turn the wheels a little once a month in or-
der to prevent the tires from be-
coming degraded in one spot.
9. Cover the muffler outlet with a plastic bag to prevent moisture
from entering it.
10. Remove the battery and fully charge it, or attach a maintenance
charger to keep the battery opti-
mally charged. NOTICE: Confirm
that the battery an d its char ger
are compati ble. Do not char ge a
VRLA battery with a convention-
al char ger.
[ECA26330]
TIP If the battery will be removed,
charge it once a month and store
it in a temperate location between
0-30 °C (32-90 °F).
See page 6-31 for more informa-
tion on charging and storing the
battery.
UBEHE0E0.book Page 4 Tuesday, December 8, 2020 6:57 PM
Page 101 of 104

Index
10-2
10
Supporting the motorcycle ................... 6-35
Swingarm pivots, lubricating ................ 6-29TTail/brake light ...................................... 6-34
Throttle grip and cable, checking and
lubricating........................................... 6-27
Throttle grip free play, checking ........... 6-17
Tires ...................................................... 6-17
Tool kit .................................................... 6-2
Troubleshooting.................................... 6-36
Troubleshooting chart .......................... 6-37
Turn signal indicator lights ..................... 3-3
Turn signal light bulb, replacing ........... 6-34
Turn signal switch................................. 3-14VValve clearance .................................... 6-17
Vehicle identification number ................. 9-1
Vehicle lights ........................................ 6-33WWheel bearings, checking .................... 6-30
Wheels .................................................. 6-20YYamalube.............................................. 6-14
UBEHE0E0.book Page 2 Tuesday, December 8, 2020 6:57 PM