Page 107 of 172
9-17
9
5. Install the cover.
For handlebar-mounted light equipped
models: Install the handlebar-mounted
light cover.
For non-equipped models: Install the han-
dlebar cover.
6. Install the panels.
EBU23216Checking the spark plugThe spark plug is an important engine component,
which is easy to check. Since heat and deposits
will cause any spark plug to slowly erode, the
spark plug should be removed and checked in ac-
cordance with the periodic maintenance chart. In
addition, the condition of the spark plug can reveal
the condition of the engine.
To remove the spark plug 1. Remove the spark plug cap. 2. Remove the spark plug as shown, with the
spark plug wrench included in the tool kit.
1. Spark plug cap
1. Spark plug wrench
11
UBEY60E0.book Page 17 Monday, July 27, 2020 10:46 AM
Page 109 of 172
9-19
9
TIPIf a torque wrench is not available when installing
the spark plug, a good estimate of the correct
torque is 1/4–1/2 turn past finger tight. However,
the spark plug should be tightened to the speci-
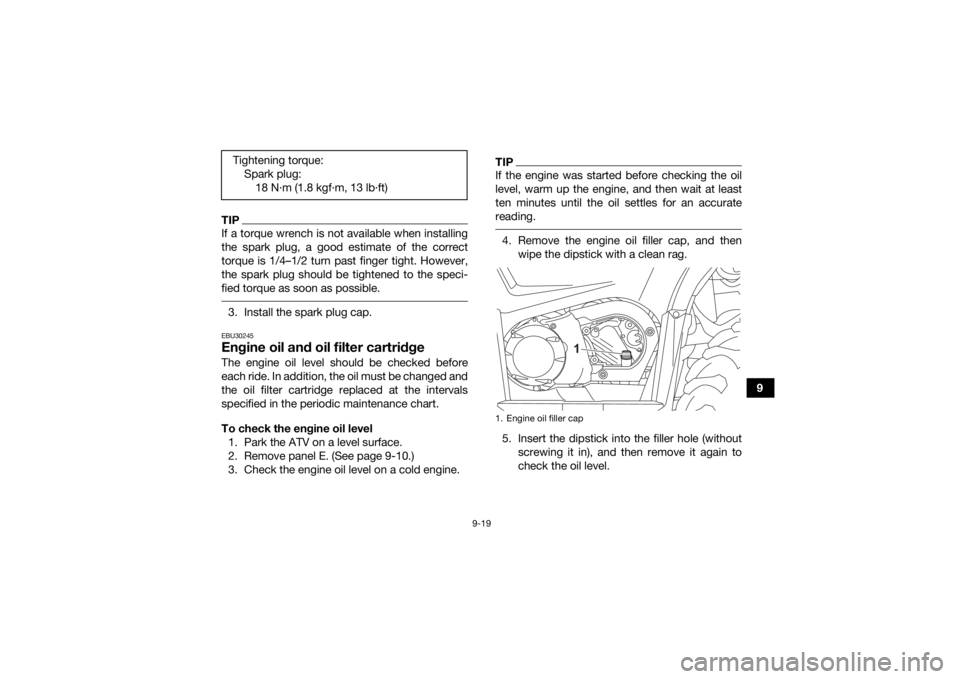
fied torque as soon as possible. 3. Install the spark plug cap.EBU30245Engine oil and oil filter cartridgeThe engine oil level should be checked before
each ride. In addition, the oil must be changed and
the oil filter cartridge replaced at the intervals
specified in the periodic maintenance chart.
To check the engine oil level1. Park the ATV on a level surface.
2. Remove panel E. (See page 9-10.)
3. Check the engine oil level on a cold engine.
TIPIf the engine was started before checking the oil
level, warm up the engine, and then wait at least
ten minutes until the oil settles for an accurate
reading. 4. Remove the engine oil filler cap, and then wipe the dipstick with a clean rag.
5. Insert the dipstick into the filler hole (without screwing it in), and then remove it again to
check the oil level.
Tightening torque:
Spark plug:18 N
Page 114 of 172

9-24
9research and development into oil since the
1960’s helps make Yamalube the best choice for
your Yamaha engine.
EBU28569Final gear oilThe final gear case must be checked for oil leak-
age before each ride. If any leakage is found, have
a Yamaha dealer check and repair the ATV. In ad-
dition, the final gear oil level must be checked and
the oil changed as follows at the intervals speci-
fied in the periodic maintenance chart.
To check the final gear oil level
1. Park the ATV on a level surface.
2. Remove the final gear oil filler bolt and its gas- ket, and then check the oil level in the final
gear case. The oil level should be at the brim
of the filler hole. 3. If the oil is below the brim of the filler hole, add
sufficient oil of the recommended type to
raise it to the correct level.
4. Check the oil filler bolt gasket for damage, and replace it if necessary.
5. Install the oil filler bolt and its gasket, and then tighten the bolt to the specified torque.
1. Final gear oil filler bolt
2. Gasket
3. Final gear oil
4. Correct oil levelTightening torque:Final gear oil filler bolt:22 N·m (2.2 kgf·m, 16 lb·ft)1
2
3
4
UBEY60E0.book Page 24 Monday, July 27, 2020 10:46 AM
Page 117 of 172
9-27
9
EBU38831Changing the differential gear oilThe differential gear case must be checked for oil
leakage before each ride. If any leakage is found,
have a Yamaha dealer check and repair the ATV.
In addition, the differential gear oil must be
changed as follows at the intervals specified in the
periodic maintenance chart.
For non-differential gear lock modelsFor differential gear lock models1. Differential gear oil filler bolt
2. Gasket
2
1
Recommended differential gear oil:
Yamaha Friction Modified Shaft Drive Gear Oil or SAE 80 API GL-4 Hypoid gear oil
Oil quantityW 0.35 L (0.37 US qt, 0.31 Imp.qtF1. Differential gear oil filler bolt
2. GasketRecommended differential gear oil:Yamaha Friction Modified Shaft Drive Gear Oil or SAE 80 API GL-4 Hypoid gear oil
Oil quantityW 0.23 L (0.24 US qt, 0.20 Imp.qtF
2
1
UBEY60E0.book Page 27 Monday, July 27, 2020 10:46 AM
Page 119 of 172

9-29
9
EBU23473CoolantThe coolant level should be checked regularly. In
addition, the coolant must be changed at the in-
tervals specified in the periodic maintenance
chart.TIPIf genuine Yamaha coolant is not available, use an
ethylene glycol antifreeze containing corrosion in-
hibitors for aluminum engines and mix with dis-
tilled water at a 1:1 ratio.
NOTICEECB02190Mix antifreeze with distilled water only. Howev-
er, if distilled water is not available, soft water
may be used for refilling. Do not use hard water
or salt water since they are harmful to the en-
gine. EBU2712ATo check the coolant level1. Park the ATV on a level surface.TIPThe coolant level must be checked on a cold en-
gine since the level varies with engine tempera-
ture. 2. Check the coolant level in the coolant reser- voir.TIPThe coolant should be between the minimum and
maximum level marks.
Recommended coolant:YAMALUBE coolant
Coolant quantity: Coolant reservoir (up to full level):0.25 L (0.26 US qt, 0.22 Imp.qt)
Radiator (including all routes): 1.32 L (1.40 US qt, 1.16 Imp.qt)
UBEY60E0.book Page 29 Monday, July 27, 2020 10:46 AM
Page 129 of 172

9-39
9
For differential gear lock models
Periodically check the throttle lever free play and
adjust if necessary.
1. Slide the rubber cover back.
2. Loosen the locknut. 3. To increase the throttle lever free play, turn
the throttle lever free play adjusting bolt in di-
rection (a). To decrease the throttle lever free
play, turn the adjusting bolt in direction (b).
4. Tighten the locknut.
5. Slide the rubber cover to its original position.
EBU24062Valve clearanceThe valve clearance changes with use, resulting in
improper air-fuel mixture and/or engine noise. To
prevent this from occurring, the valve clearance
must be adjusted by a Yamaha dealer at the inter-
vals specified in the periodic maintenance chart.EBU29602BrakesReplacement of brake components requires pro-
fessional knowledge. Brake service should be
performed by a Yamaha dealer.
WARNING
EWB02572Operating with improperly serviced or adjust-
ed brakes could lead to a loss in braking ability
and an accident.
1. Throttle lever free play
2. Rubber cover
3. Locknut
4. Throttle lever free play adjusting boltThrottle lever free play: 2.0–4.0 mm (0.08–0.16 in)
2WD
4WD
3
4
2
1
(b)
(a)
UBEY60E0.book Page 39 Monday, July 27, 2020 10:46 AM
Page 130 of 172

9-40
9
EBU28415Checking the front brake pads and rear
brake friction platesThe front brake pads and the rear brake friction
plates must be checked for wear at the intervals
specified in the periodic maintenance chart.TIPThis ATV is equipped with a wet, multiple-disc
type rear brake, which is located inside of the final
gear case. EBU24174Front brake padsCheck each front brake pad for damage and mea-
sure the lining thickness. If a brake pad is dam-
aged or if the lining thickness reaches the
specified limit, have a Yamaha dealer replace the
brake pads as a set.
TIPThe wheels need to be removed to check the
brake pads. (See page 9-63.) EBU30322Rear brake friction plates
The rear brake friction plates must be checked
and, if necessary, replaced by a Yamaha dealer at
the intervals specified in the periodic maintenance
chart.EBU29845Checking the brake fluid levelBefore riding, check that the brake fluid is above
the minimum level mark. Replenish the brake fluid
if necessary.
1. Lining thickness
Brake pad lining thickness limit:
1.0 mm (0.04 in)
UBEY60E0.book Page 40 Monday, July 27, 2020 10:46 AM
Page 131 of 172

9-41
9
TIPStraighten the handlebars for an accurate reading. NOTICEECB01161Brake fluid may damage painted surfaces or
plastic parts. Always clean up spilled fluid im-
mediately.
As the brake pads wear, it is normal for the brake
fluid level to gradually go down. A low brake fluid
level may indicate worn brake pads or brake sys-
tem leakage. Therefore, be sure to check the
brake pads for wear and the brake system for
leakage. If the brake fluid level suddenly goes
down, have a Yamaha dealer check the brake sys-
tem before further riding.
WARNING
EWB02721Improper maintenance can result in loss of
braking ability. Observe these precautions:
Insufficient brake fluid may allow air to enter
the brake system, reducing braking perfor-
mance.
Clean the filler cap before removing. Use
only DOT 4 brake fluid from a sealed contain-
er.
Use only the specified brake fluid; otherwise,
the rubber seals may deteriorate, causing
leakage.
Refill with the same type of brake fluid. Add-
ing a brake fluid other than DOT 4 may result
in a harmful chemical reaction.
1. Minimum level markSpecified brake fluid:
DOT 4
1
UBEY60E0.book Page 41 Monday, July 27, 2020 10:46 AM

