2021 YAMAHA FX SVHO ESP
[x] Cancel search: ESPPage 46 of 116

Watercraft operation
39
Activating and deactivating the cruise as-
sist
Activation of the cruise assist can be con-
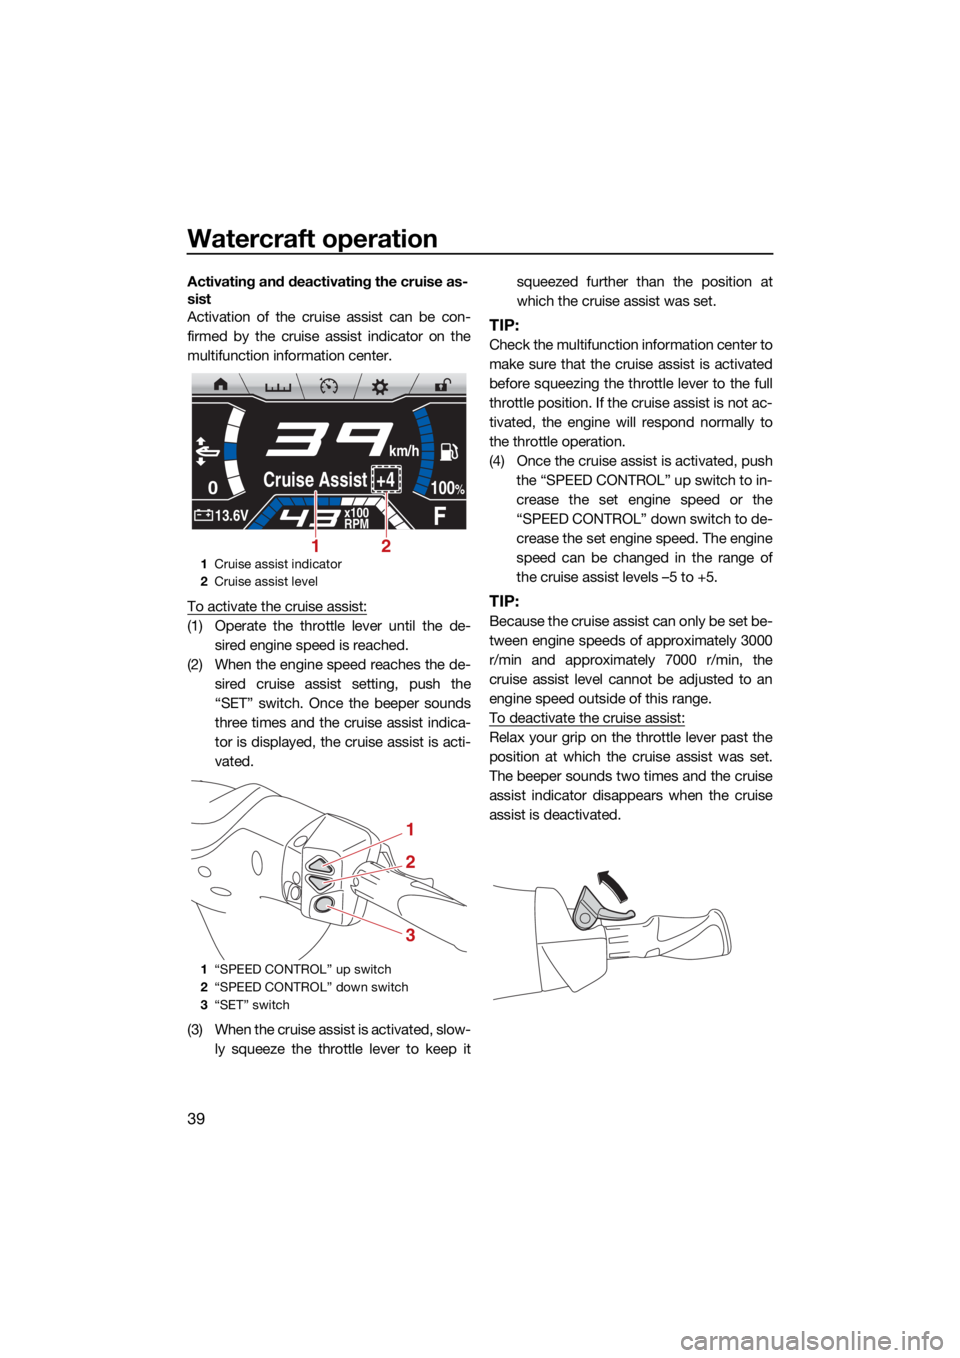
firmed by the cruise assist indicator on the
multifunction information center.
To activate the cruise assist:
(1) Operate the throttle lever until the de-sired engine speed is reached.
(2) When the engine speed reaches the de- sired cruise assist setting, push the
“SET” switch. Once the beeper sounds
three times and the cruise assist indica-
tor is displayed, the cruise assist is acti-
vated.
(3) When the cruise assist is activated, slow- ly squeeze the throttle lever to keep it squeezed further than the position at
which the cruise assist was set.
TIP:
Check the multifunction information center to
make sure that the cruise assist is activated
before squeezing the throttle lever to the full
throttle position. If the cruise assist is not ac-
tivated, the engine will respond normally to
the throttle operation.
(4) Once the cruise assist is activated, push
the “SPEED CONTROL” up switch to in-
crease the set engine speed or the
“SPEED CONTROL” down switch to de-
crease the set engine speed. The engine
speed can be changed in the range of
the cruise assist levels –5 to +5.
TIP:
Because the cruise assist can only be set be-
tween engine speeds of approximately 3000
r/min and approximately 7000 r/min, the
cruise assist level cannot be adjusted to an
engine speed outside of this range.
To deactivate the cruise assist:
Relax your grip on the throttle lever past the
position at which the cruise assist was set.
The beeper sounds two times and the cruise
assist indicator disappears when the cruise
assist is deactivated.
1Cruise assist indicator
2 Cruise assist level
1 “SPEED CONTROL” up switch
2 “SPEED CONTROL” down switch
3 “SET” switch
0
F13.6Vx100
RPM
100%Cruise Assist +4
km/h
21
1
2
3
UF3X72E0.book Page 39 Friday, May 29, 2020 10:09 AM
Page 49 of 116

Instrument operation
42
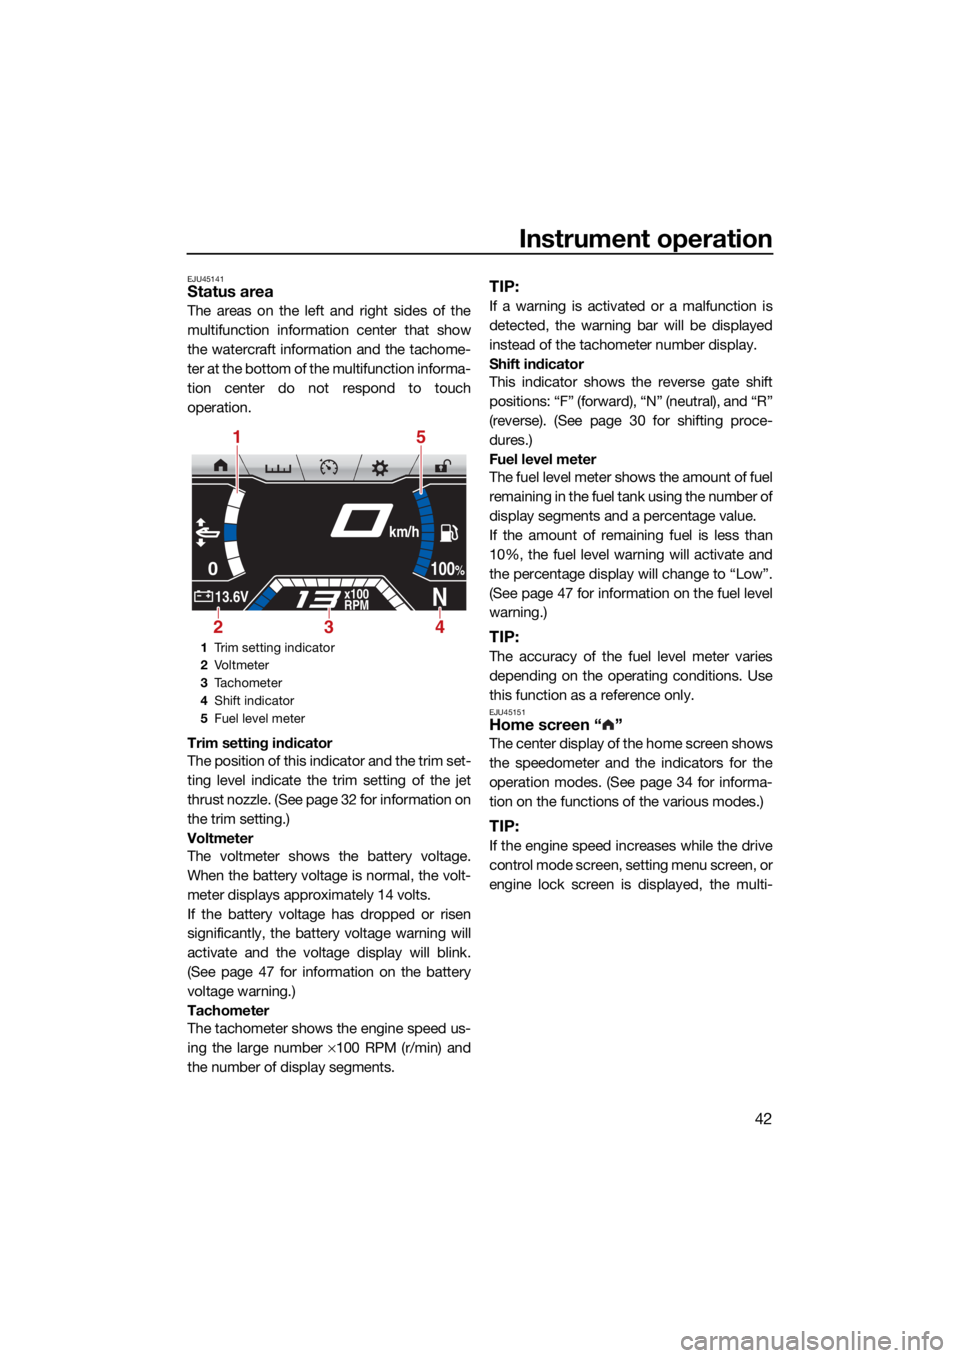
EJU45141Status area
The areas on the left and right sides of the
multifunction information center that show
the watercraft information and the tachome-
ter at the bottom of the multifunction informa-
tion center do not respond to touch
operation.
Trim setting indicator
The position of this indicator and the trim set-
ting level indicate the trim setting of the jet
thrust nozzle. (See page 32 for information on
the trim setting.)
Voltmeter
The voltmeter shows the battery voltage.
When the battery voltage is normal, the volt-
meter displays approximately 14 volts.
If the battery voltage has dropped or risen
significantly, the battery voltage warning will
activate and the voltage display will blink.
(See page 47 for information on the battery
voltage warning.)
Tachometer
The tachometer shows the engine speed us-
ing the large number ×100 RPM (r/min) and
the number of display segments.
TIP:
If a warning is activated or a malfunction is
detected, the warning bar will be displayed
instead of the tachometer number display.
Shift indicator
This indicator shows the reverse gate shift
positions: “F” (forward), “N” (neutral), and “R”
(reverse). (See page 30 for shifting proce-
dures.)
Fuel level meter
The fuel level meter shows the amount of fuel
remaining in the fuel tank using the number of
display segments and a percentage value.
If the amount of remaining fuel is less than
10%, the fuel level warning will activate and
the percentage display will change to “Low”.
(See page 47 for information on the fuel level
warning.)
TIP:
The accuracy of the fuel level meter varies
depending on the operating conditions. Use
this function as a reference only.
EJU45151Home screen “ ”
The center display of the home screen shows
the speedometer and the indicators for the
operation modes. (See page 34 for informa-
tion on the functions of the various modes.)
TIP:
If the engine speed increases while the drive
control mode screen, setting menu screen, or
engine lock screen is displayed, the multi-
1 Trim setting indicator
2 Vo l t m et e r
3 Tachometer
4 Shift indicator
5 Fuel level meter
0
N13.6Vx100
RPM
100%
km/h
15
423
UF3X72E0.book Page 42 Friday, May 29, 2020 10:09 AM
Page 52 of 116

Instrument operation
45
The color of the segments shown in the bar
graphs and the color that indicates selected
items can be changed.
To adjust the display brightness:
To make the display brighter, drag the slider
to the right. To make the display darker, drag
the slider to the left.
To select the color setting:
Drag the color selection slider to the left or
right to change the color setting to blue, red,
green, pink, orange, purple, yellow, or light
blue.
Selecting the display units (“Unit”)
The following display units can be selected
for the display units of the multifunction infor-
mation center.
“US Unit”: Distances are shown in miles,
speeds are shown in MPH, and fuel
amounts are shown in gallons.
“Metric”: Distances are shown in kilome-
ters, speeds are shown in km/h, and fuel
amounts are shown in liters.
To select the display units:
Flick up or down to select “US Unit” or “Met-
ric” under “Unit”, and then tap the “Save”
button.
Selecting the display language (“Lan-
guage”)
The display language for the multifunction in-
formation center can be selected from the
following languages.
English
French
Spanish
To select the display language:
Flick up or down to select the desired lan-
guage under “Language”, and then tap the
“Save” button.
1 Brightness adjustment slider
2 Color selection slider
100%
Background Color
1
2
Save
Unit
US Unit
Metric
Metric
Save
Langua ge
English
Españor
Français
UF3X72E0.book Page 45 Friday, May 29, 2020 10:09 AM
Page 85 of 116

Operation
78
steer without throttle. You may still have
some turning ability immediately after re-
leasing the throttle lever, but once the
engine slows down, the watercraft will no
longer respond to handlebar input until
you apply throttle again or you reach
trolling speed.
At trolling speed, the watercraft can be
turned gradually by handlebar position
alone using just the amount of thrust
available at idle.
D. If the engine is stopped while riding, there is no thrust. The watercraft will go
straight even though the handlebars are
turned.
You need throttle to steer.
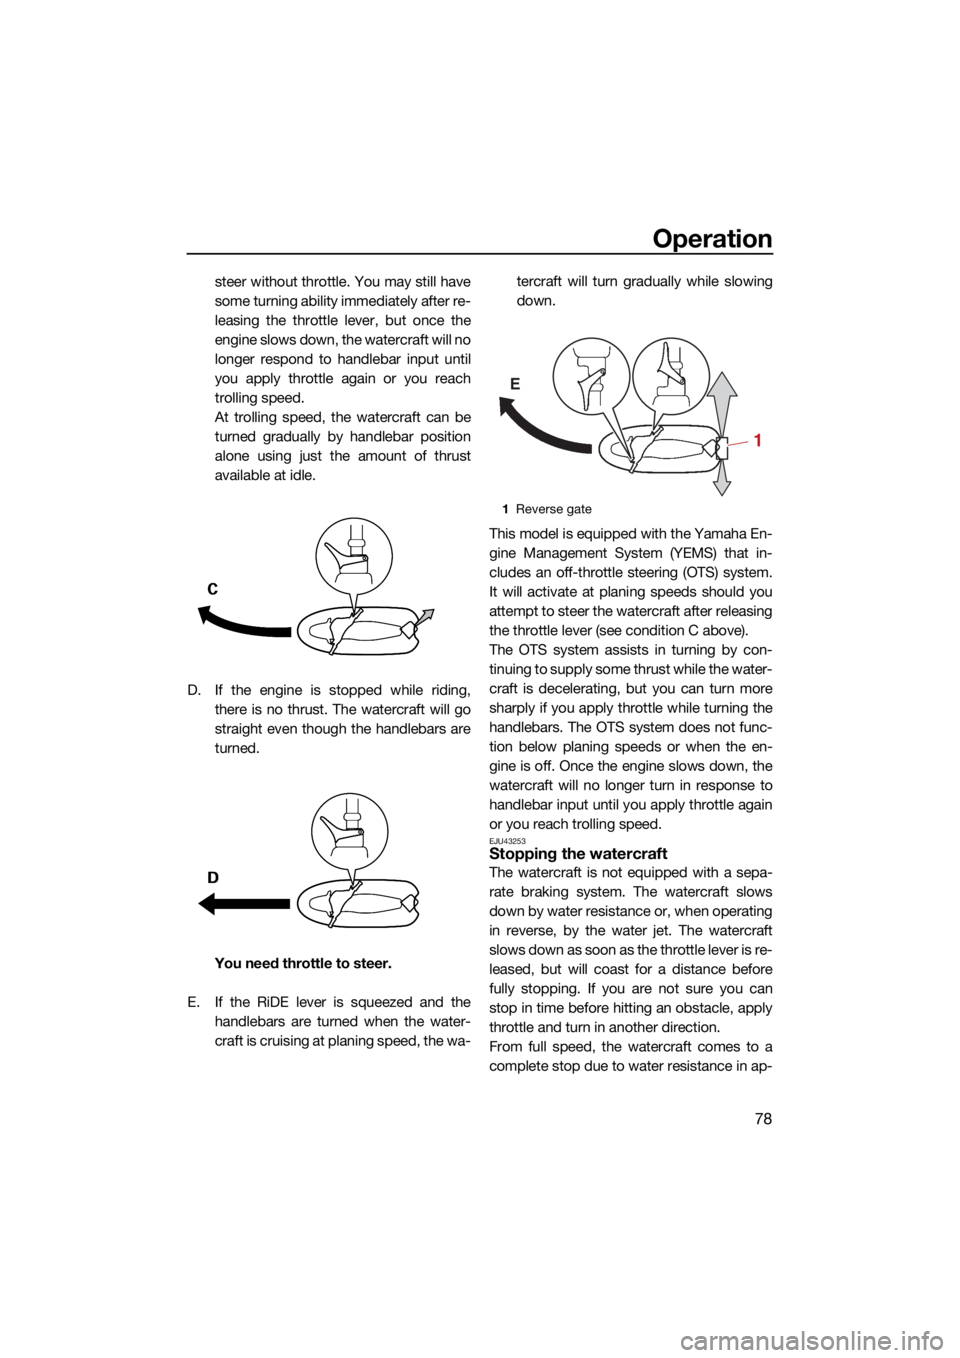
E. If the RiDE lever is squeezed and the handlebars are turned when the water-
craft is cruising at planing speed, the wa- tercraft will turn gradually while slowing
down.
This model is equipped with the Yamaha En-
gine Management System (YEMS) that in-
cludes an off-throttle steering (OTS) system.
It will activate at planing speeds should you
attempt to steer the watercraft after releasing
the throttle lever (see condition C above).
The OTS system assists in turning by con-
tinuing to supply some thrust while the water-
craft is decelerating, but you can turn more
sharply if you apply throttle while turning the
handlebars. The OTS system does not func-
tion below planing speeds or when the en-
gine is off. Once the engine slows down, the
watercraft will no longer turn in response to
handlebar input until you apply throttle again
or you reach trolling speed.
EJU43253Stopping the watercraft
The watercraft is not equipped with a sepa-
rate braking system. The watercraft slows
down by water resistance or, when operating
in reverse, by the water jet. The watercraft
slows down as soon as the throttle lever is re-
leased, but will coast for a distance before
fully stopping. If you are not sure you can
stop in time before hitting an obstacle, apply
throttle and turn in another direction.
From full speed, the watercraft comes to a
complete stop due to water resistance in ap-
1 Reverse gate
E
1
UF3X72E0.book Page 78 Friday, May 29, 2020 10:09 AM
Page 113 of 116

106
Index
A
Adjustable tilt steering system ................. 28
Adjustable tilt steering system checks .... 69
After removing the watercraft from the water ..................................................... 85
B
Battery care.............................................. 87
Battery checks ......................................... 67
Battery, jumping..................................... 101
Beaching and docking the watercraft ...... 84
Beverage holder ....................................... 55
Bilge water check..................................... 67
Bilge water, draining ................................ 61
Bilge water, draining on land ................... 61
Bilge water, draining on water ................. 61
Boarding alone ......................................... 80
Boarding and starting off from a dock ..... 83
Boarding the watercraft ........................... 80
Boarding with passenger(s) ..................... 81
Bow eye ................................................... 51
Bow storage compartment ...................... 52
Builder’s plate ............................................ 3
C
Capsized watercraft ................................. 83
Cleaning ................................................... 89
Cleaning the watercraft ............................ 87
Cleat ......................................................... 51
Cooling water pilot outlet check .............. 72
Cooling water pilot outlets ....................... 29
Craft Identification Number (CIN)............... 2
Cruise assist............................................. 38
Cruising limitations................................... 11
D
Drive control mode................................... 36
Drive control mode screen ....................... 44
E
Electric trim system.................................. 32
Electric trim system check ....................... 70
Emergency procedures .......................... 100
Engine break-in ........................................ 63
Engine compartment check ..................... 66
Engine cover, removing and installing ..... 91
Engine idling speed check ....................... 73
Engine lock screen ................................... 46
Engine oil ................................................. 59 Engine oil and oil filter .............................. 95
Engine oil level check ............................... 67
Engine oil requirements ........................... 59
Engine serial number ................................. 2
Engine shut-off cord (lanyard) check ....... 69
Engine shut-off switch ............................. 26
Engine stop switch ................................... 26
Engine unit check ..................................... 67
Enjoy your watercraft responsibly ............ 19
Equipment ................................................ 49
F
Fire extinguisher check ............................ 71
Fire extinguisher holder and cover........... 56
Fire extinguisher holder, cover, and
band checks ......................................... 70
Flushing the cooling water passages....... 86
Fuel .......................................................... 57
Fuel level check........................................ 66
Fuel requirements .................................... 57
Fuel system checks ................................. 66
Fuses, replacing ..................................... 102
G
Getting to know your watercraft .............. 74
Glossary, watercraft ................................. 20
Glove compartment ................................. 53
H
Handgrip .................................................. 50
Hazard information................................... 15
Home screen ............................................ 42
Hood check .............................................. 72
Hull and deck check ................................ 71
I
Identification numbers ............................... 1
Information screen ................................... 43
J
Jet intake and impeller, cleaning............ 100
Jet intake checks ..................................... 71
Jet thrust nozzle and reverse gate check .................................................... 71
Jumper cables, connecting .................... 101
L
Labels, important ....................................... 4
Labels, other .............................................. 8
Labels, warning .......................................... 5
Launching the watercraft ......................... 75
UF3X72E0.book Page 106 Friday, May 29, 2020 10:09 AM