2021 VOLKSWAGEN TRANSPORTER tyre pressure monitoring system
[x] Cancel search: tyre pressure monitoring systemPage 17 of 486

Symbol Meaning=>& See
.......,. Front brake pads worn .
Lit up: ESC fault or switched off for system-related reasons.
Flashing: ESC/TCS is taking corrective action. =>page 269
1} TCS switched off manually.
e ABS faulty or not functioning.
0$ Rear fog light switched on. =>page 106
Lit up: vehicle lighting not working partially or completely. =>page 432
0 Lit up or flashing: catalytic converter fault.
w Lit up: glow period for a diesel engine.
Flashing: fault in engine management system.
EPC Fault in engine management system. =>page 407
Diesel particulate filter has become saturated with soot.
Only for specially equipped courier vehicles: diesel particulate filter is being regenerated.
(1) Tyre pressure too low. =>page 367 Tyre monitoring system faulty.
0 Windscreen washer fluid level too low. =>page 116
f] Fuel tank almost empty. =>page 340
Flashing: engine oil system fault.
Lit up: engine oil level too low. =>page 353
....... Fault in airbag and belt tensioner system. =>page 87
tf'
Front passenger front airbag switched off (PASSENGER AIR BAG =>page 87
f9 Ad Blue® level is low. =>page 346
/>.
with Ad Blue® system faulty or not refilled using norm-standard AdBI-ue®. =>page 346
Have the air filter replaced. => Booklet SeNice schedule
a, Electronic Immobilizer active. =>page 257
Lit up: rear axle differential lock switched on. =>page 282 .... Flashing: rear axle differential lock fault.
Adaptive cruise control (ACC) currently not available. =>page 298
Instrument cluster 17
Page 30 of 486
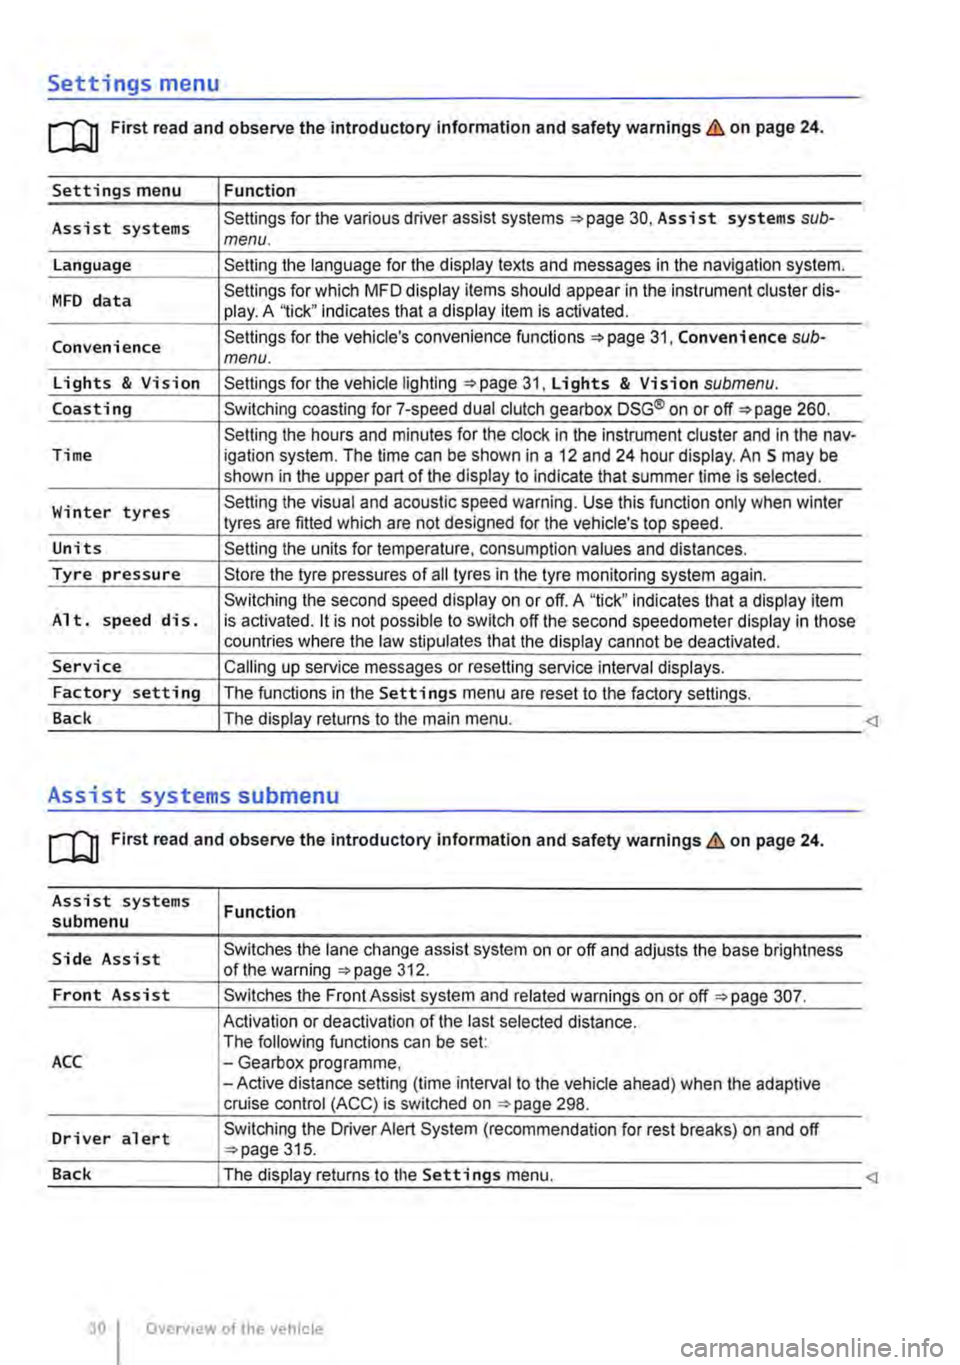
Settings menu
rn First read and observe the introductory information and safety warnings & on page 24.
Settings menu Function
Assist systems Settings for the various driver assist systems =:.page 30, Assist systems sub-menu.
Language Setting the language for the display texts and messages in the navigation system.
MFD data Settings for which MFD display items should appear in the instrument cluster dis-play. A '1ick" indicates that a display item is activated.
Convenience Settings for the vehicle's convenience functions 31, Convenience sub-menu.
Lights & Vision Settings for the vehicle lighting =:.page 31, Lights & Vision submenu.
Coasting Switching coasting for 7-speed dual clutch gearbox DSG® on or off=:. page 260.
Setting the hours and minutes for the clock in the instrument cluster and in the nav-Time igation system. The time can be shown in a 12 and 24 hour display. An S may be shown in the upper part of the display to indicate that summer time Is selected.
Winter tyres Setting the visual and acoustic speed warning. Use this function only when winter tyres are fitted which are not designed for the vehicle's top speed.
Units Setting the units for temperature, consumption values and distances.
Tyre pressure Store the tyre pressures of all tyres in the tyre monitoring system again.
Switching the second speed display on or off. A "tick" indicates that a display item Alt. speed dis. is activated. it is not possible to switch off the second speedometer display in those countries where the law stipulates that the display cannot be deactivated.
Service Calling up service messages or resetting service interval displays.
Factory setting The functions in the Settings menu are reset to the factory settings.
Back The display returns to the main menu.
Assist systems submenu
rn First read and observe the introductory information and safety warnings & on page 24.
Assist systems submenu
Side Assist
Front Assist
ACC
Driver alert
Function
Switches the lane change assist system on or off and adjusts the base brightness of the warning =:.page 312.
Switches the Front Assist system and related warnings on or off =:.page 307.
Activation or deactivation of the last selected distance. The following functions can be set: -Gearbox programme, -Active distance setting (time interval to the vehicle ahead) when the adaptive cruise control (ACC) is switched on ::.page 298.
Switching the Driver Alert System (recommendation for rest breaks) on and off ::.page 315.
Page 127 of 486

Always stow all items of luggage in the vehicle securely.
• Distribute items in the vehicle, on the roof and on the trailer as evenly as possible.
• Place heavy objects as far forward in the lug-gage compartment as possible. Position the rear seat backrests securely in the upright position.
• Secure luggage in the luggage compartment to the fastening rings with suitable straps 130.
• Adjust the headlight range 106.
• Adjust the tyre pressure according to the vehi-cle load. Adhere to the tyre pressure plate 367.
• In vehicles with a tyre monitoring system, set the new vehicle load level as necessary 318.
Stowing cargo
r-111 First read and observe the introductory L-l=:.LI information and safety warnings & on page 125.
Stow the load securely in the vehicle or on the load surface
• Before loading the vehicle, place a sturdy mat or similar cover flush with the vehicle floor. Where necessary, do not cover protruding parts of the ve-hicle floor.
• If necessary, remove the seats to increase the load area.
• The vehicle floor must be free of oil and dust, dry and fully clean in order to help prevent the load from sliding.
• Observe gross axle weight ratings and the gross vehicle weight rating.
• Distribute items in the vehicle, on the load sur-face, on the roof and on the trailer as evenly as possible.
• Stow heavy objects directly on the floor and above or in front of the rear axle and engage the rear seat backrests securely in an upright position.
CD
Hard objects on the shelf can chafe against the wires of the heating element in the rear window and cause damage.
m • Observe any information concerning the l!J loading of a trailer 139 .
• Observe any information concerning the load-ing of a roof carrier 137.
• Protect the seat rails or seat anchor points from damage.
• Secure luggage with suitable securing straps on the fastening rings 130.
• Adjust the headlight range 106.
• Adjust the tyre pressure according to the vehi-cle load. Adhere to the tyre pressure plate 367.
• In vehicles with a tyre monitoring system, set the new vehicle load level as necessary 318.
CD
Hard objects on the shelf can chafe against the wires of the heating element in the rear window and cause damage.
m • Observe any information concerning the l!J loading of a trailer =>page 139 .
• Observe any information concerning the load-ing of a roof carrier =>page 137 .
Page 318 of 486

Function and operation
•
Fig. 252 In centre console: button for setting the adaptive chassis control.
r-f"n First read and observe the introductory Information and safety warnings & on page 317.
While the vehicle is in motion, the adaptive chassis control constantly adjusts the suspension charac-teristics to match the road surface and the current driving situation, in accordance with a preset pro-gramme.
Channel
"Comfort"@
"Normal"
"Sport" 0
Recommended driving situa-tions
Comfort-oriented chassis setup, e.g. when driving for extended trips on poor quality roads.
Balanced selling, e.g. for every-day use.
Sporty setting, e.g. for a sporty driving response.
Tyre monitoring system
CO! Introduction
This chapter contains information on the following subjects:
Indicator lamp .......................... 319
Function and control ..................... 321
The tyre monitoring system warn the
driver about low tyre pressures.
Additional information and warnings:
• Volkswagen information system ""page 24
• Transporting ""page 125
318 I While dnvmg
Selecting a programme
• Switch on the ignition.
• Press the (ili) button repeatedly until the re-quired programme Is displayed.
The "Normal" programme is active if neither® nor ®light up in the button. The selected programme will remain set even after the ignition has been switched off.
A WARNING
Adjusting the damping setting could alter the vehicle handling. The adaptive chassis con-trol must never tempt you into taking any risks when driving.
• Always adapt your speed and driving style to suit visibility, weather, road and traffic con-ditions.
m If there is a fault in the adaptive chassis con-l!:J trol, the displays® and 0 will flash in the but-ton. The driving comfort of the vehicle could be af-fected until the fault is fixed. Go to a qualified work-shop and have the system checked. <1
• Braking, stopping and parking :;.page 269
• Wheels and tyres =page 367
• Cleaning and caring for the vehicle exterior =page 380
• Accessories, modifications, repairs and renewal of parts =page 394
• Consumer information =page 404 .,.
Page 319 of 486

A WARNING
The intelligent tyre monitoring system tech-nology cannot overcome the laws of physics, and functions only within the limits of the system. Incorrect handling of the wheels and tyres can lead to a sudden loss of pressure in the tyres, tread separation and even tyre blow-out.
• Check tyre pressures regularly and always maintain the specified tyre pressure value =>page 367. If the tyre pressure is too low, it is possible that the tyre temperature will in· crease to such an extent that the tread peels off and the tyre bursts.
• Always maintain correct cold tyre pres-sure as listed on the tyre pressure label =>page 367.
• Check tyre Inflation pressure regularly when the tyres are cold. Adjust tyre pressure in the cold tyre to the recommended tyre pressure for the tyres Installed on your vehi· cle as necessary.
• Check your tyres regularly for signs of wear or damage.
• Never exceed the top speed and load per-mitted for the fitted tyres.
CD
If valve caps are missing, the valve could be damaged. Always use valve caps that comply with the factory-fitted valve cap specifications. Always screw on valve caps fully. Do not use metal valve caps.
Indicator lamp
Under-inflated tyres will increase fuel con-W sumption and tyre wear. A higher tyre pres-sure generally reduces the fuel consumption. How-ever, the maximum tyre pressures specified by the manufacturer must always be adhered to.
m When new tyres are driven at high speeds for L!..J the first time, they can expand slightly and trigger a one-off pressure warning.
m Old tyres should only be replaced by tyres L!..J that have been approved by Volkswagen Commercial Vehicles for the vehicle type.
m Do not rely solely on the tyre monitoring sys-L!..J tern. Check your tyres regularly to ensure that they are properly inflated and have no signs of damage, such as punctures, cuts, cracks, and blis-ters. Remove any objects that become embedded in the tyre tread but have not penetrated into the body of the tyre itself.
m The tyre monitoring system is adjusted for L!..J the factory-recommended tyre pressures to be found on the tyre pressure label.
Lit upa) Possible cause=>& Solution
Do not drive on! Reduce speed immedi· ately. Stop the vehicle as soon as possible
The tyre pressure of one tyre or several and when safe to do so. Do not undertake
tyres has decreased considerably in com-any extreme steering or braking manoeuvres!
(l) parison to the tyre pressure set by the Check all wheels and tyre pressures, and cor-rect if necessary =>page 367. The damaged driver, or the structure of the tyre is dam-tyre should be replaced. The tyre monitoring aged. system will have to be re-synchronised after changing the tyre pressure, or after changing one or more wheels =>page 321.
a) An acoustic warning will also be sounded, and a corresponding message may appear 1n the instrument cluster display.
Driver assist systems I 319
Page 320 of 486

Flashes a) Possible cause*& Solution
If the tyre pressure is correct, but the indicator lamp fails to go out after the ignilion is switch-
(l) System faulty. ed off and back on again and if it is not possi-ble to calibrate the tyre monitoring system, please go to a qualified workshop. Have the system checked.
•I Indicator lamp flashes for around 1 minute and then lights continuously.
Several warning and indicator lamps will light up briefly as a functional check when the lgnilion is switched on. They will go out after a few seconds.
A WARNING
Differing tyre pressures or tyre pressures that are too low can cause tyre failure, the loss of vehicle control, accidents, serious in-jury and death.
• If the Indicator lamp (l) lights up, stop the vehicle as soon as possible and check all the tyres.
• Different tyre pressures or tyre pressures that are too low can Increase wear on the tyres, reduce vehicle stability and Increase the braking distance.
• Differing tyre pressures or tyre pressures that are too low can cause sudden tyre failure and lead to a tyre burst and the loss of con-trol over the vehicle.
• The driver Is responsible for the correct tyre pressure of all tyres on the vehicle. The recommended tyre pressure can be found on the tyre pressure label 367.
• The tyre monitoring system cannot func-tion correctly until all cold wheels have the correct tyre pressure.
• The use of Incorrect tyre pressures can cause accidents and tyre damage. All tyres must always have the correct tyre pressure to suit the vehicle load.
• Always Inflate all tyres to the correct tyre pressure before every journey.
• If driven with Insufficient pressure, the tyre flexes more. This could warm up the tyre to such an extent that the tread may separate and the tyre could burst.
• High speeds and overloading of the vehi-cle may cause the tyres to heat up to such an extent that the tyre bursts, leading you to lose control of the vehicle.
320 I Whllo drivmg
A WARNING (Continued)
• If the tyre pressure Is too low or too high, the tyres will wear prematurely and the vehl-cle will not handle well.
• If the tyre Is not flat and it Is not necessary to change the wheel immediately, drive at low speed to the nearest qualified workshop and check and correct the tyre pressure.
A WARNING
Failure to observe illuminated warning lamps and text messages can lead to your vehicle breaking down In traffic, and can cause acci-dent and serious injury.
• Never ignore any illuminated warning lamps or text messages.
• Stop the vehicle as soon as possible and when safe to do so.
CD
Failure to observe Illuminated Indicator lamps and text messages can lead to your vehicle be-Ing damaged.
m If the tyre pressure is too low and this is de-L!..) tected while driving, the yellow indicator lamp lights up (l). An acoustic warning is also given, and a text notification may also be shown.
m If a system fault is detected while the ignition L!..J is switched on, the yellow Indicator lamp flashes (l) for around one minute and then lights up steadily. A text notification may also be displayed.
m Driving on unpaved roads for a long time or a L!..J sporty driving style could temporarily deacti-vate the tyre monitoring system. The Indicator lamp shows the functional fault, but disappears if the road conditions or driving style change.
Page 321 of 486

Function and control
Fig. 253 In the stowage compartment on the front passenger side: button for the tyre monitoring sys-tem.
l"'"""f'n First read and observe the Introductory l.-J,.:,LL Information and safety warnings & on page 318.
The tyre monitoring system uses data from the ASS sensors and other functions to check the speed of rotation and the rolling circumference of the individual wheels. The rolling circumference of the wheels changes, if the tyre pressure is too low. This is then shown by the tyre monitoring sys-tem ill in the instrument cluster.
The operation of the tyre monitoring system is im-paired:
• If the tyre pressure has been changed manual-ly.
• If the tyre has structural damage.
• If the vehicle Is loaded more heavily on one side.
• If the wheels on one axle are loaded more heavily, e.g. high load level.
• If snow chains have been fitted.
• If one wheel per axle has been changed.
• When driving with a heavy trailer attached.
• If you are driving under winter conditions or on unsurfaced roads.
• When driving fast with hard acceleration and braking manoeuvres.
Synchronising the tyre monitoring system
The tyre monitoring system will have to be re-synchronised after changing the tyre pressure, or after changing one or more wheels. This also ap-plies for changing the wheels, e.g. from the front to the rear, and for changing from summer tyres to winter tyres.
The saved values must be reset before the system can be resynchronised.
• Switch on the ignition, and while the vehicle is stationary
• Press and hold the =>Fig. 253 button until an acoustic confirmation signal is emitted.
• OR: with some vehicle equipment options, you can open menu option Tyre pressure in the in-strument cluster display and save the new tyre pressures there =>page 24.
Once the saved values have been reset, the sys-tem calibrates itself independently to the fitted tyres and the tyre pressures filled by the driver dur-ing normal vehicle operation. The calibrated values are adopted and monitored after a long journey at various speeds.
If the wheels are loaded more heavily than normal, e.g. if the vehicle is carrying heavy payload, the tyre pressure must be raised to the recommended full-load tyre pressure before synchronisation =>page 367.
m The tyre monitoring system stops working if l!.J there is a fault in the ESC or ASS =>page 269.
m When using snow chains, an incorrect dis-l!.J play may be shown as the snow chains in-crease the tyre circumference =>page 367.
Page 367 of 486

Wheels and tyres
Useful information about wheels and tyres
o:::n Introduction
This chapter contains information on the following subjects:
Handling wheels and tyres .............. .
Rims
368
369
New wheels and tyres . . . . . . . . . . . . . . . . . . . 370 Tyre pressure . . . . . . . . . . . . . . . . 371
Tread depth and wear indicators 372 Tyre damage 373
Spare wheel . . . . . . . . . . . . . . . . . . . . . . . . . . . . 374
Tyre lettering . . . . . . . . . . . . . . . . . . . . . . . . . . . 375
Winter tyres . . . . . . . . . . • . • • . . . . . . . . . . . . 378 Snow chains . . . . . . . . . . . . . . . . . 379
Volkswagen Commercial Vehicles recommends that work on tyres and wheels is carried out by a qualified workshop. They are familiar with the pro-cedure and have the necessary special tools and spare parts and the proper facilities for disposing of the old tyres. Volkswagen Commercial Vehicles recommends using a Volkswagen Commercial Ve-hicles dealership for this purpose.
Additional information and warnings:
• Transporting 125
• Towing a trailer 139
• Braking, stopping and parking 269
• Tyre monitoring system 318
• Cleaning and caring for the vehicle exterior 380
• Consumer information 404
• Vehicle tool kit 416
• Hubcaps 417
• Changing a wheel 420
• Breakdown set 425
A WARNING
New tyres or tyres which are old, worn down or damaged cannot provide full levels of vehi-cle control and braking power.
• Incorrect handling of wheels and tyres can reduce vehicle safety and cause accidents and serious injuries.
A WARNING (Continued)
• All four wheels must be fitted with radial tyres of the same type, size (rolling circum-ference) and the same tread.
• New tyres will have to be run In as they will initially have reduced grip and braking ef-fect. Drive particularly carefully for the first 600 km in order to prevent accidents and se-rious injury.
• Check tyre pressures regularly and always keep to the specified tyre pressure value. If the tyre pressure is too low, it Is possible that the tyre temperature will Increase to such an extent when driving that the tread peels off and the tyre bursts.
• Never drive with worn tyres or tyres that are damaged (cuts, cracks or blisters). Driv-Ing with tyres in this condition can result in blown tyres, accidents and serious Injuries. Worn or damaged tyres must be replaced as soon as possible.
• Never exceed the top speed and load per-mitted for the fitted tyres.
• The effectiveness of the driver assist sys-tems and brake support systems depends on the tyre grip.
• If you notice unusual vibration or if the ve-hicle pulls to one side when driving, stop the car immediately and check the wheels and tyres for damage.
• In order to reduce the risk of losing con-trol of the vehicle, and the risk of accident and serious injury, never loosen the bolts on rims with bolted on rim rings.
• Do not use wheels or tyres if you do not know their history. Used wheels and tyres could be damaged, even If the damage is not visible.
• Old tyres (even if never used) can sudden-ly Jose pressure or burst, especially at high speeds. This can cause accidents and seri-ous injuries. Avoid using tyres that are more than six years old. If you have no alternative, drive slowly and with extra care at all times.
m For technical reasons, it is not generally pos-L!.J sible to use the wheels from other vehicles. This can also apply to wheels of the same vehicle .,.
Wheels and tyres I 367