2021 VOLKSWAGEN TRANSPORTER lock
[x] Cancel search: lockPage 18 of 486

Symbol Meaning=>& See
Lane change assist system currently not available. =>page 312 .
The fog light is switched on. =>page 106
.......,,...., Turn signal, left or right. =>page 106 r., Hazard warning lights switched on. =>page 411
Trailer turn signals in operation. =>page 139
Lit up: depress the brake pedal. Changing gear
CS» =>page 260 Flashing: the lock button in the selector lever is not engaged. Braking, stopping and parking =>page 269
The cruise control system (CCS) is controlling the speed. =>page 295
(") Adaptive cruise control (ACC) active. No vehicle has been detec-ted ahead. =>page 298
th. Lit up: Hill Descent Assist switched on. =>page 285 Flashing: the lock button in the selector lever is not engaged.
Main beam is switched on or the headlight flasher is being opera!-=>page 106 ed.
When displayed in white: Adaptive cruise control (ACC) active.
B'
Vehicle detected ahead.
When displayed in grey: Adaptive cruise control (ACC) not active. =>page 298
System switched on, does not regulate.
Main beam assist (Light Assist) is activated. =>page 110
Lit up: service interval display. =>page 22
,....c. Flashes alternately with selector lever display, e.g. 0: fault in dual clutch gearbox (DSG®. =>page 260
(A) The starUstop system is available, automatic engine stop is active.
The starUstop system is not available. =>page 282
(J9 OR: the starUstop system has switched off the engine automatical-ly.
*
Black ice warning. The outside temperature is below =>page 19 +4·c (+39.F).
® A mobile telephone is connected via Bluetooth to the factory-fitted => Booklet Radio, pro-provision for mobile telephone. vision for mobile tele-
Mobile telephone battery charge level. Only for factory-fitted provi-phone, infotainment system, navigation sion for mobile telephone. system
A WARNING A WARNING (Continued)
Failure to observe illuminated warning lamps and text messages can lead to your vehicle breaking down in traffic, and can cause acci-dent and serious injury.
• Never ignore any illuminated warning lamps or text messages.
Overv1ew of the vehicle
• Stop the vehicle as soon as possible and when safe to do so.
• Stop the vehicle at a safe distance away from moving traffic and ensure that no part of the exhaust system can come Into contact with any inflammable material underneath the vehicle, e.g. dry grass or fuel. ll>
Page 20 of 486
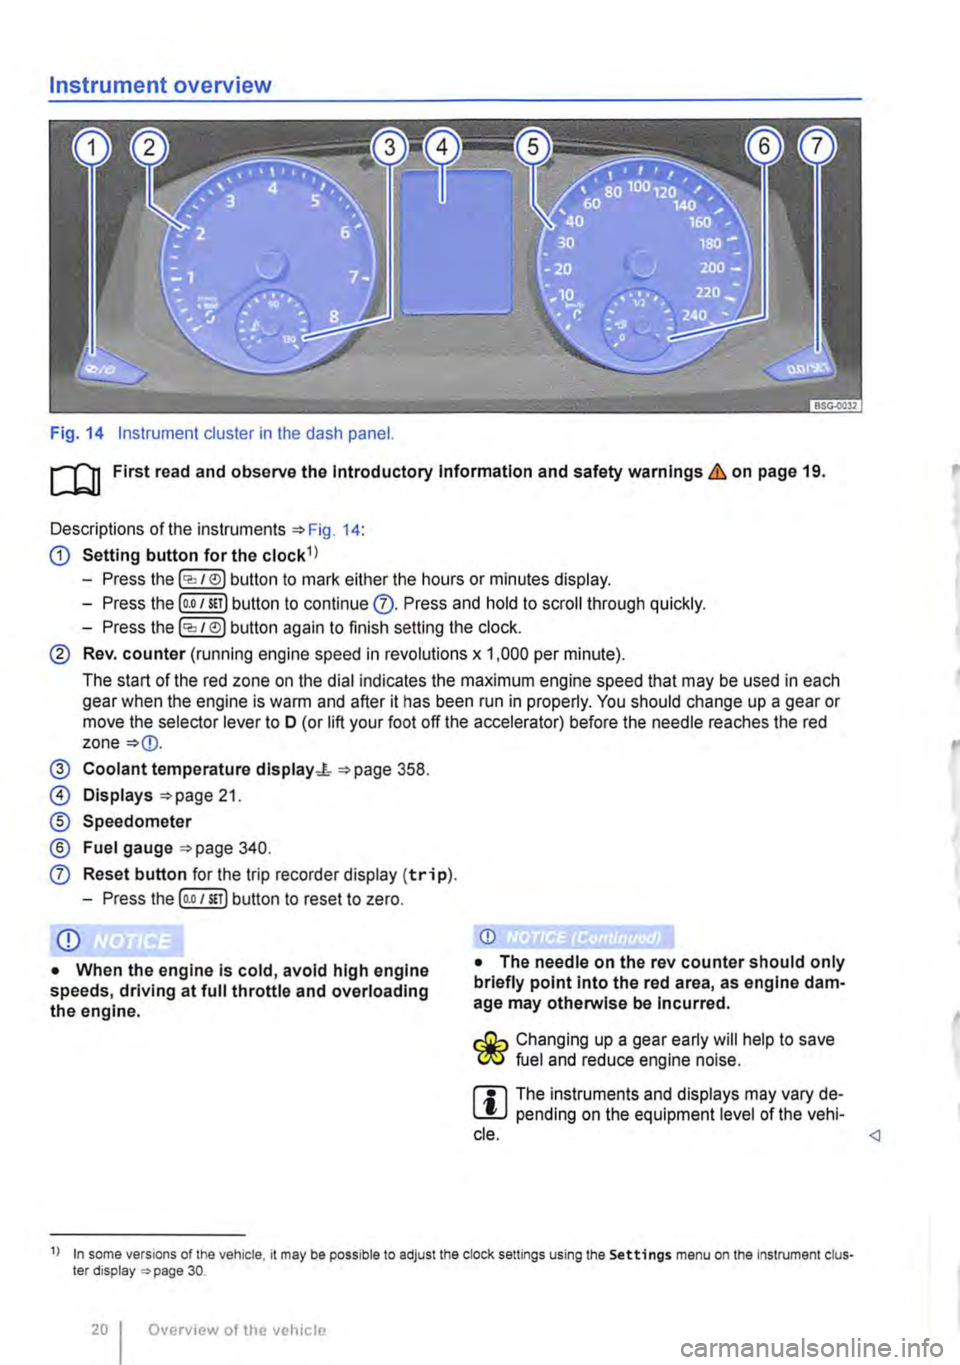
Instrument overview
Fig. 14 Instrument cluster in the dash panel.
m First read and observe the Introductory Information and safety warnings & on page 19.
Descriptions of the instruments 14:
G) Setting button for the clock 1)
-Press the (
-Press the (o.o 1 sn) button to continue Q). Press and hold to scroll through quickly.
-Press the (
® Rev. counter (running engine speed in revolutions x 1,000 per minute).
The start or the red zone on the dial indicates the maximum engine speed that may be used in each gear when the engine is wanm and after it has been run in properly. You should change up a gear or move the selector lever to D (or lift your foot off the accelerator) before the needle reaches the red zone =:o(D.
@ Coolant temperature dlsplay.J,. 358.
0) Displays =:opage 21.
® Speedometer
® Fuel gauge =:opage 340.
CD Reset button for the trip recorder display (trip).
-Press the [o.o 1 sn) button to reset to zero.
CD
• When the engine Is cold, avoid high engine speeds, driving at full throttle and overloading the engine.
&... Changing up a gear early will help to save W fuel and reduce engine noise.
r:il The instruments and displays may vary de-L!J pending on the equipment level of the vehi-cle.
20 Ovcrvtew of the vchtclc
Page 23 of 486
In vehicles with fixed oil change service, services take place at predefined intervals.
The service intervals are calculated on an Individu-al basis in vehicles with flexible oil change serv-Ice. Advances in technology have brought about a considerable reduction in servicing requirements. The flexible oil change is a new service offered by Volkswagen to ensure that the oil is only changed when necessary. The length between the oil change services (maximum of 2 years) is also de-termined by the conditions under which the vehicle is used and personal driving style. The service re-minder is displayed 20 days before the service is due. The distance is rounded to the nearest 100 km; the remaining time is rounded to full days. The current service information cannot be opened until you have driven 500 km since the last service. Until this point the display only shows lines.
Service reminder
If the vehicle is due to be serviced, a service re-minder will appear on the display when the ignition is switched on.
In vehicles without text messages a spanner sym-bol will appear on the instrument cluster along with a display in km and a clock symbol e> showing the time left before the next service appointment is due in days. The number of kilometres shown cor-responds to the maximum number of kilometres that can still be driven until the service appoint-ment is due. In addition, a symbol in the top right corner of the display specifies which service ap-pointment the reminder is for (1 for inspection, 2 for oil change service).
If the service reminder is displayed for both service appointments (1 and 2 in the top right corner of the instrument cluster display), the distance and the display in days for the next service appointment applies in vehicle without text messages.
In vehicles with text messages, Oi 1 change or Inspection in---km or ---days appears in the instrument cluster display.
Service event
If a service Is due, a signal will sound and the spanner symbol will appear for a few seconds when the ignition is switched on. In vehicles with text messages, Oil change now! or Inspec-tion now! appears In the instrument cluster dis-play.
Accessing a service message
You can access the current service messages whenever the ignition is switched on, the engine is not running and the vehicle is stationary.
• Press the button in the instrument cluster as often as possible until the spanner symbol and 1 in the top right corner of the display appears. The values shown apply to the oil change service.
• Press the lCCJie>J button on the instrument cluster again. The spanner symbol appear and the number 2 will appear on the top right hand corner of the display. The values shown apply to the in-spection.
• OR: select the Settings menu.
• Select the menu option Info in the Service submenu.
If a service Is overdue, this is indicated by a mi-nus sign in front of the mileage or trip reading.
Resetting oil change service
If the oil change service was not performed by a Volkswagen Commercial Vehicles workshop, it can be reset as follows:
Vehicles with text messages:
Switch off the ignition.
Press and hold down the lo.o/SETJ button in the in-strument cluster.
Restart the ignition.
Release the lo.o/sn) button.
Confirm the selection on the instrument cluster by pressing the laKJRESET) button on the wiper lever or the I!) button on the multifunction steering wheel.
Vehicles without text messages:
Switch off the ignition.
Press and hold down the lo.o1sn) button in the in-strument cluster.
Restart the ignition.
Release the lo.o/SETJ button and press the li:Q'e>J but-ton within approximately 20 seconds.
Do not reset the display between service intervals. This can lead to Incorrect information being dis-played.
If you manually reset the service interval display while flexible oil change service is valid, "fixed oil change service" will be activated. The service inter-val will no longer be calculated on an Individual ba-sis =*Booklet Service schedule.
Resetting Inspection
If the inspection was not performed by a Volkswa-gen Commercial Vehicles workshop. it can be reset asfollows:
Instrument cluster
Page 25 of 486
A WARNING
Accidents and injuries can occur if the driver is distracted.
• Never open the menus on the instrument cluster display while the vehicle is in motion.
r::l After starting the engine with a discharged l!..J vehicle battery, or after the battery has been changed, system settings (time, date, personal
Overview of the menu structure
nl1 First read and observe the introductory 1-J,::.JJ Information and safety warnings & on page 24.
The following menu structure shows how the Volkswagen information system menus on the in-strument cluster display are structured. The size and layout of the Volkswagen information system menu depends on the vehicle electronics and the level of vehicle equipment.
MFD (multlfunctlon display) 28
• Travel time
• Curr. consum. (current fuel consumption)
• Av. consum. (average consumption)
• Fuel range
• SCR range (Ad Blue® remaining range)
• Distance
• Av. speed (average speed)
• Digit. speed (digital speed display)
• Digital oil temp. (digital oil temperature display)
• Speed warning
ACC =>page 298
Audio Radio, provision for mobile telephone, infotainment system, navigation system
Navigation Radio, provision for mo-bile telephone, infotainment system, navigation system
Telephone Radio, provision for mo-bile telephone, infotainment system, navigation system
Vehicle status 21, Displays and 22, Service Interval display
convenience settings and programming) may have been changed or deleted. Check and correct the settings as necessary once the vehicle battery has been sufficiently charged.
• Assist systems
-Side Assist
System on/off
Brightness
Back
-Front Assist
System on/off
Acoustic warning/advance warning
Dist. warn. (distance warning)
Back
-ACC
Basic sett. (basic settings)
Distance
Back
-Back
• Language
• MFD data
-Travel time on/off
-Current consumption (current fuel consump-tion) on/off
-Av. consum. (average consumption) on/off
-Distance on/off
-Av. speed (average speed) on/off
-Digital speed (digital speed display) on/off
-Digital oil temp. (digital oil temperature dis-play) on/off
-Speed warn. (speed warning) on/off
-Back
• Convenience
-ATA confirm on/off
-Central locking (central locking system)
Auto lock (automatic locking) on/off
Auto unlock (automatic unlocking) on/off
Instrument cluster 25
...
Page 26 of 486
Unlock doors (door unlocking)
Back
-Window op. (window operation)
Off
All
Driver
Back
-Factory setting (factory setting)
-Back
• Lights & Vision
-Coming Home
System on/off
+ 10 Sec.
-10 Sec.
Back
-Leaving Home
System on/off
+ 10 Sec.
-10 Sec.
Back
-Backgrnd light.
System on/off
+5%
-5%
Back
-Footwelllight
System on/off
+5%
-5%
Back
-Lane change flash on/off
-Travel mode on/off
-Factory setting (factory setting)
-Back
• Coasting on/off
• Time
-Hours
-Minutes
Overview of the vehicle
-24 hr mode on/off
-Summer on/off
-Back
• Winter tyres
-System on/off
- + 10 km/h (6 mph)
--10 km/h (6 mph)
-Back
• Units
-Temperature oc
OF
Back
-Consump./dist.
l/100km, km
km/1, km
MPG(GB), mi
MPG(US), mi
Back
-Air pressure
bar
psi
kPa
Back
-Back
• Tyre pressure
-Save
-Back
• Alt. speed dis. (secondary speed display) on/off
• Service
-Information
-Back
• Factory settings
Page 30 of 486
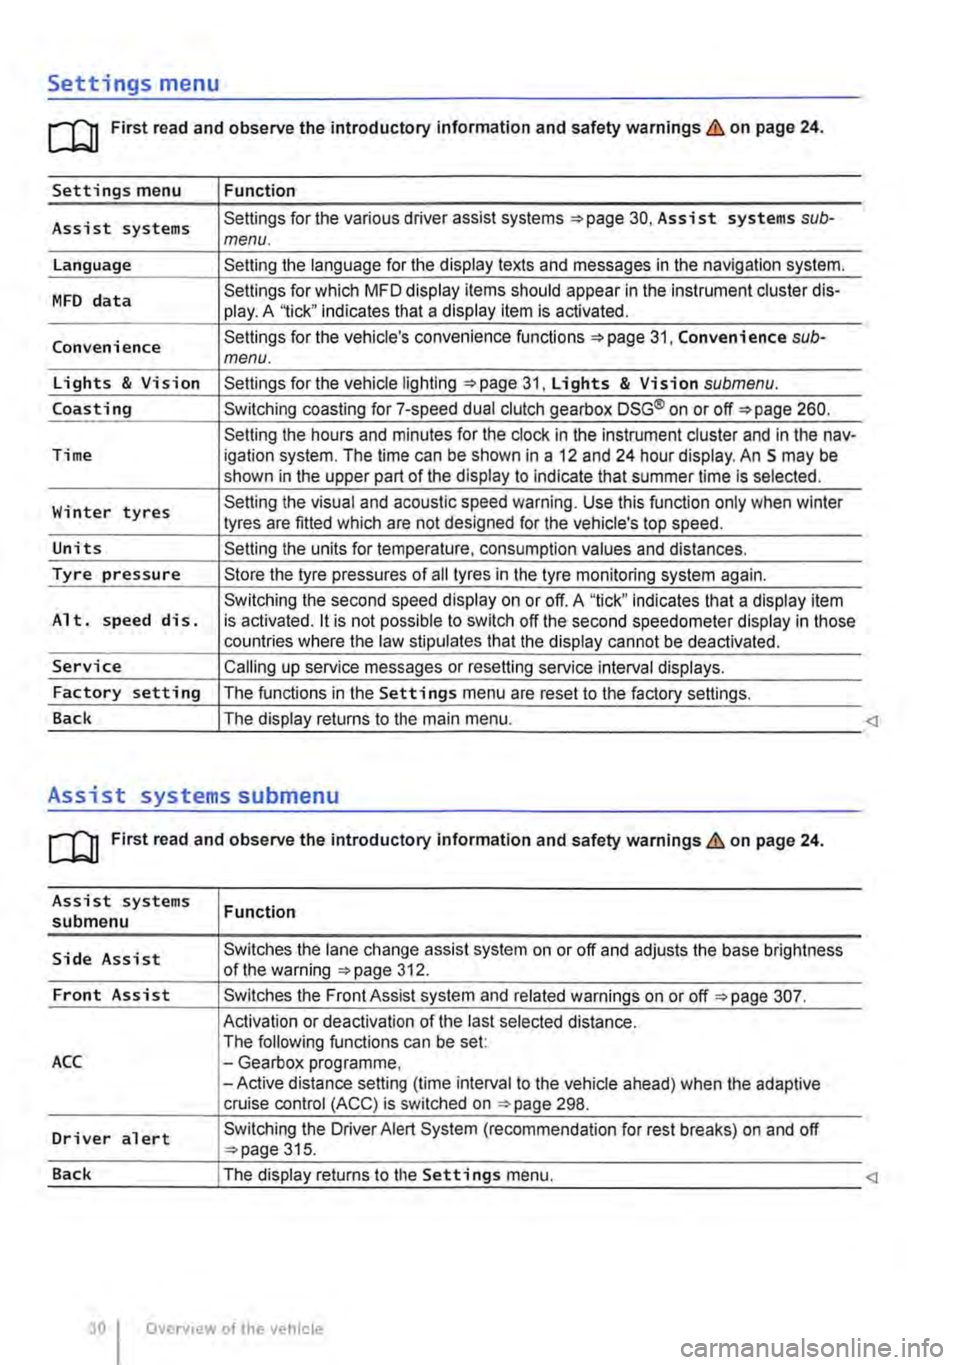
Settings menu
rn First read and observe the introductory information and safety warnings & on page 24.
Settings menu Function
Assist systems Settings for the various driver assist systems =:.page 30, Assist systems sub-menu.
Language Setting the language for the display texts and messages in the navigation system.
MFD data Settings for which MFD display items should appear in the instrument cluster dis-play. A '1ick" indicates that a display item is activated.
Convenience Settings for the vehicle's convenience functions 31, Convenience sub-menu.
Lights & Vision Settings for the vehicle lighting =:.page 31, Lights & Vision submenu.
Coasting Switching coasting for 7-speed dual clutch gearbox DSG® on or off=:. page 260.
Setting the hours and minutes for the clock in the instrument cluster and in the nav-Time igation system. The time can be shown in a 12 and 24 hour display. An S may be shown in the upper part of the display to indicate that summer time Is selected.
Winter tyres Setting the visual and acoustic speed warning. Use this function only when winter tyres are fitted which are not designed for the vehicle's top speed.
Units Setting the units for temperature, consumption values and distances.
Tyre pressure Store the tyre pressures of all tyres in the tyre monitoring system again.
Switching the second speed display on or off. A "tick" indicates that a display item Alt. speed dis. is activated. it is not possible to switch off the second speedometer display in those countries where the law stipulates that the display cannot be deactivated.
Service Calling up service messages or resetting service interval displays.
Factory setting The functions in the Settings menu are reset to the factory settings.
Back The display returns to the main menu.
Assist systems submenu
rn First read and observe the introductory information and safety warnings & on page 24.
Assist systems submenu
Side Assist
Front Assist
ACC
Driver alert
Function
Switches the lane change assist system on or off and adjusts the base brightness of the warning =:.page 312.
Switches the Front Assist system and related warnings on or off =:.page 307.
Activation or deactivation of the last selected distance. The following functions can be set: -Gearbox programme, -Active distance setting (time interval to the vehicle ahead) when the adaptive cruise control (ACC) is switched on ::.page 298.
Switching the Driver Alert System (recommendation for rest breaks) on and off ::.page 315.
Page 31 of 486
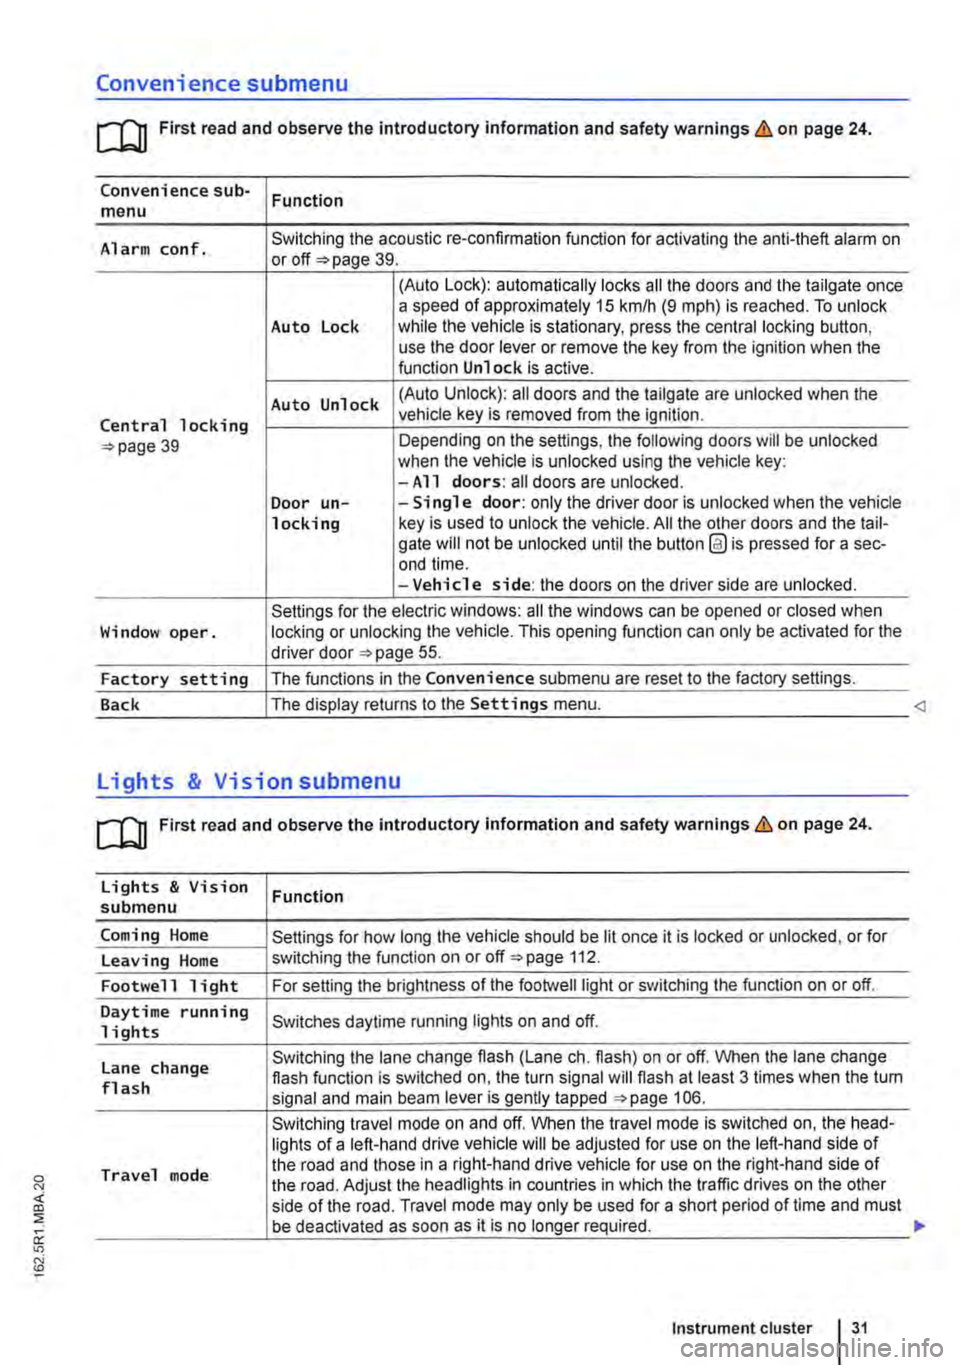
Convenience submenu
m First read and observe the introductory information and safety warnings & on page 24.
Convenience sub-menu Function
Alarm conf. Switching the acoustic re-confirmation function for activating the anti-theft alarm on or page 39.
(Auto Lock): automatically locks all the doors and the tailgate once a speed of approximately 15 km/h (9 m ph) is reached. To unlock Auto Lock while the vehicle is stationary, press the central locking button, use the door lever or remove the key from the ignition when the function Unlock is active.
Auto Unlock (Auto Unlock): all doors and the tailgate are unlocked when the
Central locking vehicle key is removed from the ignition.
39 Depending on the settings, the following doors will be unlocked when the vehicle is unlocked using the vehicle key: -All doors: all doors are unlocked. Door un--Single door: only the driver door is unlocked when the vehicle locking key is used to unlock the vehicle. All the other doors and the tail-gate will not be unlocked until the button @ is pressed for a sec-end time. -Vehicle side: the doors on the driver side are unlocked.
Settings for the electric windows: all the windows can be opened or closed when Window oper. locking or unlocking the vehicle. This opening function can only be activated for the driver door 55.
Factory setting The functions in the Convenience submenu are reset to the factory settings.
Back The display returns to the Settings menu.
[QJ First read and observe the introductory information and safety warnings & on page 24.
Lights & Vision Function submenu
Coming Home Settings for how long the vehicle should be lit once it is locked or unlocked, or for
Leaving Home switching the function on or off 112.
Footwell light For setting the brightness of the footwelllight or switching the function on or off.
Daytime running Switches daytime running lights on and off. 1 i ghts
Lane change Switching the lane change flash (Lane eh. flash) on or off. When the lane change flash function is switched on, the turn signal will flash at least 3 times when the tum flash signal and main beam lever is gently tapped 106.
Switching travel mode on and off. When the travel mode is switched on, the head-lights of a left-hand drive vehicle will be adjusted for use on the left-hand side of
Travel mode the road and those in a right-hand drive vehicle for use on the right-hand side of the road. Adjust the headlights in countries in which the traffic drives on the other side of the road. Travel mode may only be used for a short period of time and must be deactivated as soon as it is no longer required.
Instrument cluster 31
Page 36 of 486
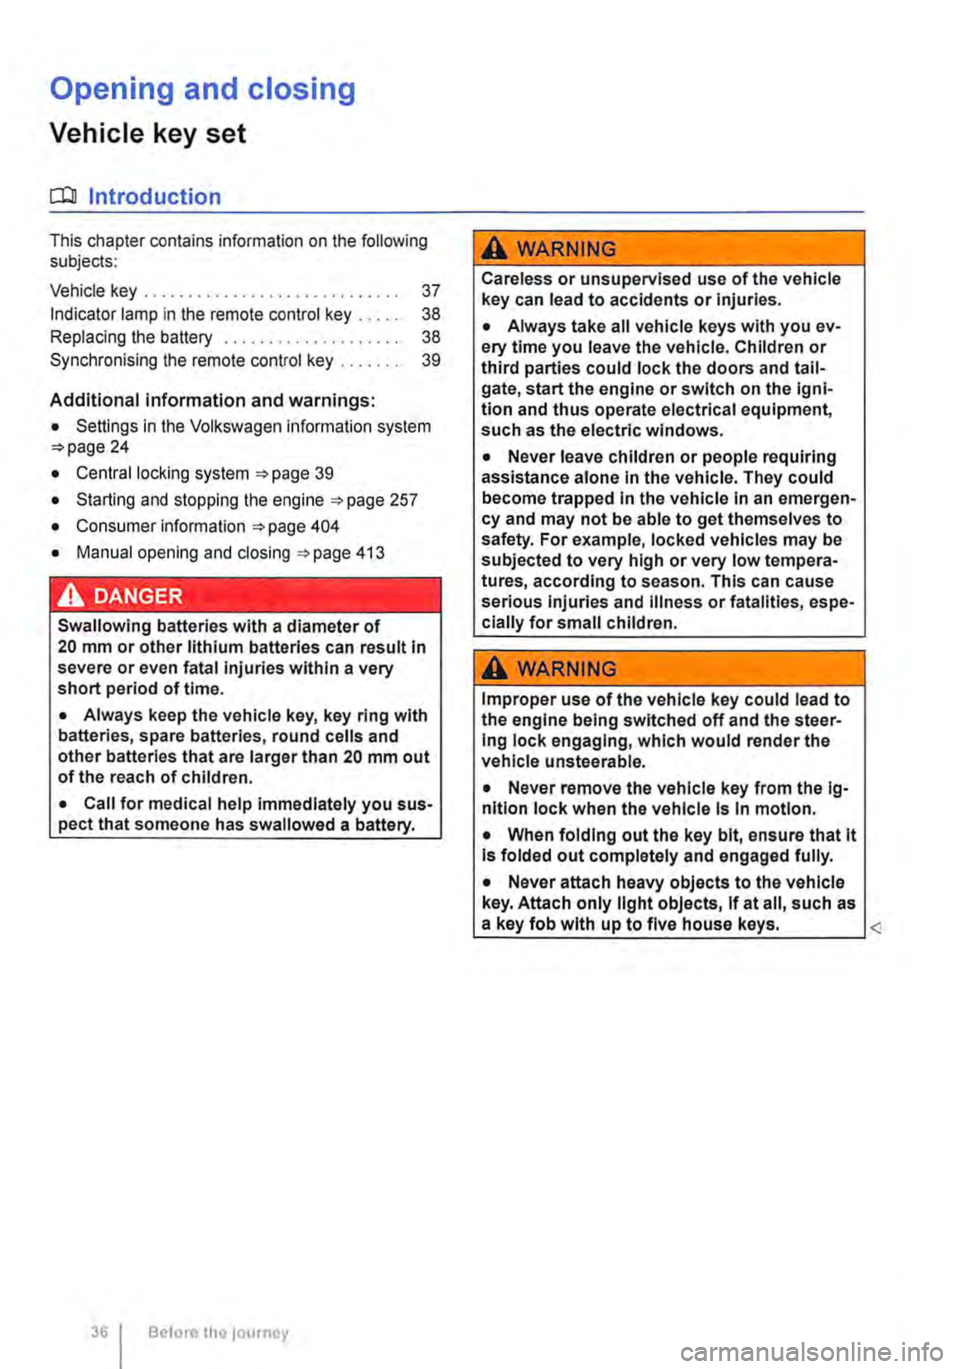
Opening and closing
Vehicle key set
COl Introduction
This chapter contains information on the following subjects:
Vehicle key . . . . . . . . . . . . . . . . . . . . . . . . . . . . . 37 Indicator lamp in the remote control key . . . . . 38 Replacing the battery . . . . . . . . . . . . . 38 Synchronising the remote control key . . . . . . . 39
Additional Information and warnings:
• Settings in the Volkswagen information system 24
• Central locking system 39
• Starting and stopping the engine 257
• Consumer information 404
• Manual opening and closing 413
A DANGER .
Swallowing batteries with a diameter of 20 mm or other lithium batteries can result In severe or even fatal injuries within a very short period of time.
• Always keep the vehicle key, key ring with batteries, spare batteries, round cells and other batteries that are larger than 20 mm out of the reach of children.
• Call for medical help Immediately you sus-pect that someone has swallowed a battery.
36 Before tho journey
A WARNING
Careless or unsupervised use of the vehicle key can lead to accidents or injuries.
• Always take all vehicle keys with you ev-ery time you leave the vehicle. Children or third parties could lock the doors and tail-gate, start the engine or switch on the igni-tion and thus operate electrical equipment, such as the electric windows.
• Never leave children or people requiring assistance alone In the vehicle. They could become trapped In the vehicle in an emergen-cy and may not be able to get themselves to safety. For example, locked vehicles may be subjected to very high or very low tempera-tures, according to season. This can cause serious Injuries and Illness or fatalities, espe-cially for small children.
A WARNING
Improper use of the vehicle key could lead to the engine being switched off and the steer-Ing lock engaging, which would render the vehicle unsteerable.
• Never remove the vehicle key from the Ig-nition lock when the vehicle Is In motion.
• When folding out the key bit, ensure that lt Is folded out completely and engaged fully.
• Never attach heavy objects to the vehicle key. Attach only light objects, If at all, such as a key fob with up to five house keys. <