2021 VOLKSWAGEN TRANSPORTER wheel
[x] Cancel search: wheelPage 424 of 486
Checklist (Continued)
7. Raise the vehicle jack until it just fits under the jacking point of the vehicle.
8. Make sure that the foot of the jack is resting securely on the ground with its whole sur-face and that its axis of rotation is posi-tioned precisely, i.e. vertically beneath the point of application. For better clarity, extend the line from the point of application to the axis of rotation of the jack foot =>Fig. 300.
9. Position the vehicle jack. At the same time, continue to crank the claw up until it is in po-sition around the vertical rib underneath the vehicle => Fig. 300.
10. Crank the vehicle jack further until the wheel is just clear of the ground.
A WARNING
Incorrect use of the vehicle jack can cause the vehicle to slip off the jack, which can lead to severe Injuries. Please note the following points In order to reduce the risk of Injuries:
• Only use vehicle jacks which have been approved by Volkswagen Commercial Vehi-cles for your vehicle type. Other vehicle jacks could slip out of position-this Includes vehi-cle jacks supplied with other Volkswagen models.
• The ground must be firm and level. Soft ground or surfaces at an Incline under the ve-hicle jack may cause the vehicle to slip off the jack. If necessary use a large, strong board or similar support for the vehicle jack.
Changing a wheel
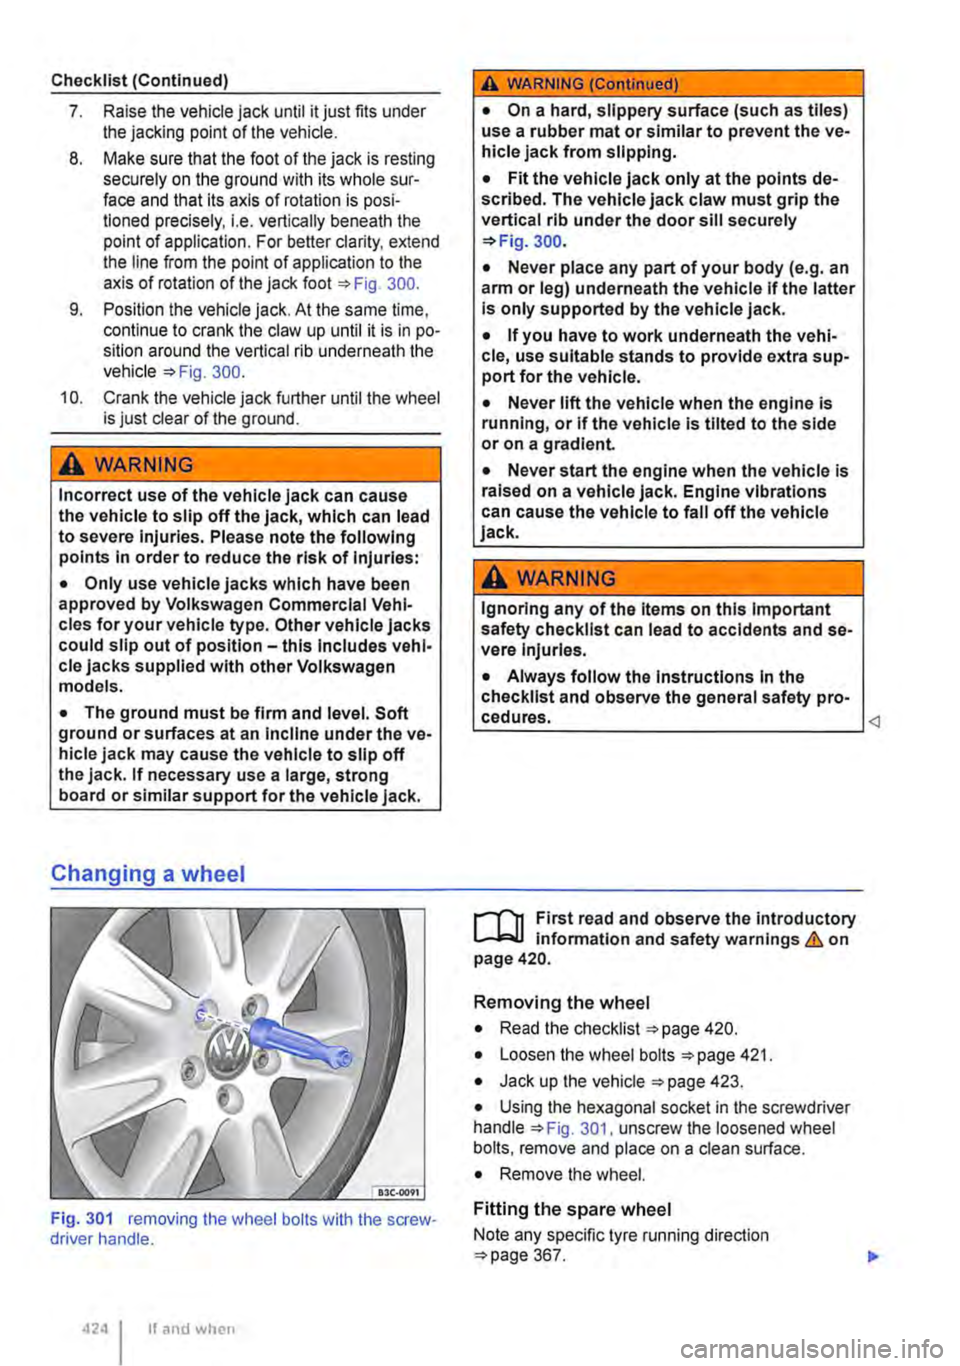
Fig. 301 removing the wheel bolts with the screw-driver handle.
424 If and when
A WARNING (ConUnued)
• On a hard, slippery surface (such as tiles) use a rubber mat or similar to prevent the ve-hicle jack from slipping.
• Fit the vehicle jack only at the points de-scribed. The vehicle jack claw must grip the vertical rib under the door sill securely =>Fig. 300.
• Never place any part of your body (e.g. an arm or leg) underneath the vehicle If the latter Is only supported by the vehicle jack.
• If you have to work underneath the vehi-cle, use suitable stands to provide extra sup-port for the vehicle.
• Never lift the vehicle when the engine is running, or If the vehicle is tilted to the side or on a gradient
• Never start the engine when the vehicle is raised on a vehicle jack. Engine vibrations can cause the vehicle to fall off the vehicle jack.
A WARNING
Ignoring any of the Items on this Important safety checklist can lead to accidents and se-vere Injuries.
• Always follow the Instructions In the checklist and observe the general safety pro-
r--('n First read and observe the introductory L-J.:.I.J information and safety warnings & on page 420.
Removing the wheel
• Read the checklist =>page 420.
• Loosen the wheel bolts =>page 421.
• Jack up the vehicle =>page 423.
• Using the hexagonal socket in the screwdriver handle =>Fig. 301, unscrew the loosened wheel bolts, remove and place on a clean surface.
• Remove the wheel.
Fitting the spare wheel
Note any specific tyre running direction =>page 367.
Page 425 of 486
• Clean the area around the fastening holes of the spare wheel.
• Position the spare wheel.
• Insert the anti-theft wheel bolt using the adapter at position 298 @or® and tighten it slight-ly.
• Screw in all the other wheel bolts in a clockwise direction and use the box spanner to tighten them gently.
• Lower the vehicle with the jack.
• Use the box spanner to tighten all the wheel bolts securely in a clockwise direction &. Do not tighten the bolts in clockwise or anticlockwise se-quence. Tighten them in diagonal sequence.
• Fit the cover caps, centre covers or wheel cov-ers 417.
After changing a wheel
rl'l1 First read and observe the Introductory L-.lo:.ll Information and safety warnings & on page 420.
• If necessary, clean the vehicle tools and stow them safely in the vehicle 416.
• Stow the spare wheel or the removed wheel safely under the vehicle.
Breakdown set
CQJ Introduction
This chapter contains information on the following subjects:
Storing . . . . . . . . . . . . . . . . . . . . 426
Contents of the breakdown set . . . . . . . . . . . . 427 Preparation . . . . . . . . . . . . . . . . . . . . . . . . . . . 427
Sealing and inflating tyres . . . . • . . . . . . . 428
Test after driving for 10 minutes . . . . 429
You can use the breakdown set (tyre mobility set) to safely seal any tyre damage caused by foreign bodies or punctures (up to 4 mm (0.16 Inches) in diameter). Do not remove foreign objects (e.g. screws or nails) from the tyrel
Once the sealant has been added to the tyre, the tyre pressure must be checked again after approxi-mately 10 minutes of driving.
,A WARNING
Incorrect torque or incorrect use of wheel bolts can lead to a loss of control of the vehi-cle, cause accidents and serious Injuries.
• Always keep all wheel bolts and threads In the wheel hubs clean and free from oil and grease. The wheel bolts must be easy to turn and be tightened to the specified torque.
• The hexagonal socket In the screwdriver handle should only be used for turning wheel bolts, not use for loosening or tightening them.
• The damaged wheel should be replaced as soon as possible.
m In vehicles with a tyre monitoring system, the L!..J system may have to "re-learn" if new tyres are fitted 318.
Only use the breakdown set if the car is parked in a safe place, you are familiar with the required ac-tions and safety procedures, and you have access to the correct breakdown set. Seek expert assis-tance if this is not the case.
The tyre sealant must not be used:
• If the rim is damaged.
• If the outside temperature is below -2o•c (-4 ·F).
• If there are cuts or punctures in the tyre that are larger than 4 mm. .,.
Practical tips 425
Page 426 of 486

• If the tyre pressure is very low or the tyres are flat.
• If the use-by date on the tyre filler bottle has ex-pired.
Additional information and warnings:
• Vehicle key set 36
• Seat functions, front 69
• Stowage 150
• Braking, stopping and parking =>page 269
• Wheels and tyres 367
• In an emergency 411
• Hubcaps 417
A WARNING
Using the breakdown set can be dangerous, especially if the tyres are inflated at the road-side. Please note the following points In or-der to reduce the risk of serious injuries:
• Stop the vehicle as soon as possible and when safe to do so. Park the vehicle at a safe distance from moving traffic in order to fill the tyre.
• Check that the surface the vehicle is parked on is level and firm.
• All passengers, and children in particular, must be at a safe distance and away from your area of work.
• Switch on the hazard warning lights to warn other road users.
• The breakdown set should only be used if you feel confident with carrying out the pro-cedure. If not, seek expert assistance.
Storing
rT'n First read and observe the introductory L-W.I information and safety warnings & on page 425.
Model
Multivan
California
426 I If and when
A WARNING (Continued)
• Tyres repaired with the breakdown set are intended for temporary, emergency use only. They should only be used until you can reach the nearest qualified workshop.
• Tyres that have been repaired using the breakdown set should be replaced as soon as possible.
• Sealant Is hazardous to health and must be washed off Immediately if it gets onto the skin.
• The breakdown set must be stored out of the reach of children.
• Never use a vehicle jack, even If it Is ap-proved for the vehicle.
• Always switch off the engine, apply the handbrake and move the selector lever to the position P or select a gear on a manual gear-box In order to reduce the risk of unintended vehicle movement.
A WARNING
Tyres that have been filled with sealant will not handle In the same way as a standard tyre.
• Never drive faster than 80 km/h (50 mph).
• Avoid full acceleration, sudden braking and fast driving through bends In the road.
• Drive for just 10 minutes at no more than 80 km/h (50 m ph) and then check the tyre.
Dispose of used or out-of-date sealant in ac-W cordance with legal requirements.
m You can get a new tyre filler bottle from a L!:J Volkswagen Commercial Vehicles dealership.
m Observe the separate instructions from the l!:J manufacturer of the breakdown set. <1
The breakdown set can be located in different pla-ces depending on the model.
Stowage
In the drawer in the 3-seat bench or in the drawer of the rear left single seat.
Behind the load-through hatch cover on the side of the bench seat/bed. <1
Page 439 of 486
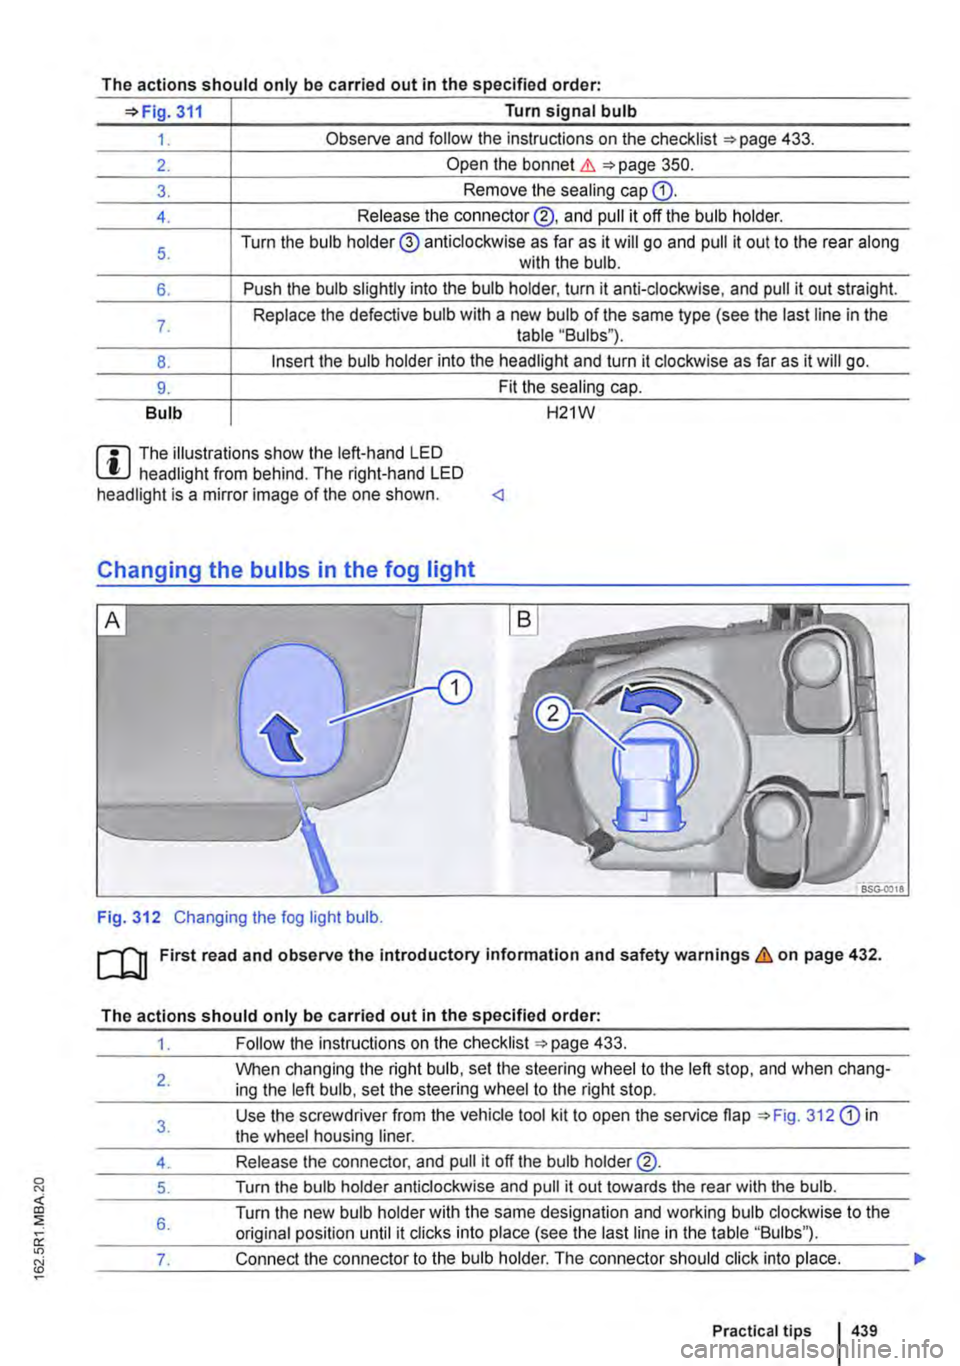
The actions should only be carried out in the specified order·
311 Turn signal bulb
1. Observe and follow the instructions on the checklist ""page 433.
2. Open the bonnet.&. 350.
3. Remove the seating cap Q).
4. Release the connector@, and pull it off the bulb holder.
5. Turn the bulb holder@ anticlockwise as far as it will go and pull it out to the rear along with the bulb.
6. Push the bulb slightly into the bulb holder, turn it anti-clockwise, and pull it out straight.
7. Replace the defective bulb with a new bulb of the same type (see the last line in the table "Bulbs").
8. Insert the bulb holder into the headlight and turn it clockwise as far as it will go.
9. Fit the sealing cap.
Bulb H21W
m The illustrations show the left-hand LED W headlight from behind. The right-hand LED headlight is a mirror image of the one shown.
Fig. 312 Changing the fog light bulb.
m First read and observe the introductory information and safety warnings & on page 432.
The actions should only be carried out in the specified order:
1. Follow the instructions on the checklist 433.
2.
3.
4.
5.
6.
When changing the right bulb, set the steering wheel to the left stop, and when chang-ing the left bulb, set the steering wheel to the right stop.
Use the screwdriver from the vehicle tool kit to open the service flap 312 Q) in the wheel housing liner.
Release the connector, and pull it off the bulb holder@.
Turn the bulb holder anticlockwise and pull it out towards the rear with the bulb.
Turn the new bulb holder with the same designation and working bulb clockwise to the original position until it clicks into place (see the last line in the table "Bulbs").
__ ___:7...:.. ___ ..::.sh...:.o:...:u:....ld::.....:.c:...:lic.::.k:....i:....nt.:..:.o-"p-'-la:....c:..:e...:.. ___
Practical tips 439
Page 440 of 486
![VOLKSWAGEN TRANSPORTER 2021 Owners Manual The actions should only be carried out in the specified order:
8. Close the service flap CD in the wheel housing liner.
Bulb H11 <]
Fig. 313 Changing the tail light bulbs.
ro First read and observ VOLKSWAGEN TRANSPORTER 2021 Owners Manual The actions should only be carried out in the specified order:
8. Close the service flap CD in the wheel housing liner.
Bulb H11 <]
Fig. 313 Changing the tail light bulbs.
ro First read and observ](/manual-img/18/55777/w960_55777-439.png)
The actions should only be carried out in the specified order:
8. Close the service flap CD in the wheel housing liner.
Bulb H11 <]
Fig. 313 Changing the tail light bulbs.
ro First read and observe the introductory Information and safety warnings & on page 432.
The actions should only be carried out in the specified order:
Brake light/tail Rear fog light bulb '*Fig. 313 Tail light bulb Turn signal bulb light bulb or reversing light bulb
1. Observe and follow the instructions on the checklist =>page 433.
2. Unscrew the two securing bolts G).
3. Push the tail light cluster towards the outside out of the mounting, release the connec-tor, and pull it off the bulb holder.
4. Unscrew the four securing bolts@, and pull the bulb holder@ out of the tail light cl us-ter.
Push the bulb® Push the bulb 0 Pull the bulb@ Pull the bulb ® slightly into the bulb slightly into the bulb 5. straight out of the straight out of the holder, turn it anti-holder, turn it anti-bulb holder. bulb holder. clockwise, and pull it clockwise, and pull it out straight. out straight.
6. Replace the defective bulb with a new bulb of the same type (see the last line in the table "Bulbs").
7. Insert the bulb holder into the tail light cluster and tighten the bolts.
8. Carefully insert the tail light cluster into the body so that it is flush with the vehicle body-work, and tighten the bolts.
Bulb W5W I W16W I P21/4W I H21Wor P21W <]
440 I If and whon
Page 446 of 486
Tow-starting and towing
0::0 Introduction
This chapter contains information on the following subjects:
Notes on tow-starting . . . . . . . . . . . . . . . . . . . . 446
Notes on towing . . . . . . . . . . . . . . . . . . . . . . . . . 447
Fitting the towing eye at front . . . . . . . . . . . . 448 Notes on driving while towing . . . . . . . . . . . . . . 448
Observe any legal requirements when towing.
For technical reasons, vehicles with a dis-charged battery must not be tow-started.
Towing a vehicle when the engine is switched off and the ignition is switched on discharges the vehi-cle battery. Depending on the vehicle battery charge level, the drop in voltage can be large enough after just a few minutes that electrical con-sumers in the vehicle will no longer function, e.g. the hazard warning lights.
Additional information and warnings:
• Exterior views =>page 5
• Changing gear =>page 257
• Engine management system and exhaust puri-fication system =>page 407
• Jump starting =>page 443
A wARNING
Never tow a vehicle that has no power sup-ply.
• Never remove the key from the ignition. The steering lock may be activated and you will no longer be able to steer the vehicle. This can lead to a loss of control of the vehi-cle, accidents and serious injuries.
Notes on tow-starting
t""""("'n First read and observe the introductory L-.lc:.JJ information and safety warnings & on page 446.
Vehicles should not be tow-started wherever possible. Use jump leads to start the engine in· stead =>page 443.
For technical reasons, the following vehicles can-not be tow-started:
4461 If and when
A WARNING (Continued)
• If the power supply to the towed vehicle is disconnected, stop towing immediately and seek expert assistance.
A WARNING
If a vehicle is being towed, the vehicle han-dling and braking effect will change signifi-cantly. Please note the following in order to reduce the risk of an accident or serious inju-ries:
• Notes for the driver of the towed vehicle:
-You will need to depress the brake ped-al more vigorously than normal as the brake servo is not working. Always be careful not to drive Into the vehicle that is pulling your vehicle.
-You will need to turn the steering wheel more vigorously as the power-assisted steering function Is not working.
• Notes for the driver of the towing vehicle
-Accelerate carefully and gently.
-Avoid sudden braking and driving ma· noeuvres.
-Brake earlier than normal by pressing lightly on the brake pedal.
CD
• Remove and install the cover and the tow-ing eye carefully so as to avoid damage to the vehicle, e.g. the palntwork.
• Unburnt fuel can enter the catalytic convert· er and damage it while the vehicle Is being tow-ed.
• If the vehicle battery has discharged, the en-gine control units will not function properly.
However, if the vehicle still has to be tow-started (manual gearbox):
• Engage second or third gear.
• Keep the clutch pressed down.
Page 447 of 486
• Switch on the ignition and the hazard warning lights.
• Once both vehicles are in motion, release the clutch.
• As soon as the engine starts, press the clutch and put the gear into neutral. This helps to prevent driving into the towing vehicle.
Notes on towing
i"""fl1 First read and observe the introductory L-W! information and safety warnings & on page 446.
Fixed towing eye at rear
On vehicles without a towing bracket there is a fixed towing eye under the bumper at the rear right.
Towing bracket instead of a fixed towing eye
If the vehicle has a factory-fitted towing bracket, it should also be used for towing other vehicles.
Tow rope or tow bar
lt is easier and safer to tow a vehicle with a tow bar. Only use a tow rope if you do not have a tow bar.
The tow rope should be slightly elastic to reduce the strain on both vehicles. lt is advisable to use a tow rope made of synthetic fibre or similarly elastic material.
Only attach the tow rope or tow bar to the specially provided towing eyes or to the towing bracket.
Vehicles with a factory-fitted towing bracket must be towed only with a tow bar that is specially designed for fitting to a ball coupling 139.
When your vehicle has to be towed:
• Switch on the ignition.
• Select the neutral position or move the selector lever to N 257.
• Release the handbrake. if necessary.
CD
When tow-starting, unburnt fuel can enter the catalytic converter and damage it. <1
• Do not allow the vehicle to be towed at speeds faster than 50 km/h (30 mph).
• Do not allow the vehicle to be towed further than 50 km.
• Vehicles with a DSG® dual clutch gearbox may only be towed by the breakdown truck with the front wheels raised.
Towing vehicles with four-wheel drive (4MOTION)
Vehicles with four-wheel drive (4MOTION) may be towed with a tow bar or tow rope. If the vehicle is towed with the rear or front axle raised, the engine must be switched off otherwise the drive train could be damaged.
When should your vehicle not be towed?
• If, due to damage, the vehicle gearbox no lon-ger contains any lubricant.
• If the vehicle battery is discharged.
• If the distance to be towed is further than 50 km -applies only to vehicles with the DSG® dual clutch gearbox.
• If the steering function or the operating clear-ance of the wheels cannot be ensured, e.g. after an accident.
Please comply with the following when towing another vehicle:
• Comply with legal regulations.
• Comply with the information on towing con-tained in the owner's manual for the other vehicle. <1
Practical tips
Page 450 of 486
Technical data
Technical data
Vehicle data
COJ Introduction
This chapter contains information on the following subjects:
Vehicle identification data . . . . . . . . . . . . . . . . . 451
Dimensions ........................... . 452
Unless otherwise specified, the technical data of the basic model apply. The values quoted here may differ if additional equipment is fitted, for differ-ent models, for special vehicles or if country-specif-ic equipment is fitted. All data in the official vehicle documents take precedence over these data.
Engine
The vehicle data sticker and the official vehicle documents show which engine is installed in your vehicle.
Weight
The values for the kerb weight in the following ta-bles apply for the road-ready vehicle with driver (75 kg), service fluids including fuel tank carrying 90% of its capacity and, if applicable, toolkit and spare tyre =>&.Additional equipment and retrofit-ted accessories increase the stated kerb weight and reduce the maximum permitted load accord-ingly.
The load comprises the weights of the following:
• Passengers
• Allluggage
• Roof load including the mounts or roof bars and the load carrier system
• Drawbar load when towing a trailer
Performance figures
The performance figures were measured without equipment which may influence performance, such as a roof carrier or mud flaps.
Gross combination weight rating
The gross combination weight ratings listed are on-ly applicable for altitudes up to 1 ,000 m above sea level. The maximum weight of the car and trailer must be reduced by approximately 10% for every further 1 ,000 m in altitude.
450 I Tcchn1cal data
Descriptions of the tables
Gearbox abbreviations: MG = manual gearbox, DSG® = dual clutch gearbox DSG®.
Additional information and warnings:
• Transporting =:o page 125
• Driving with respect for the environment =:.page 278
• Fuel =:.page 343
• Engine oil =:o page 353
• Engine coolant =:o page 358
• Wheels and tyres =>page 367
• Consumer information =>page 404
,A WARNING
Exceeding the maximum permissible weights, payload, dimensions, vehicle speed and axle weight rating could cause damage to the vehicle, accidents and serious Injuries.
• Do not exceed the permitted weights, loads, dimensions and maximum speeds.
• The actual axle loads must never exceed the maximum permissible axle loads.
• The payload and the distribution of the load In the vehicle have an effect on the driv-ing response and braking distance of the ve-hicle. Adjust your speed accordingly.
,A WARNING
Accidents and severe injuries can occur if the maximum permitted gross combination weight Is exceeded.
• Never exceed the specified gross combi-nation weight rating.