2021 TOYOTA YARIS HATCHBACK rear view mirror
[x] Cancel search: rear view mirrorPage 84 of 568

84
YARIS(HB) Owner's Manual_Europe_MK0001_en
2-1. Instrument cluster
The indicators inform the driver of
the operating state of the vehicle’s
various systems.
WARNING
■If a safety system warning light does not come on
Should a safety system light such as the ABS and SRS warning light not come on when you start the engine,
this could mean that these systems are not available to help protect you in an accident, which could result in
death or serious injury. Have the vehi- cle inspected by any authorized Toyota retailer or Toyota authorized
repairer, or any reliable repairer immediately if this occurs.
Indicators
Turn signal indicator
( →P.171)
Tail light indicator ( →P.173)
Headlight high beam indica-
tor ( →P.175)
Automatic High Beam indica-
tor (if equipped) ( →P.177)
Front fog light indicator (if
equipped) ( →P.180)
Rear fog light indicator
( →P.180)
PCS warning light*1, 2 (if
equipped) ( →P.196)
Cruise control indicator*3 (if
equipped) ( →P.213)
Dynamic radar cruise control
indicator*3 (if equipped)
( →P.213)
Cruise control “SET” indica-
tor*3 (if equipped) ( →P.213)
*4
LTA i n d i c a t o r*3 (if equipped)
( →P.209)
BSM outside rear view mirror
indicators*1, 5 (if equipped)
( →P.237, 247)
BSM OFF indicator*2 (if
equipped) ( →P.237)
Toyota parking assist-sensor
OFF indicator*1, 2 (if
equipped) ( →P.243)
“RCTA OFF” indicator*1, 2 (if
equipped) ( →P.248)
PKSB OFF indicator*1, 2 (if
equipped) ( →P.252)
Stop & Start indicator*1 (if
equipped) ( →P.230)
Stop & Start cancel indica-
tor*1, 2 (if equipped)
( →P.231)
Speed limiter indicator (if
equipped) ( →P.224)
(Flashes)
Slip indicator*1 (→P. 2 6 9 )
VSC OFF indicator*1, 2
( →P.270)
Smart entry & start system
indicator*3 (if equipped)
( →P.159)
Gear Shift Indicator*6 (if
equipped) ( →P.170)
Parking brake indicator
( →P.171)
Eco Driving Indicator Light*1,
6 (if equipped) ( →P.95, 101)
Low outside temperature
indicator*3, 7 ( →P.86, 90)
Security indicator ( →P. 7 6 ,
78)
Page 85 of 568

85
2
YARIS(HB) Owner's Manual_Europe_MK0001_en
2-1. Instrument cluster
Vehicle status information and indicators
*1: These lights come on when the
engine switch is turned to ON to indi-
cate that a system check is being
performed. They will turn off after the
engine is started, or after a few sec-
onds. There may be a malfunction in
a system if the lights do not come
on, or turn off. Have the vehicle
inspected by any authorized Toyota
retailer or Toyota authorized repairer,
or any reliable repairer.
*2: This light comes on when the system
is turned off.
*3: This light illuminates on the multi-
information display.
*4: Depending on the operating condi-
tion, the color and illuminating/flash-
ing state of the light change.
*5: This light illuminates on the outside
rear view mirrors.
*6: For vehicles with vertical display, this
light illuminates on the multi-informa-
tion display.
*7: When the outside temperature is
approximately 3°C (37°F) or lower,
this indicator will flash for approxi-
mately 10 seconds, then stay on.
*8: This light illuminates on the center
panel.“PASSENGER AIR
BAG” indicator
*1, 8
(→P.45)
Eco drive mode indicator
*3
(if equipped) (→P.266)
Power mode indicator
*3 (if
equipped) (→P.266)
Page 111 of 568
3
111
YARIS(HB) Owner's Manual_Europe_MK0001_en
3
Before driving
Before driving
3-1. Key information
Keys.................................. 112
3-2. Opening, closing and locking
the doors
Side doors ........................ 116
Back door ......................... 120
Smart entry & start system 123
3-3. Adjusting the seats
Front seats........................ 128
Rear seats ........................ 129
Head restraints ................. 130
3-4. Adjusting the steering wheel
and mirrors
Steering wheel .................. 134
Inside rear view mirror ...... 135
Outside rear view mirrors . 136
3-5. Opening and closing the win-
dows
Power windows................. 139
Page 135 of 568
135
3
YARIS(HB) Owner's Manual_Europe_MK0001_en
3-4. Adjusting the steering wheel and mirrors
Before driving
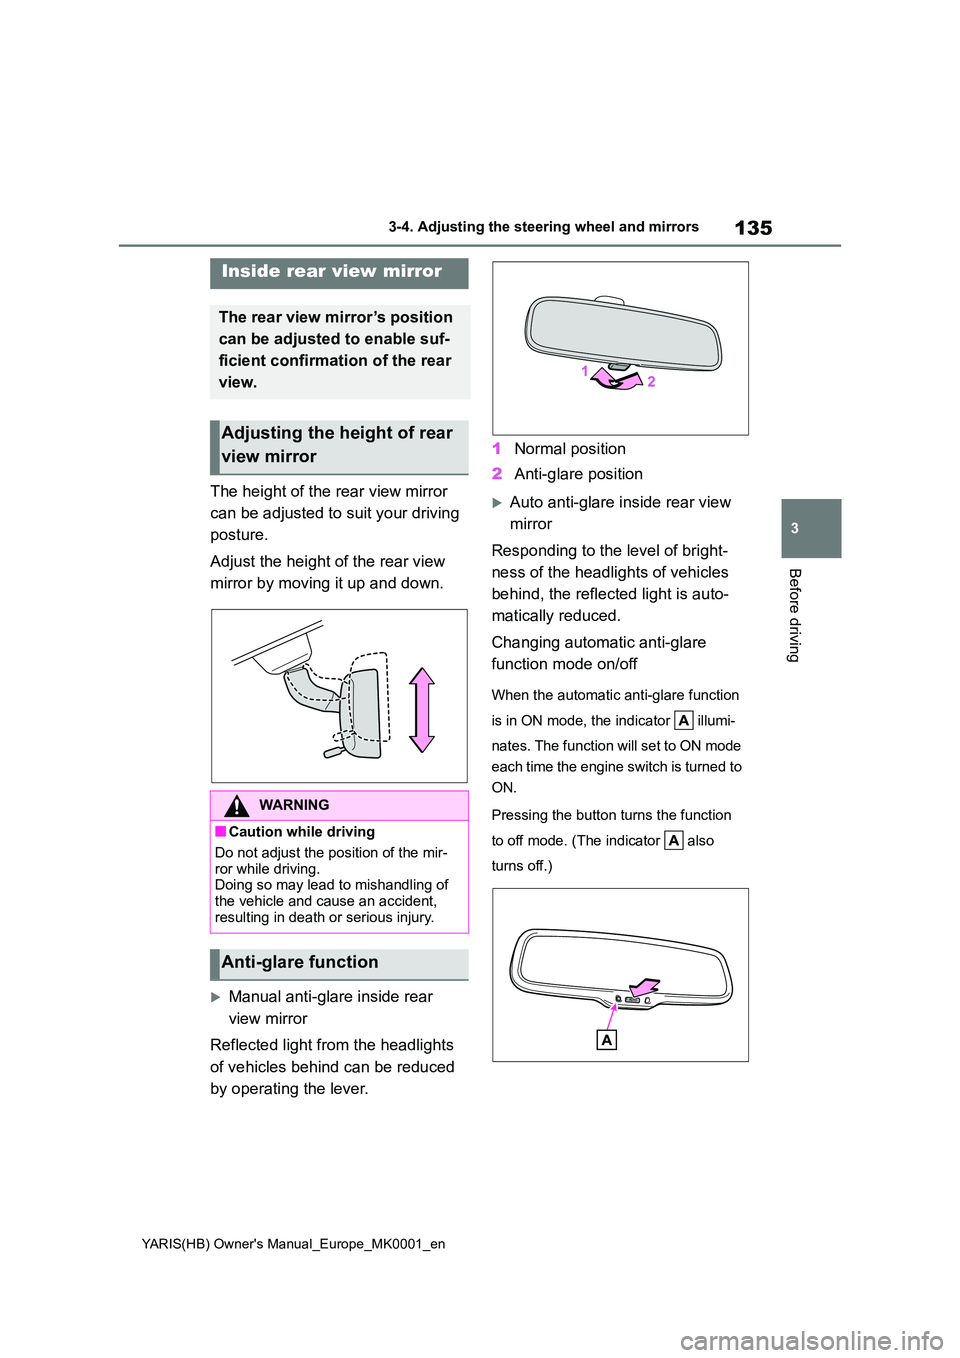
The height of the rear view mirror
can be adjusted to suit your driving
posture.
Adjust the height of the rear view
mirror by moving it up and down.
Manual anti-glare inside rear
view mirror
Reflected light from the headlights
of vehicles behind can be reduced
by operating the lever.
1 Normal position
2 Anti-glare position
Auto anti-glare inside rear view
mirror
Responding to the level of bright-
ness of the headlights of vehicles
behind, the reflected light is auto-
matically reduced.
Changing automatic anti-glare
function mode on/off
When the automatic anti-glare function
is in ON mode, the indicator illumi-
nates. The function will set to ON mode
each time the engine switch is turned to
ON.
Pressing the button turns the function
to off mode. (The indicator also
turns off.)
Inside rear view mirror
The rear view mirror’s position
can be adjusted to enable suf-
ficient confirmation of the rear
view.
Adjusting the height of rear
view mirror
WARNING
■Caution while driving
Do not adjust the position of the mir-
ror while driving. Doing so may lead to mishandling of the vehicle and cause an accident,
resulting in death or serious injury.
Anti-glare function
Page 136 of 568
136
YARIS(HB) Owner's Manual_Europe_MK0001_en
3-4. Adjusting the steering wheel and mirrors
■To prevent sensor error (vehicles with an auto anti-glare inside rear
view mirror)
To ensure that the sensors operate properly, do not touch or cover them.
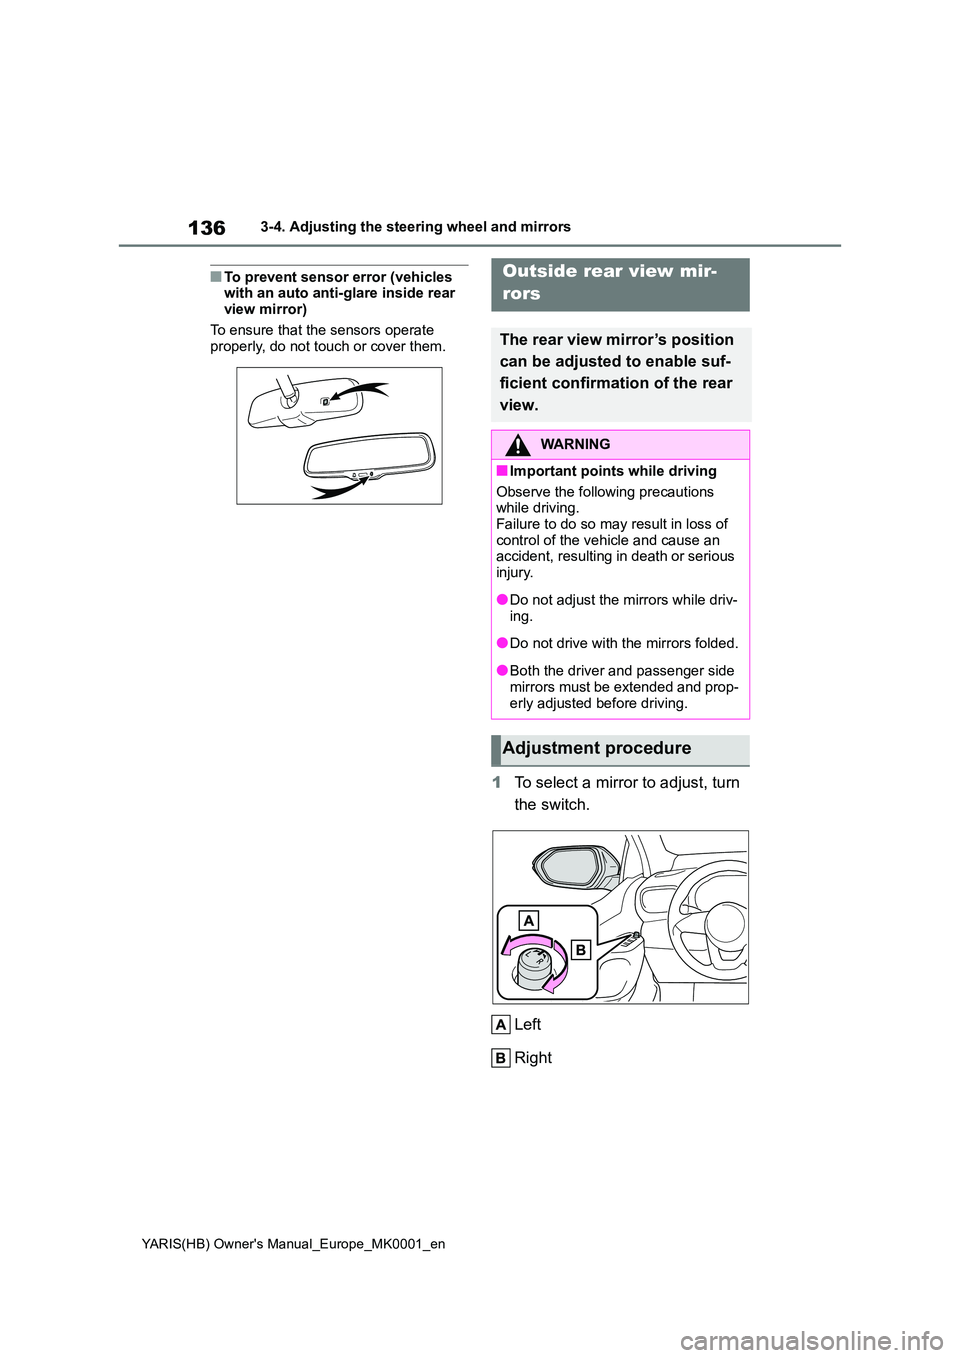
1 To select a mirror to adjust, turn
the switch.
Left
Right
Outside rear view mir-
rors
The rear view mirror’s position
can be adjusted to enable suf-
ficient confirmation of the rear
view.
WARNING
■Important points while driving
Observe the following precautions while driving.
Failure to do so may result in loss of control of the vehicle and cause an accident, resulting in death or serious
injury.
●Do not adjust the mirrors while driv-
ing.
●Do not drive with the mirrors folded.
●Both the driver and passenger side mirrors must be extended and prop-
erly adjusted before driving.
Adjustment procedure
Page 137 of 568
137
3
YARIS(HB) Owner's Manual_Europe_MK0001_en
3-4. Adjusting the steering wheel and mirrors
Before driving
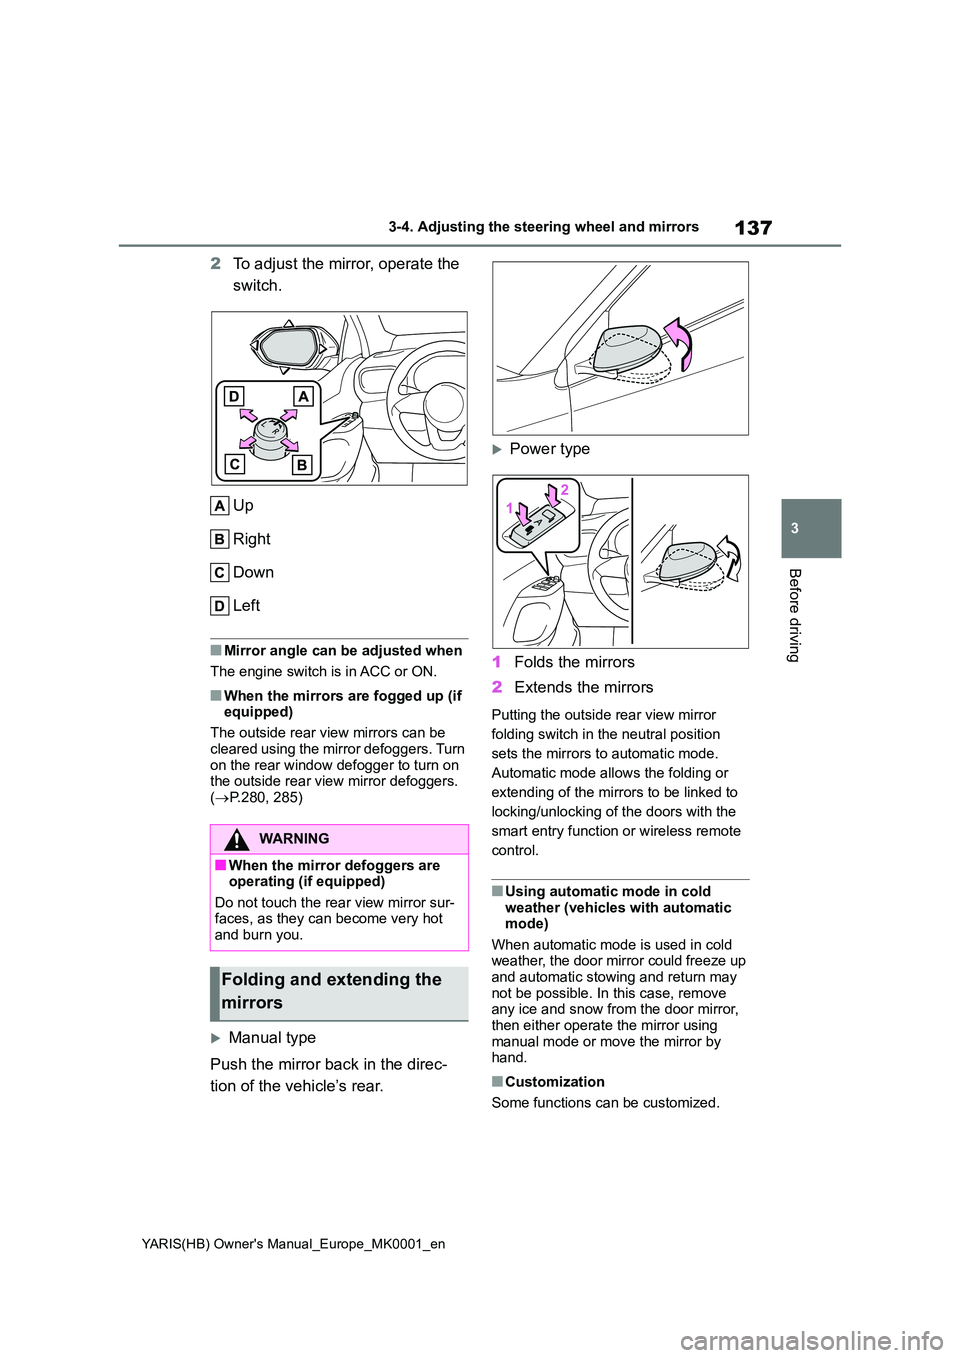
2To adjust the mirror, operate the
switch.
Up
Right
Down
Left
■Mirror angle can be adjusted when
The engine switch is in ACC or ON.
■When the mirrors are fogged up (if equipped)
The outside rear view mirrors can be
cleared using the mirror defoggers. Turn on the rear window defogger to turn on the outside rear view mirror defoggers.
( →P.280, 285)
Manual type
Push the mirror back in the direc-
tion of the vehicle’s rear.
Power type
1 Folds the mirrors
2 Extends the mirrors
Putting the outside rear view mirror
folding switch in the neutral position
sets the mirrors to automatic mode.
Automatic mode allows the folding or
extending of the mirrors to be linked to
locking/unlocking of the doors with the
smart entry function or wireless remote
control.
■Using automatic mode in cold weather (vehicles with automatic mode)
When automatic mode is used in cold weather, the door mirror could freeze up and automatic stowing and return may
not be possible. In this case, remove any ice and snow from the door mirror, then either operate the mirror using
manual mode or move the mirror by hand.
■Customization
Some functions can be customized.
WARNING
■When the mirror defoggers are operating (if equipped)
Do not touch the rear view mirror sur- faces, as they can become very hot and burn you.
Folding and extending the
mirrors
Page 147 of 568

147
4
YARIS(HB) Owner's Manual_Europe_MK0001_en
4-1. Before driving
Driving
WARNING
●Use engine braking (downshift) to maintain a safe speed when driving
down a steep hill. Using the brakes continuously may cause the brakes to overheat and
lose effectiveness. ( →P.164, 168)
●Do not adjust the positions of the
steering wheel, the seat, or the inside or outside rear view mirrors while driving.
Doing so may result in a loss of vehicle control.
●Always check that all passengers’ arms, heads or other parts of their body are not outside the vehicle.
■When driving on slippery road surfaces
●Sudden braking, acceleration and steering may cause tire slippage and reduce your ability to control
the vehicle.
●Sudden acceleration, engine brak-
ing due to shifting, or changes in engine speed could cause the vehi-cle to skid.
●After driving through a puddle, lightly depress the brake pedal to
make sure that the brakes are func- tioning properly. Wet brake pads may prevent the brakes from func-
tioning properly. If the brakes on only one side are wet and not func-tioning properly, steering control
may be affected.
■When shifting the shift lever
●Vehicles with a Multidrive: Do not let the vehicle roll backward while a forward driving position is selected,
or roll forward while the shift lever is in R.Doing so may cause the engine to
stall or lead to poor brake and steering performance, resulting in an accident or damage to the vehi-
cle.
●Vehicles with a Multidrive: Do not shift the shift lever to P while the vehicle is moving.
Doing so can damage the transmis- sion and may result in a loss of vehicle control.
●Do not shift the shift lever to R while the vehicle is moving forward.
Doing so can damage the transmis- sion and may result in a loss of vehicle control.
●Do not shift the shift lever to a driv-ing position while the vehicle is
moving backward. Doing so can damage the transmis-sion and may result in a loss of
vehicle control.
●Moving the shift lever to N while the
vehicle is moving will disengage the engine from the transmission. Engine braking is not available
when N is selected.
●Vehicles with a Multidrive: Be care-
ful not to shift the shift lever with the accelerator pedal depressed. Shift-ing the shift lever to any positions
other than P or N may lead to unex- pected rapid acceleration of the vehicle that may cause an accident
and result in death or serious injury.
■If you hear a squealing or scrap-
ing noise (brake pad wear indica- tors)
Have the brake pads checked and
replaced by any authorized Toyota retailer or Toyota authorized repairer, or any reliable repairer as soon as
possible.
Rotor damage may result if the pads
are not replaced when needed.
It is dangerous to drive the vehicle
when the wear limits of the brake pads and/or those of the brake discs are exceeded.
Page 155 of 568
155
4
YARIS(HB) Owner's Manual_Europe_MK0001_en
4-1. Before driving
Driving
■Break-in schedule
Toyota recommends that vehicles fitted with new power train components should not be used for towing trailers for
the first 800 km (500 miles).
■Safety checks before towing
●Check that the maximum load limit for
the towing hitch/bracket hitch ball is not exceeded. Bear in mind that the coupling weight of the trailer will add
to the load exerted on the vehicle. Also make sure that you will not be towing a load that exceeds the maxi-
mum permissible axle capacity.
●Ensure that the trailer load is secure.
●Supplementary outside rear view mir- rors should be added to the vehicle if
the traffic behind cannot be clearly seen with standard mirrors. Adjust the extending arms of these mirrors on
both sides of the vehicle so that they always provide maximum visibility of the road behind.
■Maintenance
●Maintenance must be performed more frequently when using the vehicle for
towing due to the greater weight bur- den placed on the vehicle compared to normal driving.
●Retighten all bolts securing the hitch-ing ball and bracket after towing for
approximately 1000 km (600 miles).
■If trailer sway occurs
One or more factors (crosswinds, pass- ing vehicles, rough roads, etc.) can
adversely affect handling of your vehicle and trailer, causing instability.
●If trailer swaying occurs:• Firmly grip the steering wheel. Steer straight ahead.
Do not try to control trailer swaying by turning the steering wheel.• Begin releasing the accelerator pedal
immediately but very gradually to reduce speed.
Do not increase speed. Do not apply
vehicle brakes.
If you make no extreme correction with
the steering or brakes, your vehicle and
trailer should stabilize (if enabled, Trailer
Sway Control can also help to stabilize
the vehicle and trailer.).
●After the trailer swaying has stopped: • Stop in a safe place. Get all occupants out of the vehicle.
• Check the tires of the vehicle and the trailer.• Check the load in the trailer.
Make sure the load has not shifted. Make sure the tongue weight is appro-priate, if possible.
• Check the load in the vehicle. Make sure the vehicle is not over-loaded after occupants get in.
If you cannot find any problems, the
speed at which trailer swaying occurred
is beyond the limit of your particular
vehicle-trailer combination. Drive at a
lower speed to prevent instability.
Remember that swaying of the towing
vehicle-trailer increases as speed
increases.
Your vehicle will handle differently
when towing a trailer. In order to
avoid accident, death or serious
injury, keep the following in mind
NOTICE
■When the rear bumper strength- ening material is aluminum
Ensure the steel bracket part does not
come directly in contact with that area.When steel and aluminum come into
contact, there is a reaction similar to corrosion, which will weaken the sec-tion concerned and may result in
damage. Apply a rust inhibitor to parts that will come in contact when attach-ing a steel bracket.
Guidance