Page 352 of 568

352
YARIS(HB) Owner's Manual_Europe_MK0001_en
6-3. Do-it-yourself maintenance
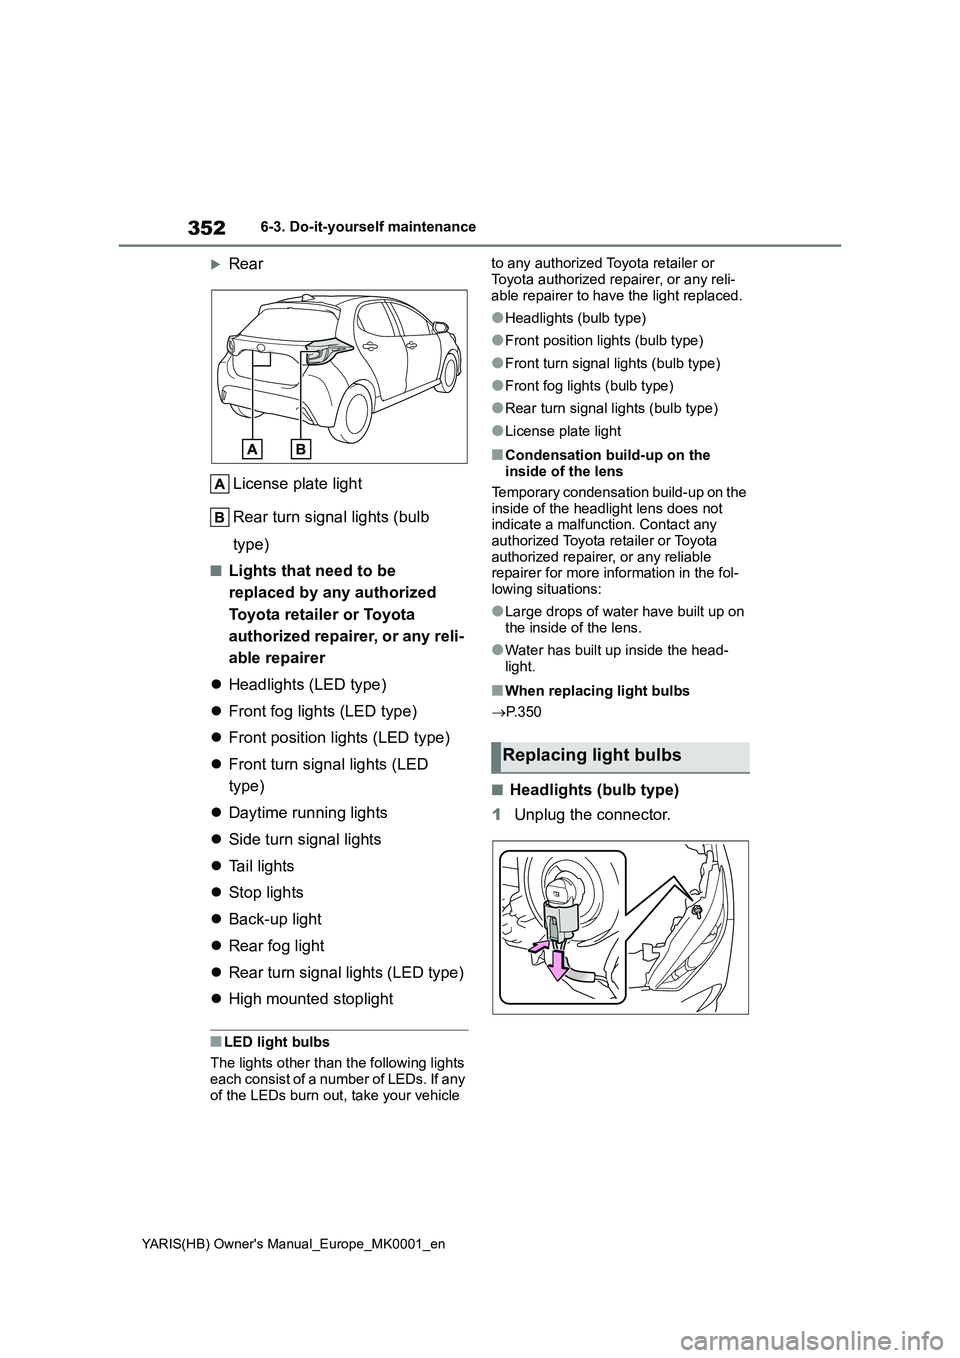
Rear
License plate light
Rear turn signal lights (bulb
type)
■Lights that need to be
replaced by any authorized
Toyota retailer or Toyota
authorized repairer, or any reli-
able repairer
�zHeadlights (LED type)
�zFront fog lights (LED type)
�zFront position lights (LED type)
�zFront turn signal lights (LED
type)
�zDaytime running lights
�zSide turn signal lights
�zTail lights
�zStop lights
�zBack-up light
�zRear fog light
�zRear turn signal lights (LED type)
�zHigh mounted stoplight
■LED light bulbs
The lights other than the following lights
each consist of a number of LEDs. If any
of the LEDs burn out, take your vehicle to any authorized Toyota retailer or
Toyota authorized repairer, or any reli-
able repairer to have the light replaced.
●Headlights (bulb type)
●Front position lights (bulb type)
●Front turn signal lights (bulb type)
●Front fog lights (bulb type)
●Rear turn signal lights (bulb type)
●License plate light
■Condensation build-up on the
inside of the lens
Temporary condensation build-up on the
inside of the headlight lens does not
indicate a malfunction. Contact any
authorized Toyota retailer or Toyota
authorized repairer, or any reliable
repairer for more information in the fol-
lowing situations:
●Large drops of water have built up on
the inside of the lens.
●Water has built up inside the head-
light.
■When replacing light bulbs
→P. 3 5 0
■Headlights (bulb type)
1Unplug the connector.
Replacing light bulbs
Page 353 of 568
353
6
YARIS(HB) Owner's Manual_Europe_MK0001_en
6-3. Do-it-yourself maintenance
Maintenance and care
2Turn the bulb base counter-
clockwise.
3 Replace the light bulb.
4 Install the bulb base.
Align the 3 tabs on the light bulb with the mounting and insert.
5 Plug the connector.
6 Secure the bulb base.
Shake the bulb base gently to check
that it is not loose, turn the headlights on once and visually confirm that no
light is leaking through the mounting.
■Front position lights (bulb
type)
1 Turn the bulb base counter-
clockwise.
2 Remove light bulb.
3 When installing, reverse the
steps listed.
Page 354 of 568
354
YARIS(HB) Owner's Manual_Europe_MK0001_en
6-3. Do-it-yourself maintenance
■Front turn signal lights (bulb
type)
1 Turn the bulb base counter-
clockwise.
2 Remove the light bulb.
3 When installing, reverse the
steps listed.
■Front fog lights (bulb type)
1 To allow enough working space,
turn the steering wheel.
2 Remove the screws and clips.
3 Partly remove the fender liner.
4 Unplug the connector.
Page 355 of 568
355
6
YARIS(HB) Owner's Manual_Europe_MK0001_en
6-3. Do-it-yourself maintenance
Maintenance and care
5Turn the bulb base counter-
clockwise.
6 Set a new light bulb.
Align the 3 tabs on the light bulb with the mounting, and insert. Turn it clock-
wise to set.
7 Set the connector.
Shake the bulb base gently to check that it is not loose, turn the front fog
lights on once and visually confirm that no light is leaking through the mount-ing.
8 Reinstall the fender liner.
9 Reinstall the screws and clips.
■Rear turn signal lights (bulb
type)
1 Open the back door.
2 Remove the 2 bolts and pull the
lamp assembly toward the rear
of the vehicle to remove it.
Page 356 of 568
356
YARIS(HB) Owner's Manual_Europe_MK0001_en
6-3. Do-it-yourself maintenance
3Turn the bulb base counter-
clockwise.
4 Remove the light bulb.
5 When installing the light bulb,
install by conducting 3 and 4
with the directions reversed.
6 Install the lamp assembly.
Align the guides and pins on the
lamp assembly with the mounting when
installing it.
7 Install the 2 bolts.
Page 357 of 568
357
6
YARIS(HB) Owner's Manual_Europe_MK0001_en
6-3. Do-it-yourself maintenance
Maintenance and care
■License plate light
1 Remove the lens.
1 Insert a small flathead screw-
driver, etc., into either the right
or left hole of the lens.
2 Tilt the screwdriver in the direc-
tion of the arrow shown in the
illustration so as to release the
fitting portion, and then remove
the lens.
To prevent damage to the vehicle, wrap
the tip of the screwdriver with tape.
Lens
Fitting portion
2 Remove the light bulb.
3 Install a new light bulb.
4 Install the lens.
1 Fit the lens into either the right
or left fitting portion.
Page 358 of 568
358
YARIS(HB) Owner's Manual_Europe_MK0001_en
6-3. Do-it-yourself maintenance
2Push the lens into place.
After installation, confirm that the lens is
properly installed by gently pulling it.
Fitting portion
WARNING
■Replacing light bulbs
●Turn off the lights. Do not attempt to
replace the bulb immediately after turning off the lights. The bulbs become very hot and may cause
burns.
●Do not touch the glass portion of
the light bulb with bare hands. When it is unavoidable to hold the glass portion, use and hold with a
clean dry cloth to avoid getting moisture and oils on the bulb. Also, if the bulb is scratched or dropped,
it may blow out or crack.
●Fully install light bulbs and any
parts used to secure them. Failure to do so may result in heat damage, fire, or water entering the light unit.
This may damage the lights or cause condensation to build up on the lens.
■To prevent damage or fire
Make sure bulbs are fully seated and
locked.
Page 419 of 568
419
8
YARIS(HB) Owner's Manual_Europe_MK0001_en
8-1. Specifications
Vehicle specifications
and drive at speeds below 100 km/h (62 mph).
A: HIR2 halogen bulbs
B: H16
C: Wedge base bulbs (clear)
D: Wedge base bulbs (amber)
Light bulbs
Light bulbsWTyp e
Exterior
Halogen headlights (bulb type)55A
Front fog lights (bulb type)19B
Front position lights (bulb type)5C
Front turn signal lights (bulb type)21D
Rear turn signal lights (bulb type)21D
License plate light5C
Interior
Front interior lights/personal lights5C
Vanity lights (if equipped)8C
Luggage compartment light5C