2021 TOYOTA PROACE VERSO door lock
[x] Cancel search: door lockPage 153 of 360

153
Driving
6
WARNI NG
Never switch off the ignition before the complete immobilisation of the vehicle. With the engine off, the braking and steering assistance systems are also turned off: risk of loss of control of the vehicle.
NOTIC E
As a safety measure, never leave the vehicle without taking the remote control with you, even for a short time.
NOTIC E
Avoid attaching heavy objects to the key or the remote control, which would weigh down on its blade in the ignition switch and could cause a malfunction.
Key left in the ignition
NOTIC E
When opening the driver's door, an alert message is displayed, accompanied by an audible signal, to remind you that the key is still in the ignition switch at position 1 (Stop).If the key has been left in the ignition switch at position 2 (Ignition on), the ignition will be
switched off automatically after one hour.To switch the ignition back on, turn the key to position 1 (Stop), then back to position 2 (Ignition on).
With Smart Entry & Start
► Immobilise the vehicle.► With the remote control in the recognition zone, press the "START/STOP" button.The engine stops and the steering column locks.
NOTIC E
If the vehicle is not immobilised, the engine will not stop.
WARNI NG
To avoid any risk of jamming the pedals:– only use mats which are suited to the fixings already present in the vehicle; these fixings must be used,– never place one mat on top of another.The use of mats not approved by TOYOTA may interfere with access to the pedals and hinder the operation of the cruise control / speed limiter.The mats approved by TOYOTA have two fixings located below the seat.
Starting/Switching off the
electric motor
Starting
The drive selector must be in mode P.► If using a conventional or remote control key, depress the brake pedal and turn the key until it reaches position 3.
► If using Smart Entry & Start, depress the brake pedal and briefly press the "START/STOP" button.► Keep your foot on the brake pedal until the READY indicator lamp comes on and an audible signal is emitted, indicating that the vehicle is ready to drive.► With your foot on the brake, select mode D or R.
► Release the brake pedal, then accelerate.
Page 154 of 360

154
On starting, the instrument panel lights up and the power indicator needle performs one sweep then moves to the "neutral" position. The steering column automatically unlocks (you may hear a sound and feel the steering wheel move).
Switching off
► If using a conventional or remote control key, turn the key fully to position 1 (Stop).► If using Smart Entry & Start, press the "START/STOP" button.Before exiting the vehicle, check that:– The drive selector is in mode P.– The READY indicator lamp is off.
NOTIC E
The drive selector moves automatically to mode P when the motor is switched off or when the driver's door is opened.
NOTIC E
If the driver's door is opened while the required conditions for stopping are not satisfied, an audible signal is emitted, accompanied by the display of a warning message.
Special case with Smart
Entry & Start
Switching on the ignition without
starting the engine
With the Smart Entry & Start system’s electronic key inside the vehicle, pressing the "START/STOP" button, with no action on the pedals, allows the ignition to be switched on.► Pressing this button again switches off the ignition and allows the vehicle to be locked.
Back-up starting
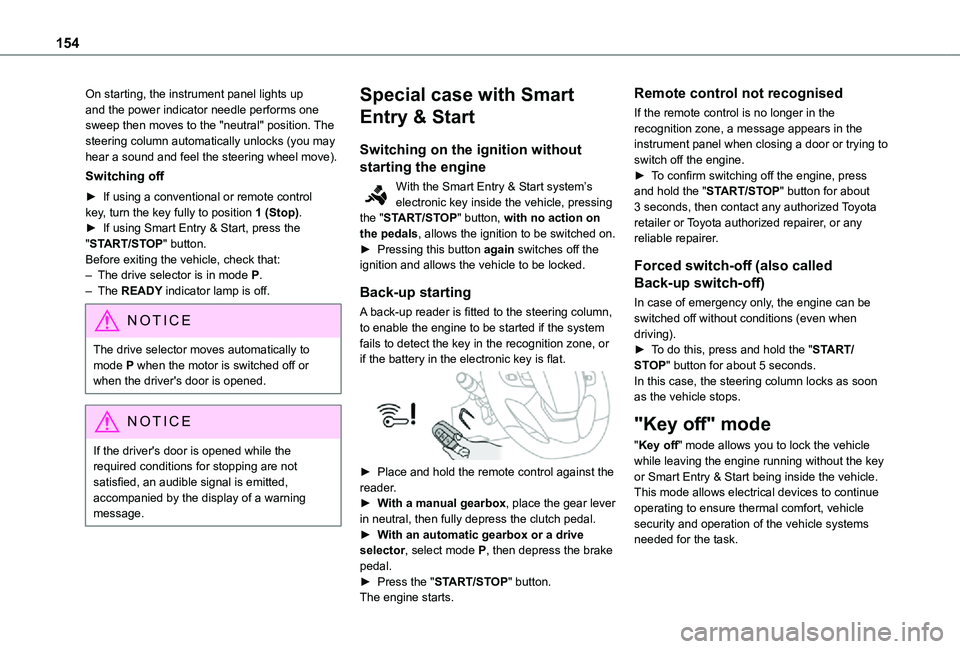
A back-up reader is fitted to the steering column, to enable the engine to be started if the system fails to detect the key in the recognition zone, or if the battery in the electronic key is flat.
► Place and hold the remote control against the reader.► With a manual gearbox, place the gear lever in neutral, then fully depress the clutch pedal.► With an automatic gearbox or a drive selector, select mode P, then depress the brake pedal.► Press the "START/STOP" button.The engine starts.
Remote control not recognised
If the remote control is no longer in the recognition zone, a message appears in the instrument panel when closing a door or trying to switch off the engine.► To confirm switching off the engine, press and hold the "START/STOP" button for about 3 seconds, then contact any authorized Toyota retailer or Toyota authorized repairer, or any reliable repairer.
Forced switch-off (also called
Back-up switch-off)
In case of emergency only, the engine can be switched off without conditions (even when driving).► To do this, press and hold the "START/STOP" button for about 5 seconds.In this case, the steering column locks as soon as the vehicle stops.
"Key off" mode
"Key off" mode allows you to lock the vehicle while leaving the engine running without the key or Smart Entry & Start being inside the vehicle.This mode allows electrical devices to continue operating to ensure thermal comfort, vehicle security and operation of the vehicle systems needed for the task.
Page 157 of 360

157
Driving
6
► Depress the brake pedal.► While maintaining pressure on the brake pedal, briefly push the control lever.
NOTIC E
If you push the control lever without pressing the brake pedal, the parking brake is not released and a message is displayed.
Manual application
With the vehicle stationary:► Pull briefly on the control lever.The control lever indicator lamp flashes to confirm the application request.
Automatic operation
Automatic release
First ensure that the engine is running and that the driver's door is closed.The electric parking brake gradually releases automatically as the vehicle moves off.With a manual gearbox► Fully depress the clutch pedal and engage first gear or reverse.► Depress the accelerator pedal and release the clutch pedal.With an automatic gearbox► Depress the brake pedal.► Select mode D, M or R.
► Release the brake pedal and depress the accelerator pedal.With a drive selector► Depress the brake pedal.► Select mode D, B or R.► Release the brake pedal and depress the accelerator pedal.
NOTIC E
With an automatic gearbox or drive selector, if the brake does not release automatically, check that the front doors are properly closed.
WARNI NG
When stationary with the engine running, do not depress the accelerator pedal unnecessarily. Risk of parking brake release.
Automatic application
With the vehicle stationary, the parking brake is applied automatically when the engine is switched off.
WARNI NG
It is not applied automatically if the engine stalls or enters STOP mode with Stop & Start.
NOTIC E
In automatic mode, the parking brake can be manually applied or released at any time using the control.
Special cases
Immobilising the vehicle with the
engine running
To immobilise the vehicle with the engine running, briefly pull the control lever.
Parking the vehicle with the brake
released
WARNI NG
In very cold conditions (ice), applying the parking brake is not recommended.To immobilise the vehicle, engage a gear or place the chocks against one of the wheels.
NOTIC E
With an automatic gearbox or drive selector, mode P is automatically selected when the ignition is switched off. The wheels are
blocked.For more information on Free-wheeling, refer to the corresponding section.
Page 198 of 360

198
Opening the filler cap may create a noise caused by an inrush of air. This is entirely normal and results from the sealing of the fuel system.To refuel in complete safety:► Always switch off the engine.► Unlock the vehicle using the Smart Entry & Start.
► Open the fuel filler flap.
► With a conventional key, insert the key into the filler cap, then turn the key to the left.
► Unscrew and remove the filler cap, then place it on the holder located on the fuel filler flap.► Insert the nozzle and push it in fully (while pushing on the metal valve A).► Fill the tank. Do not continue past the third cut-off of the nozzle, as this may cause malfunctions.► Put the filler cap back in place and close it by turning to the right.► Push the fuel filler flap to close it (your vehicle must be unlocked).
WARNI NG
If the vehicle is equipped with a sliding door on its left-hand side, do not open it while the fuel filler flap is open (risk of damaging the fuel filler flap and the sliding door and risk of injuring the person filling up).
WARNI NG
If the fuel filler flap is open and you try to open the left-hand side door, a mechanism prevents it from being opened.The door can be opened half-way, however.With a mechanical door, close the fuel filler flap to regain use of the door.With an electric door, to be able to use it correctly, close the fuel filler flap and then press an opening control.
The vehicle is fitted with a catalytic converter, which helps to reduce the level of harmful emissions in the exhaust gases.
WARNI NG
If you have put in the wrong fuel for your vehicle, you must have the fuel tank drained and filled with the correct fuel
before starting the engine.
Page 201 of 360

201
Practical information
7
WARNI NG
In the event of damage to the traction batteryIt is strictly prohibited to work on the vehicle yourself.Do not touch liquids coming from the battery, and in the event of skin contact with these products, wash abundantly with water and contact a doctor as soon as possible.Contact any authorized Toyota retailer or Toyota authorized repairer, or any reliable repairer to have the system checked.
Charging connectors and
indicator lamps
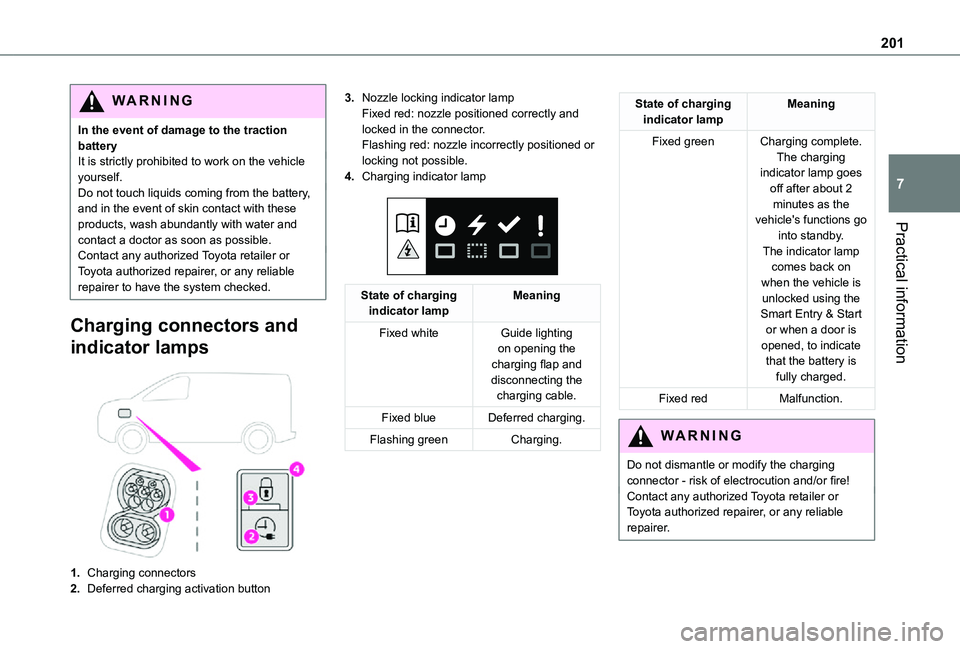
1.Charging connectors
2.Deferred charging activation button
3.Nozzle locking indicator lampFixed red: nozzle positioned correctly and locked in the connector.Flashing red: nozzle incorrectly positioned or locking not possible.
4.Charging indicator lamp
State of charging indicator lampMeaning
Fixed whiteGuide lighting on opening the charging flap and disconnecting the charging cable.
Fixed blueDeferred charging.
Flashing greenCharging.
State of charging indicator lampMeaning
Fixed greenCharging complete.The charging indicator lamp goes off after about 2 minutes as the vehicle's functions go into standby.
The indicator lamp comes back on when the vehicle is unlocked using the Smart Entry & Start or when a door is opened, to indicate that the battery is fully charged.
Fixed redMalfunction.
WARNI NG
Do not dismantle or modify the charging connector - risk of electrocution and/or fire!Contact any authorized Toyota retailer or Toyota authorized repairer, or any reliable repairer.
Page 208 of 360

208
For domestic or accelerated charging
WARNI NG
Before chargingDepending on the context:► Have a professional check that the electrical system to be used complies with applicable standards and is compatible with the vehicle.► Have a professional electrician install a dedicated domestic power socket or accelerated charging unit (Wallbox) compatible with the vehicle.You should preferably use the charging cable available as an accessory.For more information, contact a any authorized Toyota retailer or Toyota authorized repairer, or any reliable repairer.
WARNI NG
(During charging)While charging is in progress, unlocking the vehicle will cause the charging to stop.If no action is taken on one of the openings (door or boot) or on the charging nozzle, the vehicle will lock again after 30 seconds and charging will resume automatically.Never work under the bonnet:– Some areas remain very hot, even an hour after charging ends - risk of burns!– The fan may start at any time - risk of cuts or strangulation!
WARNI NG
After chargingCheck that the charging flap is closed.Do not leave the cable connected to the domestic power socket - risk of short-circuit or electrocution in the event of contact with or
immersion in water!
For superfast charging
NOTIC E
Before chargingCheck that the fast public charging station and its charging cable are compatible with the vehicle.If the exterior temperature is below:– 0°C, charging times may be extended.– -20°C, charging is still possible, but charging times may be extended even further (the battery has to be heated first).
WARNI NG
After chargingCheck that the charging flap is closed.
Connection
► Before charging, check that the drive selector is in mode P, otherwise charging is not possible.
► Open the charging flap by pressing the push-button, and check that there are no foreign bodies on the charging connector.
Page 209 of 360

209
Practical information
7
Domestic charging, mode 2
► Connect the charging cable from the control unit to the domestic socket.When the connection is made, all of the indicator lamps on the control unit light up, then only the POWER indicator lamp remains on in green.► Remove the protective cover from the charging nozzle.► Insert the nozzle into the charging connector.The start of charging is confirmed by the flashing green CHARGE indicator lamps in the flap, then those on the control unit.If this is not the case, charging has not started; restart the procedure, ensuring that all connections are properly established.The red indicator lamp in the flap comes on to
indicate that the nozzle is locked.
NOTIC E
When charging is complete and while the charging cable is still connected, opening the driver's door will display the charge level on the instrument panel for about 20 seconds.
Accelerated charging, mode 3
► Follow the accelerated charging unit (Wallbox) user instructions.► Remove the protective cover from the charging nozzle.► Insert the nozzle into the charging connector.The start of charging is confirmed when the charging indicator lamp in the flap flashes green.If this is not the case, charging has not started; restart the procedure, ensuring that the connection has been properly established.The red indicator lamp in the flap comes on to indicate that the nozzle is locked.
Superfast charging, mode 4
► Depending on version, remove the protective cover from the lower part of the connector.► Follow the instructions for use of the fast public charger and connect the cable from the
fast public charger to the vehicle's connector.The start of charging is confirmed by the flashing green charging indicator lamp in the flap.If this is not the case, charging has not started; restart the procedure, ensuring that the connection is properly established.The red indicator lamp in the flap comes on to indicate that the nozzle is locked.
Deferred charging
Settings
At any authorized Toyota retailer or Toyota authorized repairer, or any reliable repairer, with Bluetooth® audio systemBy default, the deferred charging start time is set to midnight (vehicle time).You can have the deferred charging start time
modified.Go to any authorized Toyota retailer or Toyota authorized repairer, or any reliable repairer.
Page 210 of 360

210
On a smartphone or tablet (GSM), with TOYOTA Pro Touch or TOYOTA Pro Touch with navigation systemYou can programme the deferred charging function at any time via the MyToyota application (Available soon).For more information on Remote functions, refer to the corresponding section.In the vehicle, with TOYOTA Pro Touch with navigation system► In the Energy touch screen menu, select the Charge page.► Set the charging start time.► Press OK.The setting is saved in the system.
Activation
NOTIC E
Deferred charging is only possible with modes 2 and 3.
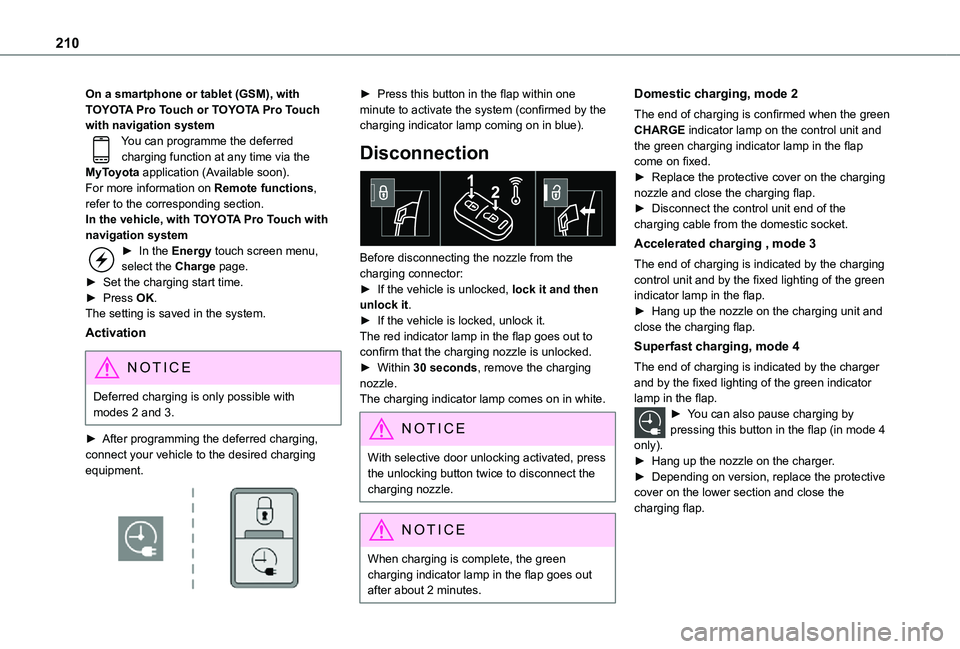
► After programming the deferred charging, connect your vehicle to the desired charging equipment.
► Press this button in the flap within one minute to activate the system (confirmed by the charging indicator lamp coming on in blue).
Disconnection
Before disconnecting the nozzle from the charging connector:► If the vehicle is unlocked, lock it and then unlock it.► If the vehicle is locked, unlock it.The red indicator lamp in the flap goes out to confirm that the charging nozzle is unlocked.► Within 30 seconds, remove the charging nozzle.The charging indicator lamp comes on in white.
NOTIC E
With selective door unlocking activated, press the unlocking button twice to disconnect the charging nozzle.
NOTIC E
When charging is complete, the green charging indicator lamp in the flap goes out after about 2 minutes.
Domestic charging, mode 2
The end of charging is confirmed when the green CHARGE indicator lamp on the control unit and the green charging indicator lamp in the flap come on fixed.► Replace the protective cover on the charging nozzle and close the charging flap.► Disconnect the control unit end of the charging cable from the domestic socket.
Accelerated charging , mode 3
The end of charging is indicated by the charging control unit and by the fixed lighting of the green indicator lamp in the flap.► Hang up the nozzle on the charging unit and close the charging flap.
Superfast charging, mode 4
The end of charging is indicated by the charger and by the fixed lighting of the green indicator lamp in the flap.► You can also pause charging by pressing this button in the flap (in mode 4
only).► Hang up the nozzle on the charger.► Depending on version, replace the protective cover on the lower section and close the charging flap.