2021 TOYOTA PROACE EV ignition
[x] Cancel search: ignitionPage 163 of 360

163
Driving
6
NOTIC E
In manual mode, there is no need to release the accelerator pedal while changing gear.
NOTIC E
It is only possible to change from one gear to another if the vehicle speed and engine
speed permit.
NOTIC E
If the engine speed is too low or too high, the selected gear flashes for a few seconds, then the gear actually engaged is shown.When the vehicle is stationary or moving very slowly, the gearbox automatically selects gear M1.
NOTIC E
To preserve the brakes while descending a steep incline, use engine braking to reduce your speed (change down or select a lower gear).Keeping the brake pedal pressed continuously for long periods can overheat the brakes, with the risk of damaging the braking system or making it inoperative.Only use the brakes when necessary, to slow or stop the vehicle.
NOTIC E
Depending on the road configuration (e.g. mountainous road), manual operation may be preferable.Automatic operation may not always be suitable, and does not enable engine braking.
Invalid value during manual
operation
This symbol is displayed if a gear is not engaged correctly (gear selector between two positions).► Place the selector "correctly" at a position.
Switching off the vehicle
Before switching off the engine, select position P then apply the parking brake to immobilise
the vehicle, unless this is set to automatic mode (with electric parking brake).Check that mode P has been engaged and that the electric parking brake has been applied automatically; if not, apply it manually.The corresponding indicator lamps in the selector and the electric parking brake control lever must be on, as well as those on the instrument panel.
NOTIC E
A point of resistance may be noticed when moving to position P.If the selector is not in position P, when the driver's door is opened or approximately 45 seconds after the ignition is switched off, an audible signal sounds and a message appears.► Return the drive selector to position P; the audible signal stops and the message disappears.
WARNI NG
When positioned on a steep slope with a loaded vehicle, depress the brake pedal, select position P, apply the parking brake, unless it is set to automatic mode (with
electric parking brake), then release the brake pedal.
Page 164 of 360

164
WARNI NG
In all circumstances, ensure that the selector is in position P before leaving your vehicle.
Malfunction
When the ignition is on, a message appears on the instrument panel to indicate a fault with the gearbox.In this case, the gearbox goes into back-up mode and is locked in 3rd gear. You may feel a significant jolt (without risk to the gearbox) when changing from P to R and from N to R.Do not exceed 62 mph (100 km/h), local speed restrictions permitting.Have it checked by any authorized Toyota retailer or Toyota authorized repairer, or any reliable repairer.
WARNI NG
There is a risk of damaging the gearbox:– If the accelerator and brake pedals are depressed simultaneously.– In the event of a battery failure, forcing the selector from position P to another position.
WARNI NG
If your vehicle has an automatic gearbox, do not try to start the engine by pushing the vehicle.
Drive selector (Electric)
The drive selector is a pulse selector with a regenerative braking function.The drive selector provides traction control based on the driving style, the road profile and the vehicle load.With regenerative braking activated, it also manages engine braking when the accelerator pedal is released.
P.ParkButton for parking the vehicle: the front wheels are locked (the button lights up to indicate that it is activated).
R.ReverseTo engage reverse gear, with your foot on the brake pedal.
N.NeutralTo move the vehicle with the ignition off and so allow it to free-wheel.For more information on Free-wheeling, refer to the corresponding section.
D.Drive (automatic forward gear)
B.Brake (regenerative braking)Button for changing to Drive/automatic forward gear mode with regenerative braking function (the button lights up to indicate that it is activated).
Information displayed on
the instrument panel
When the ignition is switched on, the drive selector status is displayed on the instrument panel:P: Park.R: Reverse.
N: Neutral.D: Drive (automatic forward gear).B: Brake (automatic forward gear with regenerative braking function activated).
Operation
► Move the selector by pressing it forwards (N or R) or rearwards (N or D) once or twice, passing the point of resistance if necessary.
Page 165 of 360
, either push forwards twice without passing the point of resistance or push just once, passing the point of resista")
165
Driving
6
For example, to change from P to R (with your foot on the brake pedal), either push forwards twice without passing the point of resistance or push just once, passing the point of resistance.
Regenerative braking
With the Brake function and when decelerating
The Brake function emulates engine braking, slowing the vehicle with no need to depress the brake pedal. The vehicle slows more quickly when the driver releases the accelerator pedal.The energy recovered when the accelerator pedal is released is then used to partially recharge the traction battery, thereby increasing the vehicle's driving range.
WARNI NG
The resulting deceleration of the vehicle does not cause the brake lamps to come on.
► From mode D, press button B to activate/deactivate the function (the button lights up when the function is activated).D on the instrument panel is replaced with B.The system status is saved when the ignition is switched off.
WARNI NG
In some situations (e.g. battery full, extreme temperatures), the amount of regenerative braking may be temporarily limited, resulting in less deceleration.The driver must remain alert to traffic conditions and must always be ready to use the brake pedal.
With the brake pedal
When the brake pedal is depressed, the intelligent braking system automatically recovers some of the energy and uses it to recharge the traction battery.This energy recovery also reduces use of the brake pads, thereby limiting their wear.
NOTIC E
The driver may experience a different sensation when depressing the brake pedal compared to a vehicle without regenerative braking.
Driving modes (Electric)
Driving modes are selected using the following control:
Pressing the control displays the modes on the instrument panel and, depending on version, on the screen with TOYOTA Pro Touch with navigation system.You cannot select a mode if the READY lamp is off.When the message disappears, the selected mode is activated and remains indicated on the
instrument panel (except Normal mode).Each time the ignition is switched on, Normal mode is selected by default.
Normal
This optimises the driving range and dynamic performance.To obtain maximum torque and power, depress the accelerator pedal fully.
Page 167 of 360

167
Driving
6
With an automatic gearbox: with the brake pedal depressed or the gear selector in position N, with the vehicle stationary.
Time counter
A time counter adds up the time spent in standby during the journey. It is reset to zero every time the ignition is switched on.
Special cases:
The engine will not go into standby if all of the conditions for operation are not met and in the following cases.– Steep slope (ascending or descending).– Vehicle has not exceeded 10 km/h (6 mph) since the last engine start (with the key or the “START/STOP” button).– Needed to maintain a comfortable temperature in the passenger compartment.– Demisting active.In these cases, this indicator lamp flashes for a few seconds, then goes off.
NOTIC E
After the engine has restarted, STOP mode is not available until the vehicle has reached a speed of 8 km/h (5 mph).
NOTIC E
During parking manoeuvres, STOP mode is not available for a few seconds after coming out of reverse gear or turning the steering wheel.
Restarting the engine (START mode)
The engine automatically restarts as soon as the driver indicates the intention of moving off again.With a manual gearbox: with the clutch pedal fully depressed.With an automatic gearbox:– With the selector in position D or M: with the brake pedal released.– With the selector in position N and the brake pedal released: with the selector at D or M.– With the selector in position P and the brake pedal depressed: with the selector at R, N, D or M.– Reverse gear engaged.
Special cases
The engine will restart automatically if all conditions for operation are met again and in the following case.– With a manual gearbox: vehicle speed exceeds 16 mph (25 km/h) or 2 mph (3 km/h) (depending on the engine).– With an automatic gearbox, vehicle speed exceeds 2 mph (3 km/h).
In this case, this indicator lamp flashes for a few seconds, then goes off.
Malfunctions
Depending on the vehicle’s equipment:In the event of a system malfunction, this warning lamp flashes on the instrument panel.The warning lamp in this button flashes and a message appears, accompanied by an audible signal.Have it checked by any authorized Toyota retailer or Toyota authorized repairer, or any reliable repairer.
The vehicle stalls in STOP mode
All of the instrument panel warning lamps come on if there is a fault.Depending on version, a warning message may also be displayed, prompting you to place the gear selector in position N and depress the brake pedal.► Switch off the ignition then start the engine
again with the key or the "START/STOP" button.
Page 173 of 360
173
Driving
6
Brightness adjustment
► With the engine running, adjust the brightness of the information display using the buttons 3:• on the "sun" to increase the brightness,• on the "moon" to decrease the brightness.
W ARNI NG
When stationary or while driving, no objects
should be placed around the projection blade (or in its recess) so as not to impede its movement and correct operation.
NOTIC E
In certain extreme weather conditions (rain and/or snow, bright sunshine, etc.), the head-up display may not be legible or may suffer temporary interference.Some sunglasses may hamper reading of the information.To clean the projection blade, use a clean, soft cloth (such as a spectacles cloth or microfibre cloth). Do not use a dry or abrasive cloth, or detergent or solvent products, due to the risk of scratching the projection blade or damaging the non-reflective coating.
NOTIC E
This system operates when the engine is running, and the settings are saved when the ignition is switched off.
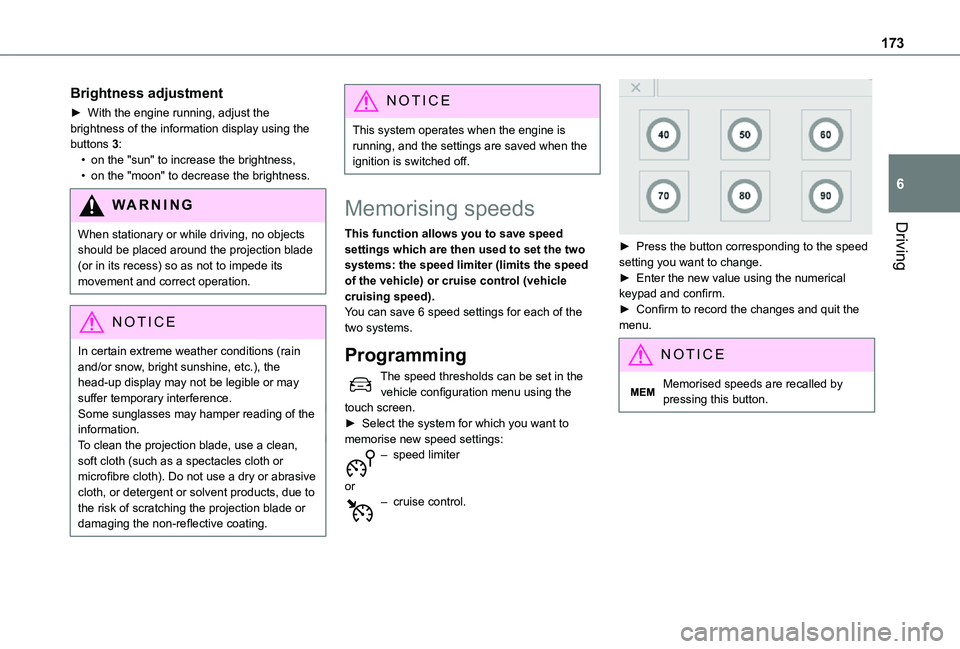
Memorising speeds
This function allows you to save speed settings which are then used to set the two systems: the speed limiter (limits the speed of the vehicle) or cruise control (vehicle cruising speed).You can save 6 speed settings for each of the two systems.
Programming
The speed thresholds can be set in the vehicle configuration menu using the touch screen.► Select the system for which you want to memorise new speed settings:
– speed limiter
or– cruise control.
► Press the button corresponding to the speed setting you want to change.► Enter the new value using the numerical keypad and confirm.► Confirm to record the changes and quit the menu.
NOTIC E
Memorised speeds are recalled by pressing this button.
Page 176 of 360

176
Head-up display
3.Speed limit indication.
4.Request to memorise the speed.
5.Current speed setting.
Storing the speed setting
► Switch on the speed limiter/cruise control.The speed limiter/cruise control information is displayed. Upon detecting a sign suggesting a new speed setting, the system displays the value and "MEM" flashes for a few seconds, prompting you to save it as a new speed setting.
NOTIC E
If there is a difference of less than 6 mph (9 km/h) between the speed setting and the speed displayed by the Speed Limit Recognition and Recommendation, the "MEM" symbol is not displayed.
Depending on the road conditions, several speeds may be displayed.► Press button 2 once to save the suggested speed value.A message is displayed, confirming the request.► Press button 2 again to confirm and save the new speed setting.The display then reverts to its previous state.
Speed limiter
WARNI NG
Refer to the General recommendations on the use of driving and manoeuvring aids.
This system prevents the vehicle from exceeding the speed programmed by the driver (speed setting).The speed limiter is switched on manually.The minimum speed setting is 30 km/h (19 mph).The speed setting remains in the system memory when the ignition is switched off.
NOTIC E
For more information on this button and the Adaptive cruise control, refer to the corresponding section.
NOTIC E
For more information on Memorising speeds, refer to the corresponding section.
Page 179 of 360

179
Driving
6
WARNI NG
Operating limitsNever use the system in the following situations:– In an urban area with the risk of pedestrians crossing the road.– In heavy traffic (except versions with the Stop & Go function).– On winding or steep roads.– On slippery or flooded roads.– In poor weather conditions.– Driving on a speed circuit.– Driving on a rolling road.– When using snow chains, non-slip covers or studded tyres.
Cruise control
WARNI NG
Refer to the General recommendations on the use of driving and manoeuvring aids and to Cruise control - particular recommendations.
This system automatically maintains the vehicle’s speed at the value programmed by the driver (speed setting), without the use of the accelerator pedal.Cruise control is switched on manually.It requires a minimum vehicle speed of 25 mph (40 km/h).With a manual gearbox, third gear or higher must be engaged.With an automatic gearbox, mode D or second gear or higher in mode M must be engaged.With a drive selector, mode D or B must be engaged.
NOTIC E
Cruise control remains active after changing gear, regardless of the gearbox type, on engines fitted with Stop & Start.
NOTIC E
Switching off the ignition cancels any speed setting.
Steering mounted control
1.ON (CRUISE position) / OFF (position 0)
2.Activate cruise control at the current speed / decrease speed setting
3.Activate cruise control at the current speed / increase speed setting
4.Pause / resume cruise control with the speed setting previously saved
5.Depending on version:Display the speed thresholds saved using the Memorising speeds functionorUse the speed suggested by the Speed Limit Recognition and Recommendation (MEM display)
Page 183 of 360

183
Driving
6
► Press 4 to restart cruise control. Cruise control may have been paused automatically:• When the inter-vehicle distance threshold is reached.• When the distance between your vehicle and the one in front becomes too short.• When the vehicle starts moving too slowly or the vehicle in front starts moving too slowly.• When the VSC system is triggered.
W ARNI NG
When the driver attempts to reactivate cruise control, after the function has been paused, the message "Activation not possible, unsuitable conditions" is briefly displayed if reactivation is not possible (safety conditions not met).
Using the Speed Limit Recognition and Recommendation function or speed limit sign memorisation to modify the speed setting.
► Press 5 to accept the speed setting proposed by the system on the instrument panel or touch screen, then press again to confirm.
WARNI NG
To prevent any sudden acceleration or deceleration of the vehicle, select a speed setting fairly close to the current speed of your vehicle.
Changing the inter-vehicle distance
► Press 6 to display the distance setting thresholds ("Distant", "Normal" or "Near"), then press again to select a threshold.After a few seconds, the option is accepted and will be memorised when the ignition is switched off.
Temporarily exceeding the speed setting
► Depress the accelerator pedal. Distance monitoring and cruise control are deactivated as long as you continue to accelerate. The speed on the instrument panel flashes.
Deactivating the system
► Turn the knob 1 upwards into position 0 (OFF).
Information displayed on
the instrument panel
Head-up display
7.Cruise control pause/resume indication.
8.Indication of selection of cruise control mode, or vehicle speed adjustment phase.
9.Speed setting value.
NOTIC E
For more information on the Head-up display, refer to the corresponding section.
Messages and alerts
NOTIC E
The display of these messages or alerts is not sequential.
“Cruise control paused” or “Cruise control suspended” following a brief acceleration by the driver.