2021 TOYOTA PROACE EV ECU
[x] Cancel search: ECUPage 142 of 360
142
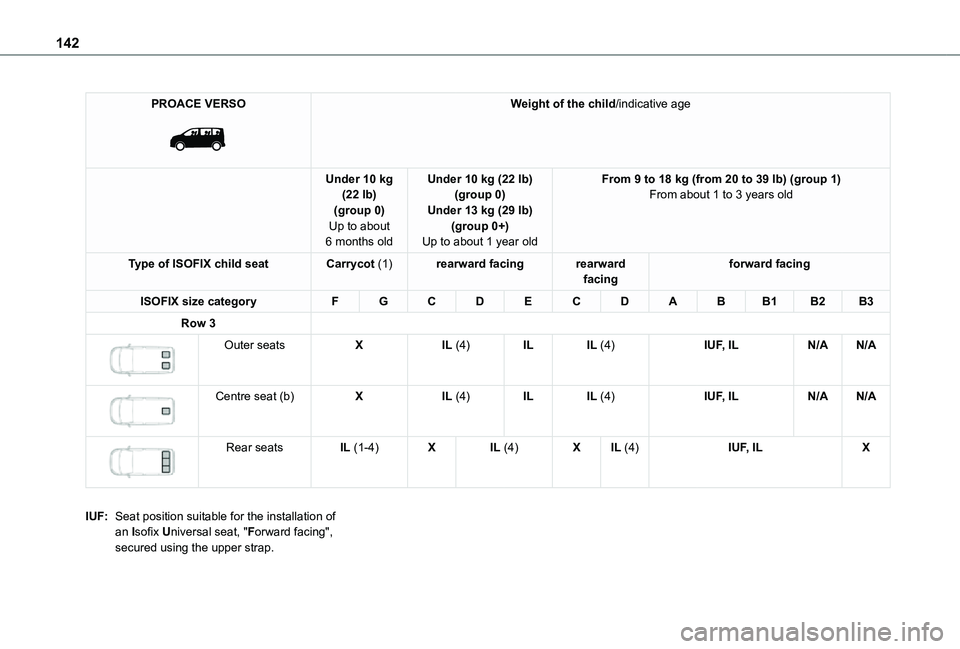
PROACE VERSO
Weight of the child/indicative age
Under 10 kg (22 lb)(group 0)Up to about 6 months old
Under 10 kg (22 lb)(group 0)Under 13 kg (29 lb)(group 0+)Up to about 1 year old
From 9 to 18 kg (from 20 to 39 lb) (group 1)From about 1 to 3 years old
Type of ISOFIX child seatCarrycot (1)rearward facingrearward facingforward facing
ISOFIX size categoryFGCDECDABB1B2B3
Row 3
Outer seatsXIL (4)ILIL (4)IUF, ILN/AN/A
Centre seat (b)XIL (4)ILIL (4)IUF, ILN/AN/A
Rear seatsIL (1-4)XIL (4)XIL (4)IUF, ILX
IUF:Seat position suitable for the installation of an Isofix Universal seat, "Forward facing", secured using the upper strap.
Page 143 of 360
143
Safety
5
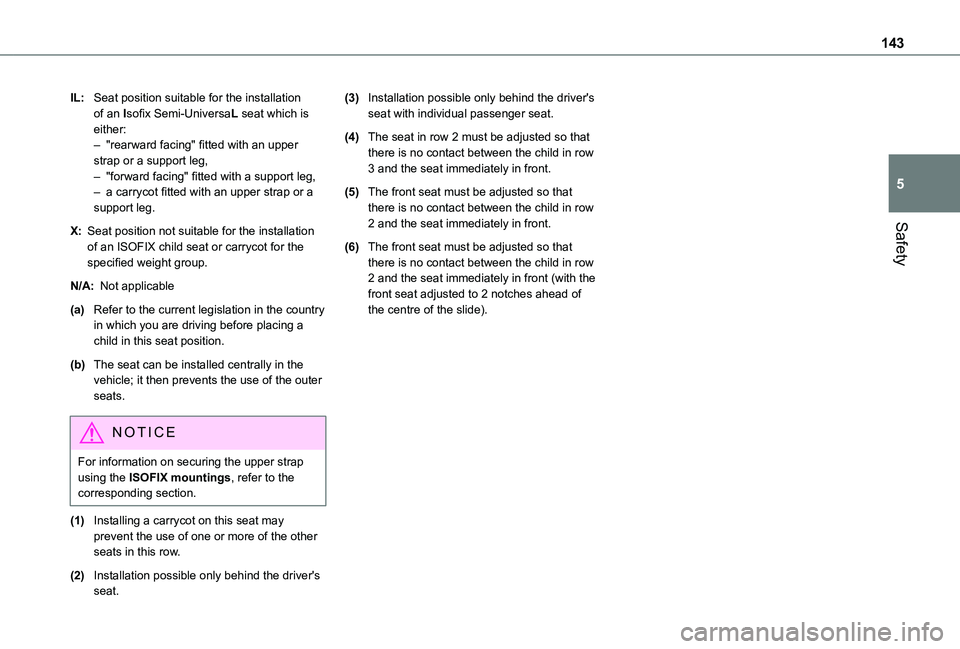
IL:Seat position suitable for the installation of an Isofix Semi-UniversaL seat which is either:– "rearward facing" fitted with an upper strap or a support leg,– "forward facing" fitted with a support leg,– a carrycot fitted with an upper strap or a support leg.
X:Seat position not suitable for the installation
of an ISOFIX child seat or carrycot for the specified weight group.
N/A:Not applicable
(a)Refer to the current legislation in the country in which you are driving before placing a child in this seat position.
(b)The seat can be installed centrally in the vehicle; it then prevents the use of the outer seats.
NOTIC E
For information on securing the upper strap using the ISOFIX mountings, refer to the corresponding section.
(1)Installing a carrycot on this seat may prevent the use of one or more of the other seats in this row.
(2)Installation possible only behind the driver's seat.
(3)Installation possible only behind the driver's seat with individual passenger seat.
(4)The seat in row 2 must be adjusted so that there is no contact between the child in row 3 and the seat immediately in front.
(5)The front seat must be adjusted so that there is no contact between the child in row 2 and the seat immediately in front.
(6)The front seat must be adjusted so that there is no contact between the child in row 2 and the seat immediately in front (with the front seat adjusted to 2 notches ahead of the centre of the slide).
Page 154 of 360
154
On starting, the instrument panel lights up and the power indicator needle performs one sweep then moves to the "neutral" position. The steering column automatically unlocks (you may hear a sound and feel the steering wheel move).
Switching off
► If using a conventional or remote control key, turn the key fully to position 1 (Stop).► If using Smart Entry & Start, press the "START/STOP" button.Before exiting the vehicle, check that:– The drive selector is in mode P.– The READY indicator lamp is off.
NOTIC E
The drive selector moves automatically to mode P when the motor is switched off or when the driver's door is opened.
NOTIC E
If the driver's door is opened while the required conditions for stopping are not satisfied, an audible signal is emitted, accompanied by the display of a warning message.
Special case with Smart
Entry & Start
Switching on the ignition without
starting the engine
With the Smart Entry & Start system’s electronic key inside the vehicle, pressing the "START/STOP" button, with no action on the pedals, allows the ignition to be switched on.► Pressing this button again switches off the ignition and allows the vehicle to be locked.
Back-up starting
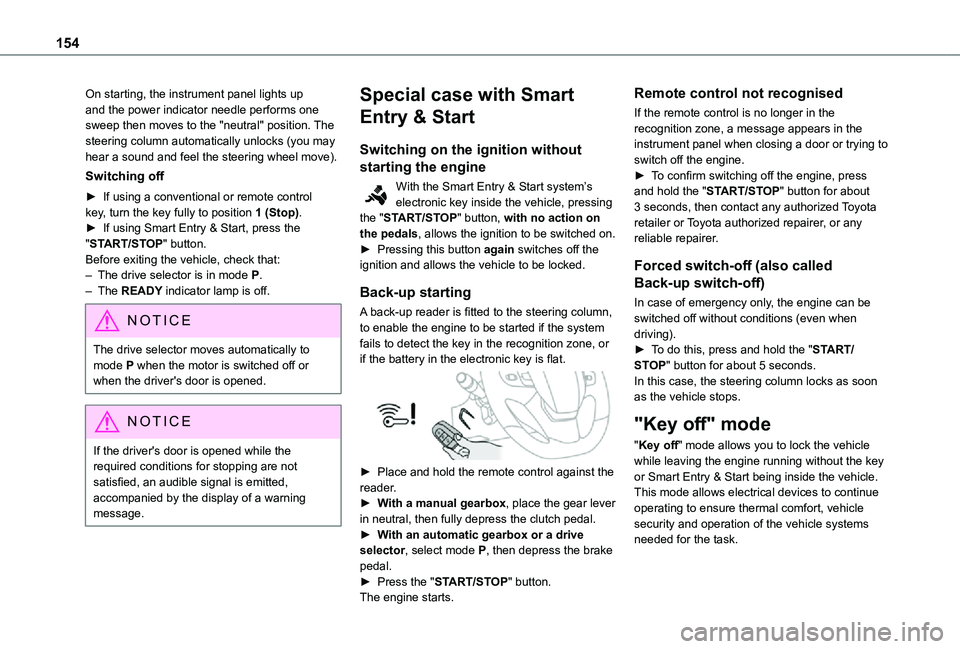
A back-up reader is fitted to the steering column, to enable the engine to be started if the system fails to detect the key in the recognition zone, or if the battery in the electronic key is flat.
► Place and hold the remote control against the reader.► With a manual gearbox, place the gear lever in neutral, then fully depress the clutch pedal.► With an automatic gearbox or a drive selector, select mode P, then depress the brake pedal.► Press the "START/STOP" button.The engine starts.
Remote control not recognised
If the remote control is no longer in the recognition zone, a message appears in the instrument panel when closing a door or trying to switch off the engine.► To confirm switching off the engine, press and hold the "START/STOP" button for about 3 seconds, then contact any authorized Toyota retailer or Toyota authorized repairer, or any reliable repairer.
Forced switch-off (also called
Back-up switch-off)
In case of emergency only, the engine can be switched off without conditions (even when driving).► To do this, press and hold the "START/STOP" button for about 5 seconds.In this case, the steering column locks as soon as the vehicle stops.
"Key off" mode
"Key off" mode allows you to lock the vehicle while leaving the engine running without the key or Smart Entry & Start being inside the vehicle.This mode allows electrical devices to continue operating to ensure thermal comfort, vehicle security and operation of the vehicle systems needed for the task.
Page 162 of 360
162
WARNI NG
When the engine is running at idle with the brakes released, if position R, D or M is selected, the vehicle moves even without the accelerator being pressed.Never leave children inside the vehicle unsupervised.As a safety measure, never leave the vehicle without taking your key or remote control with you, even for a short time.When carrying out maintenance with the engine running, apply the parking brake and select position P.
WARNI NG
With an automatic gearbox, never try to start the engine by pushing the vehicle.
Automatic operation
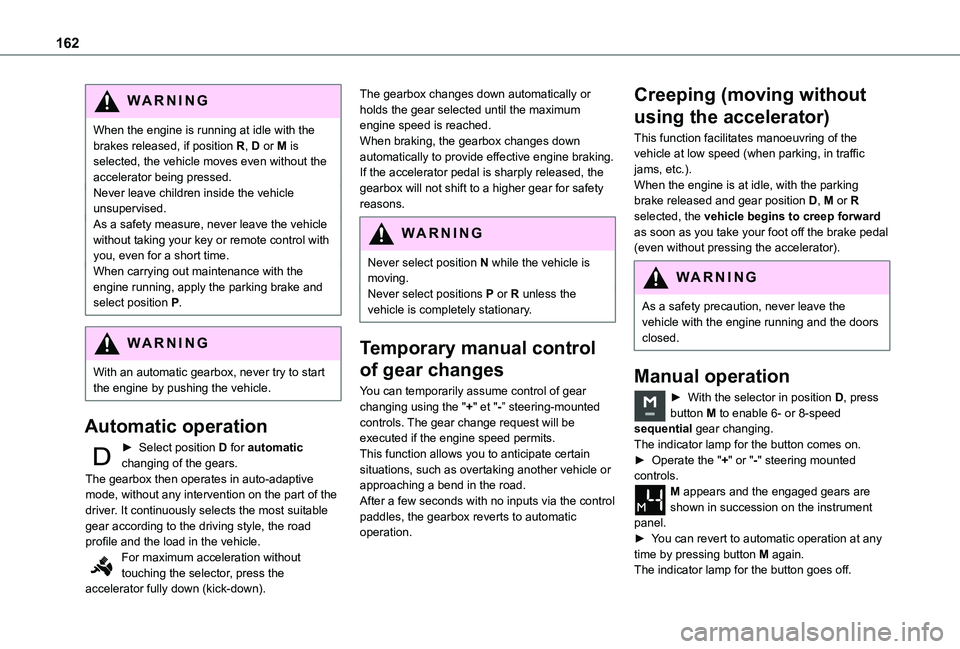
► Select position D for automatic changing of the gears.The gearbox then operates in auto-adaptive mode, without any intervention on the part of the driver. It continuously selects the most suitable gear according to the driving style, the road profile and the load in the vehicle.For maximum acceleration without touching the selector, press the accelerator fully down (kick-down).
The gearbox changes down automatically or holds the gear selected until the maximum engine speed is reached.When braking, the gearbox changes down automatically to provide effective engine braking.If the accelerator pedal is sharply released, the gearbox will not shift to a higher gear for safety reasons.
WARNI NG
Never select position N while the vehicle is moving.Never select positions P or R unless the vehicle is completely stationary.
Temporary manual control
of gear changes
You can temporarily assume control of gear changing using the "+" et "-” steering-mounted controls. The gear change request will be executed if the engine speed permits. This function allows you to anticipate certain situations, such as overtaking another vehicle or approaching a bend in the road. After a few seconds with no inputs via the control paddles, the gearbox reverts to automatic operation.
Creeping (moving without
using the accelerator)
This function facilitates manoeuvring of the vehicle at low speed (when parking, in traffic jams, etc.).When the engine is at idle, with the parking brake released and gear position D, M or R selected, the vehicle begins to creep forward as soon as you take your foot off the brake pedal (even without pressing the accelerator).
WARNI NG
As a safety precaution, never leave the vehicle with the engine running and the doors closed.
Manual operation
► With the selector in position D, press button M to enable 6- or 8-speed sequential gear changing.The indicator lamp for the button comes on.► Operate the "+" or "-" steering mounted controls. M appears and the engaged gears are shown in succession on the instrument panel.► You can revert to automatic operation at any time by pressing button M again.The indicator lamp for the button goes off.
Page 171 of 360

171
Driving
6
NOTIC E
Other camerasThe images from the camera(s) displayed on the touch screen or on the instrument panel may be distorted by the relief.In the presence of areas in shade, or in conditions of bright sunlight or inadequate lighting, the image may be darkened and with lower contrast.Obstacles may appear further away than they actually are.
WARNI NG
SensorsThe operation of the sensors as well as the associated functions may be disturbed by sound interference such as that emitted by noisy vehicles and machinery (e.g. lorries, pneumatic drills), by the accumulation of snow or dead leaves on the road or in the event of damaged bumpers and mirrors.When reverse gear is engaged, an audible signal (long beep) indicates that the sensors may be dirty.A front or rear impact to the vehicle can upset the sensors’ settings, which is not always detected by the system: distance measurements may be distorted.The sensors do not systematically detect obstacles that are too low (pavements, studs) or too thin (trees, posts, wire fences).Certain obstacles located in the sensors’ blind spots may not be detected or may no longer be detected during the manoeuvre.
Certain materials (fabrics) absorb sound waves: pedestrians may not be detected.
NOTIC E
MaintenanceClean the bumpers and door mirrors and the field of vision of the cameras regularly.When washing your vehicle at high pressure, direct the spray from at least 30 cm away from the radar, sensors and cameras.
WARNI NG
MatsThe use of mats not approved by TOYOTA may interfere with the operation of the speed limiter or cruise control.To avoid any risk of jamming the pedals:– Ensure that the mat is secured correctly.– Never fit one mat on top of another.
NOTIC E
Units of speed
Ensure that the units of speed displayed on the instrument panel (km/h or mph) are those for the country you are driving in.If this is not the case, when the vehicle is stationary, set the display to the required units of speed so that it complies with what is authorised locally.In case of doubt, contact any authorized Toyota retailer or Toyota authorized repairer,
or any reliable repairer.
Page 213 of 360
213
Practical information
7
Roof bars / Roof rack
WARNI NG
As a safety measure and to avoid damaging the roof, it is essential to use the roof bars and racks approved for your vehicle.Observe the instructions on fitting and use contained in the guide supplied with the roof bars and racks.
WARNI NG
RecommendationsDistribute the load uniformly, taking care to avoid overloading one of the sides.Arrange the heaviest part of the load as close as possible to the roof.Secure the load firmly.Drive gently: the vehicle will be more susceptible to the effects of side winds and its stability may be affected.
Remove the roof bars once they are no longer needed.
WARNI NG
As this value may change, please verify the maximum load quoted in the guide supplied with the roof bars.If the height exceeds 40 cm, adapt the speed of the vehicle to the profile of the road to avoid damaging the roof bars and the fixings on the vehicle.Be sure to refer to national legislation in order to comply with the regulations for transporting objects that are longer than the vehicle.
Roof bars
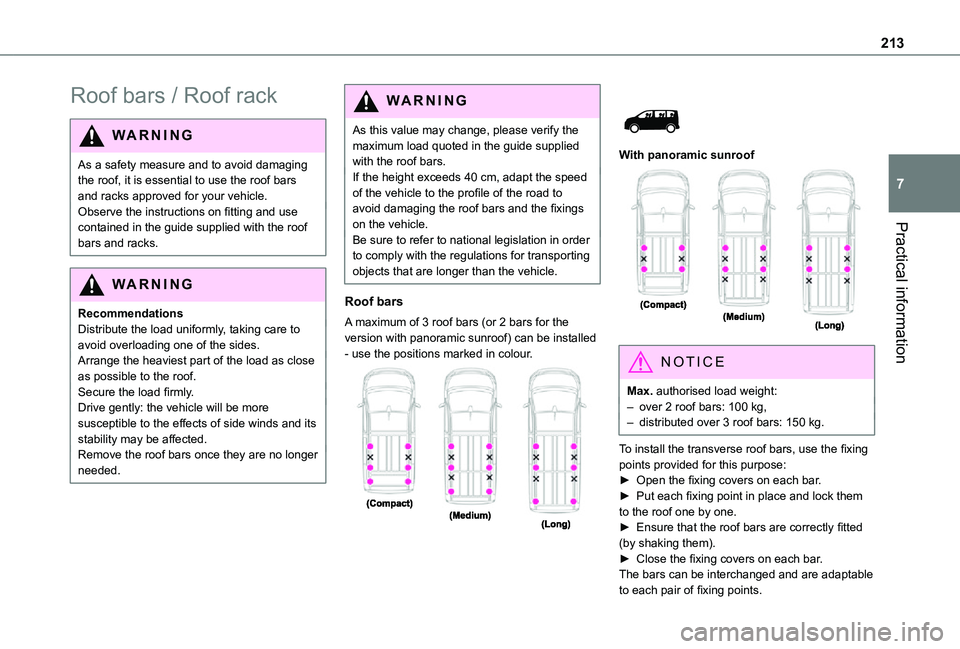
A maximum of 3 roof bars (or 2 bars for the version with panoramic sunroof) can be installed - use the positions marked in colour.
With panoramic sunroof
NOTIC E
Max. authorised load weight:– over 2 roof bars: 100 kg,– distributed over 3 roof bars: 150 kg.
To install the transverse roof bars, use the fixing points provided for this purpose:► Open the fixing covers on each bar.► Put each fixing point in place and lock them to the roof one by one.► Ensure that the roof bars are correctly fitted (by shaking them).► Close the fixing covers on each bar.The bars can be interchanged and are adaptable to each pair of fixing points.
Page 214 of 360
214
Roof racks
NOTIC E
Max. authorised load weight:– Compact: 140 kg,– Medium and Long: 170 kg.
To fit a roof rack, use the fixing points provided for this purpose:
► Place the roof rack on the roof aligned with the fixing points and secure each one to the roof in turn.► Ensure that the roof rack is correctly fitted (by shaking it).
Bonnet
WARNI NG
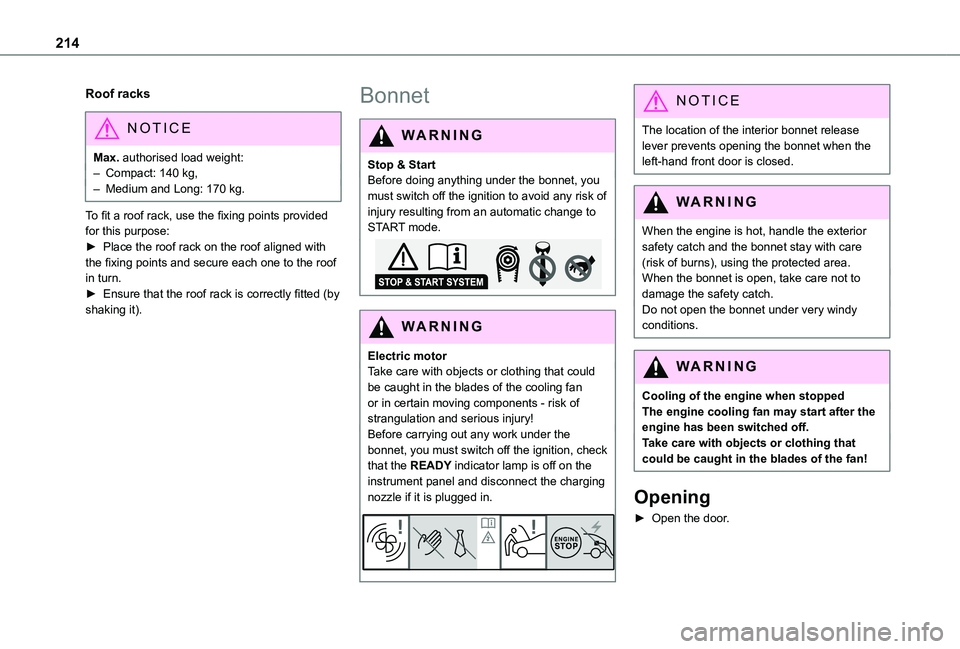
Stop & StartBefore doing anything under the bonnet, you must switch off the ignition to avoid any risk of injury resulting from an automatic change to START mode.
WARNI NG
Electric motorTake care with objects or clothing that could be caught in the blades of the cooling fan or in certain moving components - risk of strangulation and serious injury!Before carrying out any work under the
bonnet, you must switch off the ignition, check that the READY indicator lamp is off on the instrument panel and disconnect the charging nozzle if it is plugged in.
NOTIC E
The location of the interior bonnet release lever prevents opening the bonnet when the left-hand front door is closed.
WARNI NG
When the engine is hot, handle the exterior
safety catch and the bonnet stay with care (risk of burns), using the protected area.When the bonnet is open, take care not to damage the safety catch.Do not open the bonnet under very windy conditions.
WARNI NG
Cooling of the engine when stoppedThe engine cooling fan may start after the engine has been switched off.Take care with objects or clothing that could be caught in the blades of the fan!
Opening
► Open the door.
Page 228 of 360
228
Tool box
Access
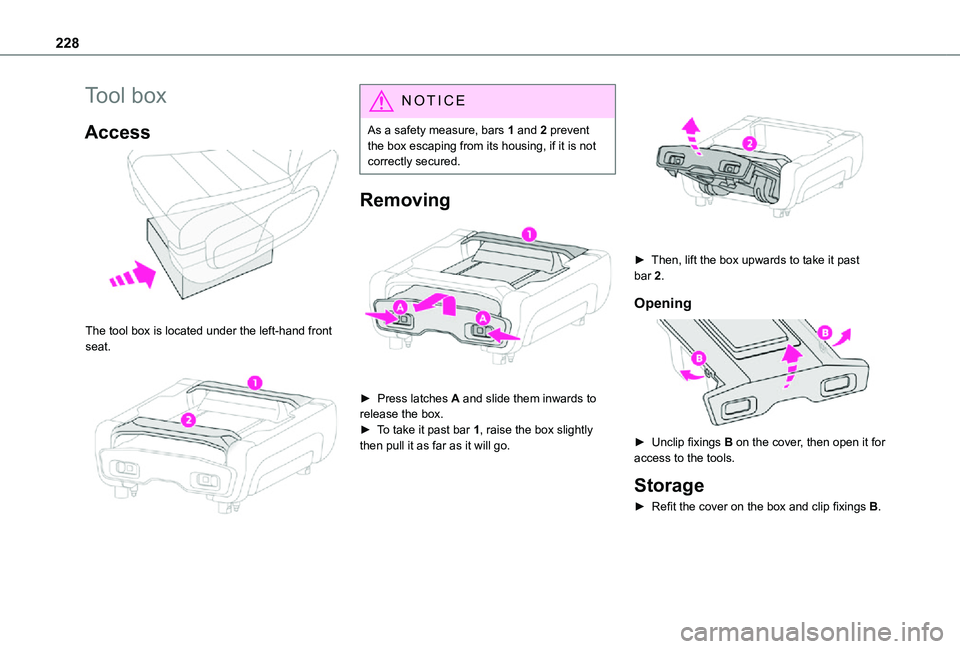
The tool box is located under the left-hand front seat.
NOTIC E
As a safety measure, bars 1 and 2 prevent the box escaping from its housing, if it is not correctly secured.
Removing
► Press latches A and slide them inwards to release the box.► To take it past bar 1, raise the box slightly
then pull it as far as it will go.
► Then, lift the box upwards to take it past bar 2.
Opening
► Unclip fixings B on the cover, then open it for
access to the tools.
Storage
► Refit the cover on the box and clip fixings B.