2021 TOYOTA PROACE EV weight
[x] Cancel search: weightPage 140 of 360
140
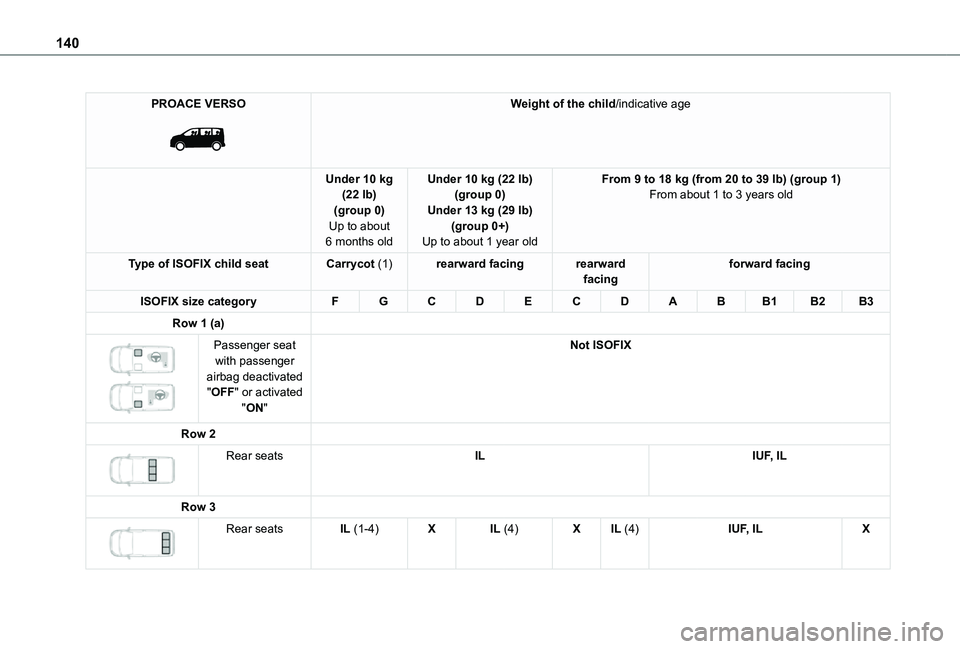
PROACE VERSO
Weight of the child/indicative age
Under 10 kg (22 lb)(group 0)Up to about 6 months old
Under 10 kg (22 lb)(group 0)Under 13 kg (29 lb)(group 0+)Up to about 1 year old
From 9 to 18 kg (from 20 to 39 lb) (group 1)From about 1 to 3 years old
Type of ISOFIX child seatCarrycot (1)rearward facingrearward facingforward facing
ISOFIX size categoryFGCDECDABB1B2B3
Row 1 (a)
Passenger seat with passenger airbag deactivated "OFF" or activated "ON"
Not ISOFIX
Row 2
Rear seatsILIUF, IL
Row 3
Rear seatsIL (1-4)XIL (4)XIL (4)IUF, ILX
Page 141 of 360
141
Safety
5
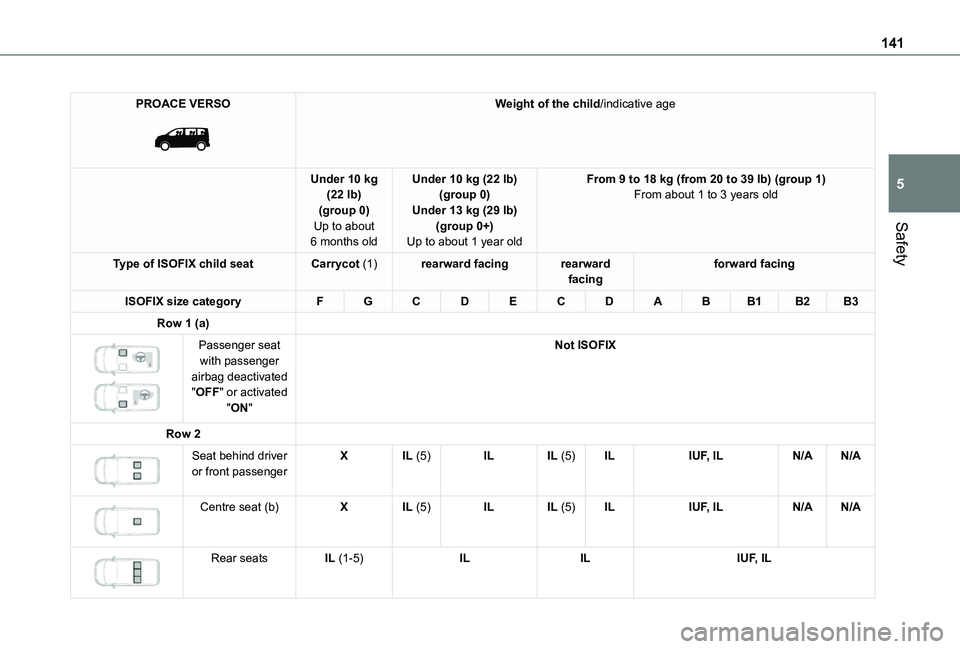
PROACE VERSO
Weight of the child/indicative age
Under 10 kg (22 lb)(group 0)Up to about 6 months old
Under 10 kg (22 lb)(group 0)Under 13 kg (29 lb)(group 0+)Up to about 1 year old
From 9 to 18 kg (from 20 to 39 lb) (group 1)From about 1 to 3 years old
Type of ISOFIX child seatCarrycot (1)rearward facingrearward facingforward facing
ISOFIX size categoryFGCDECDABB1B2B3
Row 1 (a)
Passenger seat with passenger airbag deactivated "OFF" or activated "ON"
Not ISOFIX
Row 2
Seat behind driver or front passengerXIL (5)ILIL (5)ILIUF, ILN/AN/A
Centre seat (b)XIL (5)ILIL (5)ILIUF, ILN/AN/A
Rear seatsIL (1-5)ILILIUF, IL
Page 142 of 360
142
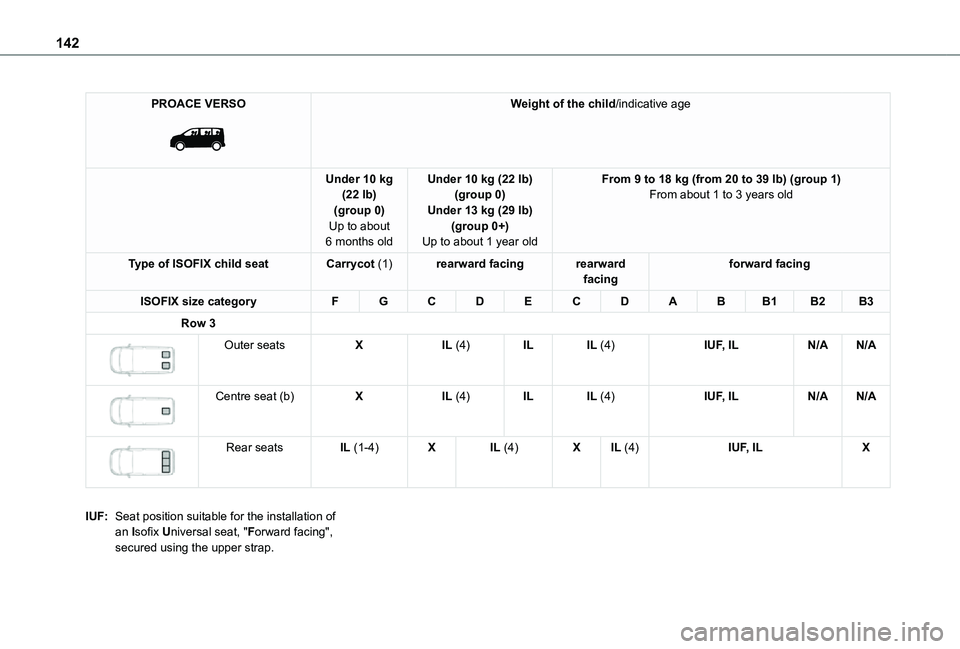
PROACE VERSO
Weight of the child/indicative age
Under 10 kg (22 lb)(group 0)Up to about 6 months old
Under 10 kg (22 lb)(group 0)Under 13 kg (29 lb)(group 0+)Up to about 1 year old
From 9 to 18 kg (from 20 to 39 lb) (group 1)From about 1 to 3 years old
Type of ISOFIX child seatCarrycot (1)rearward facingrearward facingforward facing
ISOFIX size categoryFGCDECDABB1B2B3
Row 3
Outer seatsXIL (4)ILIL (4)IUF, ILN/AN/A
Centre seat (b)XIL (4)ILIL (4)IUF, ILN/AN/A
Rear seatsIL (1-4)XIL (4)XIL (4)IUF, ILX
IUF:Seat position suitable for the installation of an Isofix Universal seat, "Forward facing", secured using the upper strap.
Page 143 of 360
143
Safety
5
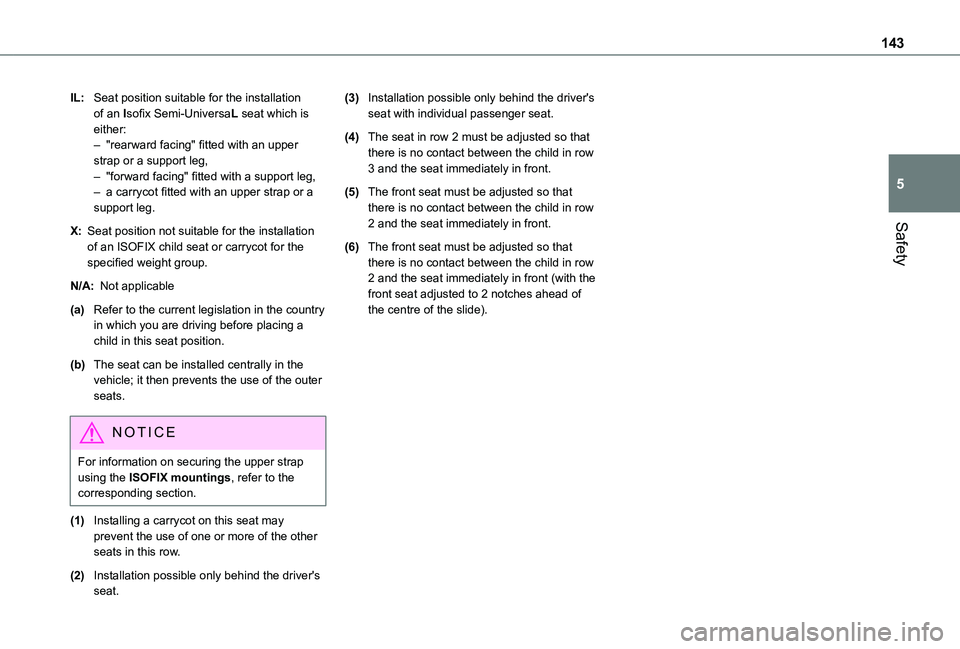
IL:Seat position suitable for the installation of an Isofix Semi-UniversaL seat which is either:– "rearward facing" fitted with an upper strap or a support leg,– "forward facing" fitted with a support leg,– a carrycot fitted with an upper strap or a support leg.
X:Seat position not suitable for the installation
of an ISOFIX child seat or carrycot for the specified weight group.
N/A:Not applicable
(a)Refer to the current legislation in the country in which you are driving before placing a child in this seat position.
(b)The seat can be installed centrally in the vehicle; it then prevents the use of the outer seats.
NOTIC E
For information on securing the upper strap using the ISOFIX mountings, refer to the corresponding section.
(1)Installing a carrycot on this seat may prevent the use of one or more of the other seats in this row.
(2)Installation possible only behind the driver's seat.
(3)Installation possible only behind the driver's seat with individual passenger seat.
(4)The seat in row 2 must be adjusted so that there is no contact between the child in row 3 and the seat immediately in front.
(5)The front seat must be adjusted so that there is no contact between the child in row 2 and the seat immediately in front.
(6)The front seat must be adjusted so that there is no contact between the child in row 2 and the seat immediately in front (with the front seat adjusted to 2 notches ahead of the centre of the slide).
Page 149 of 360

149
Driving
6
If the vehicle absolutely must drive through a flooded section of road:► Check that the depth of the water does not exceed 15 cm, taking account of waves that might be generated by other users.► Deactivate the Stop & Start function.► Drive as slowly as possible without stalling. In all cases, do not exceed 6 mph (10 km/h).► Do not stop and do not switch off the motor.On leaving the flooded road, as soon as safety conditions allow, make several light brake applications to dry the brake discs and pads.If in doubt about the state of your vehicle, contact any authorized Toyota retailer or Toyota authorized repairer, or any reliable repairer.
Noise (Electric)
On the outside
Due to the vehicle’s quiet operation when driving, the driver must pay particular attention.At speeds of up to 19 mph (30 km/h), the pedestrian horn warns other road users of the vehicle’s presence.
NOTIC E
Cooling the traction batteryThe cooling fan comes on during charging to cool the on-board charger and the traction battery.
On the inside
During use, you may hear certain perfectly normal noises specific to electric vehicles, such as:– Traction battery relay when starting.– Vacuum pump when braking.– Vehicle tyres or aerodynamics when driving.– Jolting and knocking noise during hill starts.
In case of towing
WARNI NG
Driving with a trailer places greater demands on the towing vehicle and requires extra care from the driver.
NOTIC E
Respect the maximum towable weights.At altitude: reduce the maximum load by
10% per 1,000 metres (3,280 ft) of altitude; the density of the air decreases with altitude and the performance of the engine reduces.
WARNI NG
New vehicle: do not pull a trailer before having driven at least 1,000 kilometres (620 miles).
NOTIC E
If the outside temperature is high, let the
engine idle for 1 to 2 minutes after the vehicle comes to a stop, to help it to cool.
Before setting off
Nose weight
► Distribute the load in the trailer so that the heaviest items are as close as possible to the axle and the nose weight (at the point where it joins your vehicle) approaches the maximum permitted without exceeding it.
Tyres
► Check the tyre pressures of the towing vehicle and of the trailer, observing the recommended pressures.
Lighting
► Check the electrical signalling on the trailer and the headlamp beam height of your vehicle.
Page 204 of 360
204
3.Always use an electrical socket protected by a circuit-breaker appropriate for the electrical circuit’s current rating.
4.The weight of the control unit must not be borne by the electrical socket, plug and cables.
5.Never use this charging cable if it is defective or in any way damaged.
6.Never attempt to repair or open this charging cable. It contains no repairable parts - replace the charging cable if it is damaged.
7.Never immerse this charging cable in water.
8.Never use this charging cable with an extension cable, a multi-plug socket, a conversion adaptor or on a damaged electrical socket.
9.Do not unplug the plug from the wall as a means of stopping charging.
10.Immediately stop charging, by locking and then unlocking the vehicle using the remote control key, if the charging cable or wall socket feel burning hot to the touch.
11 .This charging cable includes components liable to cause electrical arcing or sparks. Do not expose to flammable vapours.
12.Only use this charging cable with TOYOTA vehicles.
13.Never plug the cable into the wall socket (or unplug it) with wet hands.
14.Do not force the connector if it is locked into the vehicle.
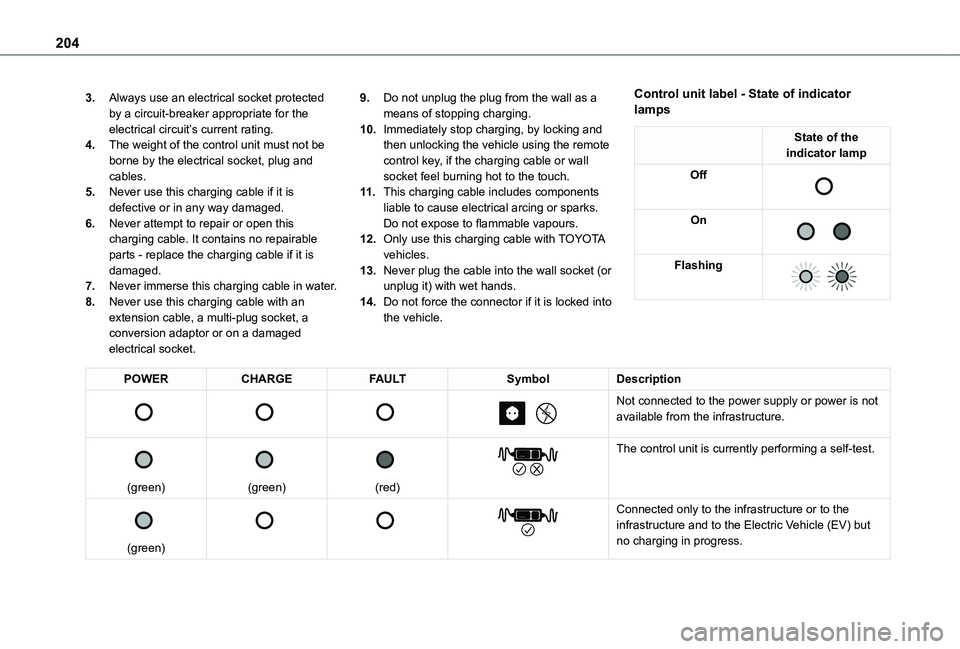
Control unit label - State of indicator lamps
State of the indicator lamp
Off
On
Flashing
POWERCHARGEFAULTSymbolDescription
Not connected to the power supply or power is not available from the infrastructure.
(green)
(green)
(red)
The control unit is currently performing a self-test.
(green)
Connected only to the infrastructure or to the infrastructure and to the Electric Vehicle (EV) but no charging in progress.
Page 212 of 360

212
Installation tips
► If you have to fit the chains during a journey, stop the vehicle on a flat surface on the side of the road.► Apply the parking brake and position any wheel chocks under the wheels to prevent movement of your vehicle.► Fit the chains following the instructions provided by the manufacturer.► Move off gently and drive for a few moments, without exceeding 50 km/h (31 mph).► Stop your vehicle and check that the snow chains are correctly tightened.
NOTIC E
It is strongly recommended that before you leave, you practise fitting the snow chains on a level and dry surface.
WARNI NG
Avoid driving with snow chains on roads that have been cleared of snow to avoid damaging your vehicle's tyres and the road surface. If your vehicle is fitted with alloy wheels, check that no part of the chain or its fixings is in contact with the wheel rim.
Towing device
Load distribution► Distribute the load in the trailer so that the heaviest items are as close as possible to the axle and the nose weight approaches the maximum permitted without exceeding it.Air density decreases with altitude, thus reducing engine performance. The maximum towed load must be reduced by 10 % for every 1,000 metres (3,280 ft) of altitude.
NOTIC E
Use towing devices and their unmodified harnesses approved by TOYOTA. It is recommended that the installation be performed by any authorized Toyota retailer or Toyota authorized repairer, or any reliable repairer.If the towing device is not fitted by any authorized Toyota retailer or Toyota authorized repairer, or any reliable repairer, it must still be fitted in accordance with the vehicle manufacturer's instructions.Certain driving assistance or manoeuvring assistance functions are automatically disabled if an approved towbar is used.
WARNI NG
Observe the maximum authorised towable weight, indicated on your vehicle's registration certificate, the manufacturer's label as well as in the Technical data section of this guide.Complying with the maximum authorised nose weight (towball) also includes the use of accessories (bicycle carriers, tow boxes, etc.).
WARNI NG
Observe the legislation in force in the country in which you are driving.
NOTIC E
Electric motorAn electric vehicle may be fitted with a towing device.It is therefore possible to tow a trailer or caravan.Contact any authorized Toyota retailer or Toyota authorized repairer, or any reliable repairer for more information and to obtain a suitable towing device.
Page 213 of 360
213
Practical information
7
Roof bars / Roof rack
WARNI NG
As a safety measure and to avoid damaging the roof, it is essential to use the roof bars and racks approved for your vehicle.Observe the instructions on fitting and use contained in the guide supplied with the roof bars and racks.
WARNI NG
RecommendationsDistribute the load uniformly, taking care to avoid overloading one of the sides.Arrange the heaviest part of the load as close as possible to the roof.Secure the load firmly.Drive gently: the vehicle will be more susceptible to the effects of side winds and its stability may be affected.
Remove the roof bars once they are no longer needed.
WARNI NG
As this value may change, please verify the maximum load quoted in the guide supplied with the roof bars.If the height exceeds 40 cm, adapt the speed of the vehicle to the profile of the road to avoid damaging the roof bars and the fixings on the vehicle.Be sure to refer to national legislation in order to comply with the regulations for transporting objects that are longer than the vehicle.
Roof bars
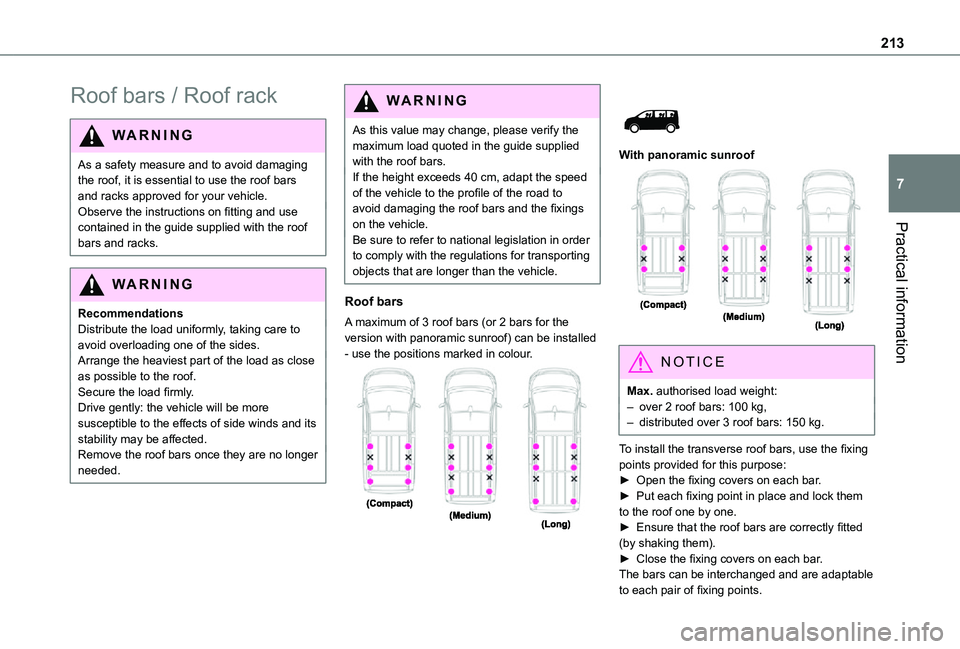
A maximum of 3 roof bars (or 2 bars for the version with panoramic sunroof) can be installed - use the positions marked in colour.
With panoramic sunroof
NOTIC E
Max. authorised load weight:– over 2 roof bars: 100 kg,– distributed over 3 roof bars: 150 kg.
To install the transverse roof bars, use the fixing points provided for this purpose:► Open the fixing covers on each bar.► Put each fixing point in place and lock them to the roof one by one.► Ensure that the roof bars are correctly fitted (by shaking them).► Close the fixing covers on each bar.The bars can be interchanged and are adaptable to each pair of fixing points.