Page 63 of 360
63
Ease of use and comfort
1
Precautions for the seats
and bench seats
Do not remove a head restraint without storing it and securing it to a support.Ensure that the passengers can always access the seat belts and fasten them easily.A passenger must not take their seat without adjusting the seat's head restraint correctly and adjusting and fastening their seat belt.
WARNI NG
Ensure that no object or passenger feet could obstruct the anchorage points or prevent the correct latching of the assembly.
NOTIC E
If removing and storing seats and bench seats out of the vehicle, ensure that they are placed in a clean area, so as to avoid introducing any foreign bodies into the mechanisms.
NOTIC E
The seats and bench seats are not designed for any other use than in the vehicle. They are equipped with mechanisms and features that may be damaged if used improperly or if dropped.
Loading luggage or objects
behind the row 3 seat and
bench seat
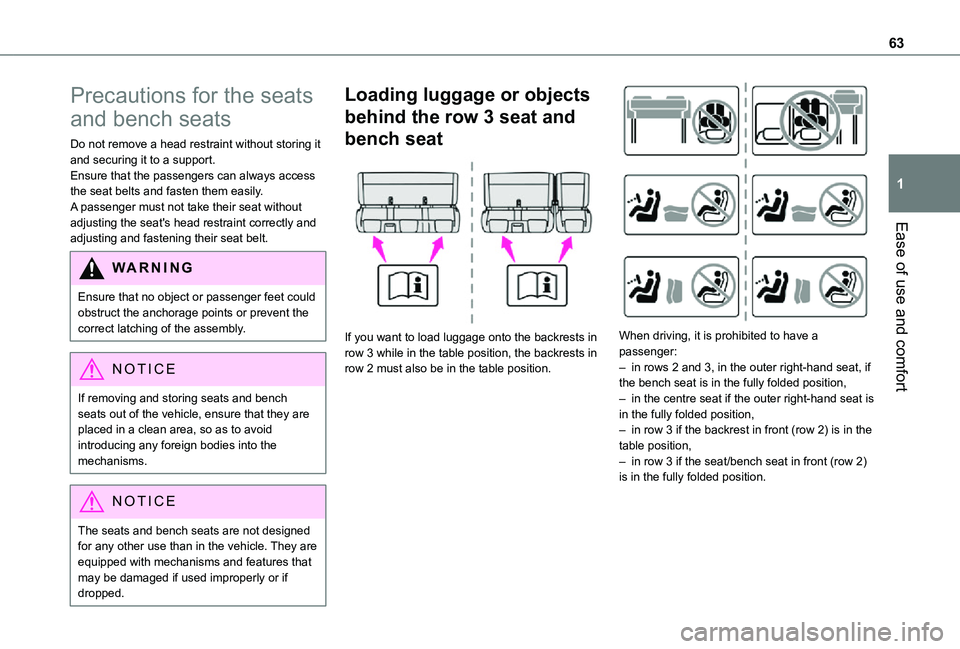
If you want to load luggage onto the backrests in row 3 while in the table position, the backrests in row 2 must also be in the table position.
When driving, it is prohibited to have a passenger:– in rows 2 and 3, in the outer right-hand seat, if the bench seat is in the fully folded position,– in the centre seat if the outer right-hand seat is in the fully folded position,– in row 3 if the backrest in front (row 2) is in the table position,– in row 3 if the seat/bench seat in front (row 2) is in the fully folded position.
Page 70 of 360
70
Refitting
NOTIC E
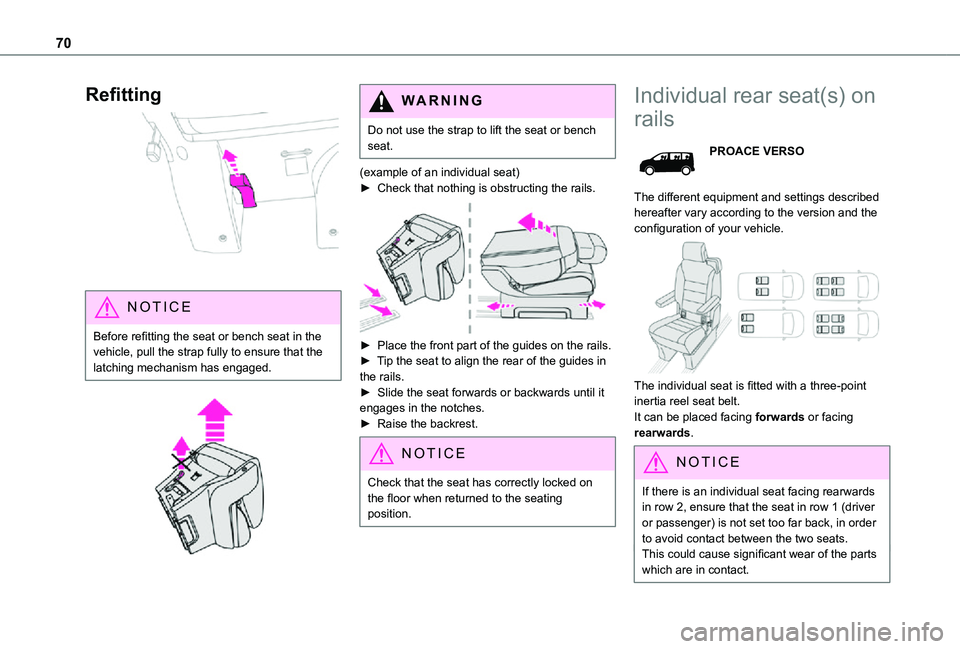
Before refitting the seat or bench seat in the vehicle, pull the strap fully to ensure that the latching mechanism has engaged.
WARNI NG
Do not use the strap to lift the seat or bench seat.
(example of an individual seat)► Check that nothing is obstructing the rails.
► Place the front part of the guides on the rails.► Tip the seat to align the rear of the guides in the rails.► Slide the seat forwards or backwards until it engages in the notches.► Raise the backrest.
NOTIC E
Check that the seat has correctly locked on the floor when returned to the seating position.
Individual rear seat(s) on
rails
PROACE VERSO
The different equipment and settings described hereafter vary according to the version and the configuration of your vehicle.
The individual seat is fitted with a three-point inertia reel seat belt.It can be placed facing forwards or facing rearwards.
NOTIC E
If there is an individual seat facing rearwards in row 2, ensure that the seat in row 1 (driver or passenger) is not set too far back, in order to avoid contact between the two seats.This could cause significant wear of the parts which are in contact.
Page 73 of 360

73
Ease of use and comfort
1
► Tip the seat to align the rear of the guides in the rails.► Slide the seat forwards or backwards until it engages in the notches.► Raise the backrest.
NOTIC E
Check that the seat has correctly locked on the floor when returned to the seating
position.
Fixed Crew Cab
The Crew Cab is made up of a fixed bench seat, seat belts, storage compartments (depending on equipment) and side windows. It is separated from the loading area by a high-strength partition.
Rear bench seat
This ergonomic bench seat has three seats.The two outer seats are fitted with ISOFIX mountings.
NOTIC E
For more information on the ISOFIX mountings, refer to the corresponding section.
Storage compartment
If applicable, a storage compartment is available at the front, underneath the bench seat.
Under seat cushion storage
wells
If the vehicle is so equipped, they are located underneath the centre and outer left-hand seats.To gain access to it from the cab, tip the required seat forwards.
Page 77 of 360
77
Ease of use and comfort
1
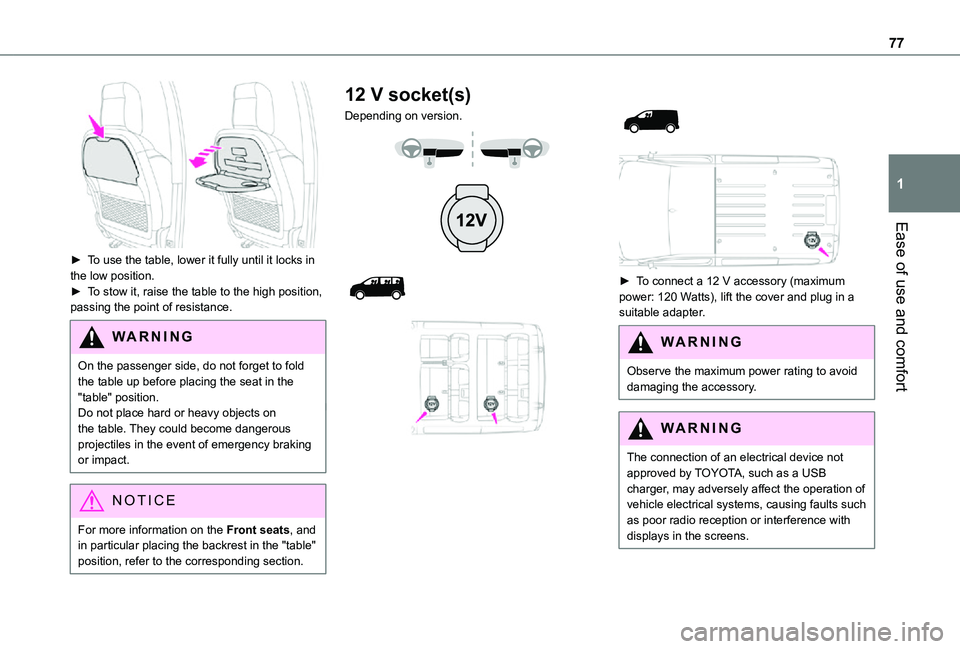
► To use the table, lower it fully until it locks in the low position.► To stow it, raise the table to the high position, passing the point of resistance.
WARNI NG
On the passenger side, do not forget to fold the table up before placing the seat in the "table" position.Do not place hard or heavy objects on the table. They could become dangerous
projectiles in the event of emergency braking or impact.
NOTIC E
For more information on the Front seats, and in particular placing the backrest in the "table" position, refer to the corresponding section.
12 V socket(s)
Depending on version.
► To connect a 12 V accessory (maximum power: 120 Watts), lift the cover and plug in a suitable adapter.
WARNI NG
Observe the maximum power rating to avoid damaging the accessory.
WARNI NG
The connection of an electrical device not approved by TOYOTA, such as a USB charger, may adversely affect the operation of vehicle electrical systems, causing faults such as poor radio reception or interference with displays in the screens.
Page 79 of 360
79
Ease of use and comfort
1
NOTIC E
If the power consumption becomes too high and when required by the vehicle's electrical system (particular weather conditions, electrical overload, etc.), the power supply to the socket will be cut off; the green indicator lamp goes off
Load space cover
► To remove it, lift it up.
► To install it, insert the guides into their housings.
WARNI NG
In the event of sudden deceleration, objects placed on the load space cover can turn into projectiles.
Loading area fittings
Stowing rings
Use the stowing rings on the rear floor to secure loads.As a safety precaution in case of sharp braking, we recommend placing heavy objects as far forwards as possible (i.e. near the cab).We recommend using the stowing rings on the floor to firmly secure the load.
Load retaining partition
On the floor, behind the front seats, a vertical partition protects the driver and front passengers against the risk of load movement.
Page 81 of 360
81
Ease of use and comfort
1
Seating area fittings
High load retaining net
This allows the use of the entire loading capacity, up to the roof:– behind the front seats in row 1, when the rear seats (and bench seats) in rows 2 and 3 are folded or removed,– behind the rear seats (and bench seats) in row 2, when the rear seats (and bench seats) in row 3 are folded or removed.
Upper fixings
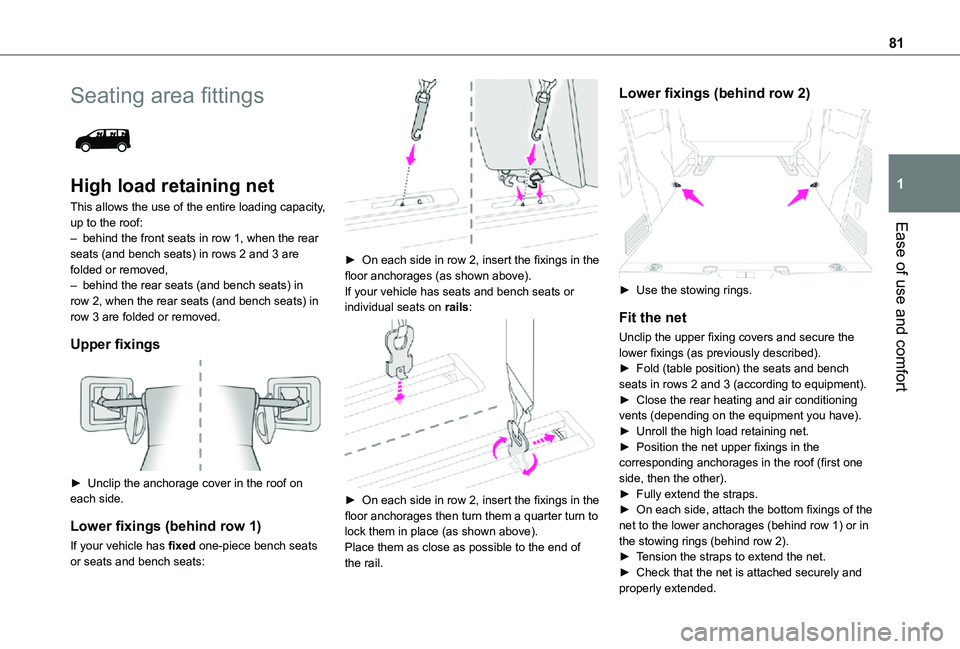
► Unclip the anchorage cover in the roof on each side.
Lower fixings (behind row 1)
If your vehicle has fixed one-piece bench seats or seats and bench seats:
► On each side in row 2, insert the fixings in the floor anchorages (as shown above).If your vehicle has seats and bench seats or individual seats on rails:
► On each side in row 2, insert the fixings in the floor anchorages then turn them a quarter turn to lock them in place (as shown above).Place them as close as possible to the end of the rail.
Lower fixings (behind row 2)
► Use the stowing rings.
Fit the net
Unclip the upper fixing covers and secure the lower fixings (as previously described).► Fold (table position) the seats and bench seats in rows 2 and 3 (according to equipment).► Close the rear heating and air conditioning vents (depending on the equipment you have).► Unroll the high load retaining net.
► Position the net upper fixings in the corresponding anchorages in the roof (first one side, then the other).► Fully extend the straps.► On each side, attach the bottom fixings of the net to the lower anchorages (behind row 1) or in the stowing rings (behind row 2).► Tension the straps to extend the net.► Check that the net is attached securely and properly extended.
Page 86 of 360
86
WARNI NG
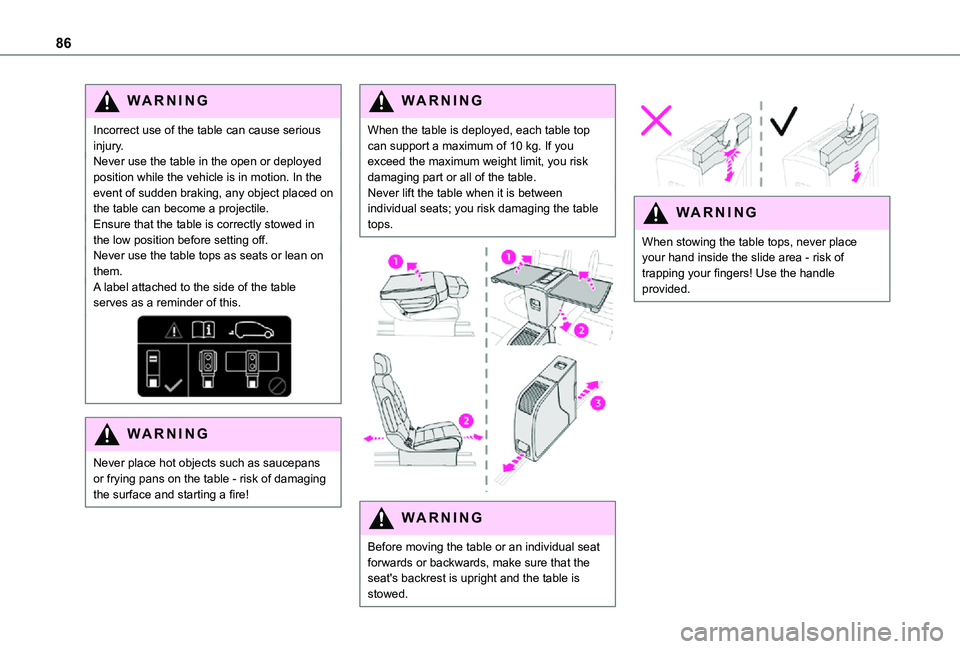
Incorrect use of the table can cause serious injury.Never use the table in the open or deployed position while the vehicle is in motion. In the event of sudden braking, any object placed on the table can become a projectile.Ensure that the table is correctly stowed in the low position before setting off.Never use the table tops as seats or lean on them.A label attached to the side of the table serves as a reminder of this.
WARNI NG
Never place hot objects such as saucepans or frying pans on the table - risk of damaging the surface and starting a fire!
WARNI NG
When the table is deployed, each table top can support a maximum of 10 kg. If you exceed the maximum weight limit, you risk damaging part or all of the table.Never lift the table when it is between individual seats; you risk damaging the table tops.
WARNI NG
Before moving the table or an individual seat forwards or backwards, make sure that the seat's backrest is upright and the table is stowed.
WARNI NG
When stowing the table tops, never place
your hand inside the slide area - risk of trapping your fingers! Use the handle provided.
Page 104 of 360
104
WARNI NG
Clean the windscreen regularly, particularly the area in front of the camera.The internal surface of the windscreen can also become misted around the camera. In humid and cold weather, demist the windscreen regularly.Do not allow snow to accumulate on the bonnet or roof of the vehicle as this could obstruct the detection camera.
Headlamp beam height
adjustment
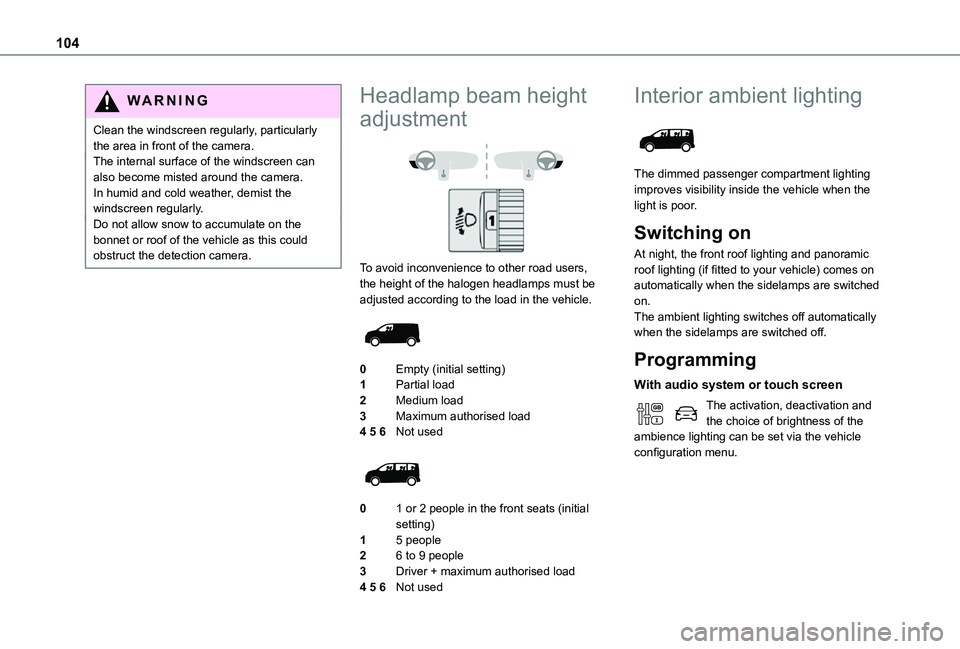
To avoid inconvenience to other road users, the height of the halogen headlamps must be adjusted according to the load in the vehicle.
0Empty (initial setting)
1Partial load
2Medium load
3Maximum authorised load
4 5 6Not used
01 or 2 people in the front seats (initial setting)
15 people
26 to 9 people
3Driver + maximum authorised load
4 5 6Not used
Interior ambient lighting
The dimmed passenger compartment lighting improves visibility inside the vehicle when the light is poor.
Switching on
At night, the front roof lighting and panoramic roof lighting (if fitted to your vehicle) comes on automatically when the sidelamps are switched on.The ambient lighting switches off automatically when the sidelamps are switched off.
Programming
With audio system or touch screen
The activation, deactivation and the choice of brightness of the ambience lighting can be set via the vehicle configuration menu.