2021 TOYOTA PROACE EV Wiper
[x] Cancel search: WiperPage 108 of 360
108
► Proceed with the desired operation or the replacement of the wiper blades.
After refitting a windscreen wiper blade
► To return the wiper blades to their initial position, switch on the ignition and operate the wiper control stalk.
Changing a wiper blade
Removing/refitting at the front
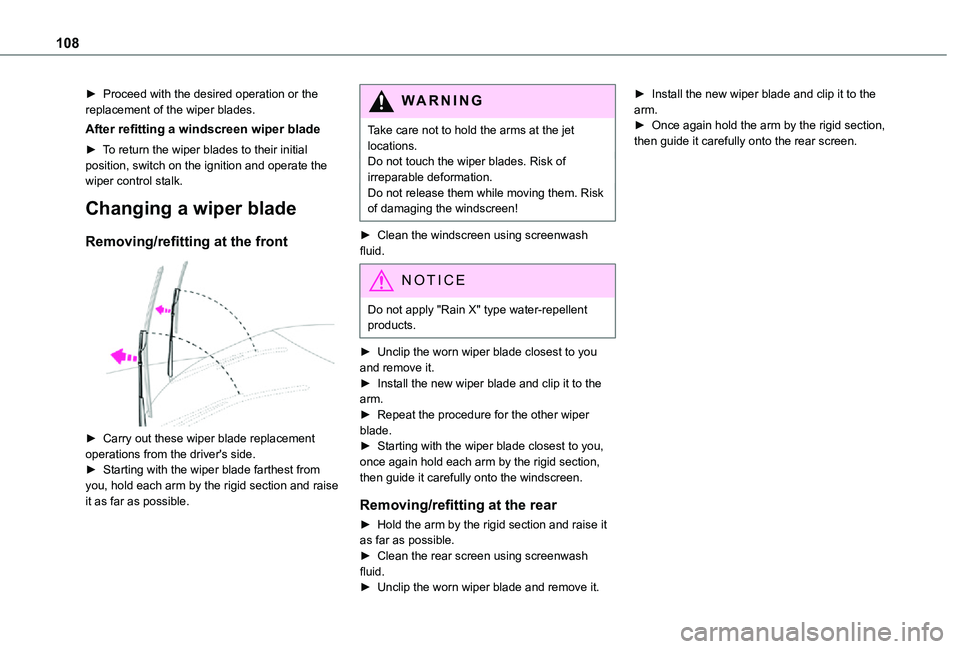
► Carry out these wiper blade replacement
operations from the driver's side.► Starting with the wiper blade farthest from you, hold each arm by the rigid section and raise it as far as possible.
WARNI NG
Take care not to hold the arms at the jet locations.Do not touch the wiper blades. Risk of irreparable deformation.Do not release them while moving them. Risk of damaging the windscreen!
► Clean the windscreen using screenwash fluid.
NOTIC E
Do not apply "Rain X" type water-repellent products.
► Unclip the worn wiper blade closest to you and remove it.► Install the new wiper blade and clip it to the arm.► Repeat the procedure for the other wiper blade.► Starting with the wiper blade closest to you, once again hold each arm by the rigid section, then guide it carefully onto the windscreen.
Removing/refitting at the rear
► Hold the arm by the rigid section and raise it as far as possible.► Clean the rear screen using screenwash fluid.► Unclip the worn wiper blade and remove it.
► Install the new wiper blade and clip it to the arm.► Once again hold the arm by the rigid section, then guide it carefully onto the rear screen.
Page 211 of 360
2 11
Practical information
7
Energy economy mode
System which manages the duration of use of certain functions to conserve a sufficient level of charge in the battery.After switching off the engine and for a maximum cumulative period of around 40 minutes, you can continue to use functions such as the audio and telematics system, the wipers, the dipped beam headlamps, the courtesy lamps, etc.
Switching to the mode
A message indicating that the vehicle has switched to economy mode is displayed on the instrument panel screen and the active functions are put on standby.
NOTIC E
If a telephone call is in progress at the time, it will be maintained for around 10 minutes using your audio system’s hands-free system.
Exiting the mode
These functions will be automatically reactivated the next time the vehicle is used.In order to restore the use of these functions immediately, start the engine and let it run:– for less than 10 minutes, to use the equipment for approximately 5 minutes,– for more than 10 minutes, to use the equipment for approximately 30 minutes.
Let the engine run for the duration specified to ensure that the battery charge is sufficient.Do not repeatedly and continuously restart the engine in order to charge the battery.
WARNI NG
A flat battery prevents the engine from starting.For more information on the 12 V battery,
refer to the corresponding section.
Load reduction mode
System that manages the use of certain functions according to the level of charge remaining in the battery.When the vehicle is being driven, the load reduction function temporarily deactivates certain functions, such as the air conditioning and the heated rear screen.The deactivated functions are reactivated automatically as soon as conditions permit.
Snow chains
In wintry conditions, snow chains improve traction as well as the behaviour of the vehicle when braking.
WARNI NG
The snow chains must be fitted only to the front wheels. They must never be fitted to "space-saver" type spare wheels.
NOTIC E
Take account of the legislation specific to each country on the use of snow chains and the maximum authorised speed.
Only use chains that have been designed for the type of wheel fitted to your vehicle.
Original tyre sizeType of chain
215/65 R1612 mm link
215/60 R17
225/55 R17
You can also use snow socks.For more information, contact a any authorized Toyota retailer or Toyota authorized repairer, or
any reliable repairer..
Page 244 of 360

244
WARNI NG
The replacement of a fuse not shown in the allocation tables could cause a serious malfunction of the vehicle.Consult any authorized Toyota retailer or Toyota authorized repairer, or any reliable repairer.
GoodFaulty
Tweezers
NOTIC E
Installing electrical accessoriesThe vehicle's electrical system is designed to
operate with standard or optional equipment.Before fitting other electrical equipment or accessories to your vehicle, contact any authorized Toyota retailer or Toyota
authorized repairer, or any reliable repairer.
WARNI NG
TOYOTA accepts no responsibility for the cost incurred in repairing the vehicle or for rectifying malfunctions resulting from the installation of accessories not supplied or not recommended by TOYOTA and not installed in accordance with its recommendations, in particular when the combined power consumption of all of the additional equipment connected exceeds 10 milliamperes.
NOTIC E
For more information on installing a towbar or TAXI type equipment, contact any authorized Toyota retailer or Toyota authorized repairer, or any reliable repairer.
Version 1 (Eco)
The fuses described below vary according to the equipment in your vehicle.
Fuse N°Rating(Amps)Functions
F415Horn.
F520Front/rear screenwash pump.
F620Front/rear screenwash pump.
F710Rear 12 V accessory socket.
F820Single or double rear wipers.
F10/F1130Internal/external locks, front and rear.
F145Alarm, emergency and assistance calls.
F245Touch screen, reversing camera and parking sensors.
Page 245 of 360

245
In the event of a breakdown
8
Fuse N°Rating(Amps)Functions
F2920Audio system, touch screen, CD player, navigation.
F3215Front 12 V accessory socket.
Version 2 (Full)
The fuses described below vary according to the equipment in your vehicle.
Fuse N°Rating(Amps)Functions
F55Touch screen, reversing camera and
parking sensors.
Fuse N°Rating(Amps)Functions
F820Single or double rear wipers.
F10/F1130Internal/external locks, front and rear.
F123Alarm.
F1710Rear 12 V accessory socket.
F3315Front 12 V accessory socket.
F3620Audio system, touch screen, CD player, navigation.
Engine compartment fuses
The fusebox is placed in the engine compartment near the battery.
Access to the fuses
► Release the two latches A.► Remove the cover.► Change the fuse.► When you have finished, close the cover carefully then engage the two latches A, to ensure correct sealing of the fusebox.The fuses described below vary according to the equipment in your vehicle.
Fuse N°Rating(Amps)Functions
F1425Front and rear screenwash pump.
F1930Windscreen wiper motor.
F2015Front and rear screenwash pump.
Page 247 of 360
247
In the event of a breakdown
8
Starting using another
battery
If the vehicle's battery is flat, the engine can be started using a backup battery (either external or from another vehicle) and jump leads or using a battery booster.
WARNI NG
Never start the engine by connecting a battery charger.Never use a 24 V or higher battery booster.Check beforehand that the backup battery has a nominal voltage of 12 V and a capacity at least equal to that of the discharged battery.The two vehicles must not be in contact with each other.Switch off all electricity-consuming equipment on both vehicles (audio system, wipers, lighting, etc.).Make sure that the jump leads are well away from the engine’s moving parts (fan, belt, etc.).Do not disconnect the (+) terminal while the engine is running.
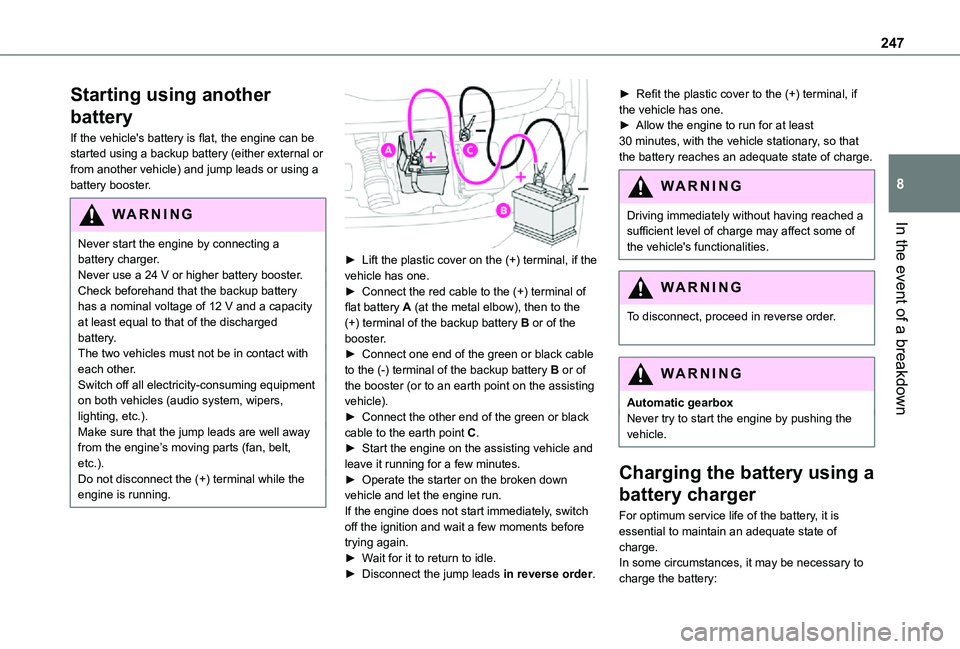
► Lift the plastic cover on the (+) terminal, if the vehicle has one.► Connect the red cable to the (+) terminal of flat battery A (at the metal elbow), then to the (+) terminal of the backup battery B or of the booster.► Connect one end of the green or black cable to the (-) terminal of the backup battery B or of the booster (or to an earth point on the assisting vehicle).► Connect the other end of the green or black cable to the earth point C.► Start the engine on the assisting vehicle and leave it running for a few minutes.► Operate the starter on the broken down vehicle and let the engine run.If the engine does not start immediately, switch off the ignition and wait a few moments before trying again.► Wait for it to return to idle.► Disconnect the jump leads in reverse order.
► Refit the plastic cover to the (+) terminal, if the vehicle has one.► Allow the engine to run for at least 30 minutes, with the vehicle stationary, so that the battery reaches an adequate state of charge.
WARNI NG
Driving immediately without having reached a sufficient level of charge may affect some of
the vehicle's functionalities.
WARNI NG
To disconnect, proceed in reverse order.
WARNI NG
Automatic gearboxNever try to start the engine by pushing the vehicle.
Charging the battery using a
battery charger
For optimum service life of the battery, it is essential to maintain an adequate state of
charge.In some circumstances, it may be necessary to charge the battery:
Page 248 of 360
248
– When using the vehicle mainly for short journeys.– If the vehicle is to be taken off the road for several weeks.Consult any authorized Toyota retailer or Toyota authorized repairer, or any reliable repairer.
WARNI NG
To charge the vehicle's battery yourself, use
only a charger compatible with lead-acid batteries with a nominal voltage of 12 V.
WARNI NG
Follow the instructions provided by the manufacturer of the charger.Never reverse polarities.
NOTIC E
It is not necessary to disconnect the battery.
► Switch the ignition off.► Switch off all electrical consumers (audio system, lighting, wipers, etc.).
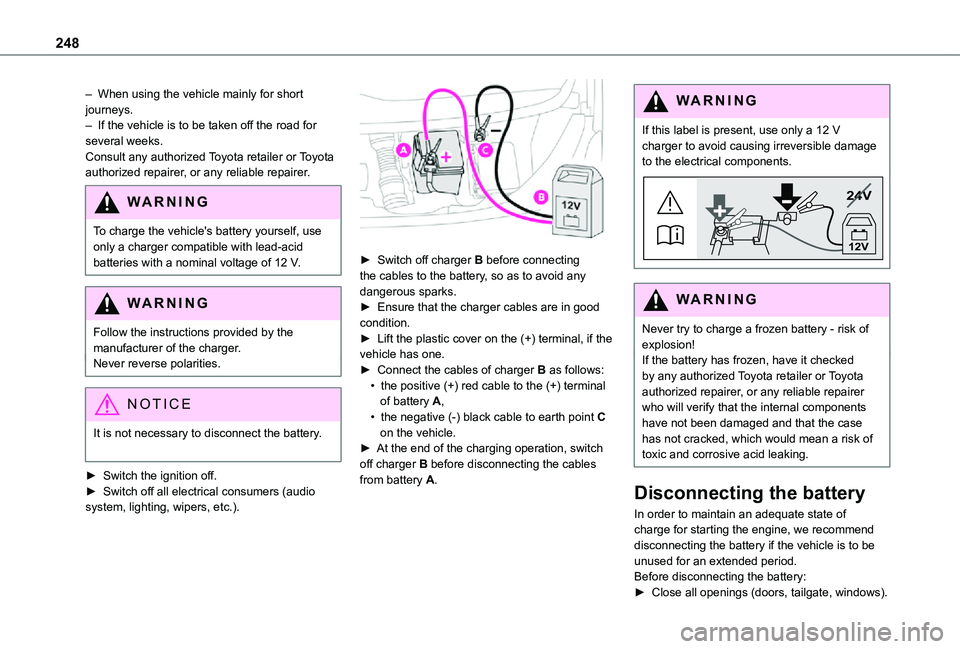
► Switch off charger B before connecting the cables to the battery, so as to avoid any dangerous sparks.► Ensure that the charger cables are in good condition.► Lift the plastic cover on the (+) terminal, if the vehicle has one.► Connect the cables of charger B as follows:• the positive (+) red cable to the (+) terminal of battery A,• the negative (-) black cable to earth point C on the vehicle.► At the end of the charging operation, switch off charger B before disconnecting the cables from battery A.
WARNI NG
If this label is present, use only a 12 V charger to avoid causing irreversible damage to the electrical components.
24V
12V
WARNI NG
Never try to charge a frozen battery - risk of explosion!If the battery has frozen, have it checked by any authorized Toyota retailer or Toyota authorized repairer, or any reliable repairer who will verify that the internal components have not been damaged and that the case has not cracked, which would mean a risk of toxic and corrosive acid leaking.
Disconnecting the battery
In order to maintain an adequate state of charge for starting the engine, we recommend disconnecting the battery if the vehicle is to be unused for an extended period.Before disconnecting the battery:► Close all openings (doors, tailgate, windows).
Page 249 of 360
249
In the event of a breakdown
8
► Switch off all electricity-consuming devices (audio system, wipers, lamps, etc.).► Switch off the ignition and wait for 4 minutes.After accessing the battery, it is only necessary to disconnect the (+) terminal.
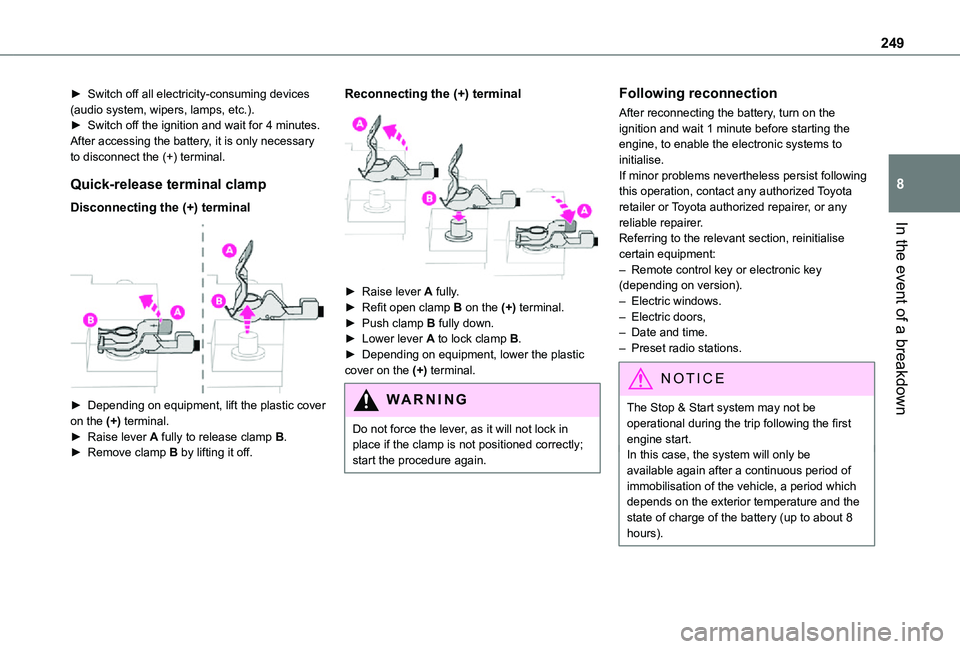
Quick-release terminal clamp
Disconnecting the (+) terminal
► Depending on equipment, lift the plastic cover on the (+) terminal.► Raise lever A fully to release clamp B.
► Remove clamp B by lifting it off.
Reconnecting the (+) terminal
► Raise lever A fully.► Refit open clamp B on the (+) terminal.► Push clamp B fully down.► Lower lever A to lock clamp B.► Depending on equipment, lower the plastic cover on the (+) terminal.
WARNI NG
Do not force the lever, as it will not lock in place if the clamp is not positioned correctly; start the procedure again.
Following reconnection
After reconnecting the battery, turn on the ignition and wait 1 minute before starting the engine, to enable the electronic systems to initialise.If minor problems nevertheless persist following this operation, contact any authorized Toyota retailer or Toyota authorized repairer, or any reliable repairer.Referring to the relevant section, reinitialise certain equipment:– Remote control key or electronic key (depending on version).– Electric windows.– Electric doors,– Date and time.– Preset radio stations.
NOTIC E
The Stop & Start system may not be operational during the trip following the first engine start.
In this case, the system will only be available again after a continuous period of immobilisation of the vehicle, a period which depends on the exterior temperature and the state of charge of the battery (up to about 8 hours).
Page 318 of 360

318
A
ABS 11 2Accelerated charging unit (Wallbox) 202Accessories 109, 154Access to the 3rd row 64, 66Access to the spare wheel 234Active Safety Brake 185–187AdBlue® 19, 221AdBlue® tank 222Additive, Diesel 218–219Adjusting head restraints 54Adjusting seat 52–54Adjusting the air distribution 89–90Adjusting the air flow 89–90Adjusting the date 29, 288, 314Adjusting the height and reach of the steering wheel 57Adjusting the lumbar support 52Adjusting the seat angle 52, 54Adjusting the seat belt height 11 7Adjusting the temperature 89–90
Adjusting the time 29, 288, 314Advice on care and maintenance 200, 225Advice on driving 8, 148–149Airbags 120, 122–123, 126Airbags, curtain 122–123Airbags, front 121, 123, 127Airbags, lateral 121, 123Air conditioning 87, 90, 92, 92–93Air conditioning, digital 91Air conditioning, dual-zone automatic 89–90
Air conditioning, manual 88, 91Air intake 89–91Air vents 87Alarm 49–50Android Auto connection 284, 304Anti-lock braking system (ABS) 11 2Anti-pinch 82Antitheft / Immobiliser 31Apple CarPlay connection 284, 304Applications 304Area, loading 32–33, 40–41, 80Armrest, front 55, 75Assistance call 11 0–111Assistance, emergency braking 11 2, 186Audible warning 111Audio streaming (Bluetooth) 270, 282–283, 309
B
Battery 2 11, 246
Battery, 12 V 218, 246–249Battery, ancillaries 246Battery, charging 247–248Battery, remote control 38–39, 95Bench seat, one-piece, fixed 64–65Blind, panoramic roof 82Blind spot monitoring system 191Blind spot sensors 190Blinds, side 82Bluetooth (hands-free) 271, 285–286, 310
Bluetooth (telephone) 285–286, 310–3 11Bodywork 225Bonnet 214–215Boot 48Boot lid 35–36, 38, 48Bottle holder 75Brake discs 220Brake lamps 241, 243Brakes 219–220Braking 165Braking assistance system 11 2Braking, automatic emergency 185–187Braking, dynamic emergency 156–158Brightness 287Bulbs 238Bulbs (changing) 237, 241
C
Capacity, fuel tank 197, 199Cap, fuel filler 197, 199
Care of the bodywork 225CD 269, 282CD, MP3 269, 282Central locking 30, 35, 39Changing a bulb 237, 241, 243Changing a bulb (side-hinged doors) 241Changing a fuse 243–245Changing a wheel 233Changing a wiper blade 107–108Changing the remote control battery 38