2021 TOYOTA PROACE CITY VERSO wheel
[x] Cancel search: wheelPage 170 of 272
170
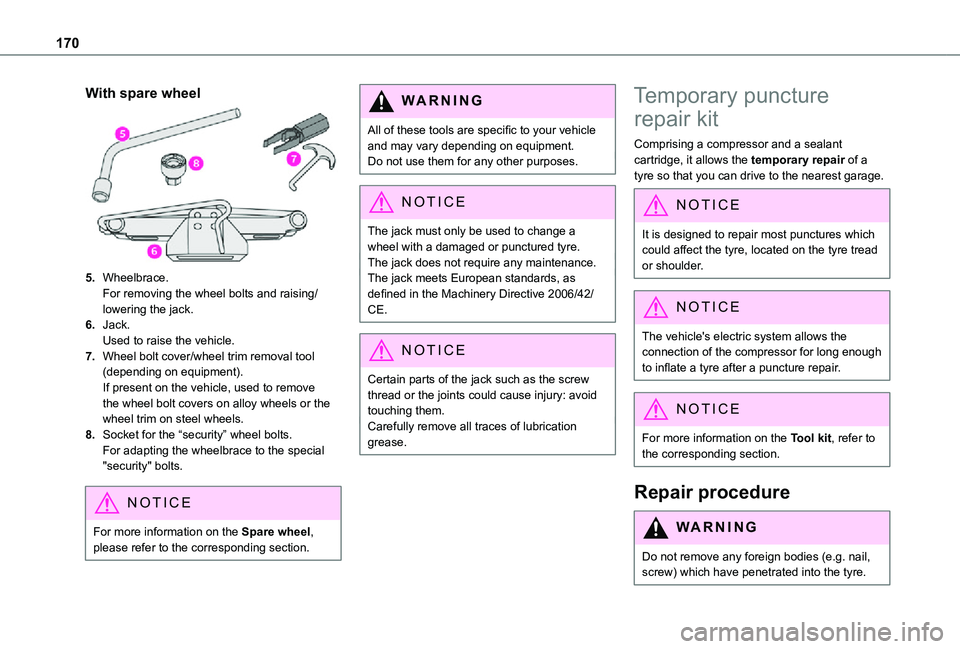
With spare wheel
5.Wheelbrace.For removing the wheel bolts and raising/lowering the jack.
6.Jack.Used to raise the vehicle.
7.Wheel bolt cover/wheel trim removal tool (depending on equipment).If present on the vehicle, used to remove the wheel bolt covers on alloy wheels or the wheel trim on steel wheels.
8.Socket for the “security” wheel bolts.For adapting the wheelbrace to the special "security" bolts.
NOTIC E
For more information on the Spare wheel, please refer to the corresponding section.
WARNI NG
All of these tools are specific to your vehicle and may vary depending on equipment.Do not use them for any other purposes.
NOTIC E
The jack must only be used to change a
wheel with a damaged or punctured tyre.The jack does not require any maintenance.The jack meets European standards, as defined in the Machinery Directive 2006/42/CE.
NOTIC E
Certain parts of the jack such as the screw thread or the joints could cause injury: avoid touching them.Carefully remove all traces of lubrication grease.
Temporary puncture
repair kit
Comprising a compressor and a sealant cartridge, it allows the temporary repair of a tyre so that you can drive to the nearest garage.
NOTIC E
It is designed to repair most punctures which
could affect the tyre, located on the tyre tread or shoulder.
NOTIC E
The vehicle's electric system allows the connection of the compressor for long enough to inflate a tyre after a puncture repair.
NOTIC E
For more information on the Tool kit, refer to the corresponding section.
Repair procedure
WARNI NG
Do not remove any foreign bodies (e.g. nail, screw) which have penetrated into the tyre.
Page 171 of 272
171
In the event of a breakdown
8
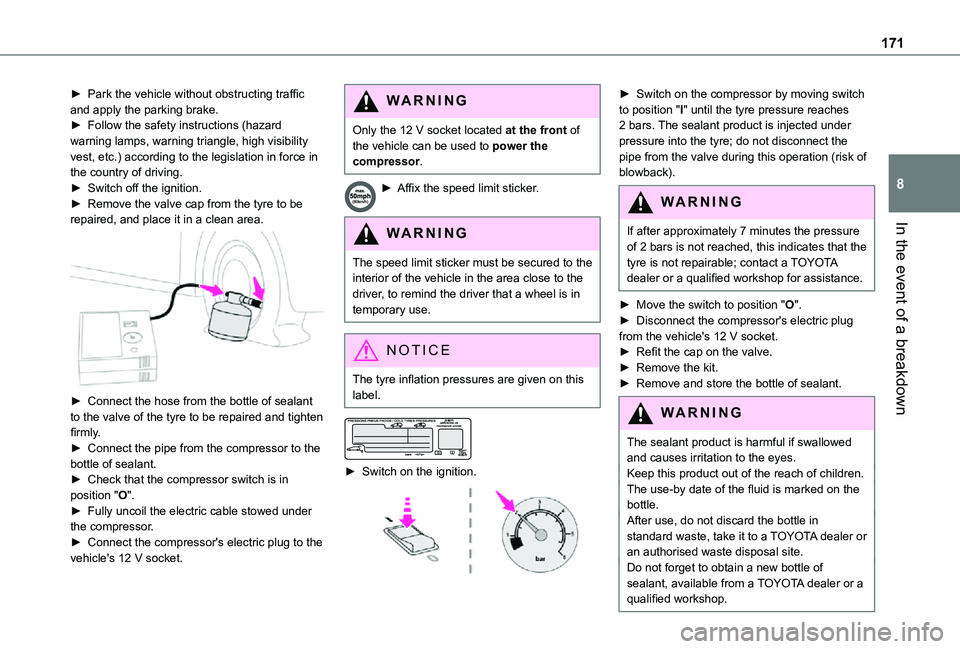
► Park the vehicle without obstructing traffic and apply the parking brake.► Follow the safety instructions (hazard warning lamps, warning triangle, high visibility vest, etc.) according to the legislation in force in the country of driving.► Switch off the ignition.► Remove the valve cap from the tyre to be repaired, and place it in a clean area.
► Connect the hose from the bottle of sealant to the valve of the tyre to be repaired and tighten firmly.► Connect the pipe from the compressor to the bottle of sealant.► Check that the compressor switch is in position "O".► Fully uncoil the electric cable stowed under the compressor.► Connect the compressor's electric plug to the vehicle's 12 V socket.
WARNI NG
Only the 12 V socket located at the front of the vehicle can be used to power the compressor.
► Affix the speed limit sticker.
WARNI NG
The speed limit sticker must be secured to the interior of the vehicle in the area close to the driver, to remind the driver that a wheel is in temporary use.
NOTIC E
The tyre inflation pressures are given on this label.
► Switch on the ignition.
► Switch on the compressor by moving switch to position "I" until the tyre pressure reaches 2 bars. The sealant product is injected under pressure into the tyre; do not disconnect the pipe from the valve during this operation (risk of blowback).
WARNI NG
If after approximately 7 minutes the pressure
of 2 bars is not reached, this indicates that the tyre is not repairable; contact a TOYOTA dealer or a qualified workshop for assistance.
► Move the switch to position "O".► Disconnect the compressor's electric plug from the vehicle's 12 V socket.► Refit the cap on the valve.► Remove the kit.► Remove and store the bottle of sealant.
WARNI NG
The sealant product is harmful if swallowed and causes irritation to the eyes.Keep this product out of the reach of children.The use-by date of the fluid is marked on the bottle.After use, do not discard the bottle in standard waste, take it to a TOYOTA dealer or
an authorised waste disposal site.Do not forget to obtain a new bottle of sealant, available from a TOYOTA dealer or a qualified workshop.
Page 173 of 272
173
In the event of a breakdown
8
Spare wheel
Procedure for changing a damaged wheel with the spare wheel using the tools provided with the vehicle.
NOTIC E
For more information on the Tool kit, refer to the corresponding section.
► Park the vehicle, taking care to avoid obstructing traffic, and apply the parking brake.► Follow the safety instructions (hazard warning lamps, warning triangle, wearing high visibility vest, etc.) according to the legislation in force in the country where you are driving.► Switch off the ignition.
Access to the spare wheel
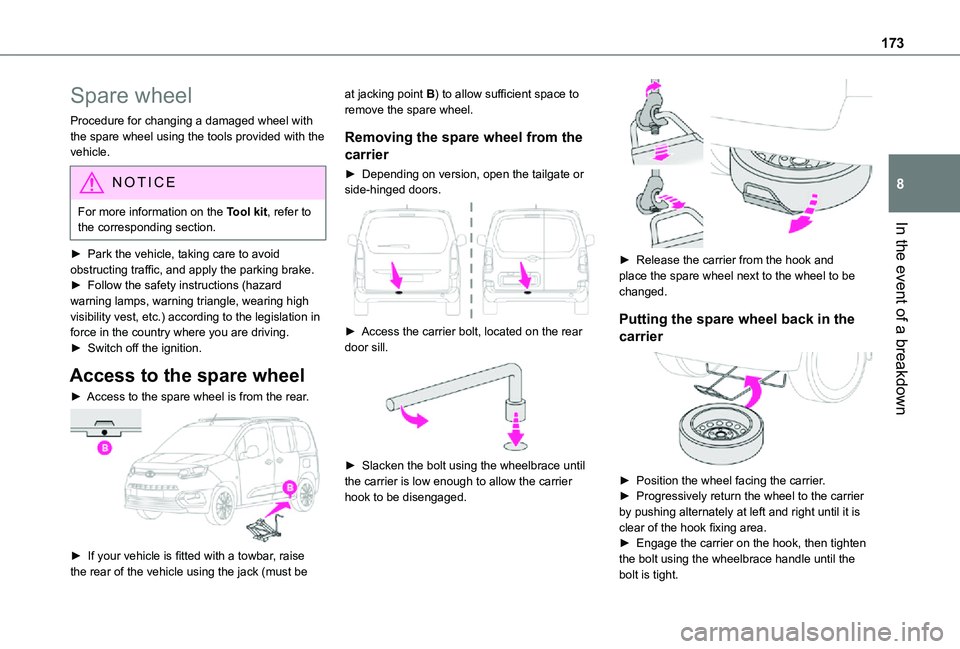
► Access to the spare wheel is from the rear.
► If your vehicle is fitted with a towbar, raise the rear of the vehicle using the jack (must be
at jacking point B) to allow sufficient space to remove the spare wheel.
Removing the spare wheel from the
carrier
► Depending on version, open the tailgate or side-hinged doors.
► Access the carrier bolt, located on the rear door sill.
► Slacken the bolt using the wheelbrace until the carrier is low enough to allow the carrier hook to be disengaged.
► Release the carrier from the hook and place the spare wheel next to the wheel to be changed.
Putting the spare wheel back in the
carrier
► Position the wheel facing the carrier.► Progressively return the wheel to the carrier by pushing alternately at left and right until it is clear of the hook fixing area.► Engage the carrier on the hook, then tighten the bolt using the wheelbrace handle until the bolt is tight.
Page 174 of 272
174
Removing a wheel
WARNI NG
Parking the vehicleImmobilise the vehicle where it does not obstruct traffic: the ground must be level, stable and non-slippery.With a manual gearbox, engage first gear to lock the wheels, apply the parking brake, unless it is programmed to be in automatic mode, and switch off the ignition.With an automatic gearbox, select mode P to lock the wheels, apply the parking brake, unless it is programmed to be in automatic mode, and switch off the ignition.Check for the fixed illumination of the parking brake warning lamps in the instrument panel.The occupants must get out of the vehicle and wait where they are safe.If necessary, place a chock under the wheel diagonally opposite the wheel to be changed.Never go underneath a vehicle raised using a
jack; use an axle stand.
NOTIC E
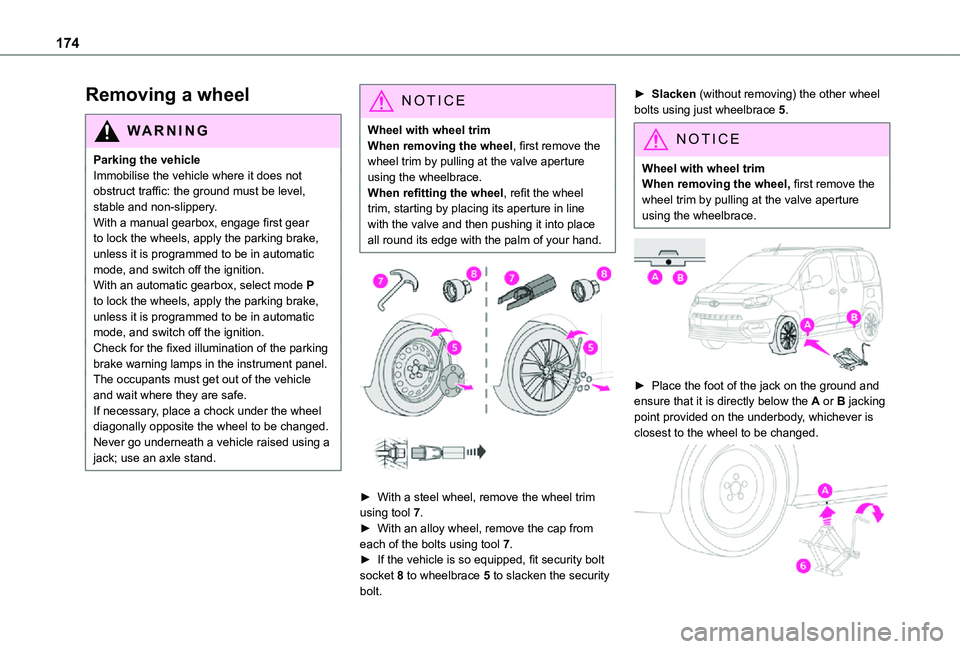
Wheel with wheel trimWhen removing the wheel, first remove the wheel trim by pulling at the valve aperture using the wheelbrace.When refitting the wheel, refit the wheel trim, starting by placing its aperture in line with the valve and then pushing it into place all round its edge with the palm of your hand.
► With a steel wheel, remove the wheel trim using tool 7.► With an alloy wheel, remove the cap from each of the bolts using tool 7.
► If the vehicle is so equipped, fit security bolt socket 8 to wheelbrace 5 to slacken the security bolt.
► Slacken (without removing) the other wheel bolts using just wheelbrace 5.
NOTIC E
Wheel with wheel trimWhen removing the wheel, first remove the wheel trim by pulling at the valve aperture using the wheelbrace.
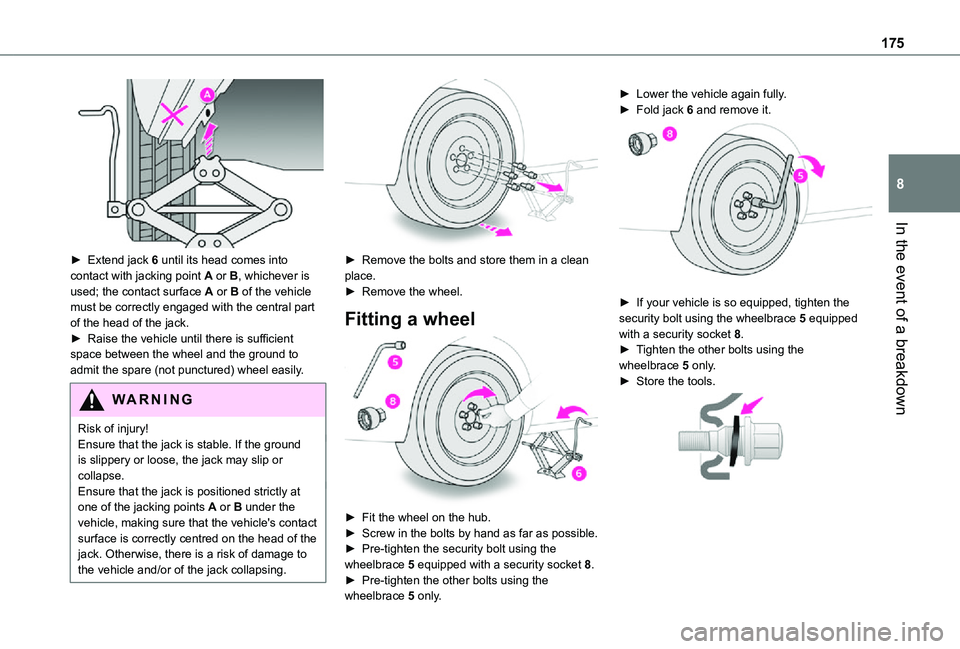
► Place the foot of the jack on the ground and ensure that it is directly below the A or B jacking point provided on the underbody, whichever is closest to the wheel to be changed.
Page 175 of 272
175
In the event of a breakdown
8
► Extend jack 6 until its head comes into contact with jacking point A or B, whichever is used; the contact surface A or B of the vehicle must be correctly engaged with the central part of the head of the jack.► Raise the vehicle until there is sufficient space between the wheel and the ground to admit the spare (not punctured) wheel easily.
WARNI NG
Risk of injury!
Ensure that the jack is stable. If the ground is slippery or loose, the jack may slip or collapse.Ensure that the jack is positioned strictly at one of the jacking points A or B under the vehicle, making sure that the vehicle's contact surface is correctly centred on the head of the jack. Otherwise, there is a risk of damage to the vehicle and/or of the jack collapsing.
► Remove the bolts and store them in a clean place.► Remove the wheel.
Fitting a wheel
► Fit the wheel on the hub.► Screw in the bolts by hand as far as possible.► Pre-tighten the security bolt using the wheelbrace 5 equipped with a security socket 8.► Pre-tighten the other bolts using the wheelbrace 5 only.
► Lower the vehicle again fully.► Fold jack 6 and remove it.
► If your vehicle is so equipped, tighten the security bolt using the wheelbrace 5 equipped with a security socket 8.► Tighten the other bolts using the wheelbrace 5 only.► Store the tools.
Page 176 of 272
176
NOTIC E
Fitting a steel or "space-saver" type spare wheelIf the vehicle is equipped with alloy wheels, the washers do not make contact with the steel or "space-saver" type spare wheel. The wheel is secured by the conical contact of each bolt.
WARNI NG
After changing a wheelStow the punctured wheel in the carrier.Go to a TOYOTA dealer or a qualified workshop as soon as possible.Have the punctured tyre examined. After inspection, the technician will advise you on whether the tyre can be repaired or if it must be replaced.
NOTIC E
Some driving aid functions should be disabled, e.g. the Active Safety Brake.
NOTIC E
If your vehicle has tyre under-inflation detection, check the tyre pressures and reinitialise the system.For more information on Under-inflation detection, refer to the corresponding section.
NOTIC E
Wheel with wheel trimWhen refitting the wheel, refit the wheel trim, starting by aligning the cutout with the valve and then pushing the trim into place all round its edge with the palm of your hand.
NOTIC E
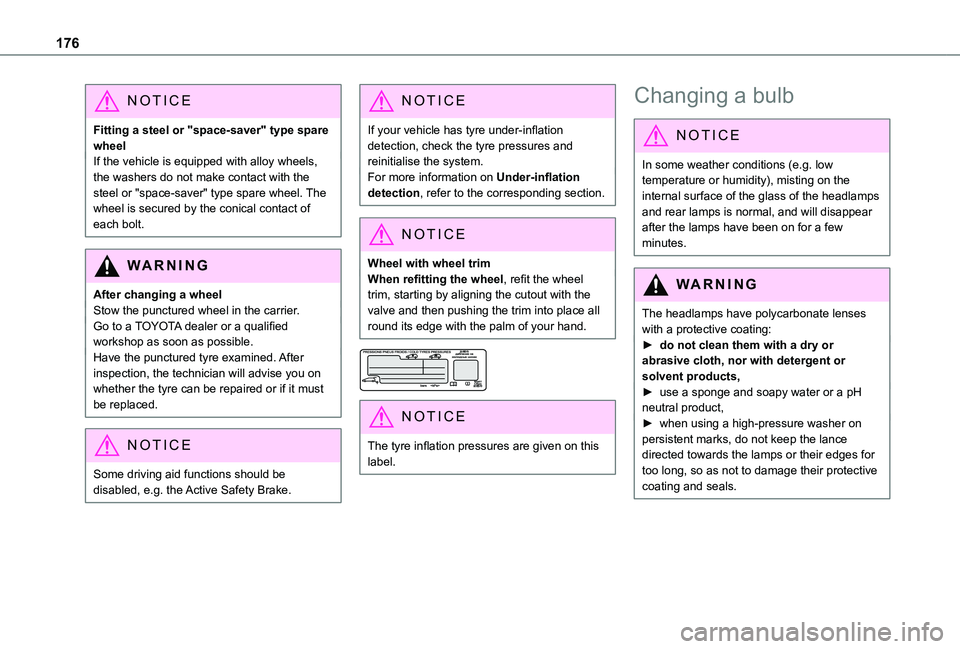
The tyre inflation pressures are given on this label.
Changing a bulb
NOTIC E
In some weather conditions (e.g. low temperature or humidity), misting on the internal surface of the glass of the headlamps and rear lamps is normal, and will disappear after the lamps have been on for a few minutes.
WARNI NG
The headlamps have polycarbonate lenses with a protective coating:► do not clean them with a dry or abrasive cloth, nor with detergent or solvent products,► use a sponge and soapy water or a pH neutral product,► when using a high-pressure washer on persistent marks, do not keep the lance
directed towards the lamps or their edges for too long, so as not to damage their protective coating and seals.
Page 188 of 272
188
Towing
Procedure for having your vehicle towed or for towing another vehicle using the towing eye.
NOTIC E
General recommendationsObserve the legislation in force in the country where you are driving.Ensure that the weight of the towing vehicle is higher than that of the towed vehicle.
The driver must remain at the wheel of the towed vehicle and must have a valid driving licence.When towing a vehicle with all four wheels on the ground, always use an approved towbar; ropes and straps are prohibited.The towing vehicle must move off gently.When the vehicle is towed with its engine off, there is no longer braking and steering assistance.
WARNI NG
A professional recovery service must be called if:– broken down on a motorway or main road;– not possible to put the gearbox into neutral, unlock the steering, or release the parking brake;– not possible to tow a vehicle with an automatic gearbox, with the engine running;– towing with only two wheels on the ground;– four-wheel drive vehicle;– no approved towbar available.
Towing constraints
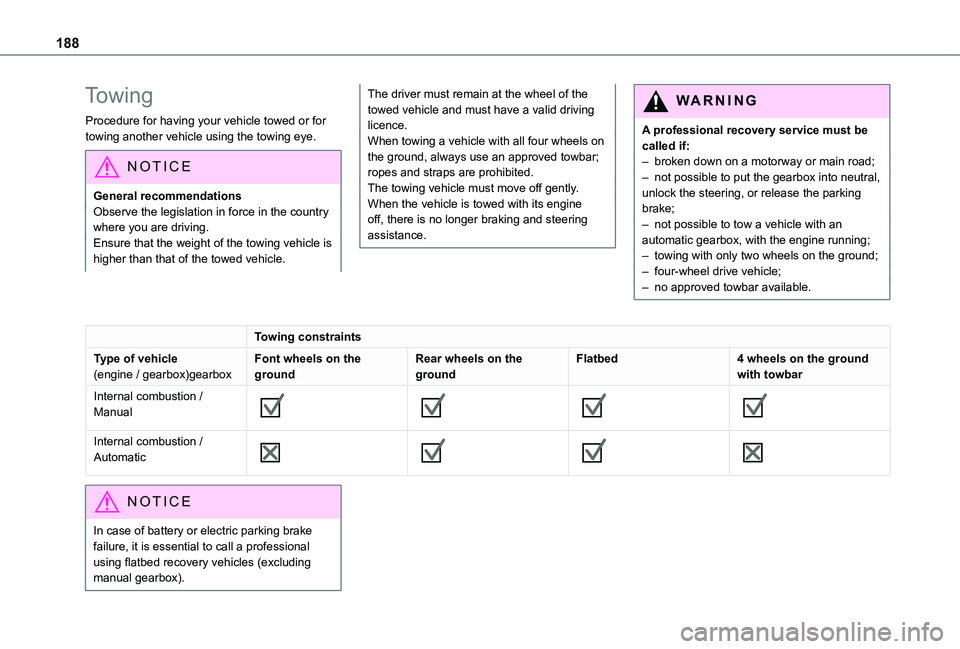
Type of vehicle(engine / gearbox)gearboxFont wheels on the groundRear wheels on the groundFlatbed4 wheels on the ground with towbar
Internal combustion / Manual
Internal combustion / Automatic
NOTIC E
In case of battery or electric parking brake failure, it is essential to call a professional using flatbed recovery vehicles (excluding manual gearbox).
Page 190 of 272
190
Dimensions (mm)
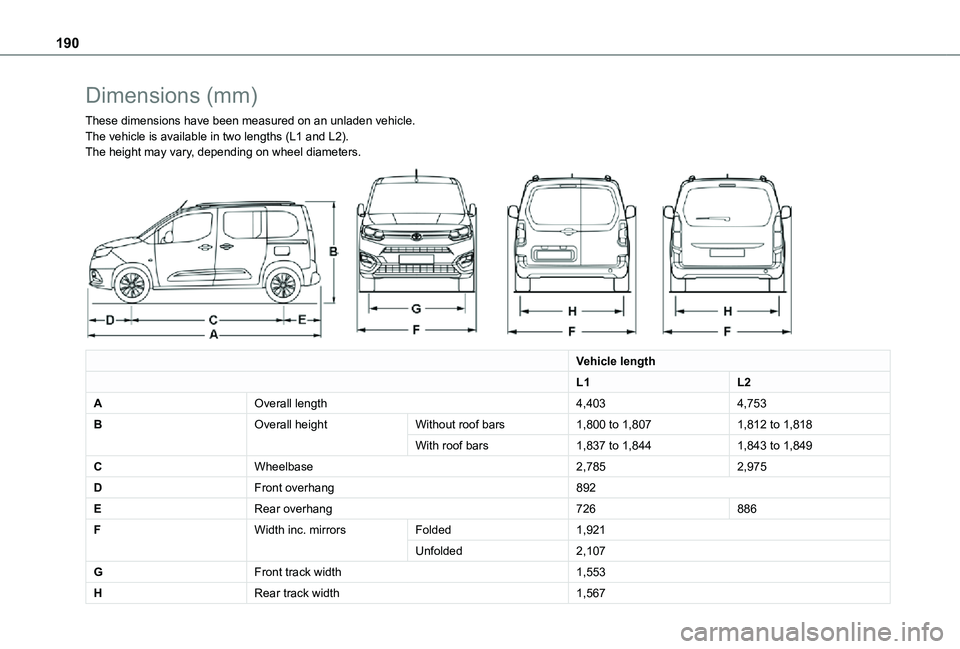
These dimensions have been measured on an unladen vehicle.The vehicle is available in two lengths (L1 and L2).The height may vary, depending on wheel diameters.
Vehicle length
L1L2
AOverall length4,4034,753
BOverall heightWithout roof bars1,800 to 1,8071,812 to 1,818
With roof bars1,837 to 1,8441,843 to 1,849
CWheelbase2,7852,975
DFront overhang892
ERear overhang726886
FWidth inc. mirrorsFolded1,921
Unfolded2,107
GFront track width1,553
HRear track width1,567