2021 TOYOTA PROACE CITY VERSO key
[x] Cancel search: keyPage 167 of 272
167
Practical information
7
After refilling
► Refit the blue cap to the tank filler and turn it clockwise, as far as it will go.► Close the fuel filler flap.
Do not dispose of AdBlue® bottles or containers in the household waste.Place them in a container reserved for this purpose or take them back to where you purchased them.
Free-wheeling
In certain situations, you must allow the vehicle to free-wheel (while being towed, on a rolling road, in an automatic car wash, or being transported by rail or sea freight, etc.).The procedure varies according to the type of gearbox and parking brake.
With a manual gearbox and
electric parking brake /
Release procedure
► With the engine running and while depressing the brake pedal, move the gear selector to the neutral position.
► While depressing the brake pedal, switch off the ignition.► Release the brake pedal, then switch on the ignition again.► While depressing the brake pedal, press the control lever to release the parking brake.► Release the brake pedal, then switch off the ignition.
Reverting to normal operation
► While depressing the brake pedal, start the engine.
With an automatic gearbox
and electric parking brake /
Release procedure
► With the engine running and while depressing the brake pedal, set the gear selector to N.► While depressing the brake pedal, switch off the ignition.
► Release the brake pedal, then switch on the ignition again.► While depressing the brake pedal, press the control lever to release the parking brake.► Release the brake pedal, then switch off the ignition.
Reverting to normal operation
► While depressing the brake pedal, start the engine.
NOTIC E
Keyless Entry and StartingYou must not depress the brake pedal while switching the ignition on or off. If you do, the engine will start, requiring you to restart the procedure.
Advice on care and
maintenance
General recommendations
Observe the following recommendations to avoid damaging your vehicle.
Exterior
WARNI NG
Never use a high-pressure jet wash in the engine compartment, due to the risk of damaging electrical components.Do not wash the vehicle in strong sunshine or extremely cold conditions.
Page 168 of 272
168
NOTIC E
When washing the vehicle at an automatic roller-brush car wash, be sure to lock the doors and, depending on version, remove the electronic key.When using a pressure washer, hold the lance at least 30 cm (0 ft 11") from the vehicle (particularly when cleaning areas containing chipped paint, sensors or seals).Promptly clean up any stains containing chemicals liable to damage the vehicle's paint (including tree resin, bird droppings, insect secretions, pollen and tar).If justified by the environment, clean the vehicle more frequently to remove salty deposits (in coastal areas), soot (in industrial estates) and mud (in wet or cold areas). These substances can be highly corrosive.Contact a TOYOTA dealer or a qualified workshop if you require advice on removing stubborn stains requiring special products (such as tar or insect removers).
Preferably, have paint touch-ups performed by a TOYOTA dealer or a qualified workshop.
Interior
WARNI NG
When washing the vehicle, never use a water hose or high-pressure washer to clean the interior.Liquids carried in cups or other open containers can spill, presenting a risk of damage if they come into contact with the
controls in the dashboard and centre console. Take care!
Bodywork
High-gloss paint
WARNI NG
Do not use abrasive products or solvents, petrol or oil to clean the bodywork.Never use an abrasive sponge to clean stubborn stains. Risk of scratching the paintwork!Do not apply polish in strong sunshine, or to plastic or rubber parts.
NOTIC E
Use a soft sponge and soapy water or a pH neutral product.Gently wipe the bodywork with a clean microfibre cloth.Apply polish with the vehicle clean and dry.Comply with the instructions for use stated on the product.
Decals
(Depending on version)
WARNI NG
Do not use a high pressure washer to clean the vehicle. Risk of damaging or detaching the decals!
NOTIC E
Use a high-flow hose at a temperature between 25°C and 40°C.Sweep the jet of water across the surface to be cleaned, perpendicular to it.Rinse the vehicle with demineralised water.
Page 169 of 272
169
In the event of a breakdown
8
Running out of fuel
(Diesel)
On vehicles fitted with Diesel engines, the fuel system must be primed if you run out of fuel.If the engine does not start first time, do not keep trying, but start the procedure again from the beginning.
NOTIC E
For more information on Misfuel prevention (Diesel), refer to the corresponding section.
With Euro 6.2/6.3 engines
► Switch on the ignition (without starting the engine).► Wait around 1 minute and switch off the ignition.► Operate the starter motor to start the engine.If the engine does not start at the first attempt, do not keep trying, but restart the procedure.
Tool kit
► For easier access, move the seat(s) forward.
Accessing the tools
With a temporary puncture repair kit
The kit is located under the right-hand front seat.
With spare wheel
The jack is located under the right-hand front seat.The tools are located under the left-hand front seat.
Description of tools
1.Chock to immobilise the vehicle.
2.Removable towing eye.
3.Torx key.Allows the removal of the rear lamps in order to change a bulb.
With a temporary puncture repair kit
4.12 V compressor with a cartridge of sealant and a speed limit stickerFor temporary repair of a tyre and to adjust the tyre pressure.
For more information about the Temporary puncture repair kit, refer to the corresponding section.
Page 181 of 272
181
In the event of a breakdown
8
► From the inside, disconnect the electrical connector at the rear of the lamps.
► Remove the two fixing bolts using the Torx key provided in your vehicle.For more information on the Tool kit, please refer to the corresponding section.► From the outside, pull the whole lamp unit towards you (with side-hinged doors) or towards the centre of the vehicle (with tailgate).
► Open the tabs, then pull out the lamp holder.► Remove the faulty bulb by pressing lightly on it while turning it a quarter turn anti-clockwise.► Replace the bulb.
NOTIC E
Take care to reposition the tabs and the wiring correctly to avoid trapping the wire.
NOTIC E
After changing a rear direction indicator bulb, the reinitialisation time is approximately 2
minutes or more.
Number plate lamps
Type A, W5W - 5W
With side-hinged doors
► Unclip the interior trim.► Disconnect the connector by moving aside its tab.► Turn the bulb holder a quarter turn anti-clockwise.► Change the bulb.► Put the bulb holder back in place and reconnect the connector.► Put the trim back in place.
With tailgate
► Remove the plastic lens using a screwdriver.► Change the bulb.► Refit the plastic lens and press on it.
Page 187 of 272
187
In the event of a breakdown
8
Disconnecting the battery
In order to maintain an adequate state of charge for starting the engine, we recommend disconnecting the battery if the vehicle is to be unused for an extended period.Before disconnecting the battery:► close all doors, windows and the tailgate and sunroof,► switch off all electricity consuming devices (audio system, wipers, headlamps, etc.),► switch off the ignition and wait for four minutes.At the battery, it is only necessary to disconnect the (+) terminal.
Quick-release terminal clamp
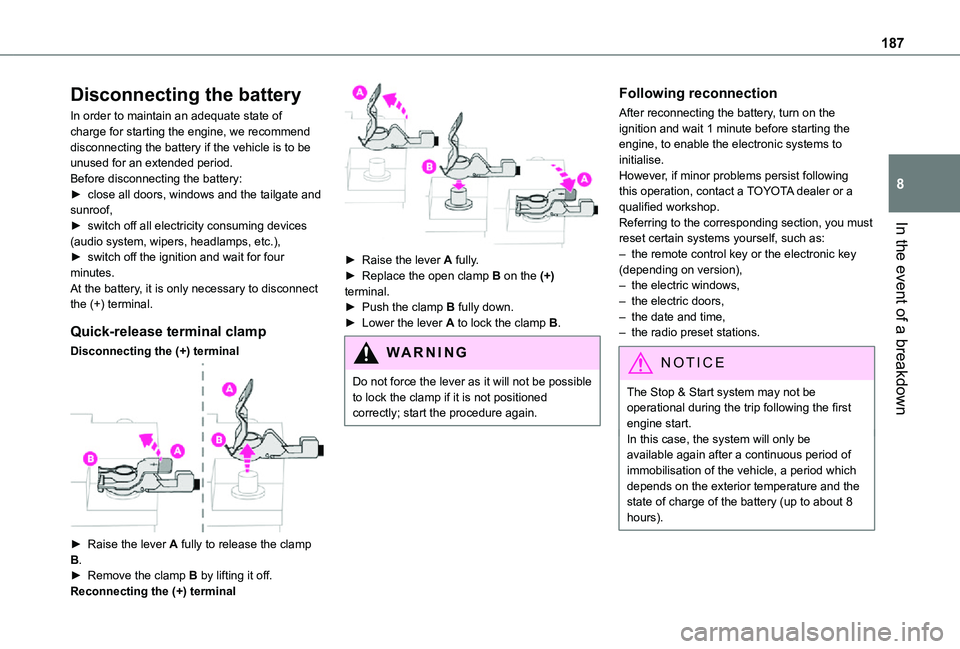
Disconnecting the (+) terminal
► Raise the lever A fully to release the clamp B.► Remove the clamp B by lifting it off.Reconnecting the (+) terminal
► Raise the lever A fully.► Replace the open clamp B on the (+) terminal.► Push the clamp B fully down.► Lower the lever A to lock the clamp B.
WARNI NG
Do not force the lever as it will not be possible to lock the clamp if it is not positioned correctly; start the procedure again.
Following reconnection
After reconnecting the battery, turn on the ignition and wait 1 minute before starting the engine, to enable the electronic systems to initialise.However, if minor problems persist following this operation, contact a TOYOTA dealer or a qualified workshop.Referring to the corresponding section, you must reset certain systems yourself, such as:– the remote control key or the electronic key (depending on version),– the electric windows,– the electric doors,– the date and time,– the radio preset stations.
NOTIC E
The Stop & Start system may not be operational during the trip following the first engine start.In this case, the system will only be
available again after a continuous period of immobilisation of the vehicle, a period which depends on the exterior temperature and the state of charge of the battery (up to about 8 hours).
Page 189 of 272
189
In the event of a breakdown
8
Access to the eye
NOTIC E
For more information on the Tool kit, refer to the corresponding section.
WARNI NG
With a manual gearbox, move the gear lever into neutral.With an automatic gearbox, place the gear selector into position N.Failure to adhere to this instruction may lead to damage to braking system components and the lack of braking assistance on restarting the engine.
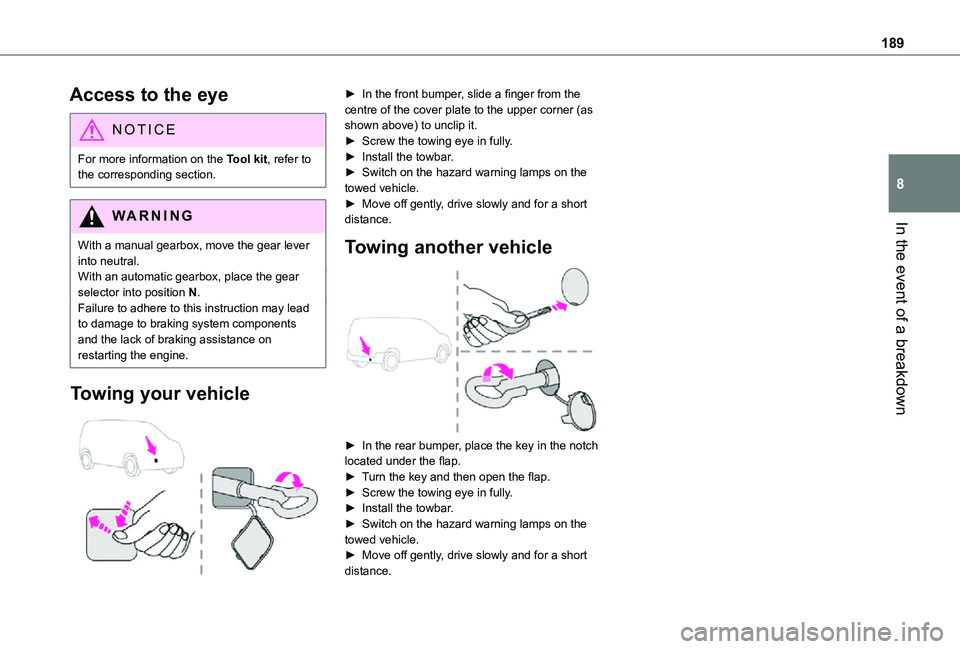
Towing your vehicle
► In the front bumper, slide a finger from the centre of the cover plate to the upper corner (as shown above) to unclip it.► Screw the towing eye in fully.► Install the towbar.► Switch on the hazard warning lamps on the towed vehicle.► Move off gently, drive slowly and for a short distance.
Towing another vehicle
► In the rear bumper, place the key in the notch located under the flap.► Turn the key and then open the flap.► Screw the towing eye in fully.► Install the towbar.► Switch on the hazard warning lamps on the towed vehicle.► Move off gently, drive slowly and for a short distance.
Page 201 of 272
201
Bluetooth® audio system
10
Input AUX socket (AUX)
Depending on equipmentConnect a portable device (MP3 player, etc.) to the auxiliary jack socket using an audio cable (not supplied).
NOTIC E
Any additional devices connected to the system must comply with the standard
applicable to the product and/or the standard IEC 60950-1.
Press the SOURCE button several times in succession and select "AUX".First adjust the volume on your portable device (to a high level). Then adjust the volume on your audio system. Controls are managed via the portable device.
WARNI NG
Do not connect the same device to both the auxiliary jack socket and the USB port at the same time.
CD player
Insert circular compact discs only.Some anti-pirating systems, on original discs
or CDs copied using a personal recorder, may cause faults which are no reflection on the quality of the original player.
Insert a CD in the player, play begins automatically.
WARNI NG
External CD players connected via the USB port are not recognised by the system.
To play a disc which has already been inserted, press the SOURCE button several times in succession and select "CD".
Press one of the buttons to select a track on the CD.Press the LIST button to display the list of tracks on the CD.Press and hold one of these buttons for fast forward or rewind.
Playing an MP3 compilation
Insert an MP3 compilation in the CD player.The audio equipment searches for all of the music tracks, which may take anything between a few seconds and several tens of seconds, before play begins.
WARNI NG
On a single disc, the CD player can read up to 255 MP3 files spread over 8 directory levels.
However, it is advisable to keep to a limit of two levels to reduce the access time before the CD is played.
The folder structure is not observed during playback.All of the files are displayed on a single level.
To play a disc which has already been inserted, press the SOURCE button several times in succession and select "CD".Press one of the buttons to select a folder on the CD.Press one of the buttons to select a track on the CD.Press the LIST button to display the list of directories of the MP3 compilation.Press and hold one of these buttons for fast forward or rewind.
Bluetooth® audio streaming
Streaming allows music files on the telephone to be played via the vehicle's loudspeakers.Connect the telephone.(Refer to the "Pairing a Bluetooth® telephone" section).Activate the streaming source by pressing
SOURCE.In certain cases, play of the audio files must be initiated from the keypad.Audio files can be selected using the buttons on the audio system control panel and the steering mounted controls. The contextual information can be displayed in the screen.If the telephone supports the function. The audio quality depends on the quality of transmission by the telephone.
Page 205 of 272
205
Bluetooth® audio system
10
Telephone mode
In the contextual menu:
– select "Telephone mode" to transfer the call to the telephone (for example, to leave the vehicle while continuing a conversation).– deselect "Telephone mode" to transfer the call to the vehicle.Confirm with OK.
If the contact has been cut off, when you reconnect on returning to the vehicle, the Bluetooth connection will be restored automatically and sound returned to the system (depending on the compatibility of the telephone).In some cases, the Telephone mode must be activated from the telephone.
Interactive voice response
From the contextual menu, select "DTMF tones" and confirm to use the digital keypad to navigate in the interactive voice
response menu.Confirm with OK.
Consultation call
From the contextual menu, select "Switch" and validate to return to a call left on hold.Confirm with OK.
Directory
To access the directory, press and hold SRC/TEL.Select "Directory" to see the list of contacts.Confirm with OK.
To modify the contacts saved in the system, press MENU then select "Telephone" and confirm.Select "Directory management" and confirm.You can:– "Consult an entry",– "Delete an entry",– "Delete all entries".The system accesses the telephone's contacts directory, depending on its compatibility, and while it is connected via Bluetooth.With certain telephones connected by Bluetooth you can send a contact to the directory of the audio system.
Contacts imported in this way are saved in a permanent directory visible to all, whatever the telephone connected.The menu for the directory is not accessible if it is empty.
Voice recognition
This function allows you to use your smartphone's voice recognition via the system.To start voice recognition, depending on the type of steering mounted controls:Make a long press on the end of the lighting control lever.ORPress this button.
NOTIC E
Voice recognition requires the use of a compatible smartphone first connected to the vehicle by Bluetooth.