2021 TOYOTA PROACE CITY VERSO ESP
[x] Cancel search: ESPPage 84 of 272
84
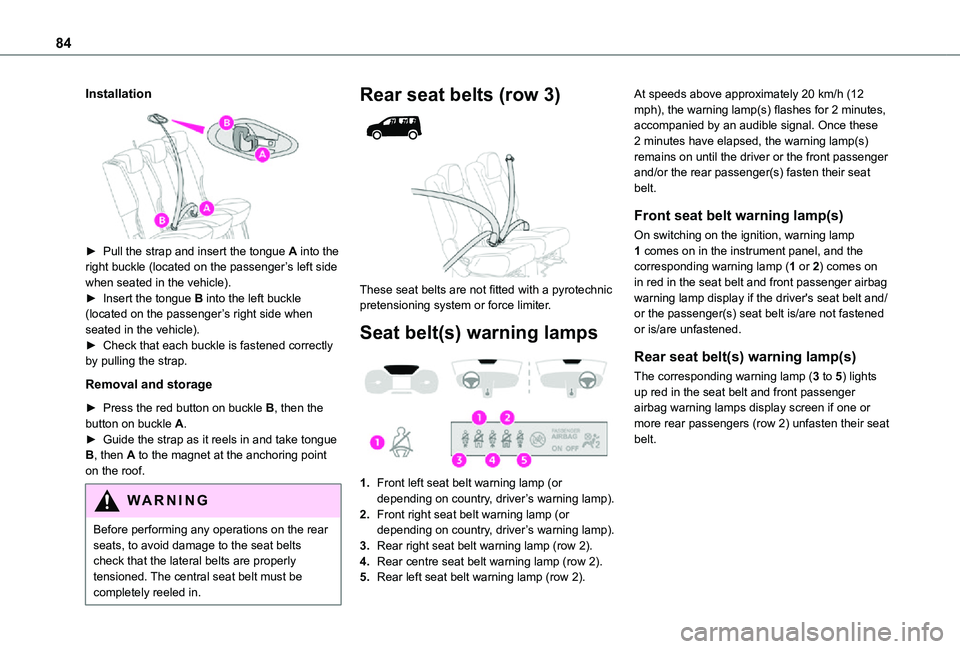
Installation
► Pull the strap and insert the tongue A into the right buckle (located on the passenger’s left side when seated in the vehicle).► Insert the tongue B into the left buckle (located on the passenger’s right side when seated in the vehicle).► Check that each buckle is fastened correctly by pulling the strap.
Removal and storage
► Press the red button on buckle B, then the button on buckle A.► Guide the strap as it reels in and take tongue
B, then A to the magnet at the anchoring point on the roof.
WARNI NG
Before performing any operations on the rear seats, to avoid damage to the seat belts check that the lateral belts are properly tensioned. The central seat belt must be completely reeled in.
Rear seat belts (row 3)
These seat belts are not fitted with a pyrotechnic pretensioning system or force limiter.
Seat belt(s) warning lamps
1.Front left seat belt warning lamp (or depending on country, driver’s warning lamp).
2.Front right seat belt warning lamp (or depending on country, driver’s warning lamp).
3.Rear right seat belt warning lamp (row 2).
4.Rear centre seat belt warning lamp (row 2).
5.Rear left seat belt warning lamp (row 2).
At speeds above approximately 20 km/h (12 mph), the warning lamp(s) flashes for 2 minutes, accompanied by an audible signal. Once these 2 minutes have elapsed, the warning lamp(s) remains on until the driver or the front passenger and/or the rear passenger(s) fasten their seat belt.
Front seat belt warning lamp(s)
On switching on the ignition, warning lamp 1 comes on in the instrument panel, and the corresponding warning lamp (1 or 2) comes on in red in the seat belt and front passenger airbag warning lamp display if the driver's seat belt and/or the passenger(s) seat belt is/are not fastened or is/are unfastened.
Rear seat belt(s) warning lamp(s)
The corresponding warning lamp (3 to 5) lights up red in the seat belt and front passenger airbag warning lamps display screen if one or more rear passengers (row 2) unfasten their seat belt.
Page 85 of 272
85
Safety
5
NOTIC E
These seat belt warning lamps only apply to row 2.
Advice
WARNI NG
The driver must ensure that passengers use the seat belts correctly and that they are all fastened before setting off.Wherever you are seated in the vehicle, always fasten your seat belt, even for short journeys.Do not interchange the seat belt buckles, as they will not fulfil their role fully.Before and after use, ensure that the seat belt is reeled in correctly.After folding or moving a seat or rear bench seat, ensure that the seat belt is positioned and reeled in correctly.
WARNI NG
InstallationThe lower part of the strap must be positioned as low as possible on the pelvis.The upper part must be positioned in the hollow of the shoulder.In order to be effective, a seat belt must:– be tightened as close to the body as possible,– be pulled in front of you with a smooth movement, checking that it does not twist,– be used to restrain only one person,– not show any signs of cuts or fraying,– not be converted or modified in order not to affect its performance.
WARNI NG
Recommendations for childrenUse a suitable child seat if the passenger is less than 12 years old or shorter than one and a half metres (4 ft 11").Never use the same seat belt to secure more than one child.Never carry a child on your lap.For more information on Child seats, refer to the corresponding section.
WARNI NG
MaintenanceIn accordance with current safety regulations, for all repairs on your vehicle's seat belts, go to a qualified workshop with the skills and equipment needed, which a TOYOTA dealer is able to provide.Have the seat belts checked regularly by a TOYOTA dealer or a qualified workshop, particularly if the straps show signs of damage.Clean the seat belt straps with soapy water or a textile cleaning product, sold by TOYOTA dealers.
WARNI NG
In the event of an impactDepending on the nature and seriousness of impacts, the pyrotechnic pretensioner device may trigger before and independently
of airbag deployment. Deployment of the pretensioners is accompanied by a slight discharge of harmless smoke and a noise, due to the activation of the pyrotechnic cartridge incorporated in the system.In all cases, the airbag warning lamp comes on.Following an impact, have the seat belt system checked, and if necessary replaced, by a TOYOTA dealer or a qualified workshop.
Page 94 of 272
94
For more information on the Front seats and, in particular, the folded position for the backrest, refer to the corresponding secti\
on.(g) On the L1 version, fold down the backrests in row 2.(h) Installing child seats with a support leg is prohibited in the third ro\
w.U Seat position suitable for installing a child seat secured using the se\
at belt and universally approved for rearward-facing and/or forward-faci\
ng use.UF Seat position suitable for installing a child seat secured using a seat\
belt and universally approved for forward-facing use.X Seat position not suitable for installing a child seat for the stated w\
eight class.
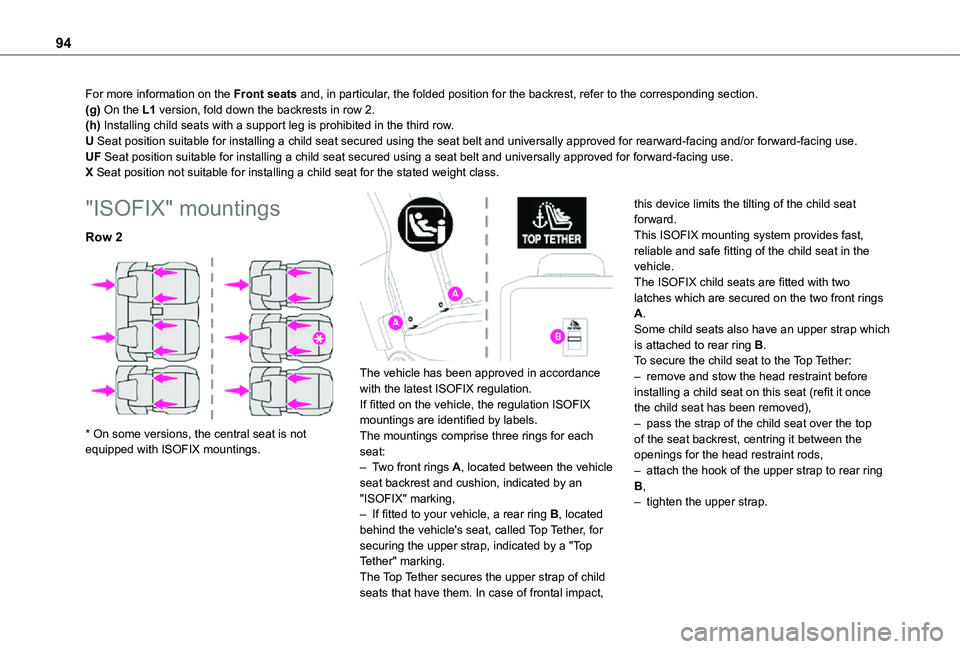
"ISOFIX" mountings
Row 2
* On some versions, the central seat is not equipped with ISOFIX mountings.
The vehicle has been approved in accordance with the latest ISOFIX regulation.If fitted on the vehicle, the regulation ISOFIX mountings are identified by labels.The mountings comprise three rings for each seat:– Two front rings A, located between the vehicle seat backrest and cushion, indicated by an "ISOFIX" marking,– If fitted to your vehicle, a rear ring B, located behind the vehicle's seat, called Top Tether, for securing the upper strap, indicated by a "Top Tether" marking.The Top Tether secures the upper strap of child seats that have them. In case of frontal impact,
this device limits the tilting of the child seat forward.This ISOFIX mounting system provides fast, reliable and safe fitting of the child seat in the vehicle.The ISOFIX child seats are fitted with two latches which are secured on the two front rings A.Some child seats also have an upper strap which is attached to rear ring B.To secure the child seat to the Top Tether:– remove and stow the head restraint before installing a child seat on this seat (refit it once the child seat has been removed),– pass the strap of the child seat over the top of the seat backrest, centring it between the
openings for the head restraint rods,– attach the hook of the upper strap to rear ring B,– tighten the upper strap.
Page 97 of 272
97
Safety
5
IL Seat suitable for an ISOFIX Semi-Universal child seat, which may be eit\
her:– rearward-facing, fitted with an upper strap or a support leg.– forward-facing, fitted with a support leg.– a carrycot fitted with an upper strap or a support leg.For more information on ISOFIX child seats and in particular on securing the upper strap, refer to the correspondi\
ng section.
i-Size child seats
i-Size child seats have two latches that engage on the two rings A.These i-Size child seats also have:– either an upper strap that is attached to ring B.– or a support leg that rests on the vehicle floor, compatible with the approved i-Size seat position.Their role is to prevent the child seat from tipping forward in the even\
t of a collision.For more information on the ISOFIX mountings, refer to the corresponding section.
Locations for i-Size child seats
In accordance with the new European regulations, this table indicates the options for installing i-Size child seats on seats in the vehicle fitted with i-Size approved ISOFIX mountings.
Seat positioni-Size child restraint system
Row 1 (a)Passenger seatNot i-Size
Row 2 (b) (c) (d)i-U
Row 3 (b)Not i-Size
Key
(a) Refer to the current legislation in the country in which you are drivin\
g before placing a child in this seat position.(b) To install a rearward-facing or forward-facing child seat on a rear seat,\
adjust the rear seat to the fully back position with the backrest strai\
ghtened.(c) Adjust the front seat to its maximum height.(d) On some versions, the central seat is not equipped with ISOFIX mounting\
s.i-U Suitable for forward-facing and rearward-facing "Universal" i-Size rest\
raint systems.i-UF Only suitable for forward-facing "Universal" i-Size restraint systems.
Page 99 of 272
99
Driving
6
Driving recommendations
► Observe the driving regulations and remain vigilant whatever the traffic conditions.► Monitor your environment and keep your hands on the wheel to be able to react to anything that may happen any time.► Drive smoothly, anticipate the need for braking and maintain a longer safety distance, especially in bad weather.► Stop the vehicle to carry out operations that require close attention (such as adjustments).► During long trips, take a break every two hours.
Important!
WARNI NG
Never leave the engine running in a closed space without sufficient ventilation. Internal combustion engines emit toxic exhaust gases such as carbon monoxide. Danger of poisoning and death!
WARNI NG
In very severe wintry conditions (temperature below -23°C), let the engine run for 4 minutes
before moving off, to ensure the correct operation and durability of the mechanical components of your vehicle (engine and gearbox).
WARNI NG
Never drive with the parking brake applied. Risk of overheating and damaging the braking system!
WARNI NG
Do not park the vehicle or leave the engine
running on a flammable surface (e.g. dry grass, dead leaves).The vehicle exhaust system is very hot, even several minutes after the engine stops. Risk of fire!
WARNI NG
Never leave a vehicle unattended with the engine running. If you have to leave your vehicle with the engine running, apply the parking brake and put the gearbox into neutral or position N or P (depending on the type of gearbox).
WARNI NG
Never leave children inside the vehicle unsupervised.
WARNI NG
Never drive on surfaces covered with vegetation (tall grass, accumulation of dead leaves, harvest, remains) such as a field, a bushy countryside path, a road's shoulder.These plants may come into contact with the vehicle's exhaust system or some systems that are very hot. Risk of fire!
On flooded roads
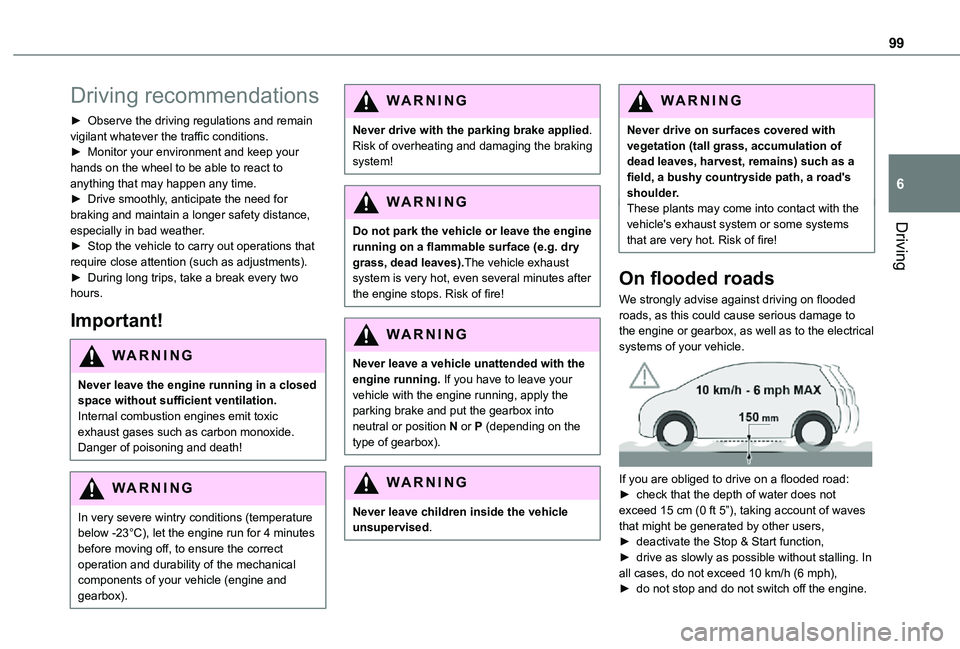
We strongly advise against driving on flooded roads, as this could cause serious damage to the engine or gearbox, as well as to the electrical systems of your vehicle.
If you are obliged to drive on a flooded road:► check that the depth of water does not exceed 15 cm (0 ft 5”), taking account of waves that might be generated by other users,► deactivate the Stop & Start function,► drive as slowly as possible without stalling. In all cases, do not exceed 10 km/h (6 mph),► do not stop and do not switch off the engine.
Page 100 of 272
100
On leaving the flooded road, as soon as safety conditions allow, make several light brake applications to dry the brake discs and pads.If in doubt about the state of your vehicle, contact a TOYOTA dealer or a qualified workshop.
In case of towing
WARNI NG
Driving with a trailer places greater demands on the towing vehicle and requires extra care from the driver.
NOTIC E
Respect the maximum towable weights.At altitude: reduce the maximum load by 10% per 1,000 metres (3,280 ft) of altitude; the density of the air decreases with altitude and the performance of the engine reduces.
WARNI NG
New vehicle: do not pull a trailer before having driven at least 1,000 kilometres (620 miles).
NOTIC E
If the outside temperature is high, let the engine idle for 1 to 2 minutes after the vehicle comes to a stop, to help it to cool.
Before setting off
Nose weight
► Distribute the load in the trailer so that the heaviest items are as close as possible to the axle and the nose weight (at the point where it joins your vehicle) approaches the maximum permitted without exceeding it.
Tyres
► Check the tyre pressures of the towing vehicle and of the trailer, observing the recommended pressures.
Lighting
► Check the electrical signalling on the trailer and the headlamp beam height of your vehicle.
NOTIC E
If a genuine TOYOTA towing device is used, the rear parking sensors will be deactivated automatically to avoid the audible signal.
When driving
Cooling
Towing a trailer uphill increases the temperature of the coolant. The maximum towable load depends on the gradient and the exterior temperature. The cooling capacity of the fan does not increase with engine speed.► Reduce speed and lower the engine speed, so as to limit the heating-up.In all cases, pay attention to the coolant temperature.If this warning lamp and the STOP warning lamp come on, stop the vehicle and switch off the engine as soon as possible.
Brakes
Braking distances are increased when towing a trailer. To avoid overheating of the brakes, the use of engine braking is recommended.
Side wind
Bear in mind the increased susceptibility to the wind that the vehicle will have.
Page 107 of 272
107
Driving
6
NOTIC E
With an automatic gearbox, if the brake does not release automatically, check that the front doors are correctly closed.
WARNI NG
When stationary with the engine running, do
not press the accelerator pedal unnecessarily - risk of parking brake release.
Automatic application
With the vehicle stationary, the parking brake is applied automatically when the engine is switched off.When the parking brake is applied, the brake indicator lamp and the P indicator lamp in the control lever come on, accompanied by the onscreen message "Parking brake applied".
WARNI NG
It is not applied automatically if the engine stalls or enters STOP mode with Stop & Start.
NOTIC E
With automatic operation, it is also possible to manually apply or release the parking brake using the control lever.
Special cases
Immobilisation of the vehicle with the
engine running
To immobilise the vehicle with the engine running, briefly pull the control lever.Application of the parking brake is confirmed by illumination of the braking indicator lamp and the P indicator lamp in the control lever, accompanied by the display of the message "Parking brake applied".
Parking the vehicle with the brake
released
WARNI NG
In very cold conditions (ice), applying the parking brake is not recommended.To immobilise the vehicle, engage a gear or place the chocks against one of the wheels.
NOTIC E
With an automatic gearbox, mode P is automatically selected when the ignition is switched off. The wheels are blocked.For more information on Free-wheeling, refer
to the corresponding section.
NOTIC E
With an automatic gearbox, while mode N is selected, opening the driver’s door triggers an audible signal. It stops when the driver's door closes again.
Deactivating automatic
operation
In some situations, for example when it is extremely cold or when towing (e.g. caravan, breakdown), it may be necessary to deactivate automatic operation of the system.► Start the engine.► Apply the parking brake with the control lever, if it is released.► Take your foot fully off the brake pedal.► Push and hold the control lever in the release direction for at least 10 seconds and no more than 15 seconds.► Release the control lever.
► Press and hold the brake pedal.► Pull the control lever in the application direction for 2 seconds.Deactivation of the automatic functions is confirmed by illumination of this indicator lamp in the instrument panel.► Release the control lever and the brake pedal.
Page 111 of 272
111
Driving
6
When you move the selector or press button M, the corresponding gear and indicator lamp are shown on the instrument panel.The "-" symbol is displayed if a value is invalid.► If the message "Foot on the brake" is displayed on the instrument panel, press the brake pedal firmly.
Moving off
► With your foot on the brake, select position P.► Start the engine.If the conditions are not met, there is an audible signal, accompanied by a message on the instrument panel screen.► Release the parking brake.► Select position R, N or D.
WARNI NG
When moving off on a steep slope with a loaded vehicle, press the brake pedal, select position D, release the parking brake, then release the brake pedal.
► Gradually release the brake pedal.The vehicle moves off immediately.
NOTIC E
If P is displayed on the instrument panel but the selector is in another position, place the selector in position P to allow the engine to be started.If position N is selected inadvertently while driving, allow the engine to return to idle, then select position D to accelerate.
WARNI NG
When the engine is running at idle with the brakes released, if position R, D or M is selected, the vehicle moves even without the accelerator being pressed.Never leave children unsupervised inside the vehicle.As a safety measure, never leave the vehicle without taking your key or remote control with you, even for a short time.When carrying out maintenance with the engine running, apply the parking brake and select position P.
WARNI NG
With an automatic gearbox, never try to start
the engine by pushing the vehicle.
Automatic operation
► Select position D for automatic changing of the gears.The gearbox then operates in auto-adaptive mode, without any intervention on the part of the driver. It continuously selects the most suitable gear according to the driving style, the road profile and the load in the vehicle.For maximum acceleration without touching the selector, press the accelerator fully down (kick-down). The gearbox changes down automatically or holds the gear selected until the maximum engine speed is reached.When braking, the gearbox changes down automatically to provide effective engine braking.If the accelerator pedal is sharply released, the gearbox will not shift to a higher gear for safety reasons.
WARNI NG
Never select position N while the vehicle is moving.Never select positions P or R unless the vehicle is completely stationary.