2021 TOYOTA PROACE CITY VERSO EV door trim
[x] Cancel search: door trimPage 4 of 320
4
Presentation
Presentation
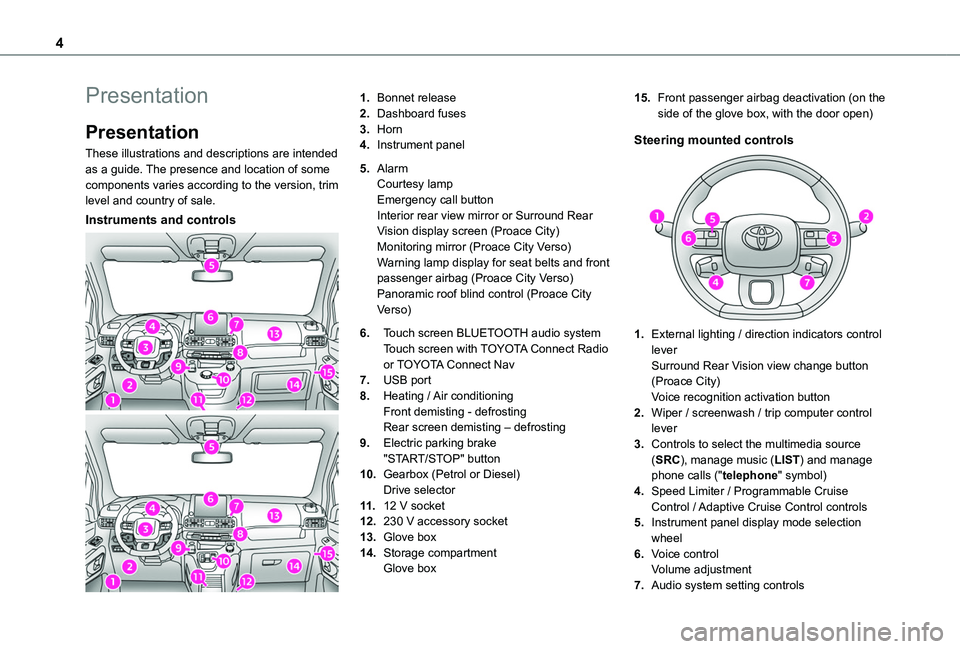
These illustrations and descriptions are intended as a guide. The presence and location of some components varies according to the version, trim level and country of sale.
Instruments and controls
1.Bonnet release
2.Dashboard fuses
3.Horn
4.Instrument panel
5.AlarmCourtesy lampEmergency call buttonInterior rear view mirror or Surround Rear Vision display screen (Proace City)Monitoring mirror (Proace City Verso)Warning lamp display for seat belts and front passenger airbag (Proace City Verso)Panoramic roof blind control (Proace City Verso)
6.Touch screen BLUETOOTH audio systemTouch screen with TOYOTA Connect Radio or TOYOTA Connect Nav
7.USB port
8.Heating / Air conditioningFront demisting - defrostingRear screen demisting – defrosting
9.Electric parking brake"START/STOP" button
10.Gearbox (Petrol or Diesel)Drive selector
11 .12 V socket
12.230 V accessory socket
13.Glove box
14.Storage compartmentGlove box
15.Front passenger airbag deactivation (on the side of the glove box, with the door open)
Steering mounted controls
1.External lighting / direction indicators control leverSurround Rear Vision view change button (Proace City)Voice recognition activation button
2.Wiper / screenwash / trip computer control lever
3.Controls to select the multimedia source
(SRC), manage music (LIST) and manage phone calls ("telephone" symbol)
4.Speed Limiter / Programmable Cruise Control / Adaptive Cruise Control controls
5.Instrument panel display mode selection wheel
6.Voice controlVolume adjustment
7.Audio system setting controls
Page 117 of 320

11 7
Safety
5
The vehicle's front door panels include side impact sensors.A damaged door or any unauthorised or incorrectly executed work (modification or repair) on the front doors or their interior trim could compromise the operation of these sensors - risk of malfunction of the lateral airbags!All work must be carried out only by any authorized Toyota retailer or Toyota authorized repairer, or any reliable repairer.
WARNI NG
Curtain airbagsDo not fix or attach anything to the roof, as this could cause head injuries when the curtain airbag is deployed.Do not remove the grab handles installed on the roof, as these help to secure the curtain airbags.
Child seats
NOTIC E
The regulations on carrying children are specific to each country. Refer to the legislation in force in your country.
For maximum safety, please observe the following recommendations:
– In accordance with European regulations, all children under the age of 12 or less than 150 cm (4 ft 11”) tall must travel in approved child seats suited to their weight, on seats fitted with a seat belt or ISOFIX mountings.– Statistically, the safest seats in your vehicle for carrying children are the rear seats.– Children weighing less than 9 kg (20 lb) must travel in the "rear facing" position, whether in the front or rear of the vehicle.
NOTIC E
It is recommended that children travel on the rear seats of the vehicle:– ‘rear facing’ up to the age of 3,– ‘forward facing’ over the age of 3.
WARNI NG
Make sure that the seat belt is correctly positioned and tightened.For child seats with a support leg, ensure that the support leg is in firm and steady contact with the floor.
WARNI NG
An incorrectly installed child seat compromises the child's safety in the event of an accident.Ensure that there is no seat belt or seat belt buckle under the child seat, as this could destabilise it.Remember to fasten the seat belts or the harness of child seats, keeping the slack relative to the child's body to a minimum, even for short journeys.When installing a child seat using the seat belt, ensure that the seat belt is tightened correctly on the child seat and that it secures the child seat firmly on the seat of the vehicle. If the passenger seat is adjustable, move it forwards if necessary.Remove the head restraint before installing a child seat with a backrest on a passenger seat.Ensure that the head restraint is stored or attached securely to prevent it from being thrown around the vehicle in the event of sharp braking. Refit the head restraint once the child seat has been removed.
Page 156 of 320
156
The sensors do not systematically detect obstacles that are too low (pavements, studs) or too thin (trees, posts, wire fences).Certain obstacles located in the sensors’ blind spots may not be detected or may no longer be detected during the manoeuvre.Certain materials (fabrics) absorb sound waves: pedestrians may not be detected.
NOTIC E
MaintenanceClean the bumpers and door mirrors and the field of vision of the cameras regularly.When washing your vehicle at high pressure, direct the spray from at least 30 cm away from the radar, sensors and cameras.
WARNI NG
Mats/Pedal trimsThe use of mats or pedal trims not approved
by TOYOTA may interfere with the operation of the speed limiter or cruise control.To avoid any risk of jamming the pedals:– Ensure that the mat is secured correctly.– Never fit one mat on top of another.
NOTIC E
Units of speedEnsure that the units of speed displayed on the instrument panel (km/h or mph) are those for the country you are driving in.If this is not the case, when the vehicle is stationary, set the display to the required units of speed so that it complies with what is authorised locally.In case of doubt, contact any authorized Toyota retailer or Toyota authorized repairer, or any reliable repairer.
Speed Limit Recognition
and Recommendation
WARNI NG
For more information, refer to the General recommendations on the use of driving and manoeuvring aids.
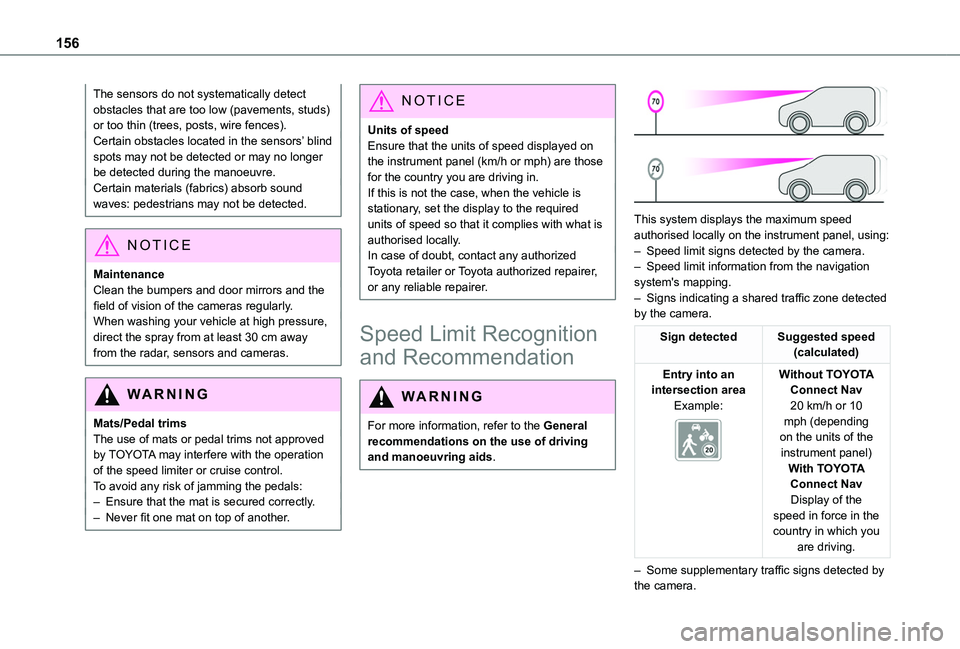
This system displays the maximum speed authorised locally on the instrument panel, using:
– Speed limit signs detected by the camera.– Speed limit information from the navigation system's mapping.– Signs indicating a shared traffic zone detected by the camera.
Sign detectedSuggested speed (calculated)
Entry into an intersection areaExample:
Without TOYOTA Connect Nav20 km/h or 10 mph (depending on the units of the instrument panel)With TOYOTA Connect NavDisplay of the speed in force in the country in which you are driving.
– Some supplementary traffic signs detected by the camera.
Page 236 of 320

236
Number plate lamps
Type A, W5W - 5W
With side-hinged doors
► Unclip the interior trim.► Disconnect the connector by moving aside its tab.► Turn the bulb holder a quarter turn anti-clockwise.► Change the bulb.► Put the bulb holder back in place and reconnect the connector.► Put the trim back in place.
With tailgate
► Remove the plastic lens using a screwdriver.► Change the bulb.► Refit the plastic lens and press on it.
Third brake lamp
Type A, W16W - 16W
– Unscrew the two nuts.– Push the rods.– If necessary, disconnect the connector to remove the lamp.– Replace the bulb.
Fuses
WARNI NG
Changing a fuseAll work must be carried out only by any authorized Toyota retailer or Toyota authorized repairer, or any reliable repairer.The replacement of a fuse by a third party could cause a serious malfunction of the
vehicle.
NOTIC E
Installing electrical accessoriesThe vehicle's electrical system is designed to operate with standard or optional equipment.Before fitting other electrical equipment or accessories to your vehicle, contact any authorized Toyota retailer or Toyota authorized repairer, or any reliable repairer.
WARNI NG
TOYOTA accepts no responsibility for the cost incurred in repairing the vehicle or for rectifying malfunctions resulting from the installation of accessories not supplied or not
recommended by TOYOTA and not installed in accordance with its recommendations, in particular when the combined power