2021 TOYOTA PROACE CITY VERSO EV towing
[x] Cancel search: towingPage 223 of 320
223
In the event of a breakdown
8
Running out of fuel
(Diesel)
With Diesel engines, the fuel system must be primed if you run out of fuel.Before starting to prime the system, it is essential to put at least 5 litres of Diesel into the fuel tank.
NOTIC E
For more information on Refuelling and on Misfuel prevention (Diesel), refer to the corresponding section.
NOTIC E
For more information on the Engine compartment, in particular the location of these components under the bonnet, refer to the corresponding section.
With Euro 6.2/6.3 engines
► Switch on the ignition (without starting the engine).► Wait around 1 minute and switch off the ignition.► Operate the starter motor to start the engine.If the engine does not start at the first attempt,
do not keep trying, but restart the procedure.
Tool kit
► For easier access, move the seat(s) forward.
Accessing the tools
Vehicle with electric motor
With temporary puncture repair kitThe tools are located in the passenger footwell.With spare wheelThe tools are located under the right-hand front seat.To access the tools:– With non-adjustable front seat, lift the seat cushion by placing your hand between the cushion and the backrest.– With adjustable front seat, move the seat forward as far as possible.The jack is located in the passenger footwell.
Vehicle with Petrol or Diesel engine
With temporary puncture repair kitThe kit is located under the right-hand front seat.With spare wheel
The jack is located under the right-hand front seat.The tools are located under the left-hand front seat.
Description of tools
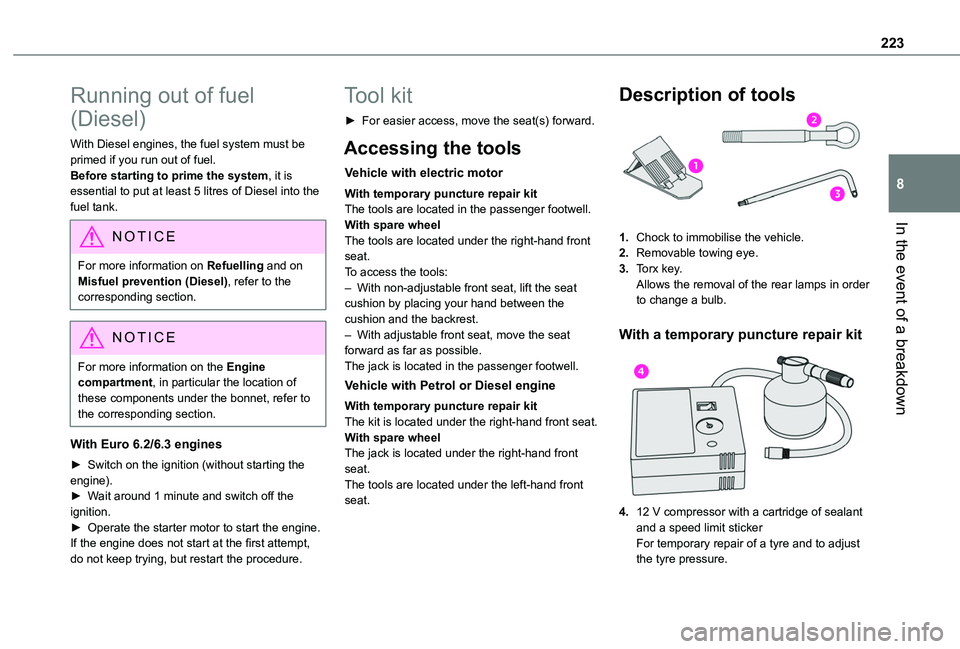
1.Chock to immobilise the vehicle.
2.Removable towing eye.
3.Torx key.Allows the removal of the rear lamps in order to change a bulb.
With a temporary puncture repair kit
4.12 V compressor with a cartridge of sealant and a speed limit stickerFor temporary repair of a tyre and to adjust
the tyre pressure.
Page 224 of 320
224
WARNI NG
Storing the tools (vehicle with electric motor)
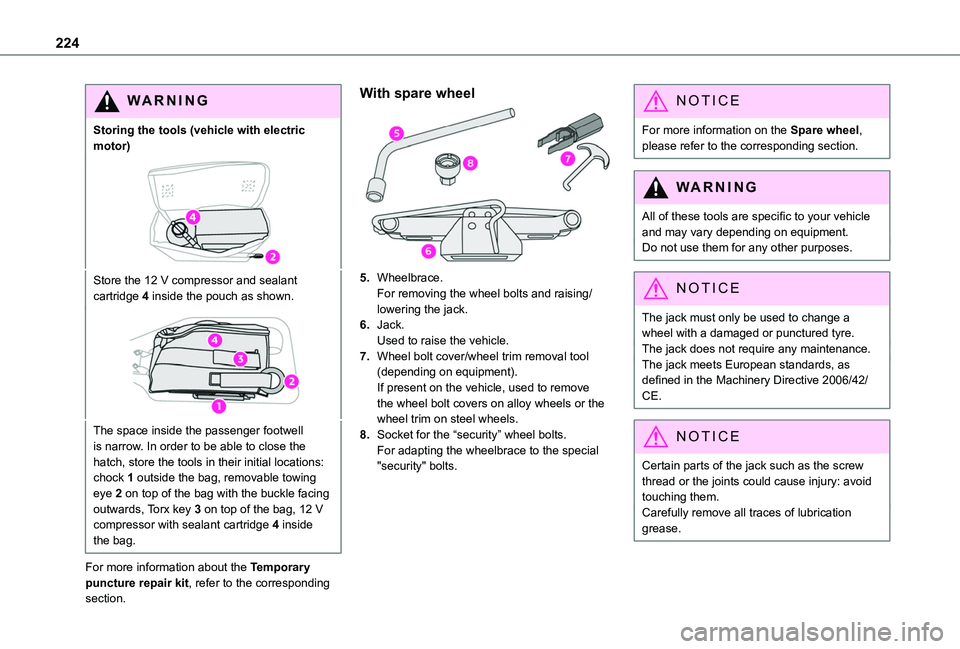
Store the 12 V compressor and sealant cartridge 4 inside the pouch as shown.
The space inside the passenger footwell is narrow. In order to be able to close the hatch, store the tools in their initial locations: chock 1 outside the bag, removable towing eye 2 on top of the bag with the buckle facing outwards, Torx key 3 on top of the bag, 12 V compressor with sealant cartridge 4 inside the bag.
For more information about the Temporary puncture repair kit, refer to the corresponding section.
With spare wheel
5.Wheelbrace.For removing the wheel bolts and raising/lowering the jack.
6.Jack.Used to raise the vehicle.
7.Wheel bolt cover/wheel trim removal tool (depending on equipment).If present on the vehicle, used to remove the wheel bolt covers on alloy wheels or the wheel trim on steel wheels.
8.Socket for the “security” wheel bolts.For adapting the wheelbrace to the special "security" bolts.
NOTIC E
For more information on the Spare wheel, please refer to the corresponding section.
WARNI NG
All of these tools are specific to your vehicle and may vary depending on equipment.Do not use them for any other purposes.
NOTIC E
The jack must only be used to change a wheel with a damaged or punctured tyre.The jack does not require any maintenance.The jack meets European standards, as defined in the Machinery Directive 2006/42/CE.
NOTIC E
Certain parts of the jack such as the screw thread or the joints could cause injury: avoid touching them.Carefully remove all traces of lubrication grease.
Page 227 of 320
227
In the event of a breakdown
8
Spare wheel
NOTIC E
For more information on the Tool kit, refer to the corresponding section.
► Park the vehicle, taking care to avoid obstructing traffic, and apply the parking brake.► Follow the safety instructions (hazard warning lamps, warning triangle, wearing high visibility vest, etc.) according to the legislation in force in the country where you are driving.► Switch off the ignition.
Access to the spare wheel
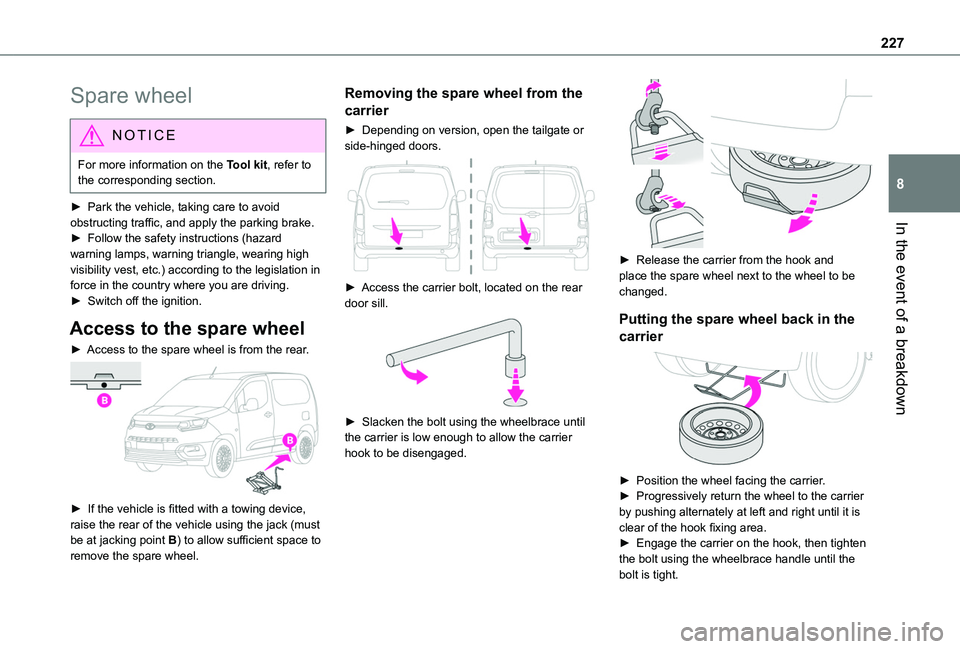
► Access to the spare wheel is from the rear.
► If the vehicle is fitted with a towing device, raise the rear of the vehicle using the jack (must be at jacking point B) to allow sufficient space to
remove the spare wheel.
Removing the spare wheel from the
carrier
► Depending on version, open the tailgate or side-hinged doors.
► Access the carrier bolt, located on the rear door sill.
► Slacken the bolt using the wheelbrace until the carrier is low enough to allow the carrier hook to be disengaged.
► Release the carrier from the hook and place the spare wheel next to the wheel to be changed.
Putting the spare wheel back in the
carrier
► Position the wheel facing the carrier.► Progressively return the wheel to the carrier by pushing alternately at left and right until it is clear of the hook fixing area.► Engage the carrier on the hook, then tighten the bolt using the wheelbrace handle until the bolt is tight.
Page 241 of 320
241
In the event of a breakdown
8
Towing
Procedure for having your vehicle towed or for towing another vehicle using the towing eye.
NOTIC E
General recommendationsObserve the legislation in force in the country where you are driving.Ensure that the weight of the towing vehicle is higher than that of the towed vehicle.The driver must remain at the wheel of the towed vehicle and must have a valid driving licence.When towing a vehicle with all four wheels on the ground, always use an approved towbar; ropes and straps are prohibited.
The towing vehicle must move off gently.When the vehicle is towed with its engine off, there is no longer braking and steering assistance.
WARNI NG
A professional recovery service must be called if:– broken down on a motorway or main road;
– not possible to put the gearbox into neutral, unlock the steering, or release the parking brake;– not possible to tow a vehicle with an automatic gearbox, with the engine running;– towing with only two wheels on the ground;– four-wheel drive vehicle;– no approved towbar available.
WARNI NG
Before towing the vehicle, it is essential to put the vehicle in free-wheeling mode.For more information on Free-wheeling, refer to the corresponding section.
NOTIC E
Electric motorAn electric vehicle cannot under any circumstances be used to tow another vehicle.However, it may be used, for example, to exit a rut.
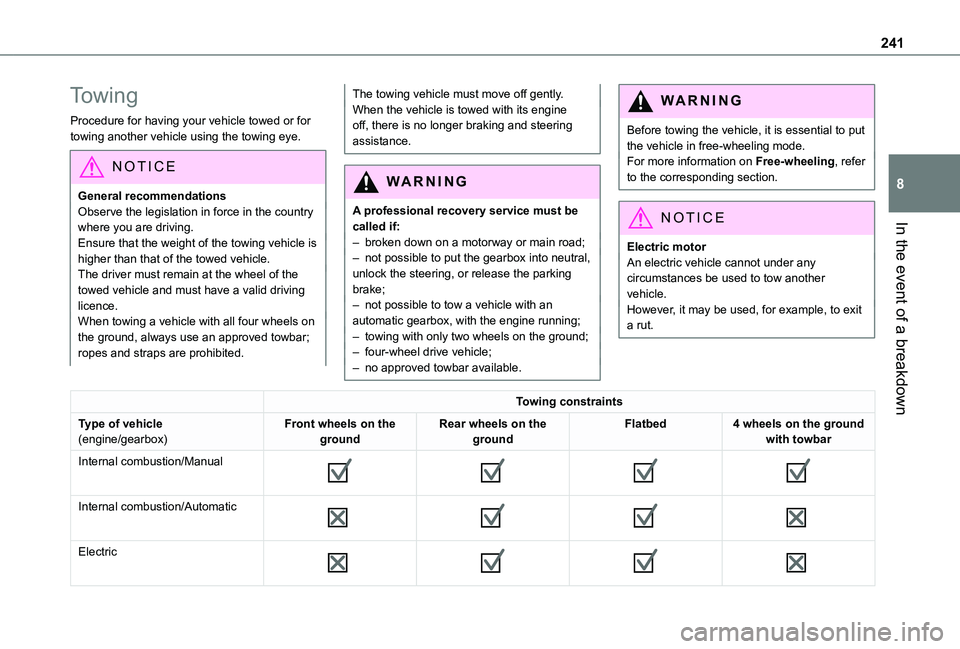
Towing constraints
Type of vehicle(engine/gearbox)Front wheels on the groundRear wheels on the groundFlatbed4 wheels on the ground with towbar
Internal combustion/Manual
Internal combustion/Automatic
Electric
Page 242 of 320
242
NOTIC E
In case of battery or electric parking brake failure, it is essential to call a professional using flatbed recovery vehicles (excluding manual gearbox).
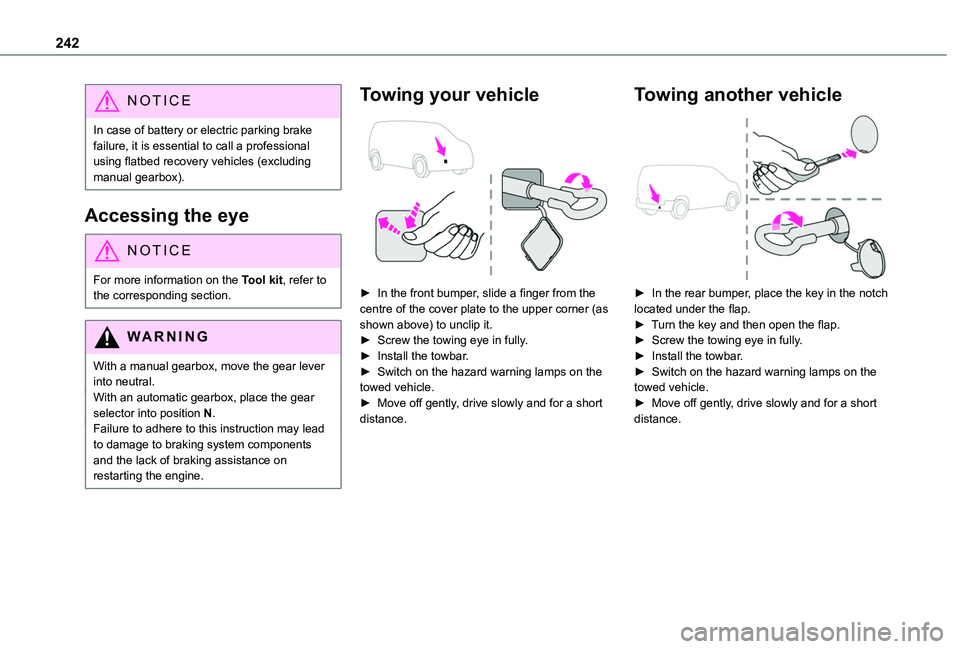
Accessing the eye
NOTIC E
For more information on the Tool kit, refer to the corresponding section.
WARNI NG
With a manual gearbox, move the gear lever into neutral.With an automatic gearbox, place the gear selector into position N.Failure to adhere to this instruction may lead to damage to braking system components and the lack of braking assistance on restarting the engine.
Towing your vehicle
► In the front bumper, slide a finger from the centre of the cover plate to the upper corner (as shown above) to unclip it.► Screw the towing eye in fully.► Install the towbar.► Switch on the hazard warning lamps on the towed vehicle.► Move off gently, drive slowly and for a short distance.
Towing another vehicle
► In the rear bumper, place the key in the notch located under the flap.► Turn the key and then open the flap.► Screw the towing eye in fully.► Install the towbar.► Switch on the hazard warning lamps on the towed vehicle.► Move off gently, drive slowly and for a short distance.
Page 248 of 320
248
Engine technical data and
towed loads
Engines
The engine characteristics are given in the vehicle's registration document, as well as in sales brochures.Only the values available at the time of publication are presented in the tables.Contact any authorized Toyota retailer or Toyota authorized repairer, or any reliable repairer to obtain missing values.
NOTIC E
The maximum power corresponds to the value type-approved on a test bed, under conditions defined by European legislation (Directive 1999/99/EC).
For more information, contact a any authorized Toyota retailer or Toyota authorized repairer, or any reliable repairer.
Weights and towed loads
The weights and towed loads relating to the vehicle are indicated on the registration document, as well as in sales brochures.These values are also indicated on the manufacturer's plate or label.For more information, contact a any authorized Toyota retailer or Toyota authorized repairer, or any reliable repairer.The GTW (Gross Train Weight) and towed load values indicated are valid up to a maximum altitude of 1,000 metres. The towed load value must be reduced by 10% for each additional 1,000 metres of altitude.The maximum authorised nose weight corresponds to the weight permitted on the towball.
WARNI NG
When exterior temperatures are high, the vehicle performance may be limited in order to protect the engine. When the exterior temperature is higher than 37°C, reduce the towed weight.
WARNI NG
Towing even with a lightly loaded vehicle can adversely affect its road holding.Braking distances are increased when towing a trailer.When using a vehicle to tow, never exceed a speed of 62 mph (100 km/h) (observe the local legislation in force).
NOTIC E
If the exterior temperature is high, it is recommended that the engine is allowed to idle for 1 to 2 minutes after the vehicle comes to a stop, to facilitate its cooling.
Page 311 of 320
3 11
Alphabetical index
Seat, rear bench 59, 61Seats, front 52–54, 57–59Seats, front bench 57–59Seats, heated 55Seats, Multiflex ~ Extenso Cab 73Seats, rear 52, 57, 59–62, 11 6Selector, gear 143–145Sensors (warnings) 153Serial number, vehicle 252Service indicator 18Servicing 213Settings, equipment 28–29Settings, system 260–261, 274, 299Sidelamps 90–92, 229, 231Side parking sensors 179Side repeater 230Silent vehicle warning sound (Electric) 102, 128Sliding side door, electric 37–38, 45Smart Entry & Start 130, 133Snow chains 150, 204–205Snow chains, link 204
Socket, 12 V accessory 63, 65Socket, 220 V 65Socket, auxiliary 257, 269, 294Socket, Jack 294Speed limiter 156–159, 167Speed limit recognition 154, 156Speedometer 10, 154Sport mode 146Stability control (ESC) 104Starting a Diesel engine 190
Starting the engine 129, 132Starting the vehicle 130, 133, 139–142, 144Starting using another battery 133, 236Station, radio 256, 266–267, 292–293Stay, bonnet 209–210Steering mounted controls, audio 254, 264, 278Steering wheel, adjustment 55Stickers, customising ~ Stickers, expressive 220Stopping the vehicle 132–133, 139–142, 144Stop & Start 27, 79, 84, 147–149, 191, 209, 213, 238Storage 63–64Storage boxes 67Stowing rings 70Sunshine sensor 78Super-fast charging (Electric) 201, 203, 251Surround Rear Vision 181Switching off the engine 129, 131–132Synchronising the remote control 41
T
Tables of engines 251Tank, fuel 190–192Technical data 247, 249–251Telephone 66, 259–260, 271–273, 295–298Temperature, coolant 18Three flashes (direction indicators) 91Time (setting) 261, 274, 300TMC (Traffic info) 286
Tools 221Topping-up AdBlue® 217Top Rear Vision 184Touch screen 27–29, 87Towbar 104, 206Towed loads 246–247, 249–251Towing another vehicle 239–240Towing eye 240Toyota Traction Select 105Traction battery charge 196Traction battery (Electric) 29, 193–194, 251Traction control (ASR) 103, 105–106Traffic information (TMC) 286Trailer 104, 206Trailer stability assist (TSA) 104Trajectory control systems 103Triangle, warning 71Trip computer 26–27Type of bulbs 229Tyres 215, 252Tyre under-inflation detection 149–150, 224
U
Under-inflation (detection) 149Unlocking 31–32, 34–37Unlocking from the inside 42–43Unlocking, selective 33–35Unlocking, total 33–35Updating the date 275, 300Updating the time 261, 274, 300