2021 TOYOTA PROACE CITY VERSO EV roof
[x] Cancel search: roofPage 170 of 320
170
WARNI NG
The system also takes motorcyclists and animals into account; however, animals below 0.5 m (1 ft 6") tall and objects on the road are not necessarily detected.
This system is comprised of three functions:– Collision Risk Alert.– Intelligent emergency braking assistance (iEBA).– Active Safety Brake (automatic emergency braking).
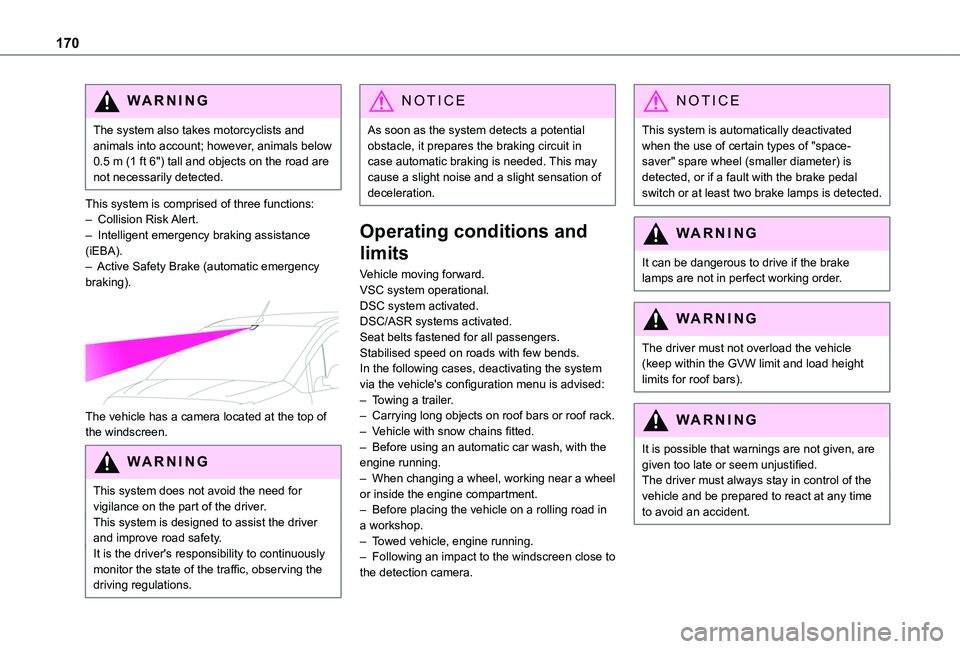
The vehicle has a camera located at the top of the windscreen.
W ARNI NG
This system does not avoid the need for vigilance on the part of the driver.This system is designed to assist the driver and improve road safety.It is the driver's responsibility to continuously monitor the state of the traffic, observing the driving regulations.
NOTIC E
As soon as the system detects a potential obstacle, it prepares the braking circuit in case automatic braking is needed. This may cause a slight noise and a slight sensation of deceleration.
Operating conditions and
limits
Vehicle moving forward.VSC system operational.DSC system activated.DSC/ASR systems activated.Seat belts fastened for all passengers.Stabilised speed on roads with few bends.In the following cases, deactivating the system via the vehicle's configuration menu is advised:– Towing a trailer.– Carrying long objects on roof bars or roof rack.– Vehicle with snow chains fitted.
– Before using an automatic car wash, with the engine running.– When changing a wheel, working near a wheel or inside the engine compartment.– Before placing the vehicle on a rolling road in a workshop.– Towed vehicle, engine running.– Following an impact to the windscreen close to the detection camera.
NOTIC E
This system is automatically deactivated when the use of certain types of "space-saver" spare wheel (smaller diameter) is detected, or if a fault with the brake pedal switch or at least two brake lamps is detected.
WARNI NG
It can be dangerous to drive if the brake lamps are not in perfect working order.
WARNI NG
The driver must not overload the vehicle (keep within the GVW limit and load height limits for roof bars).
WARNI NG
It is possible that warnings are not given, are given too late or seem unjustified.The driver must always stay in control of the vehicle and be prepared to react at any time to avoid an accident.
Page 191 of 320
191
Driving
6
Operating limits
– The system may suggest an inappropriate parking space (parking prohibited, work in progress with damaged road surface, location alongside a ditch, etc.).– The system may indicate that a space has been found but not offer it because of a fixed obstacle on the opposite side of the manoeuvre, which would not allow the vehicle to follow the necessary trajectory required for parking.– The system may indicate that a space has been found but the manoeuvre will not be triggered, because the width of the lane is insufficient.– The system is not designed to perform the parking manoeuvre on a sharp bend.– The system does not detect spaces that are much larger than the vehicle itself or that are delimited by obstacles that are too low (pavements, studs, etc.) or too thin (trees, posts, wire fences, etc.).– If the boot is heavily loaded, the tilt of the
vehicle towards the rear may interfere with the distance measurements.
WARNI NG
Do not use the function under the following exterior conditions:– Alongside a soft shoulder (e.g. ditch) or quay or on the edge of a drop.– When the road surface is slippery (e.g. ice).
WARNI NG
If any of the following malfunctions occurs, do not use the system:– If a tyre is under-inflated.– If one of the bumpers is damaged.– If one of the cameras is faulty.
WARNI NG
If the vehicle has undergone any of the following modifications, do not use the function:– When carrying an object extending beyond the dimensions of the vehicle (ladder on the roof bars, bicycle carrier on the tailgate, etc.).– With a non-approved towball in place.– With snow chains fitted.– When driving on a small-diameter or "space-saver" type spare wheel.– When the wheels fitted are a different size from the original ones.
– After modifying one or both bumpers (added protection).– If the sensors have been repainted other than by the TOYOTA dealer network.– With sensors not approved for the vehicle.
Malfunctions
When the function is not activated, this indicator lamp will flash briefly and an audible signal will be emitted to indicate a system malfunction.If the malfunction occurs while the system is in use, the warning lamp goes off.If the parking sensor malfunction occurs during use, indicated by this warning lamp coming on, it causes the function to deactivate.In the event of a malfunction, have the system checked by a TOYOTA dealer or a qualified workshop.In the event of a power steering malfunction, this warning lamp is displayed on the instrument panel, accompanied by a warning message.
WARNI NG
You must stop the vehicle.Stop as soon as it is safe to do so and switch off the ignition.Contact a TOYOTA dealer or a qualified workshop.
Page 210 of 320
210
Measurement display in the instrument panel
If the mass on board the vehicle exceeds the maximum authorised weight, this indicator lamp comes on.
Malfunction
Display of the malfunction in the loading area
After the measurement is triggered from the loading area, the LEDs of the 3 buttons flash simultaneously for about 3 seconds and then go out.Contact a TOYOTA dealer or a qualified workshop.
Information displayed on the instrument panel
These warning lamps come on, together with a message.
Contact a TOYOTA dealer or a qualified workshop.
Roof bars / Roof rack
WARNI NG
RecommendationsDistribute the load uniformly, taking care to avoid overloading one of the sides.Arrange the heaviest part of the load as close as possible to the roof.Secure the load firmly.Drive gently: the vehicle will be more susceptible to the effects of side winds and its stability may be affected.Regularly check the security and tight fastening of the roof bars and racks, at least before each trip.Remove the roof bars once they are no longer needed.
WARNI NG
In the event of loading (not exceeding 40 cm (1 ft 3") in height) on the roof, do not exceed the following loads:– Transverse bars on longitudinal bars: 80 kg (176 lb).– Two transverse bars bolted to the roof: 100 kg (220 lb).– Three transverse bars bolted to the roof: 150 kg (330 lb).– An aluminium rack: 120 kg (264 lb).– A steel rack: 115 kg (253 lb).If the height exceeds 40 cm (1 ft 3"), adapt the speed of the vehicle to the profile of the road to avoid damaging the roof bars or the roof rack and the fixings on the vehicle.Refer to national legislation in order to comply with the regulations for transporting objects that are longer than the vehicle.
W ARNI NG
In the event of loading a 7-seat model (not exceeding 40 cm (1 ft 3") in height) on the roof, do not exceed the following loads:– Three transverse bars bolted to the roof: 100 kg (220 lb).– An aluminium rack: 70 kg (154 lb).– A steel rack: 65 kg (143 lb).
Page 211 of 320
2 11
Practical information
7
WARNI NG
As a safety measure and to avoid damaging the roof, it is essential to use the roof bars and racks approved for your vehicle.Observe the instructions on fitting and use contained in the guide supplied with the roof bars and racks.
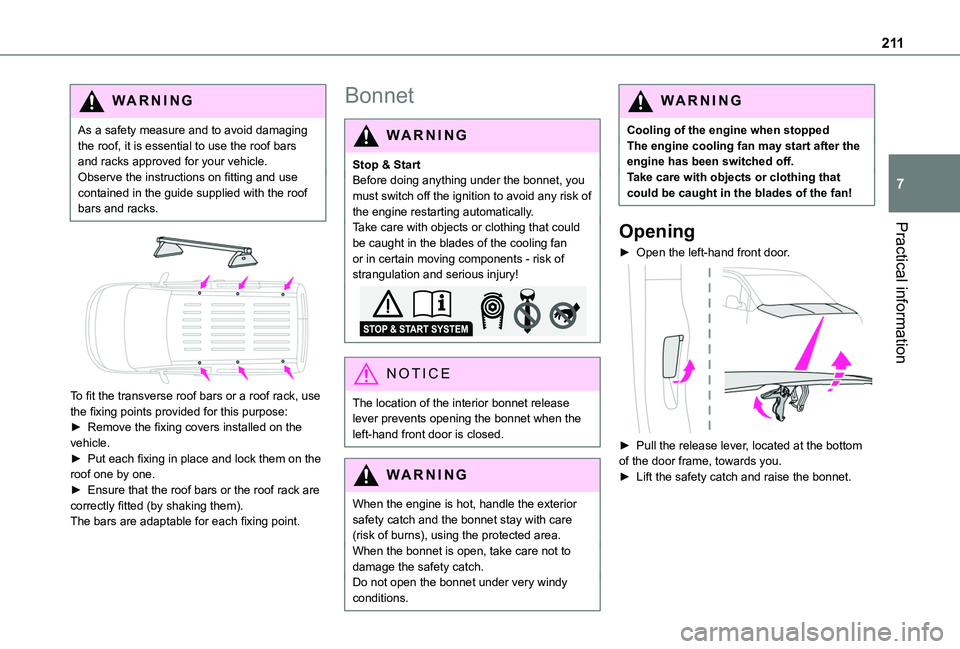
To fit the transverse roof bars or a roof rack, use the fixing points provided for this purpose:► Remove the fixing covers installed on the vehicle.
► Put each fixing in place and lock them on the roof one by one.► Ensure that the roof bars or the roof rack are correctly fitted (by shaking them).The bars are adaptable for each fixing point.
Bonnet
WARNI NG
Stop & StartBefore doing anything under the bonnet, you must switch off the ignition to avoid any risk of the engine restarting automatically.Take care with objects or clothing that could be caught in the blades of the cooling fan or in certain moving components - risk of strangulation and serious injury!
NOTIC E
The location of the interior bonnet release lever prevents opening the bonnet when the left-hand front door is closed.
WARNI NG
When the engine is hot, handle the exterior safety catch and the bonnet stay with care (risk of burns), using the protected area.When the bonnet is open, take care not to damage the safety catch.Do not open the bonnet under very windy
conditions.
WARNI NG
Cooling of the engine when stoppedThe engine cooling fan may start after the engine has been switched off.Take care with objects or clothing that could be caught in the blades of the fan!
Opening
► Open the left-hand front door.
► Pull the release lever, located at the bottom of the door frame, towards you.► Lift the safety catch and raise the bonnet.
Page 240 of 320
240
Disconnecting/reconnecting
the battery
In order to maintain an adequate state of charge for starting the engine, we recommend disconnecting the battery if the vehicle is to be unused for an extended period.Before disconnecting the battery:► Close all openings (doors, boot, windows, roof).► Switch off all electricity-consuming devices (audio system, wipers, lamps, etc.).► Switch off the ignition and wait for 4 minutes.After accessing the battery, it is only necessary to disconnect the (+) terminal.
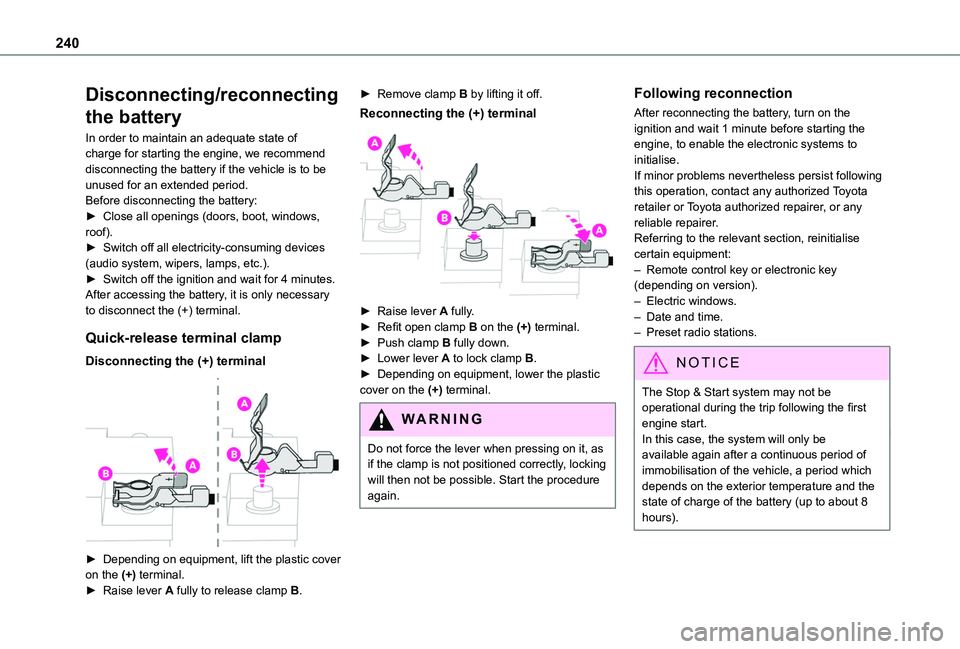
Quick-release terminal clamp
Disconnecting the (+) terminal
► Depending on equipment, lift the plastic cover on the (+) terminal.► Raise lever A fully to release clamp B.
► Remove clamp B by lifting it off.
Reconnecting the (+) terminal
► Raise lever A fully.► Refit open clamp B on the (+) terminal.► Push clamp B fully down.► Lower lever A to lock clamp B.► Depending on equipment, lower the plastic cover on the (+) terminal.
WARNI NG
Do not force the lever when pressing on it, as if the clamp is not positioned correctly, locking will then not be possible. Start the procedure again.
Following reconnection
After reconnecting the battery, turn on the ignition and wait 1 minute before starting the engine, to enable the electronic systems to initialise.If minor problems nevertheless persist following this operation, contact any authorized Toyota retailer or Toyota authorized repairer, or any reliable repairer.Referring to the relevant section, reinitialise certain equipment:– Remote control key or electronic key (depending on version).– Electric windows.– Date and time.– Preset radio stations.
NOTIC E
The Stop & Start system may not be operational during the trip following the first engine start.In this case, the system will only be
available again after a continuous period of immobilisation of the vehicle, a period which depends on the exterior temperature and the state of charge of the battery (up to about 8 hours).
Page 245 of 320
245
Technical data
9
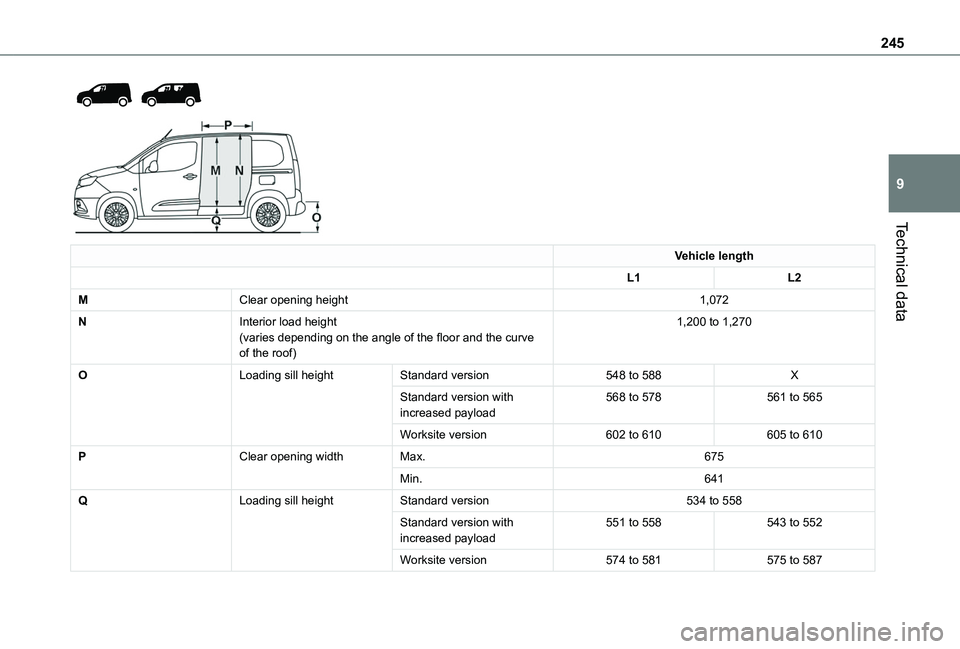
Vehicle length
L1L2
MClear opening height1,072
NInterior load height(varies depending on the angle of the floor and the curve of the roof)
1,200 to 1,270
OLoading sill heightStandard version548 to 588X
Standard version with increased payload568 to 578561 to 565
Worksite version602 to 610605 to 610
PClear opening widthMax.675
Min.641
QLoading sill heightStandard version534 to 558
Standard version with increased payload551 to 558543 to 552
Worksite version574 to 581575 to 587
Page 247 of 320
247
Technical data
9
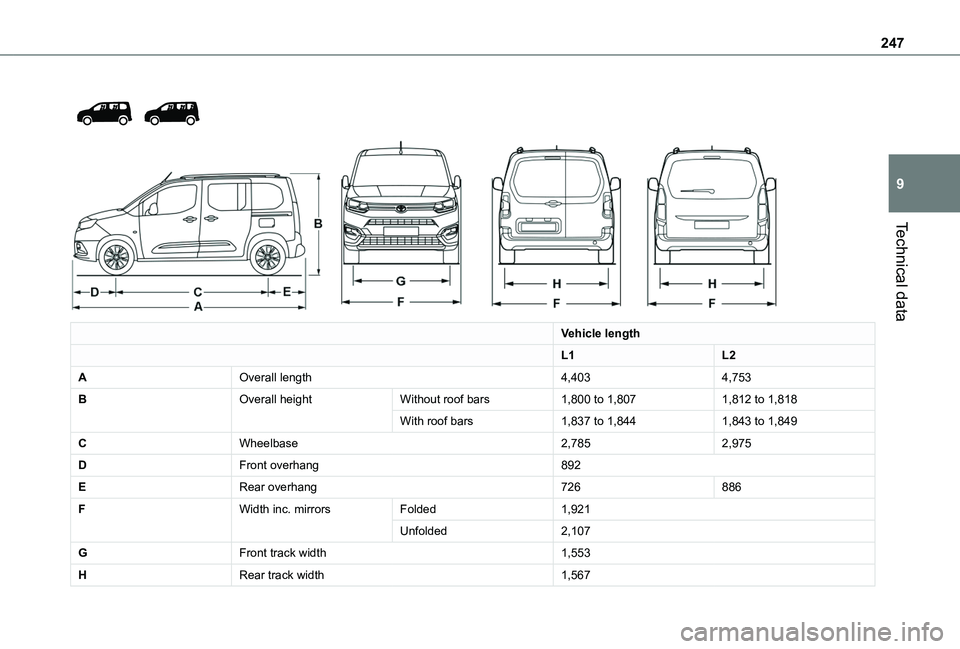
Vehicle length
L1L2
AOverall length4,4034,753
BOverall heightWithout roof bars1,800 to 1,8071,812 to 1,818
With roof bars1,837 to 1,8441,843 to 1,849
CWheelbase2,7852,975
DFront overhang892
ERear overhang726886
FWidth inc. mirrorsFolded1,921
Unfolded2,107
GFront track width1,553
HRear track width1,567
Page 282 of 320
282
Voice commands
Steering wheel-mounted
controls
Voice commands:Voice commands can be issued from any screen page after a short press on the "Voice commands" button located on the steering wheel or at the end of the lighting control lever (depending on equipment), as long as there is no telephone call in progress.
WARNI NG
To ensure that voice commands are always recognised by the system, please follow these recommendations: – use natural language in a normal tone without breaking up words or raising your voice.– always wait for the "beep" (audible signal) before speaking.– for best results, closing the windows and sunroof is recommended, to avoid extraneous interference (depending on version).– before issuing a voice command, ask any other passengers to refrain from speaking.
First steps
Example of a "voice command" for navigation:
"Navigate to address 11 regent street, London"Example of a "voice command" for the radio and media:"Play artist Madonna"Example of a "voice command" for the telephone:"Call David Miller"
WARNI NG
The voice commands, with a choice of 17 languages (Arabic, Brazilian, Czech, Danish, Dutch, English, Farsi, French, German, Italian, Norwegian, Polish, Portuguese, Russian, Spanish, Swedish, Turkish), are made using the language previously chosen and set in the system.For some voice commands, there are alternative synonyms.Example: Guide to / Navigate to / Go to / ...The voice commands in Arabic for: "Navigate to address" and "Display POI in the city", are not available.
Information - Using the
system
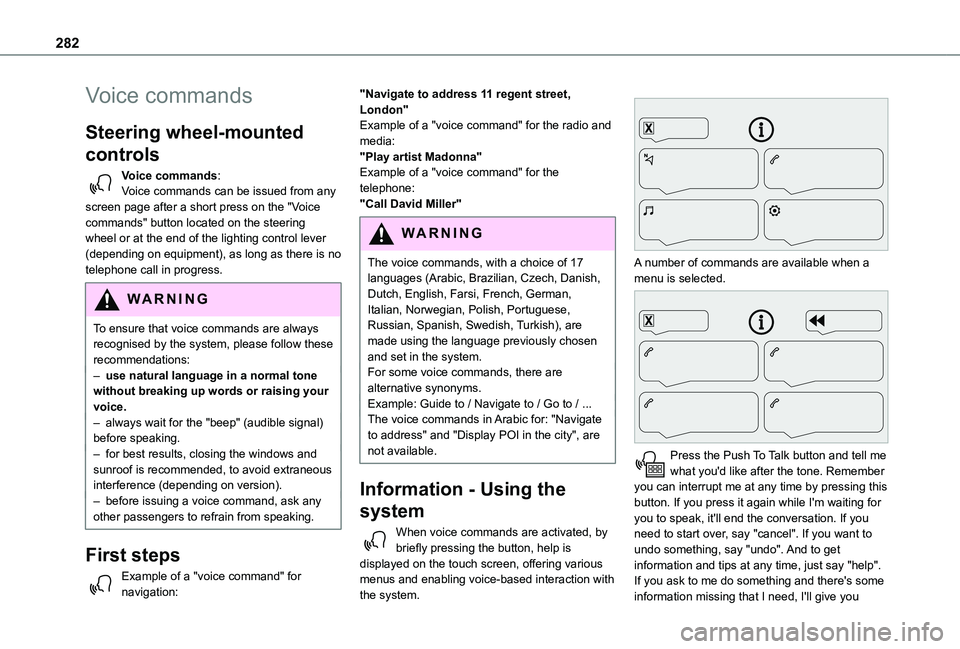
When voice commands are activated, by briefly pressing the button, help is displayed on the touch screen, offering various menus and enabling voice-based interaction with the system.
A number of commands are available when a menu is selected.
Press the Push To Talk button and tell me what you'd like after the tone. Remember you can interrupt me at any time by pressing this button. If you press it again while I'm waiting for you to speak, it'll end the conversation. If you need to start over, say "cancel". If you want to undo something, say "undo". And to get information and tips at any time, just say "help". If you ask to me do something and there's some information missing that I need, I'll give you