2021 TOYOTA PROACE CITY Headlamp
[x] Cancel search: HeadlampPage 175 of 272
175
In the event of a breakdown
8
wheel is secured by the conical contact of each bolt.
WARNI NG
After changing a wheelStow the punctured wheel in the carrier.Go to a TOYOTA dealer or a qualified workshop as soon as possible.Have the punctured tyre examined. After inspection, the technician will advise you on whether the tyre can be repaired or if it must be replaced.
NOTIC E
Some driving aid functions should be disabled, e.g. the Active Safety Brake.
NOTIC E
If your vehicle has tyre under-inflation detection, check the tyre pressures and reinitialise the system.For more information on Under-inflation detection, refer to the corresponding section.
NOTIC E
Wheel with wheel trimWhen refitting the wheel, refit the wheel trim, starting by aligning the cutout with the valve and then pushing the trim into place all round its edge with the palm of your hand.
NOTIC E
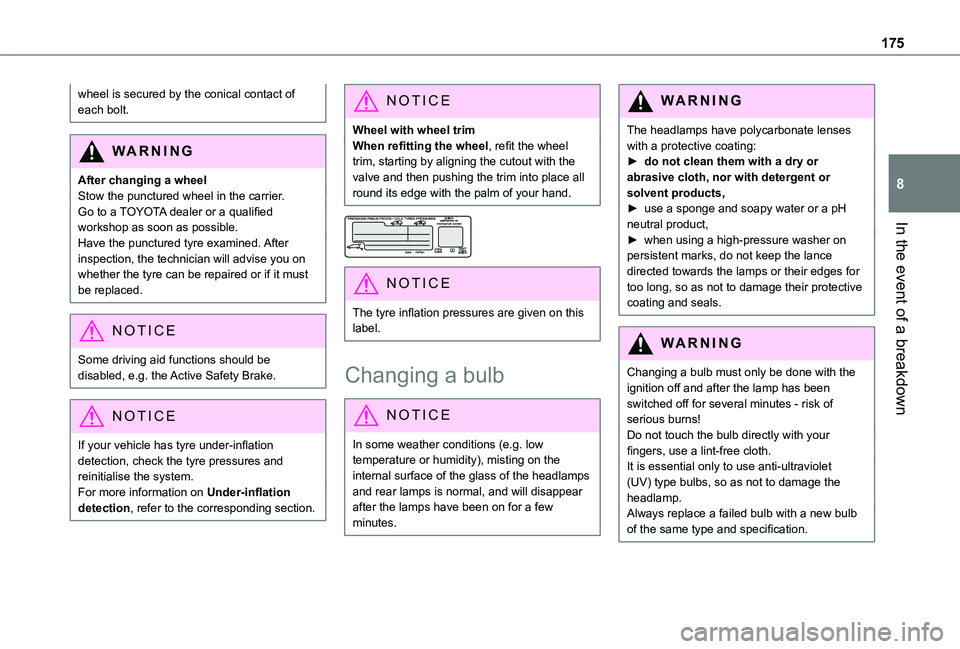
The tyre inflation pressures are given on this label.
Changing a bulb
NOTIC E
In some weather conditions (e.g. low temperature or humidity), misting on the internal surface of the glass of the headlamps and rear lamps is normal, and will disappear after the lamps have been on for a few minutes.
WARNI NG
The headlamps have polycarbonate lenses with a protective coating:► do not clean them with a dry or abrasive cloth, nor with detergent or solvent products,► use a sponge and soapy water or a pH neutral product,► when using a high-pressure washer on persistent marks, do not keep the lance directed towards the lamps or their edges for too long, so as not to damage their protective coating and seals.
WARNI NG
Changing a bulb must only be done with the ignition off and after the lamp has been switched off for several minutes - risk of serious burns!Do not touch the bulb directly with your fingers, use a lint-free cloth.It is essential only to use anti-ultraviolet (UV) type bulbs, so as not to damage the headlamp.Always replace a failed bulb with a new bulb of the same type and specification.
Page 176 of 272
176
WARNI NG
Opening the bonnet / Accessing the bulbsWith the engine warm, proceed with caution - risk of burns!Take care with objects or clothing that could be caught in the blades of the cooling fan - risk of strangulation!
NOTIC E
Halogen bulbs (Hx)To ensure good quality lighting, check that the bulb is correctly positioned in its housing.
WARNI NG
After changing a bulb
To refit, carry out the fitting operations in reverse order.Close the protective cover very carefully to guarantee the sealing of the lamps.
Types of bulb
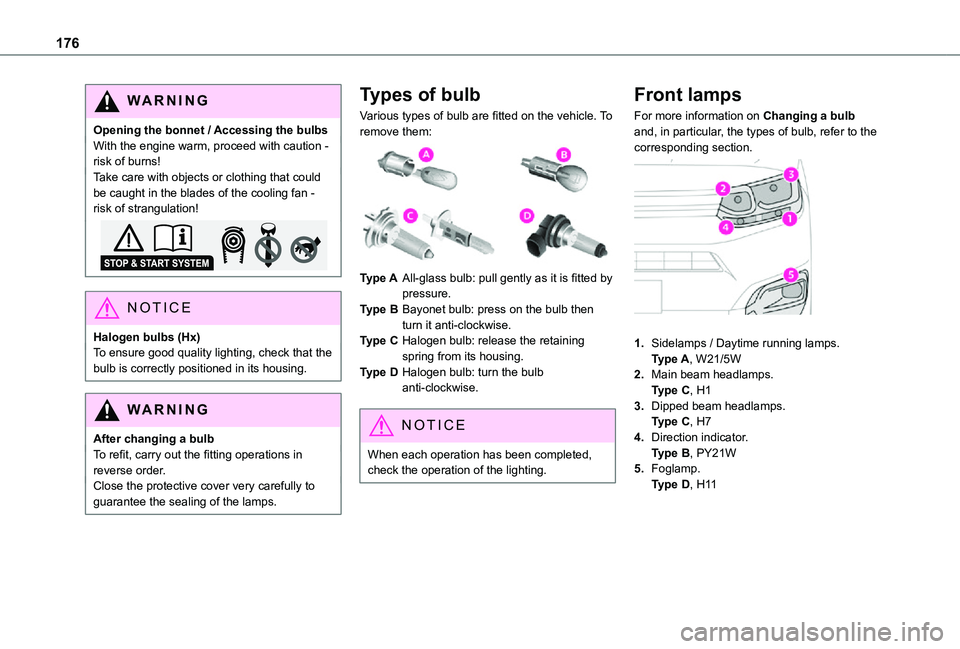
Various types of bulb are fitted on the vehicle. To remove them:
Type AAll-glass bulb: pull gently as it is fitted by pressure.
Type BBayonet bulb: press on the bulb then turn it anti-clockwise.
Type CHalogen bulb: release the retaining spring from its housing.
Type DHalogen bulb: turn the bulb anti-clockwise.
NOTIC E
When each operation has been completed, check the operation of the lighting.
Front lamps
For more information on Changing a bulb and, in particular, the types of bulb, refer to the corresponding section.
1.Sidelamps / Daytime running lamps.Type A, W21/5W
2.Main beam headlamps.Type C, H1
3.Dipped beam headlamps.Type C, H7
4.Direction indicator.Type B, PY21W
5.Foglamp.Type D, H11
Page 177 of 272
177
In the event of a breakdown
8
Direction indicator side repeater
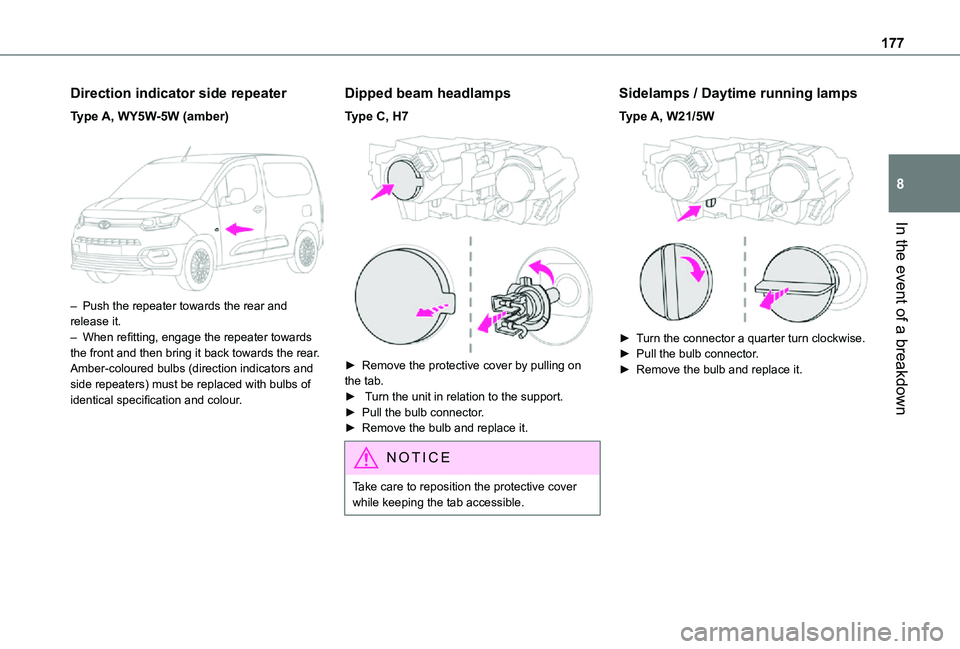
Type A, WY5W-5W (amber)
– Push the repeater towards the rear and release it.– When refitting, engage the repeater towards the front and then bring it back towards the rear.Amber-coloured bulbs (direction indicators and side repeaters) must be replaced with bulbs of identical specification and colour.
Dipped beam headlamps
Type C, H7
► Remove the protective cover by pulling on the tab. ► Turn the unit in relation to the support.► Pull the bulb connector.► Remove the bulb and replace it.
NOTIC E
Take care to reposition the protective cover while keeping the tab accessible.
Sidelamps / Daytime running lamps
Type A, W21/5W
► Turn the connector a quarter turn clockwise.► Pull the bulb connector.► Remove the bulb and replace it.
Page 178 of 272
178
Main beam headlamps
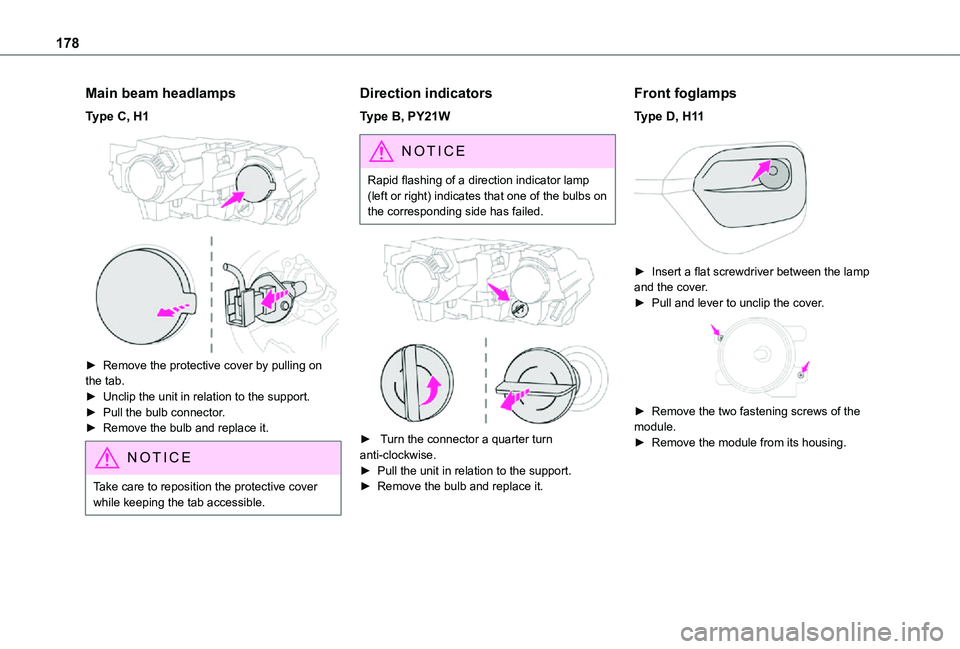
Type C, H1
► Remove the protective cover by pulling on the tab.► Unclip the unit in relation to the support.► Pull the bulb connector.► Remove the bulb and replace it.
NOTIC E
Take care to reposition the protective cover while keeping the tab accessible.
Direction indicators
Type B, PY21W
NOTIC E
Rapid flashing of a direction indicator lamp (left or right) indicates that one of the bulbs on the corresponding side has failed.
► Turn the connector a quarter turn anti-clockwise.► Pull the unit in relation to the support.
► Remove the bulb and replace it.
Front foglamps
Type D, H11
► Insert a flat screwdriver between the lamp and the cover.► Pull and lever to unclip the cover.
► Remove the two fastening screws of the module.► Remove the module from its housing.
Page 183 of 272
183
In the event of a breakdown
8
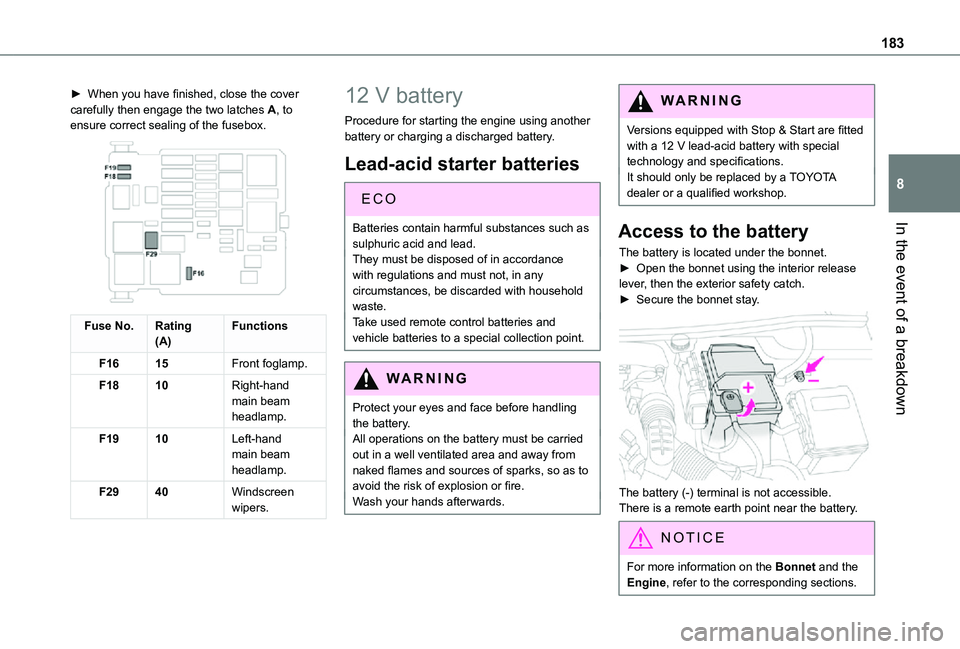
► When you have finished, close the cover carefully then engage the two latches A, to ensure correct sealing of the fusebox.
Fuse No.Rating(A)Functions
F1615Front foglamp.
F1810Right-hand main beam headlamp.
F1910Left-hand main beam headlamp.
F2940Windscreen wipers.
12 V battery
Procedure for starting the engine using another battery or charging a discharged battery.
Lead-acid starter batteries
EC O
Batteries contain harmful substances such as
sulphuric acid and lead.They must be disposed of in accordance with regulations and must not, in any circumstances, be discarded with household waste.Take used remote control batteries and vehicle batteries to a special collection point.
WARNI NG
Protect your eyes and face before handling the battery.All operations on the battery must be carried out in a well ventilated area and away from naked flames and sources of sparks, so as to avoid the risk of explosion or fire.Wash your hands afterwards.
WARNI NG
Versions equipped with Stop & Start are fitted with a 12 V lead-acid battery with special technology and specifications.It should only be replaced by a TOYOTA dealer or a qualified workshop.
Access to the battery
The battery is located under the bonnet.► Open the bonnet using the interior release lever, then the exterior safety catch.► Secure the bonnet stay.
The battery (-) terminal is not accessible.There is a remote earth point near the battery.
NOTIC E
For more information on the Bonnet and the Engine, refer to the corresponding sections.
Page 185 of 272
185
In the event of a breakdown
8
WARNI NG
Follow the instructions provided by the manufacturer of the charger.Never reverse polarities.
NOTIC E
It is not necessary to disconnect the battery.
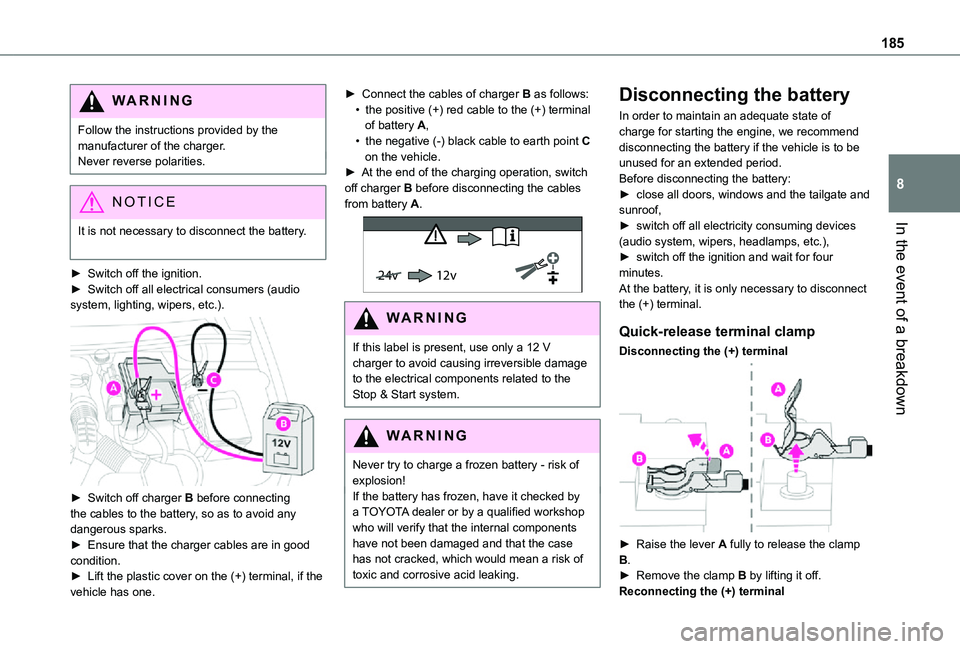
► Switch off the ignition.► Switch off all electrical consumers (audio system, lighting, wipers, etc.).
► Switch off charger B before connecting the cables to the battery, so as to avoid any dangerous sparks.
► Ensure that the charger cables are in good condition.► Lift the plastic cover on the (+) terminal, if the vehicle has one.
► Connect the cables of charger B as follows:• the positive (+) red cable to the (+) terminal of battery A,• the negative (-) black cable to earth point C on the vehicle.► At the end of the charging operation, switch off charger B before disconnecting the cables from battery A.
24v 12v
WARNI NG
If this label is present, use only a 12 V charger to avoid causing irreversible damage to the electrical components related to the Stop & Start system.
WARNI NG
Never try to charge a frozen battery - risk of explosion!If the battery has frozen, have it checked by a TOYOTA dealer or by a qualified workshop who will verify that the internal components have not been damaged and that the case has not cracked, which would mean a risk of toxic and corrosive acid leaking.
Disconnecting the battery
In order to maintain an adequate state of charge for starting the engine, we recommend disconnecting the battery if the vehicle is to be unused for an extended period.Before disconnecting the battery:► close all doors, windows and the tailgate and sunroof,► switch off all electricity consuming devices (audio system, wipers, headlamps, etc.),► switch off the ignition and wait for four minutes.At the battery, it is only necessary to disconnect the (+) terminal.
Quick-release terminal clamp
Disconnecting the (+) terminal
► Raise the lever A fully to release the clamp B.► Remove the clamp B by lifting it off.Reconnecting the (+) terminal
Page 252 of 272
252
A
ABS 82Accessories 79, 104Access to the spare wheel 172Active Safety Brake 133–135AdBlue® 163AdBlue® tank 165Additive, Diesel 161–162Adjusting headlamps 74Adjusting head restraints 49Adjusting seat 43Adjusting the air distribution 62–63Adjusting the air flow 62–63Adjusting the date 222, 248Adjusting the height and reach of the steering wheel 45Adjusting the lumbar support 43Adjusting the temperature 62–63Adjusting the time 222, 248Advanced Grip Control 85–86Advice on care and maintenance 166
Advice on driving 7, 99–100Airbags 90, 92–93, 95Airbags, curtain 91, 93Airbags, front 90, 92, 96Airbags, lateral 91–92Air conditioning 60, 63Air conditioning, digital 65Air conditioning, dual-zone automatic 62–63Air conditioning, manual 61–62Air intake 62–63
Air vents 60Alarm 38–40Alarm, volumetric 38Android Auto connection 238Anti-lock braking system (ABS) 82–83Antitheft / Immobiliser 24Apple CarPlay connection 218, 237Applications 238Area, loading 25–26, 34, 53Armrest 43Armrest, front 49Assistance call 80–81Assistance, emergency braking 83, 135Audible warning 82Audio streaming (Bluetooth) 203, 216, 242
B
Battery 156, 183, 185–186Battery, 12 V 161–162, 183–184Battery, charging 184–185
Battery, remote control 32, 68Blind spot monitoring system 140Blind spot monitoring system, active 141Blind spot sensors 139, 141Bluetooth (hands-free) 204–205, 219, 243–244Bluetooth (telephone) 219–220, 243–244Bodywork 167Bonnet 158Boot lid 29, 31
Bottle holder 49Brake discs 162Brake lamps 179Brakes 162Braking assistance system 82–83Braking, automatic emergency 133–135Braking, dynamic emergency 106–108Brightness 221Bulbs 176Bulbs (changing) 175–176Bulbs (changing, type) 176
C
Capacity, fuel tank 150–152Cap, fuel filler 151–152Care of the bodywork 167CD 203, 216CD, MP3 203, 216Central locking 24, 29Changing a bulb 175–176
Changing a fuse 181–183Changing a wheel 169, 172Changing a wiper blade 76–77Changing the remote control battery 32Charger, induction 51Charger, wireless 51Checking the levels 159–161Checking tyre pressures (using the kit) 169, 171Checks 159, 161–162
Page 254 of 272
254
Flap, removable 54–55Flashing indicators 71–72, 179Fluid, brake 160Fluid, engine coolant 160Foglamp, rear 179Foglamps 178Foglamps, front 70, 176Foglamps, rear 70Folding the rear seats 48Frequency (radio) 241Fuel 7, 150Fuel consumption 7Fuel tank 150, 152Fusebox, dashboard 181Fusebox, engine compartment 181–182Fuses 181–183
G
Gauge, fuel 150–152Gearbox,
automatic 104, 108, 11 0–11 3, 11 5, 162Gearbox, manual 108–109, 11 5, 162Gear lever, automatic gearbox 11 0–11 3Gear lever, manual gearbox 109Gear shift indicator ~ Gear efficiency indicator 11 4Glove box 49G.P.S. 233
H
Hazard warning lamps 82headlamp adjustment 74Headlamp adjustment 74Headlamps, automatic dipping 73–74, 140Headlamps, automatic illumination 71–73Headlamps, dipped beam 70, 176–177Headlamps, halogen 176Headlamps, main beam 70, 176, 178Head restraints, front 49Head restraints, rear 48Head-up display 11 8–11 9Heating 60–62, 66–68Heating, additional 38, 66–68Heating, programmable 38, 66–68Hill Assist Descent Control (HADC) 86–87Hill Descent Control 86–87Hill start assist 108–109Horn 82
I
Ignition 104, 245Ignition on 104Immobiliser, electronic 101Indicator, coolant temperature 16Indicator lamps, operation 70Indicators, direction 71Inflating tyres 163, 196
Inflating tyres and accessories (using the kit) 169, 171Infrared camera 120Instrument panel 9, 120Internet browser 234, 238
J
Jack 172Jump starting 184
K
Key 23–24, 26–27, 29–31Key, electronic 23–24, 104Keyless Entry and Starting 23, 25–29, 102, 104Key with remote control 29Kit, hands-free 204–205, 219, 243–244Kit, puncture repair 168
Kit, temporary puncture repair 168–172
L
Labels 4Labels, identification 196Lamps, parking 72Lamps, rear 179Lane departure warning active 136, 141