2021 TOYOTA PROACE CITY EV key
[x] Cancel search: keyPage 51 of 320

51
Access
2
Reactivating the interior volumetric
and anti-tilt monitoring
► Deactivate the perimeter monitoring by unlocking the vehicle with the remote control or the Keyless Entry and Starting system.The indicator lamp in the button goes off.► Reactivate all monitoring by locking the vehicle with the remote control or the Keyless Entry and Starting system.The red indicator lamp in the button once again flashes every second.
Triggering of the alarm
This is indicated by sounding of the siren and flashing of the direction indicators for 30 seconds.Depending on the country of sale, certain monitoring functions remain active until the alarm has been triggered eleven times consecutively.When the vehicle is unlocked using the remote control or the "Keyless Entry and Starting" system, rapid flashing of the red indicator lamp
in the button informs you that the alarm was triggered during your absence. When the ignition is switched on, the flashing stops immediately.
Failure of the remote control
To deactivate the monitoring functions:► Unlock the vehicle using the key in the front left-handed door lock.► Open the door; the alarm is triggered.► Switch on the ignition; the alarm stops; the indicator lamp in the button goes off.
Locking the vehicle without
activating the alarm
► Lock or deadlock the vehicle using the key (integral to the remote control) in the driver's door lock.
Malfunction
When the ignition is switched on, the fixed lighting of the red indicator lamp in the button indicates a system malfunction.Have it checked by any authorized Toyota retailer or Toyota authorized repairer, or any reliable repairer.
Automatic activation
(Depending on version)The system is activated automatically 2 minutes after the last door or the boot is closed.► To avoid triggering the alarm on entering the vehicle, first press the unlocking button on the remote control or unlock the vehicle using the “Keyless Entry and Starting” system.
Page 53 of 320

53
Access
2
► Lower the window fully, then raise it; it will rise in steps of a few centimetres each time the control is pressed. Repeat the operation until the window is fully closed.► Continue to pull the control for at least one second after the window reaches the closed position.
WARNI NG
If an electric window meets an obstacle during operation, the movement of the window must be reversed. To do this, press the relevant switch.When the driver operates the passengers’ electric window switches, it is important to ensure that nothing can prevent the window from closing properly.It is important to ensure that passengers use the electric windows correctly.Pay particular attention to children when operating windows.Be aware of passengers and/or other persons present when closing windows using the electronic key.Do not put your head or arms through the open windows when the vehicle is moving - risk of serious injury!
Tilting rear door windows
Opening
► Turn the lever outwards.► Push it fully to secure the window in the open position.
Closing
► Pull the lever to release the window.► Turn the lever fully inwards to secure the window in the closed position.
Page 58 of 320
 to the right or to the left to select the corresponding mirror.► Move control B or C (d")
58
Mirrors
Door mirrors
Adjustment
► Move control A or turn control C (depending on the version you have) to the right or to the left to select the corresponding mirror.► Move control B or C (depending on the version you have) in any of the four directions to adjust.
► Return control A or C (depending on the version you have) to its centre position.
WARNI NG
As a safety measure, the mirrors should be adjusted to reduce the blind spots.The objects observed are, in reality, closer than they appear.Take this into account when assessing the distance of vehicles approaching from behind.
Manual folding
You can manually fold the mirrors (parking obstruction, narrow garage, etc.)► Turn the mirror towards the vehicle.
Electric folding
Depending on equipment, the mirrors can be folded electrically.
► From the inside, with the ignition on, place control A in the central position.► Pull control A backwards.
► Lock the vehicle from the outside.
NOTIC E
If the mirrors are folded using control A, they will not unfold when the vehicle is unlocked.
Electric unfolding
The door mirrors are unfolded electrically when the vehicle is unlocked using the remote control or key. Unless folding was selected with control A, pull the control in the central position towards the rear again.
NOTIC E
Folding/unfolding when locking/unlocking the
vehicle can be deactivated. Contact any authorized Toyota retailer or Toyota authorized repairer, or any reliable repairer.If necessary, the mirrors can be folded manually.
Heated mirrors
► Press one of these buttons.
NOTIC E
For more information on Rear screen demisting/defrosting, refer to the corresponding section.
Page 68 of 320
.In the event of a malfunction, the green indicator lamp flashes.Have")
68
► Connect your multimedia or other electrical device (telephone charger, laptop computer, CD-DVD player, bottle warmer, etc.).In the event of a malfunction, the green indicator lamp flashes.Have the socket checked by a TOYOTA dealer or a qualified workshop.
WARNI NG
Connect only one device at a time to the socket (do not use extension leads or multi-socket adapters).Connect only devices with class II insulation (shown on the device).Do not use metal-cased devices (e.g. electric shaver, etc.).
NOTIC E
As a safety measure, if power consumption is high and power is required by the vehicle's electrical system (due to severe weather conditions, electrical overload, etc.), power to the socket may be cut off, in which case the green indicator lamp goes off.
Wireless smartphone
charger
This system allows wireless charging of a portable device such as a smartphone, using the magnetic induction principle, in accordance with the Qi 1.1 standard.The portable device to be charged must be compatible with the Qi standard, either by design or by using a compatible holder or shell.A mat can also be used provided that it is approved by the Manufacturer.The charging area is identified by the Qi symbol.The charger works with the engine running and with the Stop & Start system in STOP mode.Charging is managed by the smartphone.With Keyless Entry and Starting, the charger’s operation may be briefly disrupted when a door is opened or the ignition is switched off.
Charging
► With the charging area clear, place a device in its centre.
When the portable device is detected, the charger’s indicator lamp lights up green. It remains lit for the whole time that the battery is being charged.
WARNI NG
The system is not designed to charge multiple devices simultaneously.
WARNI NG
Do not leave any metal objects (e.g. coins, keys, vehicle remote control) in the charging area while a device is being charged - risk of overheating or interrupting the charging process!
Operating check
The state of the indicator lamp allows the
operation of the charger to be monitored.
Page 90 of 320

90
NOTIC E
The fan noise that occurs during temperature pre-conditioning is perfectly normal.
Operating conditions
– The function is only activated when the ignition is switched off and the vehicle locked.– When the vehicle is not connected, the function is only activated if the battery charge level is greater than 50%.– When the vehicle is not connected and a recurring programme is active (e.g. from Monday to Friday), if two temperature pre-conditioning sequences are run without the vehicle being used, the programme will be deactivated.
Courtesy lamp
Automatic switching on/off
The front courtesy lamp comes on when the key is removed from the ignition switch.All courtesy lamps come on when the vehicle is unlocked, when one of the corresponding doors is opened and when locating the vehicle using the remote control. They fade to off after the ignition is switched on and when the vehicle is locked.
WARNI NG
Take care not to allow objects to come into contact with the courtesy lamp.
Type 1
Always lit, ignition on.
Lights up when one of the front or rear doors is opened.Always off.
Type 2
Page 118 of 320

11 8
WARNI NG
Installing a booster seatThe chest part of the seat belt must be positioned on the child's shoulder without touching the neck.Ensure that the lap part of the seat belt passes correctly over the child's thighs.Use a booster seat with backrest, equipped with a belt guide at shoulder level.
WARNI NG
Additional protectionsTo prevent accidental opening of the doors and rear windows, use the "Child lock".Take care not to open the rear windows by more than one third.To protect young children from the rays of the sun, fit side blinds on the rear windows.As a safety precaution, do not leave:– A child alone and unattended in a vehicle.– A child or an animal in a vehicle which is exposed to the sun, with the windows closed.– The keys within reach of children inside the vehicle.
Child seat at the rear
Row 2
Forward-facing or rearward-facing
► Move the vehicle's front seat forward and straighten the backrest so that the legs of the child in the forward-facing or rearward-facing child seat itself do not touch the vehicle's front seat.► Check that the backrest of the forward-facing child seat is as close as possible to the backrest of the vehicle's rear seat, and ideally in contact with it.► Adjust the rear seat (in row 2) to the fully back longitudinal position, with the backrest straightened.
NOTIC E
Ensure that the seat belt is correctly tensioned.For child seats with a support leg, ensure that the support leg is in firm and steady contact with the floor. If necessary, adjust the vehicle's front seat.
Row 3
If a child seat is installed on a passenger seat in the third row, move the seat to its rearmost longitudinal position with the backrest straightened, so that the child seat and the child's legs do not touch the seats in the second row.
WARNI NG
Never fit a child seat with a support leg in the
third row.
Page 120 of 320

120
WARNI NG
Vehicles not equipped with a deactivation/reactivation controlInstalling a "rearward facing" child seat on the front passenger seat or bench seat is strictly prohibited - risk of death or serious injury in the event of airbag deployment!
WARNI NG
With the Extenso cabin or the Crew cab, deactivate the front passenger airbag when transporting long objects.
Deactivating/Reactivating the front
passenger airbag
For vehicles on which it is fitted, the switch is located on the side of the dashboard.
With the ignition off:► To deactivate the airbag, turn the key in the switch to the "OFF" position. ► To reactivate it, turn the key to the "ON" position.
When the ignition is switched on:This warning lamp comes on and remains lit to signal deactivation.
OrThis warning lamp comes on for about 1 minute to signal activation.
Page 123 of 320
123
Safety
5
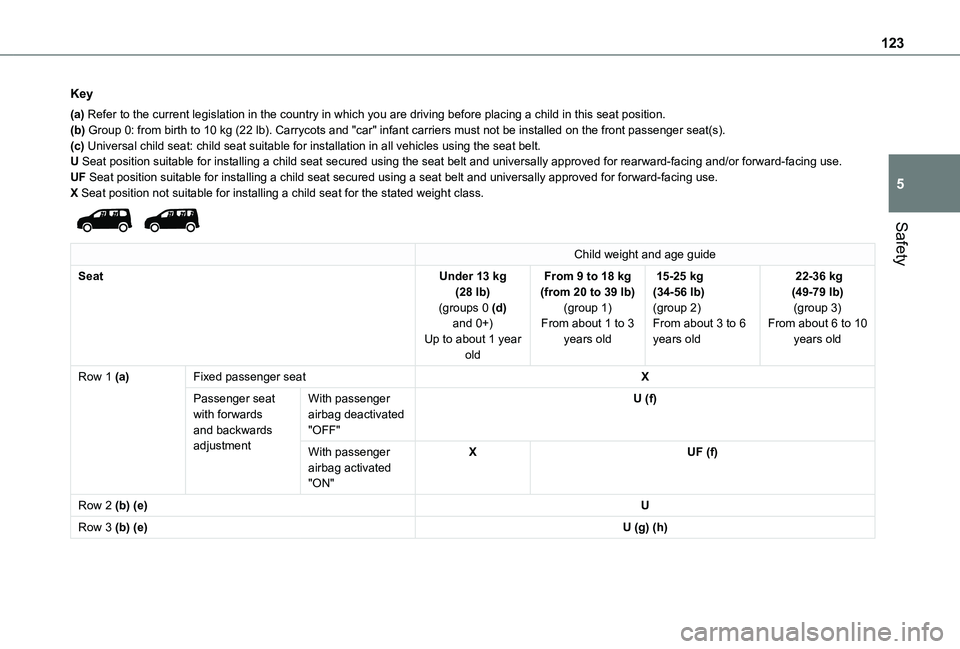
Key
(a) Refer to the current legislation in the country in which you are drivin\
g before placing a child in this seat position.(b) Group 0: from birth to 10 kg (22 lb). Carrycots and "car" infant carriers must not be installed on the f\
ront passenger seat(s).(c) Universal child seat: child seat suitable for installation in all vehic\
les using the seat belt.U Seat position suitable for installing a child seat secured using the se\
at belt and universally approved for rearward-facing and/or forward-faci\
ng use.UF Seat position suitable for installing a child seat secured using a seat\
belt and universally approved for forward-facing use.X Seat position not suitable for installing a child seat for the stated w\
eight class.
Child weight and age guide
SeatUnder 13 kg (28 lb)(groups 0 (d) and 0+)Up to about 1 year old
From 9 to 18 kg (from 20 to 39 lb)(group 1)From about 1 to 3 years old
15-25 kg (34-56 lb)(group 2)From about 3 to 6 years old
22-36 kg (49-79 lb)(group 3)From about 6 to 10 years old
Row 1 (a)Fixed passenger seatX
Passenger seat with forwards and backwards adjustment
With passenger airbag deactivated "OFF"
U (f)
With passenger airbag activated "ON"
XUF (f)
Row 2 (b) (e)U
Row 3 (b) (e)U (g) (h)