Page 64 of 250
WARNING: Forward Collision Warning and
Automatic Emergency Braking (if equipped) do
not operate when driving at very low speeds (see
Collision Avoidance Assist on page 117). Do not
rely on these features to warn you, or to prevent or
reduce the impact of a collision.
NOTE: Your chosen setting is retained in your Driver
Profile until you manually change it.
Parking Brake
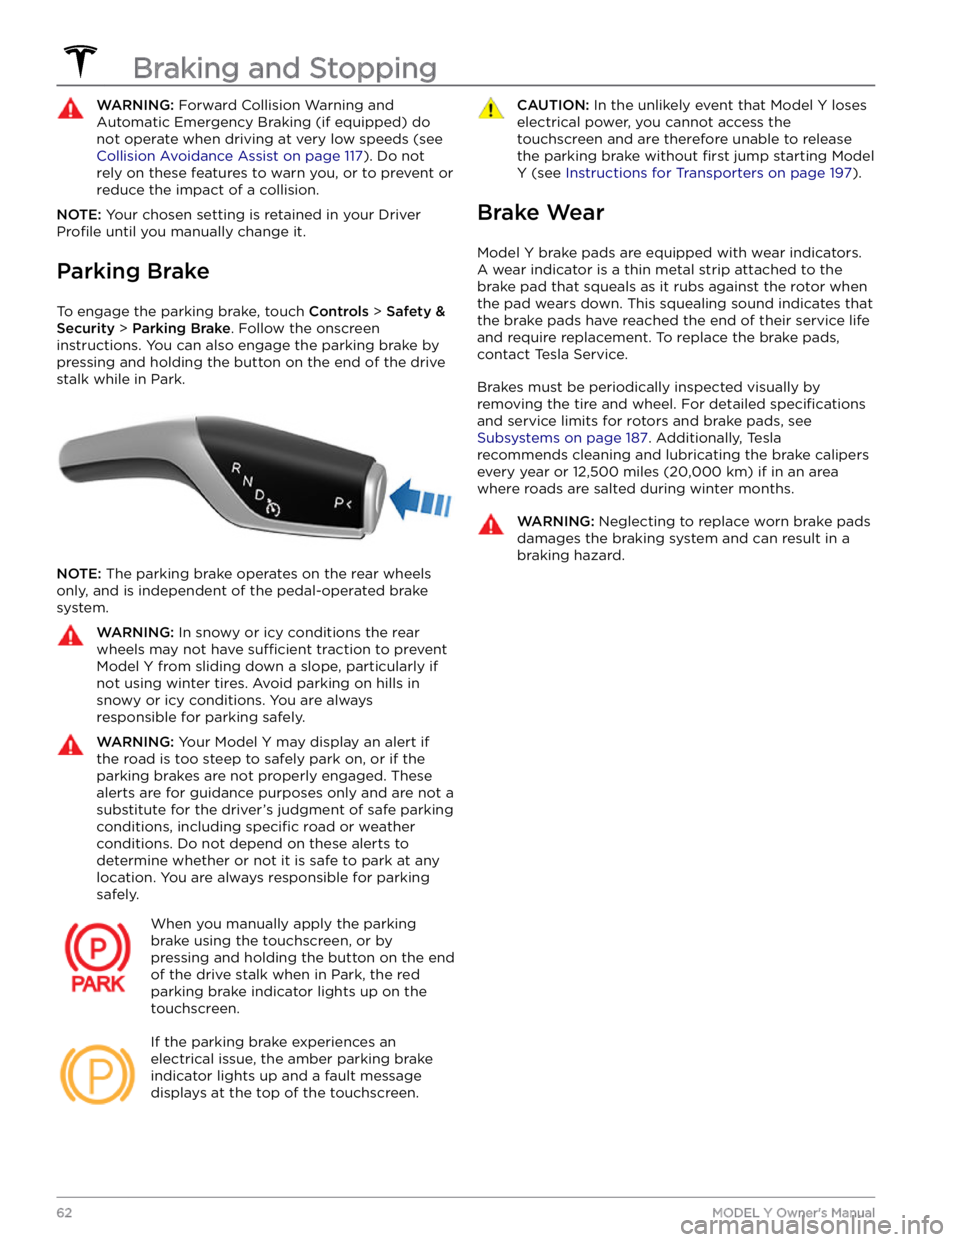
To engage the parking brake, touch Controls > Safety &
Security > Parking Brake. Follow the onscreen
instructions.
You can also engage the parking brake by
pressing and holding the button on the end of the drive
stalk while in Park.
NOTE: The parking brake operates on the rear wheels
only, and is independent of the pedal-operated brake
system.
WARNING: In snowy or icy conditions the rear
wheels may not have sufficient traction to prevent
Model Y from sliding down a slope, particularly if
not using winter tires. Avoid parking on hills in
snowy or icy conditions. You are always
responsible for parking safely.
WARNING: Your Model Y may display an alert if
the road is too steep to safely park on, or if the
parking brakes are not properly engaged. These
alerts are for guidance purposes only and are not a
substitute for the driver
Page 66 of 250
How Park Assist Works
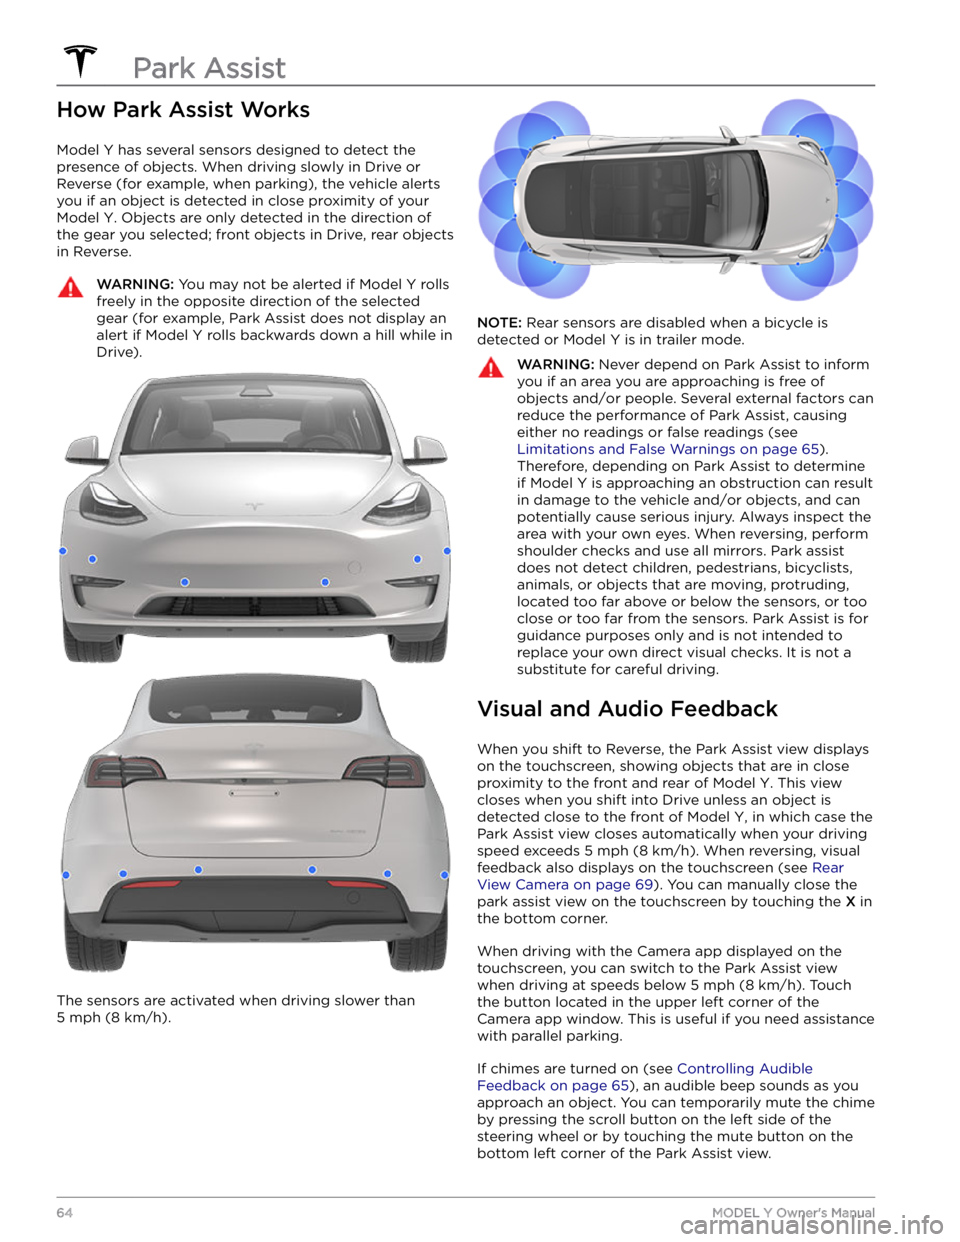
Model Y has several sensors designed to detect the
presence of objects. When driving slowly in Drive or
Reverse (for example, when parking), the vehicle alerts
you if an object is detected in close proximity of your
Model Y. Objects are only detected in the direction of
the gear you selected; front objects in Drive, rear objects in Reverse.
WARNING: You may not be alerted if Model Y rolls
freely in the opposite direction of the selected
gear (for example, Park Assist does not display an
alert if Model Y rolls backwards down a hill while in
Drive).
The sensors are activated when driving slower than
5 mph (8 km/h).
NOTE: Rear sensors are disabled when a bicycle is
detected or
Model Y is in trailer mode.
WARNING: Never depend on Park Assist to inform
you if an area you are approaching is free of
objects and/or people. Several external factors can
reduce the performance of Park Assist, causing
either no readings or false readings (see
Limitations and False Warnings on page 65).
Therefore, depending on Park Assist to determine
if Model Y is approaching an obstruction can result
in damage to the vehicle and/or objects, and can
potentially cause serious injury. Always inspect the
area with your own eyes. When reversing, perform
shoulder checks and use all mirrors. Park assist
does not detect children, pedestrians, bicyclists,
animals, or objects that are moving, protruding,
located too far above or below the sensors, or too
close or too far from the sensors. Park Assist is for
guidance purposes only and is not intended to
replace your own direct visual checks. It is not a
substitute for careful driving.
Visual and Audio Feedback
When you shift to Reverse, the Park Assist view displays on the
touchscreen, showing objects that are in close
proximity to the front and rear of
Model Y. This view
closes when you shift into Drive unless an object is
detected close to the front of
Model Y, in which case the
Park Assist view closes automatically when your driving speed exceeds
5 mph (8 km/h). When reversing, visual
feedback also displays on the touchscreen (see
Rear
View Camera on page 69). You can manually close the
park assist view on the touchscreen by touching the
X in
the bottom corner.
When driving with the Camera app displayed on the
touchscreen, you can switch to the Park Assist view when driving at speeds below
5 mph (8 km/h). Touch
the button located in the upper left corner of the Camera app window. This is useful if you need assistance
with parallel parking.
If chimes are turned on (see Controlling Audible
Feedback on page 65), an audible beep sounds as you
approach an object. You can temporarily mute the chime
by pressing the scroll button on the left side of the
steering wheel or by touching the mute button on the
bottom left corner of the Park Assist view.
Park Assist
64MODEL Y Owner
Page 67 of 250
NOTE: If a sensor is unable to provide feedback, the
touchscreen displays an alert message.
CAUTION: Keep sensors clean from dirt, debris,
snow, and ice. Avoid using a high pressure power
washer on the sensors and do not clean a sensor
with a sharp or abrasive object that can scratch or
damage its surface.
CAUTION: Do not install accessories or stickers on
or near the parking sensors.
Controlling Audible Feedback
You can use Park Assist with or without audible feedback. To turn chimes on or
off, touch Controls >
Safety & Security > Park Assist Chimes.
Limitations and False Warnings
The parking sensors may not function correctly in these
situations:
Page 68 of 250
When Model Y is stopped, Vehicle Hold can continue to
apply the brakes even after you remove your foot from
the brake pedal. When driving on a hill or on a
flat
surface, brake as you normally would. After coming to a
complete stop, simply press the brake pedal again (until
the
touchscreen displays the Vehicle Hold indicator
light) to enable Vehicle Hold. You can then release the
brake pedal and remain stopped, even on a hill.
This indicator displays on the touchscreen
whenever Vehicle Hold is actively braking
Model Y.
To disengage Vehicle Hold, press the accelerator pedal or press and release the brake pedal.
NOTE: Shifting into Neutral also disengages Vehicle
Hold.
NOTE: After actively braking Model Y for approximately
ten minutes,
Model Y shifts into Park and Vehicle Hold
cancels.
Model Y also shifts into Park if it detects that
the driver has left the vehicle.
NOTE: When Stopping Mode is set to Hold (see
Stopping Mode on page 61), Vehicle Hold engages
automatically whenever
Model Y stops while in a driving
gear. There is no need to press the brake to engage it.
Vehicle Hold
66MODEL Y Owner
Page 70 of 250
Range Assurance
The driving range displayed in Model Y is based on
estimated remaining attery energy and EPA-rated consumption. It does not account for your personal driving patterns or external conditions. The displayed range on the
touchscreenmay decrease faster than the
actual distance driven.
To view estimated range based
on your recent energy consumption, open the Energy
app to display the graph.
Model Y helps protect you against running out of energy.
Your vehicle continuously monitors its energy level and proximity to known charging locations.
Touch the map
Page 71 of 250
Camera Location
Model Y is equipped with a rear view camera located
above the rear license plate.
Whenever you shift into Reverse, the touchscreen displays the view from the camera. Lines show your
driving path based on the position of the
steering wheel.
These lines adjust as you move the
steering wheel.
Model Y also displays images from the side cameras. To
view these images, simply swipe when the view from the rear view camera is displayed.
NOTE: Visual feedback from the parking sensors also
appear on the
touchscreen (see Park Assist on page 64).
To display the view from the rear view
cameras at any time, touch the
camera
icon on the touchscreen
Page 80 of 250
NOTE: When testing chocks, ensure that Vehicle Hold
(see
Vehicle Hold on page 66) is not engaged. If
Vehicle Hold is braking
Model Y, the Vehicle Hold
indicator light displays on the touchscreen. To
disengage Vehicle Hold, press and release the brake
pedal.
4.
Place the vehicle in Park.
WARNING: If parking on a grade is necessary,
always ensure that all trailer wheels have been
securely chocked. Failure to do so can result in
serious damage or injury.
Trailer Sway Mitigation
When trailer sway is detected, the electronic stability control system attempts to apply the appropriate amount of braking to minimize trailer sway. The touchscreen
briefly displays the traction control system
indicator. Pressing the brake pedal when the system is actively braking to mitigate trailer sway does not cancel this automatic braking.
Attaching and Removing the Ball
Mount
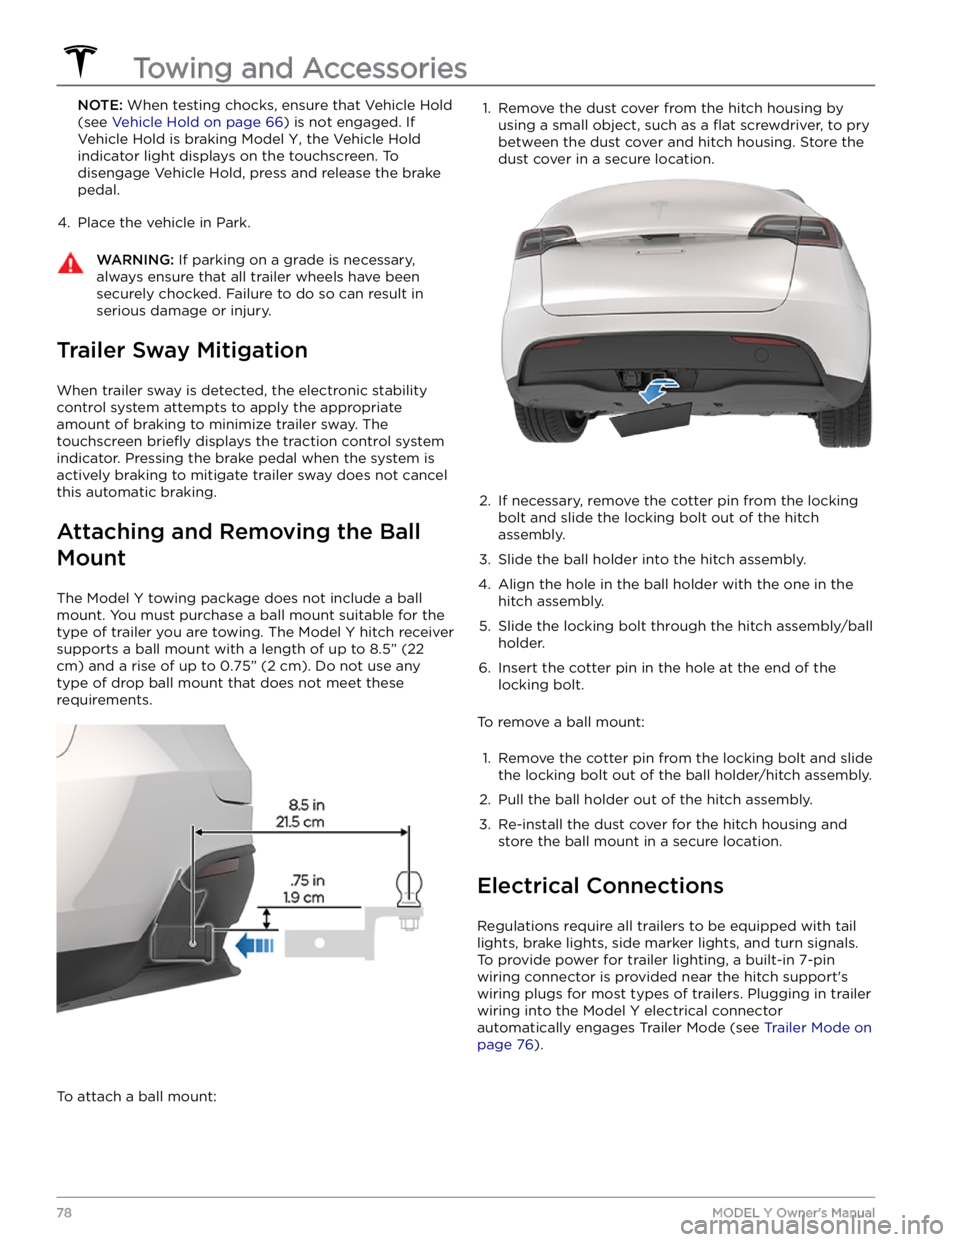
The Model Y towing package does not include a ball
mount. You must purchase a ball mount suitable for the type of trailer you are towing. The
Model Y hitch receiver
supports a ball mount with a length of up to
8.5” (22
cm) and a rise of up to 0.75” (2 cm). Do not use any
type of drop ball mount that does not meet these requirements.
To attach a ball mount:
1. Remove the dust cover from the hitch housing by
using a small object, such as a
flat screwdriver, to pry
between the dust cover and hitch housing. Store the dust cover in a secure location.
2.
If necessary, remove the cotter pin from the locking
bolt and slide the locking bolt out of the hitch assembly.
3.
Slide the ball holder into the hitch assembly.
4.
Align the hole in the ball holder with the one in the hitch assembly.
5.
Slide the locking bolt through the hitch assembly/ball holder.
6.
Insert the cotter pin in the hole at the end of the
locking bolt.
To remove a ball mount:
1.
Remove the cotter pin from the locking bolt and slide
the locking bolt out of the ball holder/hitch assembly.
2.
Pull the ball holder out of the hitch assembly.
3.
Re-install the dust cover for the hitch housing and store the ball mount in a secure location.
Electrical Connections
Regulations require all trailers to be equipped with tail lights, brake lights, side marker lights, and turn signals.
To provide power for trailer lighting, a built-in 7-pin wiring connector is provided near the hitch support
Page 87 of 250
Cleaning Cameras and Sensors
To ensure the various Autopilot components can provide
information that is as accurate as possible, keep them
clean and free of obstructions, condensation, or damage. See
Cleaning on page 172.
Condensation can form inside the camera enclosures,
especially if you park your vehicle outside in cold or wet
conditions. The
touchscreen may display an alert stating
that a camera is blocked and that some or all Autopilot
features may be temporarily restricted until the camera vision is clear. To proactively dry the condensation, precondition the cabin by setting it to a warm temperature, turning the windshield defroster on, and directing the front air vents toward the door pillars (see
Mobile App on page 154).
CAUTION: Do not wipe an exposed lens with your
hands or a cloth in an attempt to remove dirt or
debris. The debris can damage the surface of the
lens when wiped.
CAUTION: Do not use chemical-based or abrasive
cleaners. Doing so can damage surfaces.
CAUTION: Do not clean an ultrasonic sensor or
camera lens with a sharp or abrasive object that
can scratch or damage its surface.
About Autopilot
85Autopilot