Page 64 of 250

WARNING: Forward Collision Warning and
Automatic Emergency Braking (if equipped) do
not operate when driving at very low speeds (see
Collision Avoidance Assist on page 117). Do not
rely on these features to warn you, or to prevent or
reduce the impact of a collision.
NOTE: Your chosen setting is retained in your Driver
Profile until you manually change it.
Parking Brake
To engage the parking brake, touch Controls > Safety &
Security > Parking Brake. Follow the onscreen
instructions.
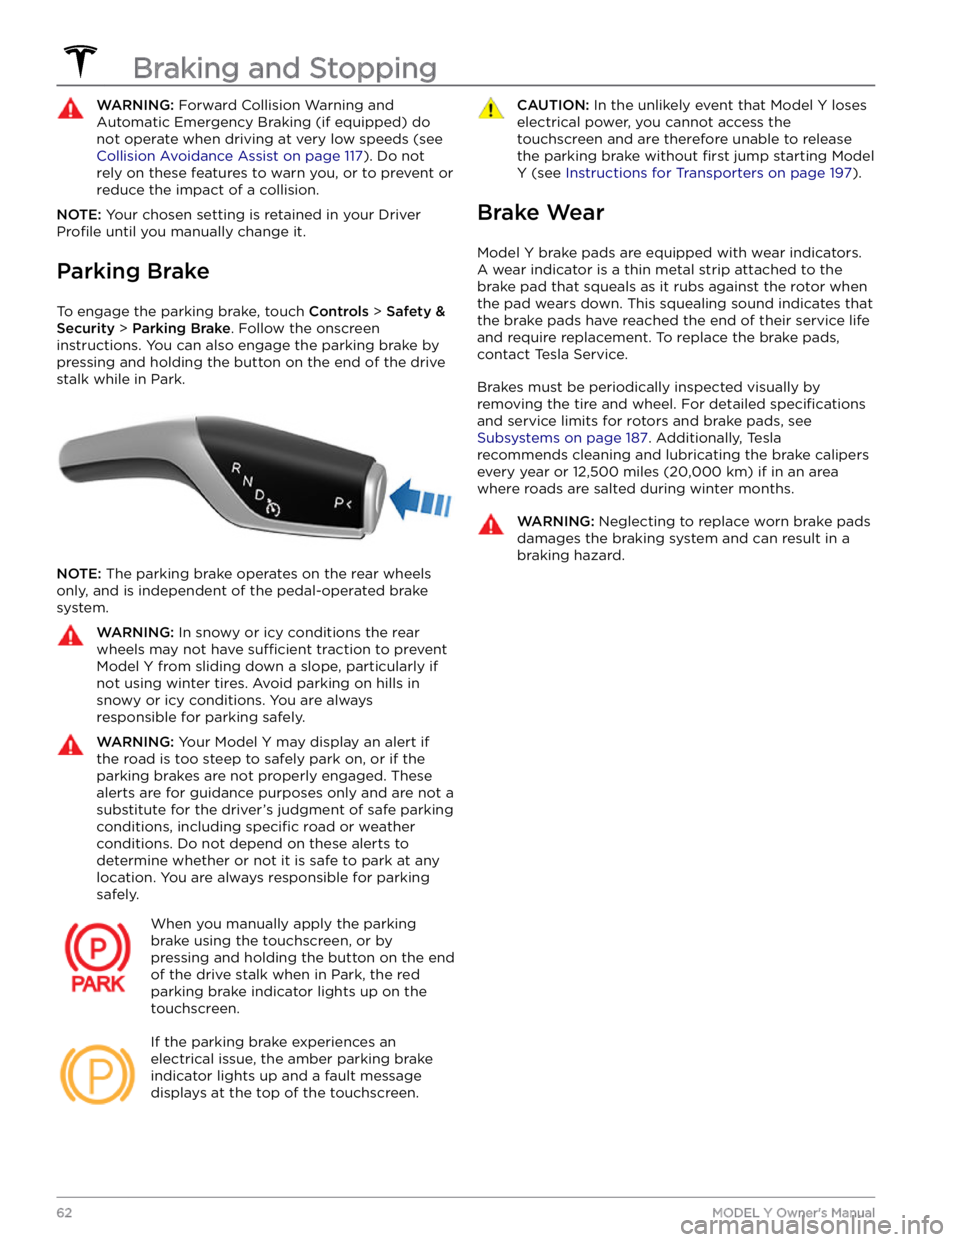
You can also engage the parking brake by
pressing and holding the button on the end of the drive
stalk while in Park.
NOTE: The parking brake operates on the rear wheels
only, and is independent of the pedal-operated brake
system.
WARNING: In snowy or icy conditions the rear
wheels may not have sufficient traction to prevent
Model Y from sliding down a slope, particularly if
not using winter tires. Avoid parking on hills in
snowy or icy conditions. You are always
responsible for parking safely.
WARNING: Your Model Y may display an alert if
the road is too steep to safely park on, or if the
parking brakes are not properly engaged. These
alerts are for guidance purposes only and are not a
substitute for the driver
Page 65 of 250
How It Works
The traction control system constantly monitors the speed of the front and rear wheels. If
Model Y
experiences a loss of traction, the system minimizes wheel spin by controlling brake pressure and motor
power. By default, the traction control system is on. Under normal conditions, it should remain on to ensure
maximum safety.
This yellow indicator flashes on the
touchscreen whenever the traction control
system is actively controlling brake
pressure and motor power to minimize wheel spin. If the indicator stays on, a fault is detected with the traction control system. Contact Tesla Service.
WARNING: Traction control cannot prevent
collisions caused by driving dangerously or turning
too sharply at high speeds.
Disabling Traction Control
Under normal conditions, the traction control system should remain on. Turn it
off only in circumstances
where you deliberately want the wheels to spin, such as:
Page 68 of 250

When Model Y is stopped, Vehicle Hold can continue to
apply the brakes even after you remove your foot from
the brake pedal. When driving on a hill or on a
flat
surface, brake as you normally would. After coming to a
complete stop, simply press the brake pedal again (until
the
touchscreen displays the Vehicle Hold indicator
light) to enable Vehicle Hold. You can then release the
brake pedal and remain stopped, even on a hill.
This indicator displays on the touchscreen
whenever Vehicle Hold is actively braking
Model Y.
To disengage Vehicle Hold, press the accelerator pedal or press and release the brake pedal.
NOTE: Shifting into Neutral also disengages Vehicle
Hold.
NOTE: After actively braking Model Y for approximately
ten minutes,
Model Y shifts into Park and Vehicle Hold
cancels.
Model Y also shifts into Park if it detects that
the driver has left the vehicle.
NOTE: When Stopping Mode is set to Hold (see
Stopping Mode on page 61), Vehicle Hold engages
automatically whenever
Model Y stops while in a driving
gear. There is no need to press the brake to engage it.
Vehicle Hold
66MODEL Y Owner
Page 77 of 250
For trailers with a combined loading of more than 1650
lbs (750 kg), Tesla recommends using a separate braking
system with an independent controller (see
Trailer
Brakes on page 77). Carefully follow the instructions
provided by the trailer brake manufacturer to ensure that trailer brakes are properly installed, adjusted, and maintained.
The tongue weight is the downward force that the weight of the trailer exerts on the hitch. This must not exceed 10% of the maximum trailer weight. Carrying a
significant amount of equipment, passengers, or cargo
in the tow vehicle can reduce the towing capacity it can handle, which also reduces the tongue weight. Maximum towing capacity is calculated assuming the
GVWR
(Gross Vehicle Weight Rating) is not exceeded (see
Vehicle Loading on page 182).
NOTE: If the information on the hitch label conflicts with
the information provided in this Owner
Page 79 of 250
Trailer Brakes
When towing a loaded trailer that weighs more than
1650 lbs (750 kg), Tesla recommends that the trailer be
equipped with its own brake system adequate for the weight of the trailer. Ensure compliance with local regulations. A brake controller must be purchased separately, and the required 4-pin pigtail connector can be ordered from Tesla Service.
Follow these steps to connect a brake controller:
1.
Connect the wiring on the brake controller to the
appropriate locations on the 4-pin pigtail connector.
2.
Remove the cover located under the dashboard in the driver
Page 80 of 250

NOTE: When testing chocks, ensure that Vehicle Hold
(see
Vehicle Hold on page 66) is not engaged. If
Vehicle Hold is braking
Model Y, the Vehicle Hold
indicator light displays on the touchscreen. To
disengage Vehicle Hold, press and release the brake
pedal.
4.
Place the vehicle in Park.
WARNING: If parking on a grade is necessary,
always ensure that all trailer wheels have been
securely chocked. Failure to do so can result in
serious damage or injury.
Trailer Sway Mitigation
When trailer sway is detected, the electronic stability control system attempts to apply the appropriate amount of braking to minimize trailer sway. The touchscreen
briefly displays the traction control system
indicator. Pressing the brake pedal when the system is actively braking to mitigate trailer sway does not cancel this automatic braking.
Attaching and Removing the Ball
Mount
The Model Y towing package does not include a ball
mount. You must purchase a ball mount suitable for the type of trailer you are towing. The
Model Y hitch receiver
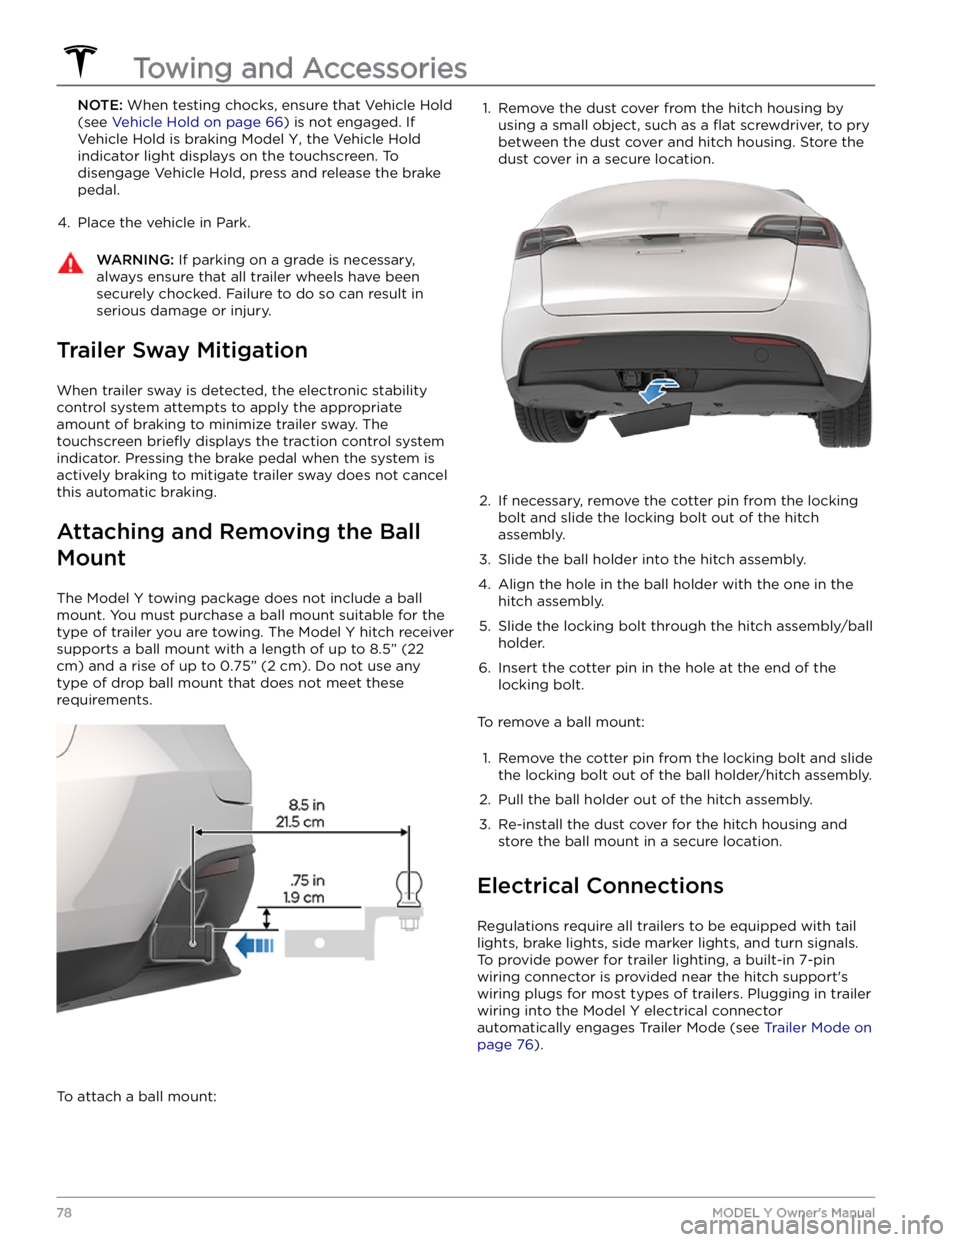
supports a ball mount with a length of up to
8.5” (22
cm) and a rise of up to 0.75” (2 cm). Do not use any
type of drop ball mount that does not meet these requirements.
To attach a ball mount:
1. Remove the dust cover from the hitch housing by
using a small object, such as a
flat screwdriver, to pry
between the dust cover and hitch housing. Store the dust cover in a secure location.
2.
If necessary, remove the cotter pin from the locking
bolt and slide the locking bolt out of the hitch assembly.
3.
Slide the ball holder into the hitch assembly.
4.
Align the hole in the ball holder with the one in the hitch assembly.
5.
Slide the locking bolt through the hitch assembly/ball holder.
6.
Insert the cotter pin in the hole at the end of the
locking bolt.
To remove a ball mount:
1.
Remove the cotter pin from the locking bolt and slide
the locking bolt out of the ball holder/hitch assembly.
2.
Pull the ball holder out of the hitch assembly.
3.
Re-install the dust cover for the hitch housing and store the ball mount in a secure location.
Electrical Connections
Regulations require all trailers to be equipped with tail lights, brake lights, side marker lights, and turn signals.
To provide power for trailer lighting, a built-in 7-pin wiring connector is provided near the hitch support
Page 81 of 250
1.
Reverse Lights
2.
Brake Controller Output
3.
Right Turn Signal and Brake Light
4.
12V Power
5.
Ground
6.
Left Turn Signal and Brake Light
7.
Tail Lamps
NOTE: It is the driver
Page 89 of 250
3. To cancel Traffic-Aware Cruise Control, push the drive
stalk up once or press the brake pedal. See
Canceling
and Resuming on page 89 for more information.
Changing the Cruising Speed
Roll the right scroll wheel up to increase, or down to decrease, the set speed. Slowly rolling the scroll wheel changes the set speed in
1 mph (1 km/h) increments and
quickly rolling the scroll wheel changes the set speed to
the closest
5 mph (5 km/h) increment.
You can also use the touchscreen and drive stalk to change the set cruising speed: