2021 TESLA MODEL S instrument panel
[x] Cancel search: instrument panelPage 128 of 281

How Speed Assist Works
Model S displays a speed limit on the instrument panel and you can choose if and
how you are warned when you exceed the speed limit. Also, instead of using the detected speed limit, you can base warnings on an arbitrary speed limit that you enter
manually.
In situations where Model S is unable to
determine a speed limit, or if Speed Assist is
uncertain that an acquired speed limit is
accurate, the
instrument panel may not
display a speed limit sign and warnings do
not take
effect.
NOTE: Speed limit warnings go away after ten
seconds, or when Model S slows down below
the specified limit.
WARNING: Do not rely on Speed Assist to determine the appropriate speed limit or driving speed. Always drive at a safe speed based on traffic and road conditions.
Controlling Speed Assist
To adjust the Speed Limit Warning setting,
touch Controls > Autopilot > Speed Limit Warning, then choose one of these options:
Page 161 of 281

Touch Show Suspension Data to display
detailed information about the dampers for
each wheel, including ride height,
compression and rebound values, and body accelerations.
Auto-Raising Suspension
Auto-raising suspension saves you from
manually having to raise the suspension every
time you arrive at a frequently-used location
where you have previously raised the
suspension. Whenever you raise the suspension to
High or Very High, you can
touch Always Auto-Raise at This Location to
save the location. When you return to the
saved location,
Model S raises the suspension
and the instrument panel displays a message
indicating that the suspension is being raised.
NOTE: When returning to a saved location
and driving faster than the High and Very High suspension settings allow, the
suspension does not raise until
Model S slows
down.
NOTE: After leaving a saved location, the
suspension automatically lowers. However, it
may not lower until you are driving faster than the speed threshold at which the suspension lowers.
NOTE: If Model S reaches a saved location
and the existing suspension setting is already
higher than the level that has been saved for
that location, the ride height is not adjusted.
To remove an auto-raising location
If you do not want the suspension to auto- raise at a saved location, touch the X in the
auto-raising location status message that
displays at a saved location. Doing so
removes the auto-raise location and the suspension no longer raises automatically
when you arrive at the location.
Self-Leveling
Model S equipped with air suspension
automatically self-levels, even when power is
off. To prevent damage when jacking or lifting
the vehicle, you must activate Jack mode to
disable self-leveling (press the brake pedal
and touch
Controls > Service > Jack Mode).
For more details, see Jack Mode on page 201.
Air Suspension
159Using the Touchscreen
Page 181 of 281

Charging Status
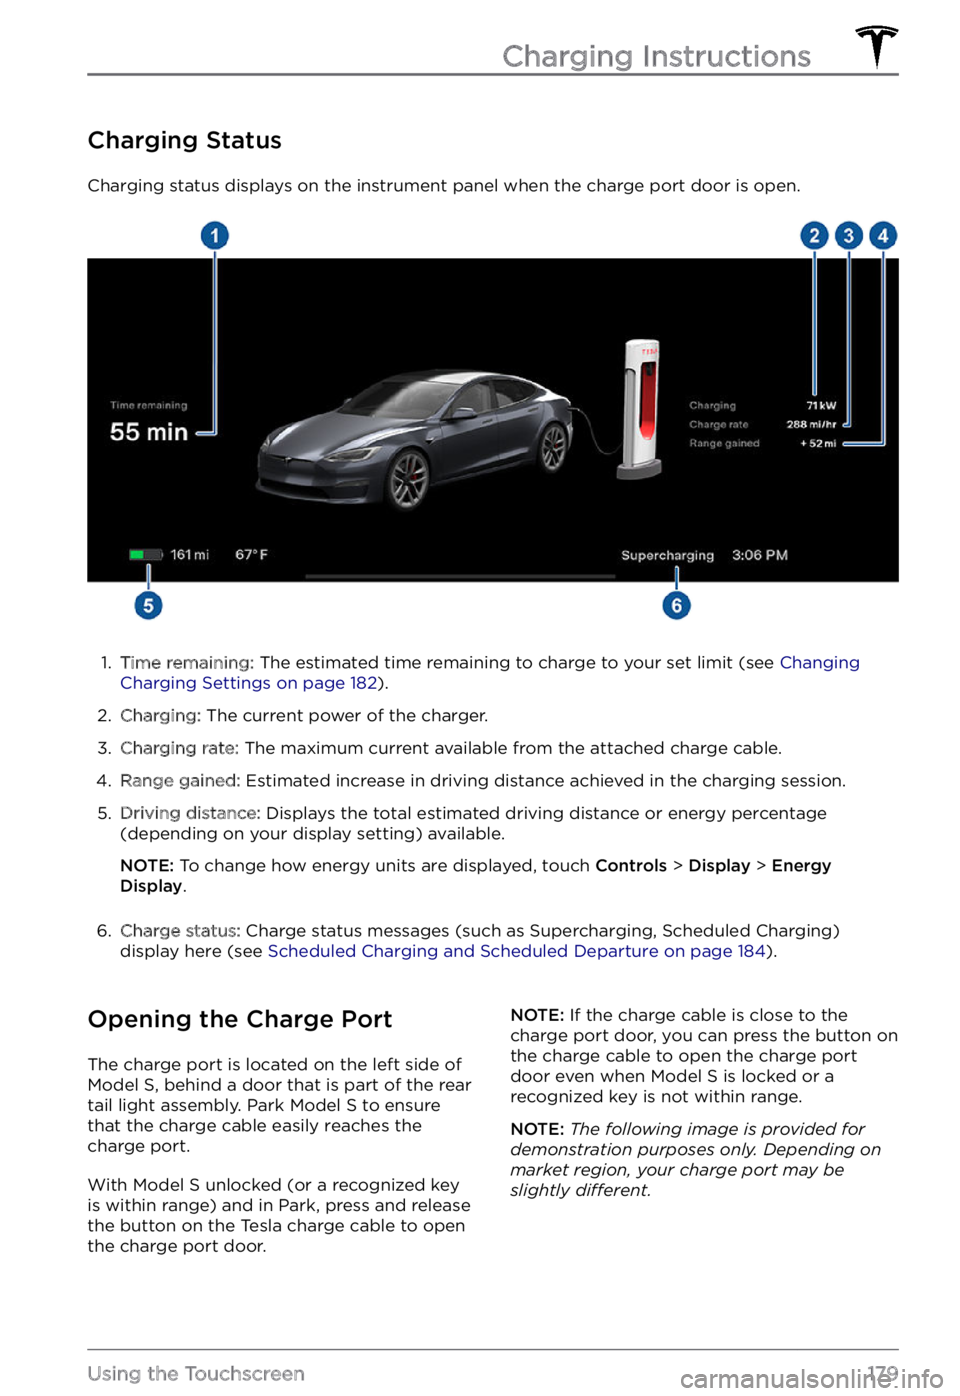
Charging status displays on the instrument panel when the charge port door is open.
1.
Time remaining: The estimated time remaining to charge to your set limit (see Changing Charging Settings on page 182).
2.
Charging: The current power of the charger.
3.
Charging rate: The maximum current available from the attached charge cable.
4.
Range gained: Estimated increase in driving distance achieved in the charging session.
5.
Driving distance: Displays the total estimated driving distance or energy percentage
(depending on your display setting) available.
NOTE: To change how energy units are displayed, touch Controls > Display > Energy Display.
6.
Charge status: Charge status messages (such as Supercharging, Scheduled Charging)
display here (see Scheduled Charging and Scheduled Departure on page 184).
Opening the Charge Port
The charge port is located on the left side of Model S, behind a door that is part of the rear
tail light assembly. Park Model S to ensure
that the charge cable easily reaches the
charge port.
With Model S unlocked (or a recognized key is within range) and in Park, press and release
the button on the Tesla charge cable to open the charge port door.
NOTE: If the charge cable is close to the
charge port door, you can press the button on
the charge cable to open the charge port
door even when Model S is locked or a recognized key is not within range.
NOTE: The following image is provided for demonstration purposes only. Depending on market region, your charge port may be slightly di
Page 190 of 281

Maintaining Tire Pressures
Keep tires inflated to the pressures shown on
the Tire and Loading Information label, even if
it
differs from the pressure printed on the tire
itself. The Tire and Loading Information label is located on the center door pillar and is
visible when the front door is open.
The Tire Pressure indicator
light on the instrument panel alerts you if one or
more tires is under- or over-inflated.
The Tire Pressure indicator light does not immediately turn off when you adjust tire pressure. After inflating the tire to the
recommended pressure, you must drive over
15 mph (25 km/h) for more than 10 minutes to
activate the Tire Pressure Monitoring System
(TPMS), which turns
off the Tire Pressure
indicator light.
If the indicator light flashes for one minute
whenever you power on Model S, a fault with
the TPMS is detected (see TPMS Malfunction on page 192).
You can display tire pressures on the touchscreen by opening Controls > Service.
You can also choose whether you want to
display tire pressures using Bar or PSI by opening
Controls > Display > Tire Pressure.
WARNING: Under-inflation is the most common cause of tire failures and can cause a tire to overheat, resulting in severe tire cracking, tread separation, or blowout, which causes unexpected loss of vehicle control and increased risk of injury. Under-inflation also reduces the vehicle
Page 201 of 281

Removing the Maintenance
Panel
To check fluid levels, remove the maintenance
panel:
1.
Open the hood.
2.
Pull the maintenance panel upward to
release the clips that hold it in place.
CAUTION: The maintenance panel protects the front trunk from water. When re-attaching, make sure it is fully seated.
Checking Battery Coolant
Your Battery coolant should not need to be
replaced for the life of your vehicle under
most circumstances. However, if the quantity
of
fluid in the cooling system drops below the
recommended level, the instrument panel displays a warning message. Stop driving Model S as soon as safety permits and
contact Tesla.
Fluid Level Check
DO NOT REMOVE THE FILLER CAP AND DO NOT ADD FLUID. Doing so can result in damage not covered by the warranty.
Do Not Top Up Battery Coolant
WARNING: Battery coolant can be hazardous and can irritate eyes and skin. Under no circumstances should you remove the filler cap and/or add coolant. If the instrument panel warns you that the fluid level is low, contact Tesla immediately.
To maximize the performance and life of the
Battery, the cooling system uses a specific
mixture of G-48 ethylene-glycol coolant
(HOAT). Contact Tesla for more specific information about the coolant.
Checking Brake Fluid
WARNING: Contact Tesla immediately if you notice increased movement of the brake pedal or a significant loss of brake fluid. Driving under these conditions can result in extended stopping distances or complete brake failure.
A red brake indicator on the instrument panel alerts you
if the quantity of fluid in the
brake reservoir drops below
the recommended level. If it
displays while driving, stop
as soon as safety permits by
gently applying the brakes.
Do not continue driving.
Contact Tesla immediately.
Fluid Level Check
Tesla checks the brake fluid level and health
at the regularly scheduled maintenance intervals.
Topping Up the Brake Fluid
Do not top up your brake fluid. The following
instructions are provided for information purposes and future reference only:
1.
Clean the filler cap before removing it to
prevent dirt from entering the reservoir.
2.
Unscrew the cap and remove it.
3.
Top up the reservoir to the MAX mark
using the appropriate brake fluid.
4.
Replace the filler cap, ensuring it is fully
secured.
WARNING: Only use new fluid from a sealed air-tight container. Never use previously used fluid or fluid from a previously opened container
Page 202 of 281

WARNING: Brake fluid is highly toxic. Keep containers sealed and out of the reach of children. In the event of accidental consumption, seek medical attention immediately.
CAUTION: Brake fluid damages painted surfaces. Immediately soak up any spills with an absorbent cloth and wash the area with a mixture of car shampoo and water.
Topping Up Windshield Washer Fluid
The only reservoir into which you can add fluid is the windshield washer fluid reservoir,
which is located behind the front trunk. When
the level is low, a message displays on the
instrument panel.
To top up the washer fluid:
1.
Open the hood.
2.
Clean around the filler cap before opening
it to prevent dirt from entering the
reservoir.
3.
Open the filler cap.
4.
While avoiding spilling, fill the reservoir
until the fluid level is visible just below the filler neck.
5.
Wipe up any spills immediately and wash
the affected area with water.
6.
Replace the filler cap.
NOTE: Some national or local regulations
restrict the use of Volatile Organic Compounds (VOCs). VOCs are commonly
used as antifreeze in washer
fluid. Use a
washer fluid with limited VOC content only if
it provides adequate freeze resistance for all
climates in which you drive
Model S.
CAUTION: Do not add formulated washer fluids that contain water repellent or bug wash. These fluids
can cause streaking, smearing, and squeaking or other noises.
WARNING: In temperatures below 40
Page 278 of 281

passenger detection: 40
passenger front airbag: 40
pedestrian warning: 80
phone: 9, 154
authenticating as a key: 9
using: 154
phone app: 155
phone key: 9, 12
adding as a key: 12
removing as a key: 12
PIN: 45
PIN to Drive: 161
power cycling: 51
power socket: 24
power windows: 16
powering on and off: 51
Preconditioning: 184
Proposition 65: 227
public charging stations: 176
R
radio: 149, 152
Radio Frequency information: 229
range: 60, 67, 74
displayed on instrument panel: 60
driving tips to maximize: 74
regenerative braking: 67
range assurance: 75
Re-route: 147
reading light: 24
rear seats, folding and raising: 26
rear view camera: 76
rear window switches, disabling: 16
recent (Media Player): 150
Recents (navigation): 142
recording videos: 78, 163
regenerative braking: 67
relative speed limit: 126
release notes: 171
restarting the touchscreen: 51
Reverse gear: 55
RFID transponders: 202
roadside assistance: 218
rotating tires: 189
Round Trip Energy (navigating): 146
S
safety defects, reporting: 229
safety information: 31, 37, 43
airbags: 43
child seats: 37
seat belts: 31
Schedule: 184
schedule service: 172
scheduled charging: 184
scheduled departure: 184
using: 184
seat belts: 29, 30, 196
cleaning: 196
in a collision: 30
overview of: 29
pre-tensioners: 30
wearing when pregnant: 30
seat covers: 28
seat heaters: 135
seating capacity: 204
seating position: 42
seats: 26, 135
adjusting: 26
heaters: 135
security settings: 161
sensors: 84
Sentry Mode: 162
service data recording: 226
service intervals: 186
shifting gears: 53
Show Calendar Upon Entry: 154, 157
Side Clearance (Summon): 111
side collision warning: 119
slip start: 69
Smart Summon: 115
smartphone: 9
authenticating as a key: 9
Software Reinstall: 170
software update preferences: 170
software updates: 170
specifications: 206, 208, 210
12V battery: 210
Index