Page 39 of 172

LIGHT CONTROLS
1AUTO:Rotate the end of the lever to set
your headlights to automatically turn on or
off, depending on the level of light outside.
NOTE: The sensitivity of the automatic
headlights can be adjusted through the
STARLINK
®multimedia display.
2Parking Lights:Rotate the end of the
lever to turn on the instrument panel
lights, parking lights, side marker lights,
tail lights, and license plate lights.
3Headlights:Rotate the end of the lever to turn on the headlights, instrument panel
lights, parking lights, side marker lights, tail lights, and license plate lights.
4High Beams:Push the lever forward to change from low beam to high beam. When
set to the “AUTO” position, pushing the lever forward also activates the High Beam
Assist (HBA) system. Pull the lever back to center to return to low beam.
5Fog Lights:If equipped, rotate the dial to turn on the fog lights when the headlights
are on low beams in the “
” or “AUTO” position.
Illumination Brightness
When the light controls are on
(in the
,, or “AUTO”
position), and ambient light is low,
rotating the illumination
brightness dial on the instrument
panel upward will make the
instrument panel illumination
brighter. When the dial is fully
rotated upward (dots aligned), the
instrument panel illumination
stays at full brightness. Rotating
the dial downward dims the
instrument panel illumination.
When the ambient light is bright,
the illumination brightness is set
to the maximum regardless of the position of the control dial.
Illumination Brightness Dial
CONTROLS
37
Page 43 of 172
COMBINATION METER
1Tachometer
2Combination Meter Display (CMD)
3Speedometer
4Fuel gauge5Trip meter and odometer
6Select lever/gear position indicator
7Engine coolant temperature gauge
WARNING AND INDICATOR LIGHTS
Red lights indicate immediate attention is required. Some examples are:
Seatbelt
warningDoor
openBrake system
Yellow lights indicate caution. Some examples are:
Low fuelEngine oil
level warning
lightTire pressure
warning light
Green and blue lights are for information. Some examples are:
Headlight
indicator
lightAuto Vehicle
Hold ONHigh beam
indicator
light
GAUGES AND WARNING LIGHTS
41
Page 115 of 172

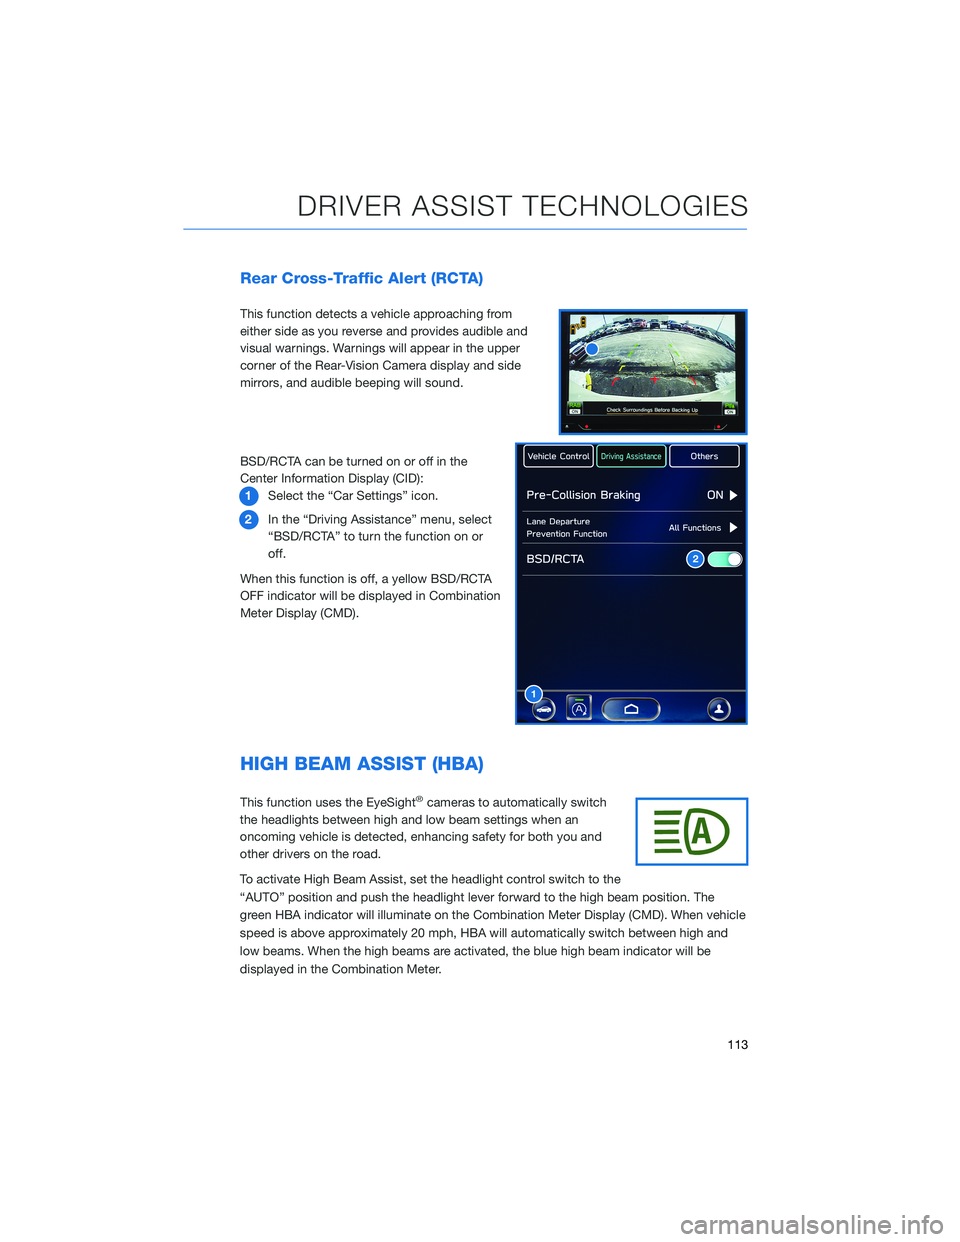
Rear Cross-Traffic Alert (RCTA)
This function detects a vehicle approaching from
either side as you reverse and provides audible and
visual warnings. Warnings will appear in the upper
corner of the Rear-Vision Camera display and side
mirrors, and audible beeping will sound.
BSD/RCTA can be turned on or off in the
Center Information Display (CID):
1Select the “Car Settings” icon.
2In the “Driving Assistance” menu, select
“BSD/RCTA” to turn the function on or
off.
When this function is off, a yellow BSD/RCTA
OFF indicator will be displayed in Combination
Meter Display (CMD).
HIGH BEAM ASSIST (HBA)
This function uses the EyeSight®cameras to automatically switch
the headlights between high and low beam settings when an
oncoming vehicle is detected, enhancing safety for both you and
other drivers on the road.
To activate High Beam Assist, set the headlight control switch to the
“AUTO” position and push the headlight lever forward to the high beam position. The
green HBA indicator will illuminate on the Combination Meter Display (CMD). When vehicle
speed is above approximately 20 mph, HBA will automatically switch between high and
low beams. When the high beams are activated, the blue high beam indicator will be
displayed in the Combination Meter.
1
2
DRIVER ASSIST TECHNOLOGIES
113
Page 116 of 172

STEERING RESPONSIVE HEADLIGHTS (SRH)
The Steering Responsive Headlights (SRH) system aims the headlight beams in the
direction you are steering, improving visibility at corners and intersections when driving at
night. You can turn the SRH system on or off in the Center Information Display through the
“Car Settings” icon.
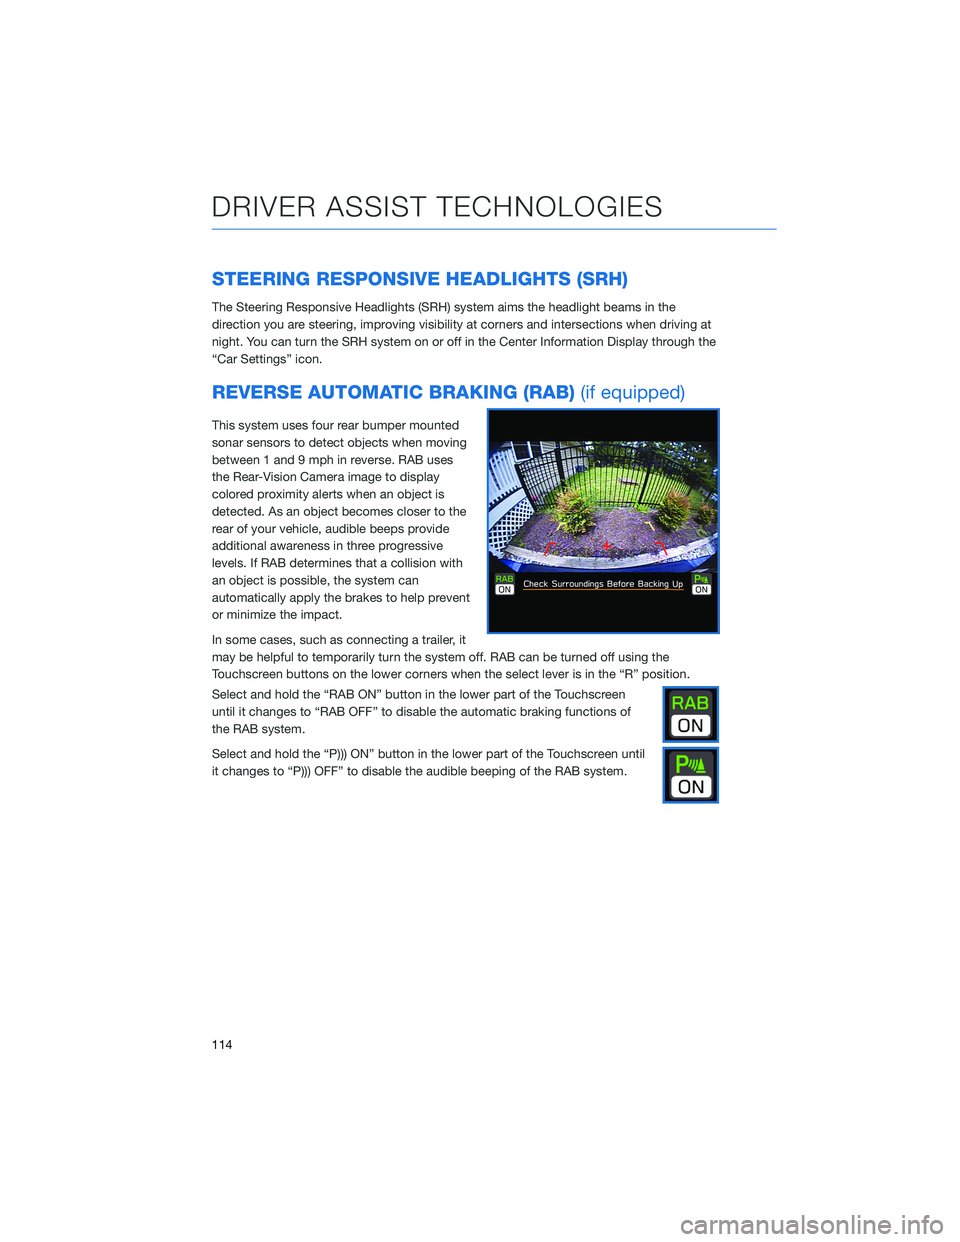
REVERSE AUTOMATIC BRAKING (RAB)(if equipped)
This system uses four rear bumper mounted
sonar sensors to detect objects when moving
between 1 and 9 mph in reverse. RAB uses
the Rear-Vision Camera image to display
colored proximity alerts when an object is
detected. As an object becomes closer to the
rear of your vehicle, audible beeps provide
additional awareness in three progressive
levels. If RAB determines that a collision with
an object is possible, the system can
automatically apply the brakes to help prevent
or minimize the impact.
In some cases, such as connecting a trailer, it
may be helpful to temporarily turn the system off. RAB can be turned off using the
Touchscreen buttons on the lower corners when the select lever is in the “R” position.
Select and hold the “RAB ON” button in the lower part of the Touchscreen
until it changes to “RAB OFF” to disable the automatic braking functions of
the RAB system.
Select and hold the “P))) ON” button in the lower part of the Touchscreen until
it changes to “P))) OFF” to disable the audible beeping of the RAB system.
DRIVER ASSIST TECHNOLOGIES
114
Page 165 of 172

F
FIRMWARE AND SOFTWARE
UPDATES . . . ............ 161
FOLDING THE REAR SEATS....... 51
FRONT VIEW MONITOR . . . . . . . . 112
FUEL . . . . . . . . . ........... 50
FUEL CAPACITY . . ............ 50
FUEL FILLER LID . . . .......... 50
FUNCTIONS . . . . . .......... 101
Advanced Adaptive Cruise Control with
Lane Centering . . ..........104
Conventional Cruise Control . . . . . 106
Lane Departure Prevention . . . . . . 104
Lane Departure Warning.......103
Lane Sway Warning . .........103
Lead Vehicle Start Alert . . . . . . . . 107
Pre-Collision Brake Assist . . . . . . 102
Pre-Collision Braking . ........102
Pre-Collision Throttle Management. . 102
H
HIGH BEAM ASSIST (HBA) . . . . . . . 113
HOME SCREEN ICONS . . . . . . . . . 72
HOOD PROP . . . . ............ 57
HOW TO CREATE A PROFILE . . . . . . 76
Retrieving a Driver Profile.......79
HOW TO OVERVIEW .......... 123
I
IGNITION SWITCH . ........... 42
IMPORTANT SAFETY INFORMATION . . 4
IN CASE OF EMERGENCY . . . . . . . . 6
Subaru Roadside Assistance . . . . . . 6
SUBARU STARLINK
®Safety and
Security . . . . . . . . . .........6
INSTRUMENT PANEL SWITCHES
(LOWER LEFT) . . . . . . . . . . . . . 35
I SWITCH . . . . . . . ........... 36K
KEYLESS ACCESS WITH PUSH BUTTON
START .................. 10
Locking Using Door Handles . . . . . 10
Locking Using the Rear Gate . . . . . 11
Unlocking Using Door Handles . . . . 10
Unlocking Using the Rear Gate....11
KEYLESS ENTRY . ............. 8
Automatic Door Locking/Unlocking . . 9
L
LANE DEPARTURE WARNING AND
PRE-COLLISION BRAKING SYSTEM
OFF................... 110
Lane Departure Warning OFF....110
Pre-Collision Braking OFF ......110
LATCH/ANCHOR . . ........... 53
LIGHT CONTROLS . ........... 37
Daytime Running Lights . .......38
Illumination Brightness . ........37
M
MAKING A CALL . . . .......... 84
MAPS . . . ................ 142
Arrival Distance/Time.........159
Canceling Guidance . . ........159
Creating Home/Work.........142
Finding a Destination By Address . . 146
Finding a Destination By POI . . . . 149
Guidance Screen Icons . .......157
Map Updates .............160
Map View/Perspectives . . . .....158
Map Zoom . . . . . . . . . ......157
Nearest Gas Station ..........159
Route Options . . . . . . . ......152
Saving Destination as a Favorite . . 154
Shortest/Fastest/Economic .....153
Traffic Information . ..........158
MAPS/NAVIGATION . . . ......... 98
Checking for Map Updates......98
INDEX
163